You know those days? The ones where you’re craving something truly decadent, something that feels like a warm hug in dessert form, but the thought of turning on the oven and dealing with a full baking project just feels… too much? Yeah, I know those days intimately. This no-bake Oreo Pie is my absolute lifesaver for exactly those moments. It’s so ridiculously easy, yet it tastes like you spent hours in the kitchen crafting something truly spectacular. My kids practically beg for this when they see me pulling out the Oreos, and honestly, I can’t blame them. It’s that rich, creamy, chocolatey goodness that just hits all the right spots. Think of it as the ultimate comfort dessert, a quick fix for a serious sweet tooth, and a guaranteed crowd-pleaser, all rolled into one glorious pie. It’s the kind of dessert that makes people say, “Wow, you MADE this?” and you get to smile knowingly because you know just how simple it truly was. It’s honestly my go-to for potlucks and last-minute get-togethers, and it never, ever disappoints. Forget those fancy, complicated desserts; this humble Oreo pie is where it’s at.

What is no bake oreo pie?
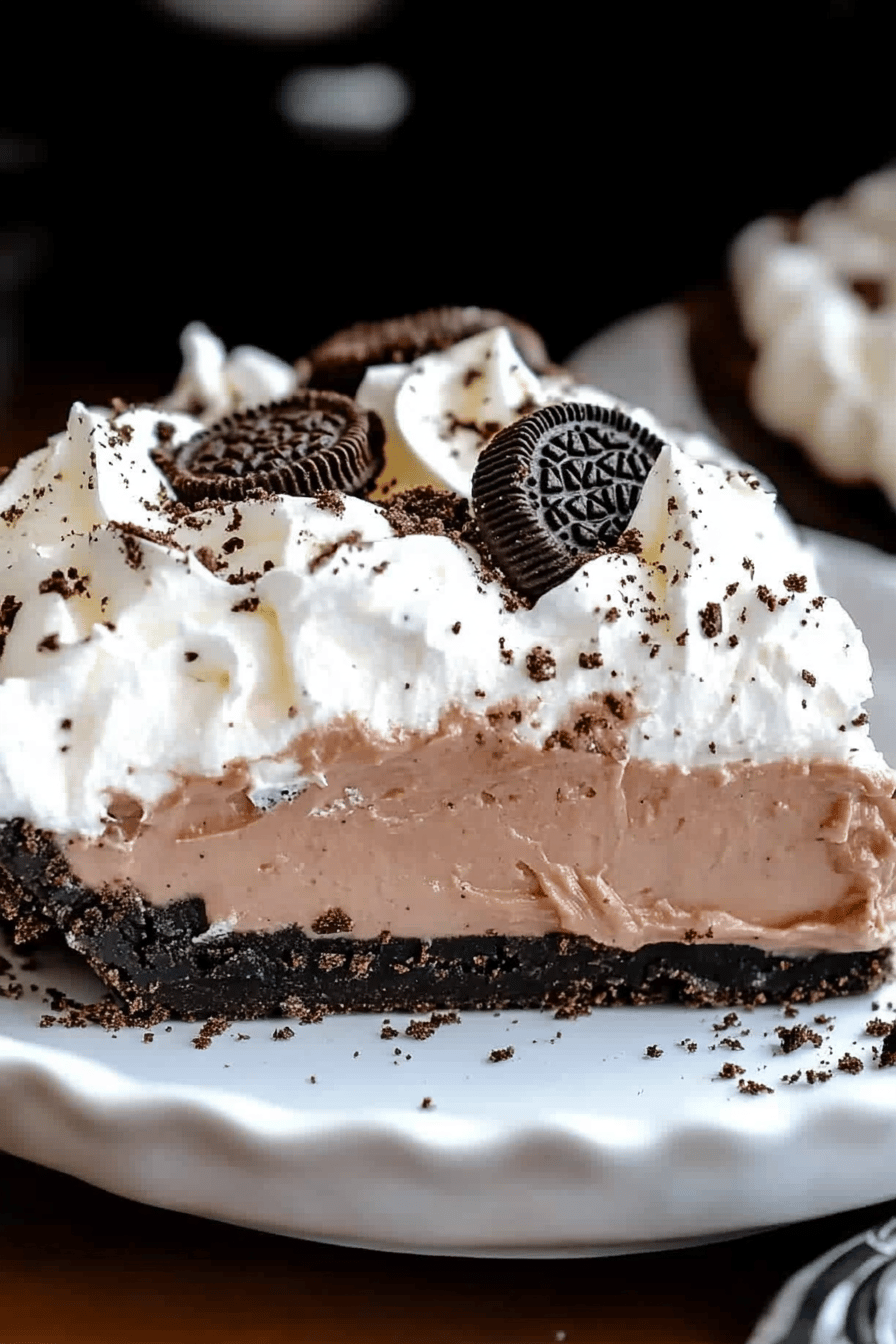
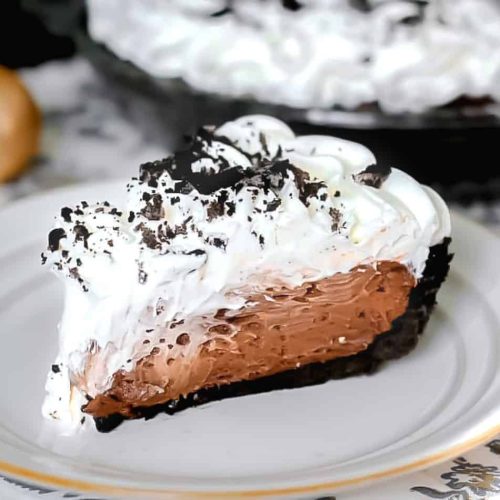
So, what exactly is this magical no-bake Oreo pie? Well, it’s exactly what it sounds like – a glorious celebration of all things Oreo, transformed into a stunning pie without ever needing to preheat your oven. The magic happens with a crust made from crushed Oreos and butter, which sets up beautifully in the fridge or freezer, providing the perfect crumbly base. Then, there’s the filling. Oh, the filling! It’s typically a dreamy, creamy concoction, often involving Cream Cheese, whipped topping, and, of course, more crushed Oreos. It’s smooth, rich, and that perfect balance of sweet and chocolatey that you’d expect from anything featuring those iconic cookies. Think of it as a super-fancy, incredibly delicious Oreo milkshake in pie form. It’s incredibly accessible; there’s no finicky pastry to worry about, no risk of underbaking or overbaking. It’s basically a foolproof way to get that intense Oreo flavor into a sliceable, dippable, utterly irresistible dessert. It’s a testament to how simple ingredients, when combined with a little love and the right technique, can create something truly extraordinary.
Why you’ll love this recipe?
There are so many reasons why this no-bake Oreo pie has become a staple in my kitchen, and I just know you’re going to adore it too. First off, let’s talk about that flavor explosion. It’s pure, unadulterated Oreo bliss. You get that unmistakable chocolate cookie crunch from the crust and those delicious cookie bits scattered throughout the silky smooth, creamy filling. It’s sweet, it’s chocolatey, and it has that satisfying richness that just makes you close your eyes and savor every single bite. But what I truly love most about this recipe is its sheer simplicity. Seriously, if you can crush cookies and whip some cream, you can make this pie. It’s a lifesaver on busy nights when you need a dessert, stat. And the cost-efficiency? Fantastic! Oreos are readily available and relatively inexpensive, and the other ingredients are pantry staples. You get a gourmet-tasting dessert without breaking the bank. Plus, it’s so versatile! Serve it as is, or get creative with toppings – chocolate shavings, extra cookie crumbles, a drizzle of hot fudge. It’s also a fantastic base for other flavor combinations if you’re feeling adventurous. Compared to baking a traditional Chocolate Cake or a complex dessert, this Oreo pie is a breeze, and the results are consistently stunning. It’s the kind of recipe that makes you feel like a baking superstar, even when you’ve barely broken a sweat.
How do I make no bake Oreo Pie?
Quick Overview
Making this no-bake Oreo pie is surprisingly straightforward. You’ll start by crushing a good amount of Oreos for both the buttery crust and the creamy filling. Then, you’ll mix those crushed cookies with melted butter to form your crust, press it into your pie plate, and let it chill to firm up. While that’s happening, you’ll whip up the luscious, smooth filling using Cream Cheese, whipped topping, and more of those delightful Oreo crumbles. Once your crust is firm, you’ll pour in that dreamy filling, smooth the top, and let the whole pie chill until it’s perfectly set. It’s a process that’s more assembly than intense cooking, making it perfect for beginners and busy bees alike. The magic really is in the chilling – that’s what transforms all these simple ingredients into a sliceable, scoopable masterpiece. It’s incredibly forgiving, so don’t stress too much about perfection; the deliciousness factor will carry it through!
Ingredients
For the Oreo Crust: For the Oreo Crust: For the Oreo Crust: For the Oreo Crust
Crushed Oreos: About 36-40 regular Oreos (or two sleeves from a family-size pack). I like to get them as fine as possible, almost like sand, but leaving a few slightly chunkier bits adds nice texture. You can use a food processor for this, or just pop them in a Ziploc bag and go at them with a rolling pin – it’s quite therapeutic!
Melted Butter: 6 tablespoons (about 3/4 of a standard stick). Unsalted is best so you can control the saltiness, but salted works too if that’s what you have on hand. The butter is key to binding everything together and giving that classic graham cracker crust vibe, but with chocolate!
Granulated Sugar: 2 tablespoons (optional). This just adds a touch more sweetness to the crust, but it’s not strictly necessary if your Oreos are already quite sweet.
Salt: A pinch. Just a tiny bit to balance out the sweetness.
For the Creamy Oreo Filling:
Cream Cheese: 8 ounces, softened. Make sure it’s softened to room temperature; this is crucial for a smooth, lump-free filling. Cold cream cheese is the enemy of creamy desserts! I always forget this step and have to microwave it for a few seconds.
Powdered Sugar: 1 cup, sifted. Sifting it prevents any little lumps from messing up that silky texture. It’s also called confectioners’ sugar or icing sugar, depending on where you are.
Vanilla Extract: 1 teaspoon. For that classic vanilla warmth that pairs so well with chocolate.
Cool Whip or Whipped Topping: 1 (8-ounce) tub, thawed. You can also make your own homemade whipped cream, but the Cool Whip makes this incredibly stable and easy. Just make sure it’s fully thawed!
Crushed Oreos: About 1 cup. These are for mixing into the filling itself. You can crush them a bit coarser than the crust for a nice chew, or keep them finer if you prefer. About 10-12 regular Oreos should do the trick.
Milk (Optional, for thinning if needed): A tablespoon or two. Sometimes my filling can get a bit too stiff, and a tiny splash of milk helps loosen it up perfectly.
For the Topping (Optional but Recommended!):
Whipped Cream: For piping or dolloping on top.
More Crushed Oreos or Oreo Crumbs: For dusting.
Chocolate Shavings or Mini Chocolate Chips: For that extra chocolaty punch.

Step-by-Step Instructions
Step 1: Preheat & Prep Pan
Okay, this step is a little different for a no-bake pie! You don’t need to preheat your oven at all, which is part of the magic, right? Grab a standard 9-inch pie plate. You don’t need to grease it; the butter in the crust will prevent sticking. Just have it ready to go. Make sure you have all your ingredients measured out and your Oreos crushed before you start mixing, as things move pretty quickly from here!
Step 2: Mix Dry Ingredients
First, let’s get that glorious crust ready. In a medium bowl, combine your finely crushed Oreos (I like to save a few larger chunks for sprinkling on top later!), the optional sugar, and that pinch of salt. Give it a good whisk to ensure everything is evenly distributed. This dry mix is the foundation of your delicious Oreo pie, so make sure it’s well combined before adding the wet ingredients.
Step 3: Mix Wet Ingredients
Now for the binder! Add the 6 tablespoons of melted butter to the dry Oreo mixture. Stir everything together with a fork or spatula until all the crumbs are moistened and the mixture resembles wet sand. It should clump together when you press it. If it seems too dry and won’t hold together, you can add another teaspoon or two of melted butter.
Step 4: Combine
This step is all about creating that perfectly pressed crust. Take about two-thirds of your crumb mixture and press it firmly into the bottom and up the sides of your pie plate. I find using the flat bottom of a measuring cup or a small glass works really well for getting an even, compact layer. Then, take the remaining one-third of the crumb mixture and press it around the outer rim of the pie plate for a decorative edge. This gives it a really nice, finished look! Once your crust is shaped, pop the pie plate into the freezer for at least 15-20 minutes, or into the refrigerator for about 30-40 minutes, to let it firm up while you make the filling. This chilling step is crucial for a sturdy crust that won’t crumble when you slice into it.
Step 5: Prepare Filling
Time for the star of the show: the creamy filling! In a large bowl, beat the softened cream cheese with an electric mixer until it’s completely smooth and creamy, with no lumps. This is the most important step for a silky filling, so don’t rush it. Add the sifted powdered sugar and beat again until well combined and fluffy. Now, stir in the vanilla extract. Gently fold in the thawed whipped topping until just combined. Be careful not to overmix at this stage; you want to keep it light and airy. Finally, gently fold in your roughly crushed Oreos for the filling. You want to see those delicious cookie pieces throughout the creamy base.
Step 6: Layer & Swirl
Once your crust is nice and firm from chilling, carefully spoon the creamy Oreo filling into the crust. Spread it out evenly with a spatula, making sure to get it right to the edges. If you like, you can reserve a few extra Oreo crumbles to sprinkle on top before chilling, or save them for garnish later. For an extra touch of elegance, you can swirl a little extra whipped topping or even a tablespoon of melted chocolate into the top of the filling before it chills, but honestly, it’s fantastic just as it is!
Step 7: Bake
No baking required for this recipe! The “baking” is done by the freezer or refrigerator. Just pop the assembled pie back into the freezer for at least 4 hours, or into the refrigerator for at least 6-8 hours (or ideally, overnight). The longer it chills, the firmer and easier to slice it will be. You’re looking for the filling to be set and firm to the touch.
Step 8: Cool & Glaze
Again, no oven cooling needed here! Once your pie is fully chilled and firm, it’s ready for its final touches. You can serve it directly from the fridge or freezer. If you want to add some extra flair, now is the time for your toppings! A generous swirl of whipped cream, a sprinkle of more Oreo crumbs, or some chocolate shavings makes it look extra special. I usually add the toppings just before serving so they stay looking their best.
Step 9: Slice & Serve
This is the moment of truth! To get clean slices, I highly recommend running your knife under hot water and wiping it dry between each cut. This helps the knife glide through the chilled filling and crust beautifully. Serve immediately and prepare for happy sighs and empty plates. This Oreo pie is best enjoyed cold, so make sure it stays chilled until you’re ready to dig in!
What to Serve It With
This no-bake Oreo pie is so incredibly versatile, it fits into almost any occasion! For a truly indulgent breakfast (because who says dessert can’t be breakfast sometimes?), a small slice with a strong, hot cup of coffee is pure heaven. The bitterness of the coffee cuts through the richness of the pie beautifully. The coffee can be a simple drip brew, or if you’re feeling fancy, a latte or cappuccino. For brunch, it’s a showstopper. Imagine this on a beautiful platter surrounded by fresh berries – raspberries and strawberries are particularly lovely here, offering a bright, fresh contrast. A mimosa or a glass of sparkling cider pairs wonderfully. As a dessert, well, it truly shines. It’s the perfect finale to a hearty meal. I love serving it with a scoop of vanilla bean ice cream for an extra layer of creamy goodness. For those cozy snack moments, maybe on a rainy afternoon or a late-night craving, a generous slice on its own is just perfect. Sometimes, I’ll even drizzle a little caramel sauce over the top for an added layer of flavor. My family tradition is to always have a little extra whipped cream on the side, and everyone can add as much as they want. It’s these simple touches that make it feel extra special, even when it’s just us at home.
Top Tips for Perfecting Your No-Bake Oreo Pie
Over the years of making this Oreo pie (and trust me, there have been many!), I’ve picked up a few tricks that I think really elevate it. For the crust, the key is getting those Oreos crushed really fine – almost like sand. If you have chunks, they can make the crust fall apart. A food processor is your best friend here, but if you don’t have one, a sturdy Ziploc bag and a rolling pin work wonders! Press the crust down firmly and evenly into the pie plate; this is super important for structural integrity. I always use a flat-bottomed glass or measuring cup to really compact it. For the filling, the cream cheese *must* be softened. I can’t stress this enough! If it’s cold, you’ll end up with lumps, and no one wants that in a smooth, creamy pie. Beat it until it’s totally smooth *before* adding anything else. When you fold in the whipped topping, be gentle. You want to keep that airy, light texture. Overmixing will deflate it, making your filling dense. I learned this the hard way after one too many “heavy” pies! As for the crushed Oreos in the filling, I like to chop them a bit coarser than the crust so you get nice little pockets of cookie goodness. Experiment with how coarse you like them! If your filling seems a bit too stiff after mixing everything, don’t be afraid to add a tablespoon or two of milk to loosen it up to a more spreadable consistency. For chilling, patience is key. While 4 hours in the freezer will set it, I truly find that chilling it overnight in the refrigerator yields the absolute best texture – it’s firm enough to slice cleanly without falling apart. I’ve tried making it with different types of chocolate sandwich cookies, and while they work, nothing quite beats the classic Oreo flavor for this pie. Trust me on this one! And if you’re worried about serving temperature, I find it’s best when it’s fully chilled, but not rock-solid frozen. A few minutes out of the freezer before slicing can work wonders if you’ve had it in there for a while.
Storing and Reheating Tips
This no-bake Oreo pie is wonderfully forgiving when it comes to storage, which is one of its many perks! If you happen to have any leftovers (which is rare in my house!), storing it is simple. At room temperature, it’s best to keep it covered loosely with plastic wrap or foil for no more than 1-2 hours. Because it has dairy and cream cheese in it, you don’t want it sitting out too long, especially if your kitchen is warm. For longer storage, the refrigerator is your best friend. Pop it into an airtight container or cover the pie plate tightly with plastic wrap. It will stay delicious in the fridge for up to 3-4 days. The crust might soften slightly over time, but it’s still really good. If you’re really trying to make it last, or you just want a cool treat on hand, you can freeze this pie! Wrap it tightly in a layer of plastic wrap, then a layer of aluminum foil, to prevent freezer burn. It can last in the freezer for about 1-2 months. When you want to serve it from frozen, I recommend taking it out of the freezer and letting it thaw in the refrigerator for a few hours, or on the counter for about 30-60 minutes, until it’s sliceable but still nice and cold. Regarding the glaze, I always add any whipped cream or decorative toppings *after* the pie has been thawed or is ready to be served. If you put whipped cream on before freezing or long-term refrigeration, it can weep and lose its fluffy texture.
Frequently Asked Questions
Final Thoughts
So there you have it – my ultimate no-bake Oreo pie recipe! It’s honestly one of those recipes that just makes me happy every time I make it, and even happier when I see other people enjoying it. It’s the perfect balance of rich, chocolatey flavor and creamy, dreamy texture, all without the stress of baking. It proves that you don’t need a complicated process to create something truly spectacular. If you love Oreos, you’re going to fall head over heels for this. I really hope you give this a try. It’s been a recipe that has brought so much joy to my table, and I’m thrilled to share it with you. If you do make it, please let me know how it turns out in the comments below! I’d love to hear about your experience, any variations you tried, or how quickly it disappeared. Happy baking (or rather, happy no-baking)! Don’t forget to share your creations with me – I live for seeing your kitchen triumphs!
Oreo Pie
Ingredients
Crust
- 36 cookies Oreo cookies finely crushed
- 6 tablespoons unsalted butter melted
Filling
- 1 package cream cheese softened
- 0.5 cup powdered sugar
- 1 cup heavy whipping cream cold
- 1 teaspoon vanilla extract
- 24 cookies Oreo cookies chopped
Toppings (Optional)
- whipped cream
- Oreo crumbs
Instructions
Preparation Steps
- In a medium bowl, combine the crushed Oreo cookies and melted butter. Press the mixture evenly into the bottom and up the sides of a 9-inch pie plate.
- In a large bowl, beat the softened cream cheese and powdered sugar until smooth.
- In a separate bowl, whip the cold heavy cream with the vanilla extract until stiff peaks form. Gently fold the whipped cream into the cream cheese mixture.
- Fold in the chopped Oreo cookies.
- Spoon the filling into the prepared crust and spread evenly.
- Refrigerate for at least 2 hours, or until firm. Garnish with whipped cream and Oreo crumbs if desired before serving.