


Oh, you know those nights? The ones where you’re just *craving* something sweet, something nostalgic, something that feels like a warm hug in edible form, but the thought of turning on the oven feels like too much effort? Yeah, me too. That’s exactly how this recipe for Nutella Rice Krispie Treats came to be. I was staring into my pantry, dreaming of gooey, marshmallowy goodness, but also trying to be realistic about my energy levels. Suddenly, my eyes landed on a jar of Nutella, and it was like a lightbulb went off! Why not combine the pure joy of a classic Rice Krispie treat with the decadent, hazelnutty magic of Nutella? It’s not a whole new invention, of course, but this particular combination? It’s become my absolute go-to, my secret weapon for satisfying those sweet cravings in under 15 minutes. Honestly, it’s just as easy as the original, maybe even easier, and the flavor payoff is HUGE. Forget boring old squares; these Nutella Rice Krispie treats are a game-changer.
What are Nutella Rice Krispie Treats?
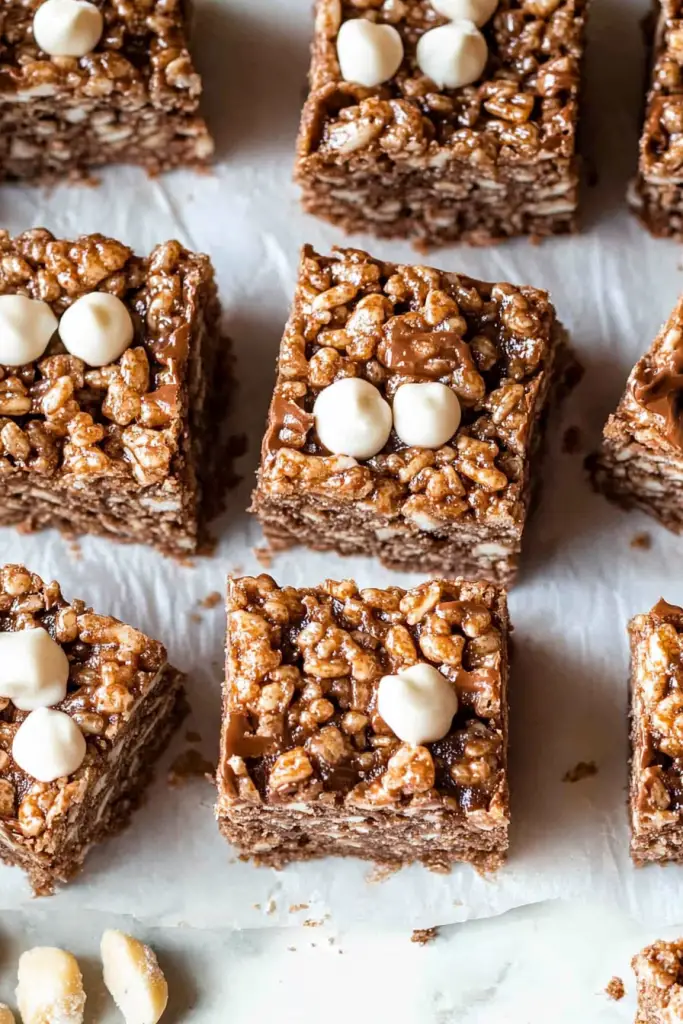
So, what exactly *are* these magical little squares? Think of your favorite childhood Rice Krispie Treats, but with a serious upgrade. We’re talking that perfect chewy, slightly crispy texture from the cereal and marshmallows, but with a rich, creamy layer of Nutella swirled right in. It’s not just a topping; it’s integrated into the whole delicious experience. The name pretty much says it all, right? It’s the classic, beloved treat you grew up with, infused with the irresistible, unmistakable flavor of Nutella. It’s essentially a celebration of two universally loved comfort foods coming together in perfect harmony. This isn’t complicated baking; it’s pure, unadulterated joy in a simple, no-bake package. It’s the kind of thing that makes people say, “Wow, how did you make these?!” and then I just smile and say, “It’s my little secret!” but then I share it because that’s what friends do.
Why you’ll love this recipe?
There are so many reasons why this Nutella Rice Krispie treat recipe has earned a permanent spot in my recipe binder, and I just know you’re going to fall in love with it too. First and foremost, let’s talk about the flavor. That deep, roasted hazelnut and cocoa blend of Nutella just elevates the whole experience from “sweet snack” to “decadent delight.” It’s comforting, it’s a little bit indulgent, and it hits all the right notes. And the texture? Oh my goodness. You still get that amazing chewiness from the perfectly melted marshmallows, but the Nutella adds this extra layer of creamy richness that is just out of this world.
Then there’s the simplicity. Seriously, this is a lifesaver on busy nights or when unexpected guests pop over. You can whip these up in less time than it takes to make a cup of tea. No baking, no fancy equipment, just a few basic ingredients and a microwave or stovetop. It’s the kind of recipe that even the most novice baker can tackle with confidence. Plus, it’s incredibly budget-friendly. Cereal, marshmallows, butter, and a jar of Nutella – these are all pantry staples for most of us, making it an affordable way to create something truly special.
And the versatility! While they’re amazing as is, you can totally customize them. Want to add some chocolate chips? Go for it! A sprinkle of sea salt on top? Perfection. Serve them at a kids’ party, or pair them with a sophisticated dessert wine for an adult gathering. They’re a winner every single time. What I love most, though, is the sheer joy they bring. Seeing the smiles on my family’s faces when I pull out a batch of these is priceless. They’re not just a dessert; they’re little pockets of happiness.
How do you make Nutella Rice Krispie Treats?
Quick Overview
This recipe is all about speed and simplicity. We’re essentially melting marshmallows and butter together, stirring in that glorious Nutella, and then folding in the crispy rice cereal. It’s a straightforward, no-fuss process designed to get you to that delicious, chewy treat as quickly as possible. You’ll be amazed at how easily these come together, and the minimal cleanup is definitely a huge bonus! It’s the perfect recipe for when you need a quick fix of Comfort Food.
Ingredients
For the Main Treat Base:
- 6 cups crispy rice cereal (this is the standard size box, usually enough)
- 10 ounces mini marshmallows (about 40 cups, or one large bag – I find mini melt faster!)
- 4 tablespoons unsalted butter (you can use salted if that’s what you have, but unsalted gives you more control)
For the Nutella Swirl:
- 1 cup Nutella (this is the star, so don’t skimp on quality or quantity!)
Step-by-Step Instructions
Step 1: Prep Your Pan
Grab a 9×13 inch baking pan. Lightly grease it with butter or cooking spray, or line it with parchment paper, leaving some overhang on the sides. This little bit of prep is crucial to prevent your treats from sticking. Trust me, you don’t want to be scraping hardened marshmallow off your pan!
Step 2: Melt the Marshmallows and Butter
In a large microwave-safe bowl, combine the butter and mini marshmallows. Microwave on high for about 1 minute, stir, then microwave in 30-second intervals, stirring after each, until everything is melted and smooth. Alternatively, you can do this in a large saucepan over low heat on the stovetop, stirring constantly until melted and smooth. Be patient; you don’t want to scorch the marshmallows!
Step 3: Stir in the Nutella
Once the marshmallows and butter are fully melted and creamy, add the entire cup of Nutella. Stir it in with a spatula until it’s completely incorporated and the mixture is a beautiful, uniform hazelnut-brown color. It will smell absolutely divine at this point!
Step 4: Add the Cereal
Pour the crispy rice cereal into the bowl with the marshmallow-Nutella mixture. Gently fold everything together with a spatula until the cereal is evenly coated. Don’t overmix, or you’ll break down the cereal too much.
Step 5: Press into Pan
Transfer the mixture to your prepared baking pan. Using a spatula lightly greased with butter or cooking spray, or even just your hands (lightly greased is best!), gently press the mixture evenly into the pan. Don’t press too hard, or your treats will be dense and hard. You want them to be nice and chewy!
Step 6: Cool and Set
Let the treats cool completely at room temperature. This usually takes about 1-2 hours. Resist the urge to cut them too early, or they might fall apart.
Step 7: Slice and Serve
Once cooled, lift the treats out of the pan using the parchment paper overhang, or cut them directly in the pan. Slice into squares or rectangles with a sharp knife. Enjoy your amazing Nutella Rice Krispie treats!
What to Serve It With
These Nutella Rice Krispie treats are so versatile, they can fit into almost any occasion! They’re not just a standalone treat; they can be part of a bigger picture.
For Breakfast: Honestly, who says you can’t have a little indulgence in the morning? I love cutting these into smaller squares and serving them alongside a strong cup of coffee. It’s like a little treat to start the day, especially on weekends when you have a bit more time to relax. They pair surprisingly well with a fresh fruit salad, adding that sweet counterpoint.
For Brunch: Elevate your brunch spread! Arrange these on a tiered stand with other pastries, mini quiches, and fresh fruit. They add a fun, kid-friendly (and adult-friendly!) element to a more sophisticated spread. A mimosa or a fancy latte would be the perfect beverage pairing.
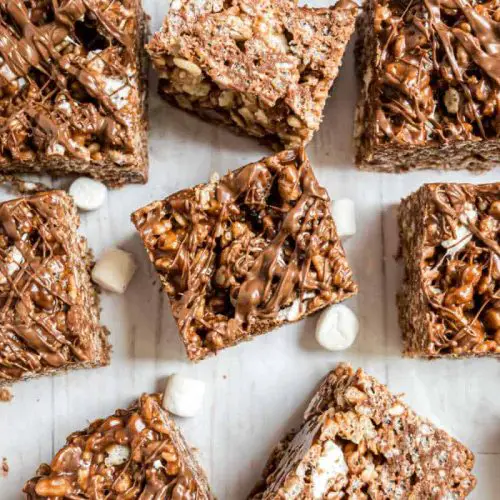
As Dessert: These are fantastic on their own, of course, but they can also be a delightful component of a dessert buffet. Imagine them nestled alongside brownies, cookies, or even a slice of cake. For a more grown-up dessert, I sometimes like to drizzle a little extra melted chocolate or a sprinkle of flaky sea salt over the top. They’re also surprisingly good crumbled over ice cream or yogurt!
For Cozy Snacks: This is probably their most natural habitat. They are the ultimate cozy snack. Curl up on the couch with a glass of milk (or hot chocolate, if you’re feeling extra indulgent!) and a handful of these. They’re perfect for movie nights, after-school snacks for the kids, or just a little pick-me-up during a busy day. My kids ask for these all the time when they get home from school!
My family loves having these during our weekend movie nights. We’ll make a big batch on Saturday morning, and they disappear by Sunday evening. They’re just that good!
Top Tips for Perfecting Your Nutella Rice Krispie Treats
I’ve made these Nutella Rice Krispie treats more times than I can count, and over the years, I’ve picked up a few little tricks that help make them absolutely perfect every single time. You can trust me on these!
Marshmallow Melting Matters: The key to a perfectly chewy treat is not to overcook or scorch the marshmallows. When you’re melting them, stir frequently and use low to medium heat if you’re on the stovetop. For the microwave, start with shorter bursts and stir in between. You want them smooth and gooey, not tough and rubbery. If they look a little stiff, a few more seconds of gentle heat should do the trick.
Don’t Skimp on the Nutella: Use a full cup of Nutella. I know it might seem like a lot, but it’s what gives these their signature flavor and incredible creamy texture. If you use less, you might end up with a treat that’s too dry or doesn’t have enough of that hazelnut goodness. I’ve tried cutting back to save calories and it was NOT worth it!
Gentle Press is Best: When you’re pressing the cereal mixture into the pan, resist the urge to compact it down with all your might. This is a common mistake that leads to hard, dense treats. Instead, use light, even pressure. A lightly greased spatula or your hands are your best friends here. You want them to hold together, but still be delightfully chewy.
Butter is Your Friend (for Greasing): When it comes time to press the mixture into the pan, lightly greasing your spatula or hands with a little butter or cooking spray makes all the difference. It prevents sticking and helps you get a smooth, even surface without tearing the treats apart.
Patience for Cooling: This is a tough one, I know! The smell alone will have you wanting to dig in immediately. But letting them cool completely at room temperature is crucial. If you try to cut them while they’re still warm, they’ll be too gooey and messy, and they won’t hold their shape. About an hour to two hours is usually sufficient.
Cereal Quality Counts: While you can technically use any brand of crispy rice cereal, I find that the name-brand ones tend to hold their crispness a little better. It’s not a huge difference, but if you want the best texture, it’s worth considering.
Temperature is Key for Swirling (if you decide to swirl): While this recipe fully incorporates the Nutella, if you decide to do a more distinct swirl on top, make sure your Nutella is spreadable but not hot. Too hot, and it will melt into the marshmallow mixture too much; too cold, and it won’t spread nicely. For this recipe, just stirring it in until fully combined is the easiest and most foolproof method.
Don’t Overmix the Cereal: Once the cereal is in the bowl, fold it gently. Overmixing can break down the cereal into tiny pieces, which will result in a less pleasant texture. You want those recognizable crispy rice puffs!
Storing and Reheating Tips
Properly storing your Nutella Rice Krispie treats is key to keeping them fresh and delicious. Here’s what I’ve learned works best:
Room Temperature Storage: This is generally the best way to store them if you plan to eat them within a few days. Once they are completely cooled and cut, store them in an airtight container. You can layer them between sheets of parchment paper or wax paper to prevent them from sticking together. They’ll stay fresh and chewy at room temperature for up to 3-4 days. Avoid storing them in a humid environment, as this can make them soggy.
Refrigerator Storage: While you *can* refrigerate them, I don’t usually recommend it unless your kitchen is exceptionally warm. Refrigeration can sometimes make them a bit too hard and less chewy. If you do need to refrigerate them, make sure they are in an airtight container. They’ll last longer in the fridge, about a week, but you might want to let them sit out at room temperature for about 15-20 minutes before serving to soften them up a bit.
Freezer Instructions: These freeze surprisingly well! If you want to make a big batch and save some for later, this is the way to go. Cut the treats into individual portions and wrap each one tightly in plastic wrap, then place them in a freezer-safe bag or airtight container. They can be stored in the freezer for up to 2-3 months. Thaw them overnight at room temperature. They should retain their chewy texture really well.
Glaze Timing Advice: Since this recipe fully incorporates the Nutella into the base, there’s no separate glaze to worry about. However, if you were to add a drizzle of melted chocolate or a sprinkle of sea salt on top, I’d recommend doing that *after* the treats have cooled and set, just before serving or storing. If you freeze them with a chocolate drizzle, the chocolate might become brittle and could crack upon thawing.
I’ve had great success freezing batches for birthday parties and just for having a quick sweet treat on hand. They’re a lifesaver!
Frequently Asked Questions
- Drizzle melted chocolate (milk, dark, or white) over the cooled treats.
- Dust them lightly with powdered sugar for a delicate finish.
- Sprinkle some flaky sea salt over the top right after pressing them into the pan – this is my favorite way to add a little complexity!
- You could also add a swirl of caramel sauce on top before they set.
The beauty of these is they are fantastic just as they are!
Final Thoughts
So there you have it – my absolute favorite Nutella Rice Krispie treats! I truly hope you give this recipe a try. It’s more than just a simple no-bake treat; it’s a shortcut to pure happiness, a little bite of nostalgia with a modern, decadent twist. The way the creamy Nutella melds with the gooey marshmallows and crunchy cereal is just pure magic. It’s the kind of recipe that makes you feel like a kitchen hero without any of the fuss.
If you love this recipe, you might also enjoy my Double Chocolate Chip Cookies or my Easy No-Bake Peanut Butter Balls – they have that same spirit of simple, delicious comfort food.
I can’t wait to hear what you think of these Nutella Rice Krispie treats! Please leave a comment below and let me know how yours turned out. Did you add anything extra? What did your family think? Sharing your own tips and tricks is always so inspiring! Happy baking (or in this case, no-baking)!
Nutella Rice Krispie Treats
Ingredients
Main Ingredients
- 3 tablespoons butter
- 10 ounces mini marshmallows
- 6 cups Rice Krispies cereal
- 0.5 cup Nutella
Instructions
Preparation Steps
- Grease a 9x13 inch baking pan with cooking spray or butter.
- In a large microwave-safe bowl, melt the butter. Add the mini marshmallows and microwave in 30-second intervals, stirring in between, until fully melted and smooth.
- Stir in the Nutella until well combined with the marshmallow mixture.
- Add the Rice Krispies cereal to the bowl and stir until evenly coated.
- Spread the mixture evenly into the prepared baking pan. You can lightly butter your hands or use a spatula to press it down.
- Let cool for at least 30 minutes before cutting into squares.


