


There are some recipes that just hug you from the inside out, aren’t there? The ones that smell like your childhood, evoke cozy memories, and instantly make any day a little brighter. For me, that’s hands down my Mom’s fudge. It’s not just any fudge; it’s *the* fudge. The kind that melts in your mouth, rich and decadent, with just the perfect whisper of vanilla. It’s surprisingly simple, which is a lifesaver when you need a sweet fix but don’t want to spend hours in the kitchen. Honestly, I’ve tried so many other fudge recipes over the years – some fancy, some quick – but none ever quite capture that same magic. This Mom’s fudge is the gold standard, the one I always come back to, and the one that always gets rave reviews. It’s like a warm hug in dessert form, and if you’re anything like me, you’re going to fall head over heels for it.
What is Mom’s Fudge?
So, what exactly is this magical stuff? Think of Mom’s fudge as the ultimate comfort dessert, elevated just a touch. It’s a rich, creamy, chocolatey confection that’s surprisingly easy to whip up. The name itself, “Mom’s Fudge,” isn’t just a label; it’s a testament to its legacy. It’s the recipe that’s been passed down, tweaked just a little bit over the years, but always holds onto that core deliciousness. It’s essentially a no-bake wonder, relying on a few key ingredients cooked to the perfect temperature to achieve that signature smooth, melt-in-your-mouth texture. It’s not overly complicated like some candy-making can be; it’s the kind of treat that makes you feel like you’ve accomplished something special without the fuss. It’s the perfect balance of sweet, chocolatey goodness that’s incredibly satisfying.
Why you’ll love this recipe?
Oh, where do I even begin with why this Mom’s fudge is a total winner? First off, the flavor is absolutely divine. It’s intensely chocolatey without being bitter, and it has this smooth, velvety texture that’s just pure bliss. It’s the kind of fudge that makes you close your eyes with the first bite. And let’s talk about simplicity – this recipe is shockingly easy. You don’t need any fancy candy thermometers or complicated techniques. If you can stir, you can make this fudge! It’s a lifesaver for last-minute guests or when you’re just craving something sweet after dinner. Plus, it’s incredibly budget-friendly. The ingredients are all pantry staples, so you don’t need to break the bank to make a batch. What I love most is its versatility. While it’s phenomenal on its own, it’s also perfect for gifting, adding to cookie platters, or even crumbling over Ice Cream. Compared to some other no-bake options, this fudge has a substance and a richness that really stands out. It’s the perfect sweet treat when you don’t have hours to bake a cake but want something truly special.
How do I make mom’s fudge?
Quick Overview
Making Mom’s fudge is a straightforward process that requires just a little attention to detail. You’ll basically be combining sugar, butter, and milk, bringing it to a boil, then adding in your chocolate and vanilla off the heat. The key is the cooking time and temperature, which ensures that perfect creamy texture. Once mixed, it’s poured into a prepared pan, cools, and sets up beautifully. It’s a truly satisfying recipe because you see and smell the magic happening right on the stovetop.
Ingredients
For the Main Batter:
3 cups granulated sugar: This is the base of our fudge, providing sweetness and structure. Make sure it’s granulated sugar; other types can alter the texture. I always use store-brand and it works perfectly.
3/4 cup unsalted butter: Using unsalted butter gives you control over the saltiness. Make sure it’s softened slightly but not completely melted.
1 (12-ounce) can evaporated milk: Don’t use regular milk! Evaporated milk has a higher concentration of milk solids and fat, which is crucial for that super smooth, creamy texture. It’s a little secret weapon.
1 teaspoon vanilla extract: Pure vanilla extract is key for that classic, comforting flavor. Don’t skimp on this!
1 cup semi-sweet chocolate chips: You can use milk chocolate too if you prefer it sweeter, but semi-sweet gives a lovely rich flavor that isn’t too overpowering.
Step-by-Step Instructions
Step 1: Preheat & Prep Pan
First things first, let’s get our pan ready. You’ll need an 8×8 inch baking pan. Lightly grease it with butter or cooking spray, or even better, line it with parchment paper, leaving some overhang on the sides. This makes lifting the fudge out so much easier later on. Trust me, dealing with sticky fudge stuck to the pan is NOT fun!
Step 2: Mix Dry Ingredients
In a heavy-bottomed saucepan (this is important to prevent scorching!), combine the granulated sugar, unsalted butter, and evaporated milk. Stir them together over medium heat until the butter is melted and the sugar is mostly dissolved. You want to make sure everything is well incorporated before you move on.
Step 3: Mix Wet Ingredients
This step really involves the magic happening on the stovetop. Once the sugar is dissolved and the butter is melted in the saucepan, you’ll bring the mixture to a rolling boil over medium heat. A “rolling boil” means it’s bubbling vigorously and won’t stop when you stir it. This is where the cooking really begins!
Step 4: Combine
This isn’t really a combination step as much as it is about cooking the base. Bring the sugar, butter, and evaporated milk mixture to a rolling boil over medium heat. Once it reaches that rolling boil, let it boil for exactly 5 minutes, stirring constantly. This is critical! Too short, and your fudge won’t set; too long, and it can get grainy. So, set a timer and stir! After 5 minutes, remove the pan from the heat.
Step 5: Prepare Filling
Now, while the base is still hot, stir in the semi-sweet chocolate chips and the vanilla extract. Stir gently but thoroughly until the chocolate chips are completely melted and the mixture is smooth and glossy. It will smell amazing at this point – that rich chocolate aroma is a sure sign you’re on the right track!
Step 6: Layer & Swirl
This step is more about pouring and letting gravity do its thing! Pour the warm fudge mixture into your prepared 8×8 inch pan. Spread it out evenly with a spatula. At this point, you can add any optional add-ins like chopped nuts or marshmallows if you like. I usually just leave it plain, but walnuts are a classic addition.
Step 7: Bake
Good news! There’s no baking involved for this fudge. It sets up at room temperature. So, after you’ve poured it into the pan and smoothed the top, the only thing left is to let it cool and set.
Step 8: Cool & Glaze
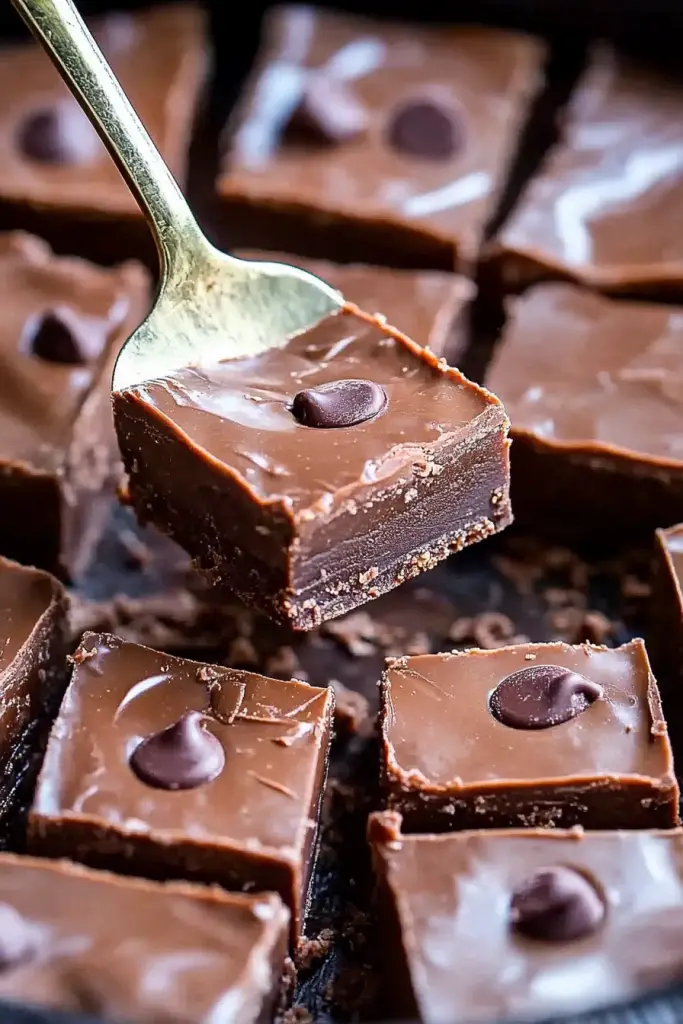
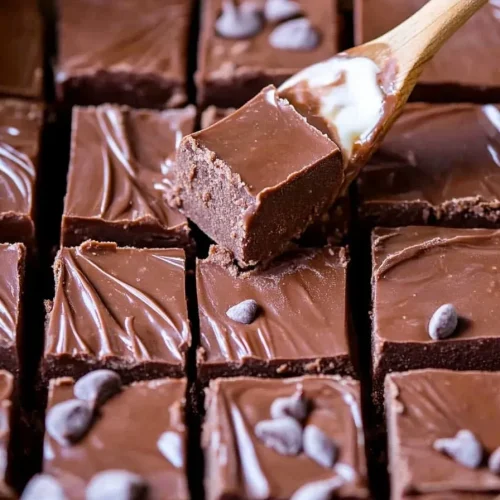
This is the patience test! Let the fudge cool at room temperature for at least 2-3 hours, or until it’s completely firm to the touch. Resist the urge to put it in the fridge too early, as this can sometimes affect the texture. Once it’s set, you can lift it out of the pan using the parchment paper overhang. Then, cut it into squares. You don’t need a glaze for this fudge; the rich chocolate is the star!
Step 9: Slice & Serve
Once the fudge is fully set, you can cut it into bite-sized squares. A sharp knife helps get clean cuts. I usually aim for about 1-inch squares, but you can make them as big or small as you like. Serve it at room temperature for the best creamy texture. It’s perfect for enjoying with a cup of coffee or a glass of cold milk!
What to Serve It With
This Mom’s fudge is so wonderfully versatile, it pairs beautifully with almost anything! For breakfast, it’s a decadent little treat alongside a strong cup of coffee. Imagine a tiny square alongside your morning brew – pure indulgence! For brunch, it’s a showstopper on a dessert platter. I love serving it alongside fresh fruit or a light yogurt parfait. It adds that touch of sweetness without being too heavy for a mid-morning meal. As a dessert, it’s obviously a home run. Serve it after dinner with a scoop of Vanilla Bean ice cream, or perhaps with a drizzle of raspberry sauce for a delightful contrast. For those cozy snack moments, it’s just perfect on its own, maybe with a tall glass of cold milk. My family loves it when I break out a batch on movie nights, and it’s always a hit at holiday gatherings. It’s the kind of treat that just brings people together.
Top Tips for Perfecting Your Mom’s Fudge
I’ve made this Mom’s fudge countless times, and over the years, I’ve picked up a few tricks that I think really make a difference. So, here are my top tips to ensure your fudge turns out absolutely perfect every single time. First, about the saucepan: always use a heavy-bottomed one. This distributes heat evenly and is crucial to prevent scorching the sugar mixture. I learned that the hard way once, and the taste of burnt sugar is something you don’t forget! For the cooking part, the 5-minute boil is non-negotiable. Make sure you’re stirring *constantly* during that time to ensure even cooking and prevent crystallization. I use a silicone spatula because it scrapes the bottom of the pan really well. When it comes to the chocolate, using good quality semi-sweet chips makes a noticeable difference in flavor. If you want a richer, darker fudge, you can use Dark Chocolate chips, but be aware it might be less sweet. For a creamier texture, ensure your butter is softened but not melted when you start, and definitely use evaporated milk – it’s a game-changer. If your fudge seems a little too soft after it’s cooled, it might mean it didn’t boil long enough. If it’s too hard or crumbly, it likely boiled for too long or at too high a temperature. Don’t be afraid to experiment with add-ins like chopped walnuts or pecans; they add a lovely crunch. Just stir them in when you add the chocolate. And finally, for cutting, a warm knife can sometimes help get cleaner edges, especially if the fudge is very firm. Just dip your knife in hot water and dry it before slicing. These little things might seem minor, but they truly elevate your Mom’s fudge from good to absolutely unforgettable.
Storing and Reheating Tips
Keeping your Mom’s fudge fresh and delicious is pretty simple. For room temperature storage, once it’s fully set, you can keep it in an airtight container for up to a week. I usually line the container with parchment paper too, just to prevent any sticking. It stays wonderfully creamy at room temperature, which is how I prefer to enjoy it. If you live in a very warm climate or need to store it for longer, the refrigerator is your friend. Place the cut pieces in an airtight container, separating layers with parchment paper if needed. It will last for about 2-3 weeks in the fridge, but be aware that it might become a bit firmer. To bring it back to that perfect creamy texture, just let it sit out at room temperature for about 30 minutes before serving. Freezing is also an option for longer storage. Wrap individual pieces tightly in plastic wrap, then place them in a freezer-safe bag or airtight container. It should last for up to 3 months. To thaw, transfer the fudge to the refrigerator overnight, then let it come to room temperature. I don’t recommend reheating this fudge in a microwave or oven as it can easily melt or become grainy. The beauty of this fudge is its perfect texture achieved through cooling and setting, so letting it come back to room temp is usually all you need.
Frequently Asked Questions
Final Thoughts
There you have it – my Mom’s unforgettable fudge. It’s more than just a sweet treat; it’s a little piece of my heart, a taste of home, and proof that sometimes, the simplest recipes are the most magical. The way it melts in your mouth, the rich chocolate flavor, and the sheer ease of making it – it all adds up to something truly special. I’ve shared this recipe with so many people over the years, and seeing their faces light up when they try it is always the best reward. If you love rich, decadent, melt-in-your-mouth chocolate, then you absolutely have to give this a try. And hey, if you’re a fan of this kind of comforting, classic dessert, you might also enjoy my recipe for [Link to another popular recipe on your blog, e.g., “Classic Chocolate Chip Cookies”] or my [Link to another popular recipe on your blog, e.g., “Easy No-Bake Peanut Butter Bars”]! I can’t wait to hear how your Mom’s Fudge turns out! Please leave a comment below and let me know what you think, or share any fun variations you tried. Happy baking, friends!
Mom's Classic Fudge
Ingredients
Main Ingredients
- 2 cups granulated sugar
- 0.5 cup butter unsalted
- 0.33 cup milk evaporated
- 1.5 cups chocolate chips semi-sweet
- 1 teaspoon vanilla extract
- 1 cup chopped nuts optional (walnuts or pecans)
Instructions
Preparation Steps
- Grease an 8x8 inch pan and set aside.
- In a heavy-bottomed saucepan, combine sugar, butter, and evaporated milk. Stir constantly over medium heat until sugar is dissolved.
- Bring the mixture to a boil, stirring occasionally. Continue to boil for 5 minutes.
- Remove from heat. Stir in chocolate chips until melted and smooth.
- Stir in vanilla extract and nuts (if using).
- Pour the mixture into the prepared pan. Let it cool completely before cutting into squares.


