


There’s something about the smell of shrimp sizzling on a grill that instantly takes me back to long, sunny afternoons with my family, laughter filling the air and a cold drink in hand. I remember the first time I tried grilled shrimp skewers; the burst of smoky, garlicky flavor combined with a hint of citrus was like a flavor party in my mouth. It’s one of those recipes that feels fancy enough for a weekend BBQ but comes together super quickly, which is a lifesaver on busy weeknights. If you’re like me and always hover between ordering takeout or cooking, grilled shrimp skewers might just nudge you toward picking up those skewers and grilling like a pro. Trust me, once you nail this, you won’t look at shrimp the same way again.
What is grilled shrimp?
Think of grilled shrimp skewers as little bites of paradise threaded onto a stick and kissed by flames. It’s essentially shrimp marinated in a medley of seasonings, then threaded onto skewers for easy grilling. The skewers part isn’t just for show — it keeps the shrimp perfectly aligned for even cooking and makes serving a breeze, especially if you’re entertaining. The concept feels so fresh and simple that it’s a great intro to grilling if you’re new at it, and way less intimidating than firing up a whole grill for steaks or brats. Plus, shrimp cooks faster than most proteins, meaning dinner can be ready almost as fast as you can peel the little guys.
Why you’ll love this recipe?
What I love most about these grilled shrimp skewers is how effortlessly they pack a punch of flavor. The marinade is like a little magic potion—bright with lemon, punchy with garlic, and if you toss in some chili flakes, you get this amazing subtle heat that keeps you coming back for more. The shrimp itself gets this beautiful caramelized crust from the grill, giving it a slight smoky touch that pairs with almost anything. Beyond taste, there’s a real simplicity at work here. These skewers take maybe 30 minutes from start to finish, making weeknight dinners feel gourmet without requiring hours of your time. Plus, they’re incredibly wallet-friendly—shrimp doesn’t have to be expensive if you keep an eye out for sales or buy frozen. I often switch up the marinade flavors, sometimes adding fresh herbs or swapping citrus types, keeping this recipe exciting every time.
Also, these skewers are endlessly versatile. I serve them over a fresh summer salad, alongside rice pilaf, or even tucked into warm pita with tzatziki when I’m feeling Mediterranean-inspired. It’s exciting to mix and match sides, because grilled shrimp skewers adapt so well. It’s like the Swiss Army knife of easy dinners in my kitchen. And honestly, my kids ask for these more than pizza — that’s the kind of parental win that makes me smile every time.
How do I make grilled shrimp skewers?
Quick Overview
Grilled shrimp skewers come together in three simple parts: marinate, skewer, and grill. The marinade is your flavor secret, soaking in fresh garlic, lemon juice, and some olive oil before the shrimp meet the grill. Thread the shrimp snugly on skewers so they cook evenly, then it’s just a quick char and flip routine—each side gets only a few minutes to avoid overcooking. What’s great here is the minimal fuss; no heavy sauces or complicated steps, just pure, mouthwatering shrimp that’s fresh and vibrant. Even if you’re juggling dinner and a bunch of other stuff, you’ll find this manageable and satisfying.
Ingredients
For the Marinade:
- 1 lb raw shrimp, peeled and deveined (medium to large size works best; wild-caught adds extra flavor but farmed is fine too)
- 3 cloves garlic, minced (fresh is key here; don’t skimp)
- Juice and zest of 1 lemon (the zest really lifts the brightness)
- 1/4 cup olive oil (go for extra virgin for richness)
- 1 tsp chili flakes (optional, but I love the slight kick)
- Salt and freshly ground Black Pepper, to taste
- 1 tbsp fresh parsley or cilantro, finely chopped (adds freshness after grilling)
For Serving:
- Wooden or metal skewers (if using wooden, soak in water for 30 minutes to prevent burning)
- Lemon wedges for garnish
- Optional: your favorite dipping sauce (garlic aioli is amazing!)
Step-by-Step Instructions
Step 1: Marinate the Shrimp
In a bowl, mix together the olive oil, garlic, lemon juice and zest, chili flakes, salt, and pepper. Toss the shrimp in the marinade, making sure every piece gets coated generously. Cover and pop it into the fridge for at least 15-30 minutes—don’t go longer than an hour or the acid can start “cooking” the shrimp and turn them mushy. I usually prep the marinade first thing when I start dinner prep, so it’s marinating while I gather the rest of my ingredients.
Step 2: Preheat Your Grill
Get your grill nice and hot — medium-high heat works best (around 400°F if you have a thermometer). If you’re using a grill pan inside, heat it up until it’s almost smoking. This high heat is where that beautiful char and flavor come from. Also, give your grill grates a quick brush and oil them to prevent the shrimp from sticking. I learned this the hard way one summer; nothing’s sadder than losing a perfectly marinated shrimp to the grill rack!
Step 3: Skewer the Shrimp
Thread the shrimp onto the skewers, piercing through the tail and then the thicker end so they lie flat and don’t spin around. Don’t overcrowd the skewers; leave a bit of space between shrimp so the heat circulates evenly and they cook perfectly. If they’re too close, they’ll steam and lose that lovely grill texture.
Step 4: Grill the Skewers
Place the skewers on the grill and cook for about 2-3 minutes per side. Watch carefully — shrimp go from perfectly tender to rubbery fast. When they turn pink and opaque, and have those lovely grill marks, they’re ready. The smell alone will make you want to dive right in.
Step 5: Garnish and Serve
Once the shrimp are off the grill, sprinkle with chopped parsley or cilantro for a touch of color and freshness. Serve immediately with lemon wedges on the side — squeezing a bit more brightness just before eating brings everything alive. I like to plate these skewers over a bed of herby couscous or alongside grilled veggies, but they’re incredible on their own too.
What to Serve It With
For Breakfast: Yep, I know it sounds odd, but I’ve done this when I’m craving protein in the morning. Serve a couple skewers with scrambled eggs and a side of fresh avocado slices. Pair it with a smooth cup of coffee for a savory wake-up call.
For Brunch: Lay the shrimp skewers over a vibrant arugula salad with cherry tomatoes, shaved parmesan, and a drizzle of balsamic. A crisp white wine or a refreshing sparkling water with lemon makes the meal sparkle.
As Dinner: These are my go-to when I want something light but satisfying—pair with Garlic Butter rice, grilled corn on the cob, and a simple cucumber-yogurt salad. At family BBQs, this combo disappears in minutes.
For Cozy Snacks: Cut the grilled shrimp off the skewers and toss into tacos with cabbage slaw and a tangy lime crema. Or stack them in pita pockets with a smear of hummus — a little something to keep hunger at bay during lazy afternoons.
Fun fact: My family has this ritual where we eat these shrimp skewers on the last night of summer vacation, sitting on the porch while the sun sets. It’s become such a special memory that those flavors now spell “summer” to me every time.
Top Tips for Perfecting Your Grilled Shrimp Skewers
Shrimp Prep: Make sure your shrimp are fully thawed and patted dry before marinating; excess water is the enemy of a good sear. I’ve learned that rinsing and immediately drying does wonders for that char.
Marinade Timing: Don’t leave your shrimp in an acidic marinade too long—20-30 minutes max. Otherwise, they’ll start to “cook” and end up mushy. It’s a subtle detail but makes a world of difference.
Skewering Technique: When threading, angle your skewer through the thickest part and tail for stability. Leaving just a little space between shrimp keeps the heat moving so they don’t steam.
Grill Heat: High and fast is the goal. Medium-high heat ensures you get that beautiful color without overcooking. I always keep an eye on the shrimp—it’s a quick turnaround.
Doneness Cue: When the shrimp turn from translucent gray to a bright, opaque pink and start curling into a loose “C” shape, you’re golden. Overdone shrimp coil tight and turn rubbery, so snap to action quickly.
Glaze and Extras: Though the marinade flavors are spot-on, I often brush a little honey-LEMON GLAZE on the skewers right at the end on the grill. It gives a subtle sweetness and extra shine — just watch it so it doesn’t burn!
Over the years, I’ve swapped fresh herbs based on what I have: basil, cilantro, dill — each brings its own personality. And if spice’s your thing, a dash of smoked paprika or cayenne works wonders. Trust me on these tweaks—they’ve been tested countless times in my kitchen.
Storing and Reheating Tips
Room Temperature: If you’re serving these at a party, shrimp skewers are best eaten within two hours of cooking, especially on a warm day. Cover loosely with foil or a clean towel if you’re letting them rest.
Refrigerator Storage: Leftovers store beautifully in an airtight container for up to 2 days. I like to squeeze fresh lemon juice over the shrimp before sealing to keep them vibrant. When reheating, warm them gently in a skillet or microwave just until heated through to avoid rubberiness.
Freezer Instructions: You can freeze cooked shrimp skewers by wrapping them tightly in plastic wrap and then foil, or using freezer-safe containers. They’ll keep well for up to 2 months. Thaw overnight in the fridge and reheat gently on the stovetop or in the oven.
Glaze Timing Advice: If you’re glazing with honey or a flavored butter, add that just before serving instead of before storing, to keep the glaze fresh and prevent it from getting sticky or separating during storage.
Frequently Asked Questions
Final Thoughts
Honestly, grilled shrimp skewers have a special place in my heart—and my kitchen routine. They’re my go-to when I want something effortless but packed with flavor. Every time I fire up the grill and those shrimp start sizzling, there’s this little thrill, knowing that a delicious meal is just moments away. They’re wonderfully flexible, whether you’re whipping up a light dinner or feeding a crowd, and they never fail to impress. If you like this recipe, you should also check out my grilled vegetable skewers or Garlic Butter grilled chicken—they play beautifully together for a full feast. I’m truly excited for you to try these and hear how they turn out. Feel free to share your tweaks or any fun twists you come up with in the comments below. Happy grilling!
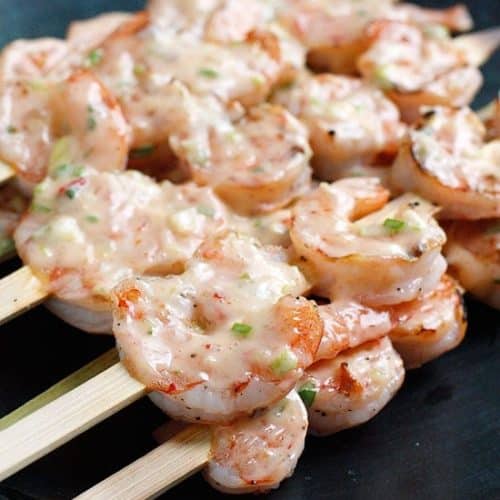
grilled shrimp skewers
Ingredients
Main Ingredients
- 2.5 tbsp light mayonnaise
- 2 tbsp scallions chopped fine
- 1.5 tbsp Thai Sweet Chili Sauce
- 0.5 tsp Sriracha or to taste
- 40 large raw shrimp shelled and deveined
- fresh cracked pepper
- spray oil
Instructions
Preparation Steps
- Combine the mayonnaise, scallions, Thai sweet chili sauce, and Sriracha in a small bowl; set aside.
- Soak wooden skewers in water for at least 20 minutes or use metal skewers to avoid soaking.
- Lightly season the shrimp with fresh cracked pepper.
- Thread 5 shrimp onto each skewer; prepare 8 skewers.
- Preheat a clean grill to medium heat and lightly spray with oil. Add the shrimp skewers carefully, avoiding burning the skewers.
- Grill shrimp for about 6 to 8 minutes total, turning to cook both sides until shrimp are opaque and cooked through.
- Remove shrimp from the grill and quickly brush with the prepared sauce; serve immediately.


