


Oh, hello there! Pull up a chair and let’s chat. You know, sometimes a craving hits you out of nowhere, a specific taste that just *transports* you. For me, lately, it’s been that incredibly distinctive, slightly chewy, utterly addictive flavor of licorice. But not just any licorice – I’m talking about the kind that reminds me of childhood summers, running through sprinklers, and those colorful candy aisles that seemed to stretch on forever. And you know what? I’ve figured out how to capture that magic right in my own kitchen, with something I like to call Homemade Kool-Aid Licorice. Seriously, if you’ve ever loved those classic sour straws or those intensely flavored licorice twists, you’re going to adore this. It’s surprisingly simple, incredibly fun to make, and the flavor? Well, it’s a punch to the tastebuds in the best way possible, a delightful echo of those beloved candy brands, but with that homemade touch that just makes everything better. Forget the store-bought stuff; this is where it’s at!
What is a home made Kool-Aid?
So, what exactly is this Homemade Kool-Aid Licorice? Think of it as a delightful mashup of your favorite childhood candy flavors and the satisfying chewiness of traditional licorice, all made from scratch with ingredients you probably already have. The “Kool-Aid” part is key here – it’s what gives these little chewy wonders their incredibly vibrant colors and that signature, intense fruit flavor that you just can’t get anywhere else. It’s essentially a super-condensed, chewy candy that you can customize to your heart’s content. We’re not using any weird chemicals or artificial flavorings here; it’s all about harnessing the power of a simple gelatin base infused with the zesty goodness of your favorite Kool-Aid packets. It’s not quite gummy bears, and it’s definitely not your grandma’s hard candy. It’s its own thing, a fantastic middle ground that’s both fun to make and even more fun to eat. If you’ve ever wondered what it would be like to have a whole batch of intensely flavored, chewy candy that tastes exactly like your favorite powdered drink mix, well, you’re in for a treat!
Why you’ll love this recipe?
There are so many reasons why this Homemade Kool-Aid Licorice has become a staple in my kitchen, and I just *know* you’re going to fall in love with it too. First off, the FLAVOR! Oh my goodness, the flavor. It’s like a party in your mouth. You can pick your favorite Kool-Aid flavor – cherry, grape, tropical punch, blue raspberry – and get that concentrated burst of sweetness and tang that you just can’t beat. It’s a serious nostalgia bomb! Then there’s the SIMPLICITY. I’m not kidding when I say this is surprisingly easy. No fancy equipment, no complicated steps. If you can boil water and stir, you can make this licorice. It’s a lifesaver on a rainy afternoon when the kids are bouncing off the walls, or when you just need a quick little sweet fix. Plus, it’s incredibly COST-EFFECTIVE. A few packets of Kool-Aid, some sugar, gelatin, and corn syrup? Way cheaper than buying gourmet licorice, and you get so much more bang for your buck. And the VERSATILITY! This is where it really shines. You can make one flavor, or you can do a whole rainbow of colors and tastes. You can cut them into strips, cubes, or even try to twist them like traditional licorice. They’re perfect for goodie bags, bake sales (they always disappear!), or just keeping a stash for yourself for those late-night sweet cravings. Seriously, what’s not to love? It’s a little bit of childhood magic, made easy and delicious!
How do I make homemade Kool-Aid Licorice?
Quick Overview
Making this Homemade Kool-Aid Licorice is a straightforward process that involves dissolving your gelatin, heating up a sugar syrup with your chosen flavoring, and then letting it set to a perfect chew. The beauty of this method is how it allows the vibrant Kool-Aid flavor to really shine through, resulting in a candy that’s intensely flavored and delightfully chewy. It’s a no-fuss approach that guarantees delicious results, perfect for beginners and seasoned candy makers alike. You’ll be amazed at how quickly you go from simple ingredients to a tray full of colorful, tasty licorice!
Ingredients
For the Main Licorice Base:
You’ll need unflavored gelatin – this is the magic stuff that gives it that perfect chew. Make sure it’s the regular kind, not the instant kind. About 4 packets (or 1 tablespoon) should do the trick for a good batch. We’ll also need sugar, of course, because it’s candy! Around 1 cup of granulated sugar is standard. And for that smooth, chewy texture and to prevent crystallization, a bit of light corn syrup is your best friend. About 1/2 cup should be perfect. And the star of the show: your favorite Kool-Aid packets! You’ll need about 2-3 packets, depending on how intense you want the flavor and color. For water, just a little bit, around 1/2 cup, to help dissolve everything. Some recipes call for citric acid to make it a bit tangier, which is totally optional but can really amp up that fruity punch. If you have it, about 1 teaspoon will do.
For the Color & Flavor Infusion:
This is where the Kool-Aid comes in! You can use any flavor you like, but I find that some flavors just work better than others. Cherry, grape, and watermelon are usually big hits and give fantastic color. If you’re feeling adventurous, try mixing two flavors! You can also add a few drops of food coloring if you want to make the colors extra vibrant, though the Kool-Aid usually does a pretty good job on its own.
For Preparing the Pan:
A little bit of oil or cooking spray will be essential to keep your licorice from sticking to the pan. I usually use a neutral oil like vegetable or canola oil. You’ll also need a baking dish or a small jelly roll pan. A 9×9 inch square pan or an 8×8 inch pan works perfectly for a good thickness.
Step-by-Step Instructions
Step 1: Preheat & Prep Pan
Alright, first things first, let’s get our pan ready. Grab your 8×8 or 9×9 inch baking dish. You want to lightly grease it with cooking spray or a neutral oil. Don’t go too crazy with the oil, just enough to coat the bottom and sides so your beautiful licorice doesn’t stick. I usually use a paper towel to spread it around evenly. Set that aside. You don’t need to preheat an oven for this recipe, which is a nice bonus!
Step 2: Mix Dry Ingredients
In a medium-sized bowl, we’re going to whisk together our unflavored gelatin. If you’re using citric acid for that extra tang, add it here too. Now, here’s a little trick I learned: bloom the gelatin. This means mixing it with a bit of cool water first. So, pour about 1/4 cup of cool water into a small bowl, sprinkle the gelatin over the top, and let it sit for about 5-10 minutes. It will get all thick and jelly-like. This helps it dissolve smoothly later on. While that’s happening, in a separate, larger bowl, we’ll combine our sugar and the Kool-Aid packets. Whisk them together really well to break up any clumps and distribute the color and flavor evenly.
Step 3: Mix Wet Ingredients
Now, grab a medium saucepan. Pour in the remaining 1/4 cup of water, the corn syrup, and the bloomed gelatin mixture. We’re going to heat this gently over medium heat. Stir it constantly until everything is completely dissolved and the mixture is clear. Be careful not to let it boil vigorously; we just want it to heat through and melt everything together. Once it’s clear and smooth, remove it from the heat. If you’re adding any extra food coloring for super intense colors, now’s the time to stir it in.
Step 4: Combine
This is where the magic happens! Carefully pour the hot syrup mixture into the bowl with the sugar and Kool-Aid mixture. Whisk it all together really, really well. You want to make sure every bit of sugar is dissolved and you have a smooth, liquid candy base. Keep whisking until it’s uniform in color and texture. It should be a beautiful, vibrant liquid. If you see any undissolved sugar granules, keep whisking until they disappear.
Step 5: Prepare Filling
Since we’re making a simple licorice, there isn’t a separate “filling” in the traditional sense. The flavor and color come directly from the Kool-Aid mixture itself. However, if you wanted to get fancy, you *could* divide the base mixture before pouring it into the pan and add different flavors or colors to each portion. For this basic recipe, we’re keeping it simple and focusing on one amazing flavor per batch.
Step 6: Layer & Swirl
Now it’s time to pour our luscious, colorful mixture into our prepared baking dish. Pour it slowly and evenly. If you’re making multiple flavors, you can pour them in layers or dollop them in and use a toothpick to swirl them together for a marbled effect. For a single flavor, just pour it all in and gently tilt the pan to ensure an even layer.
Step 7: Bake
Here’s the good news: you don’t bake this! What we need to do is let it set. Once the mixture is poured into the pan, let it cool on the counter for about 20-30 minutes, until it’s just warm to the touch. Then, cover it loosely with plastic wrap and pop it into the refrigerator. It needs to chill and set completely, which usually takes about 2-4 hours, or even overnight. The longer it chills, the firmer it will get.
Step 8: Cool & Glaze
Once your licorice is firm and completely set, it’s time to unmold it. You might need to run a knife around the edges to loosen it up. Then, carefully invert the pan onto a cutting board. It should slide right out. Now, if you want a glaze, you can make a simple powdered sugar glaze by whisking powdered sugar with a tiny bit of milk or water until it’s a pourable consistency. You can even add a drop of Kool-Aid flavor to this glaze for extra punch! Drizzle this over the set licorice. Let the glaze set for about 15-20 minutes before cutting.
Step 9: Slice & Serve
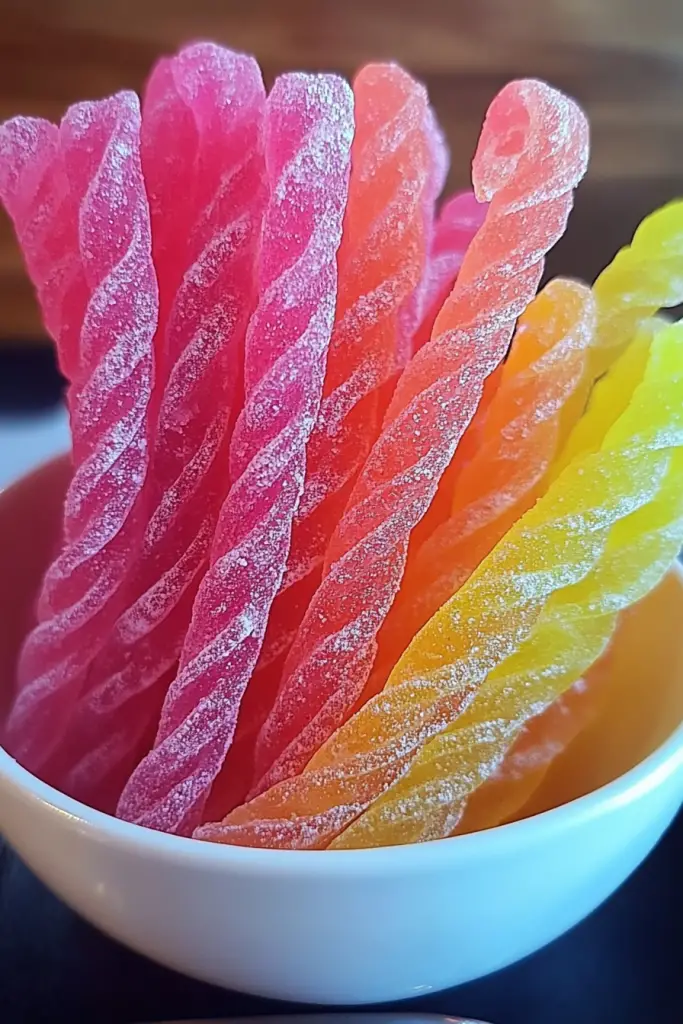
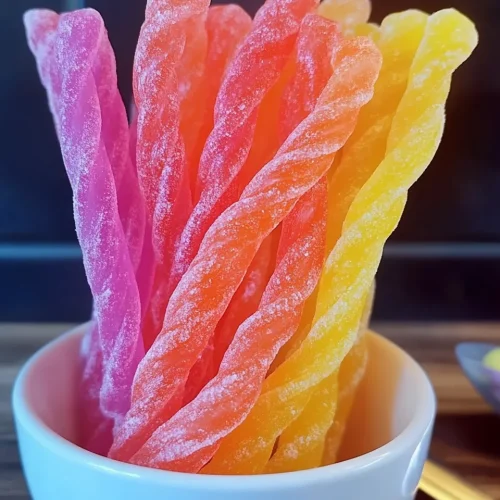
Now for the fun part – cutting! You can use a sharp knife or a pizza cutter to slice your licorice into strips. I like to make them about 1/2 inch wide, similar to those candy straws. If you want to try twisting them, you can carefully twist them before they’re fully set, but it’s a bit tricky. Once cut, they’re ready to eat! You can also dust them with a little extra sugar or citric acid if you like a really tart finish. Enjoy your homemade deliciousness!
What to Serve It With
These Homemade Kool-Aid Licorice bites are so versatile, they fit into almost any occasion! For a casual BREAKFAST, imagine a bright little bite to accompany your morning coffee or tea. They’re not overly sweet on their own and add a fun pop of color to the breakfast table, especially if you have kids who are picky eaters. For BRUNCH, they can be a playful addition to a dessert platter, alongside mini muffins or fruit skewers. Their vibrant colors make for a really cheerful presentation. As a fun DESSERT, especially for a kids’ party or a retro-themed gathering, they’re a guaranteed hit. You can serve them in small candy dishes or arrange them artfully on a cake stand. They’re also fantastic as part of a candy bar! And for COZY SNACKS, this is where they truly shine for me. They are perfect for that 10 pm craving when you don’t want to bake a whole cake. I love having a small bowl of these handy when I’m curled up on the couch with a good book or watching a movie. My family also loves them during movie nights – they’re so much easier to eat than sticky popcorn!
Top Tips for Perfecting Your Homemade Kool-Aid Licorice
I’ve made this Homemade Kool-Aid Licorice more times than I can count, and over the years, I’ve picked up a few tricks that really make a difference. First, when it comes to the Kool-Aid, don’t be afraid to experiment with different flavors. Some colors are more intense than others, so if you’re after that super vibrant look, a grape or cherry packet usually does the trick. I’ve also found that if you want an even more intense flavor and color, you can add a few drops of food coloring, especially if you’re using a lighter colored Kool-Aid flavor. Another tip for the gelatin: make sure you bloom it properly. If it’s not fully hydrated, you can end up with little chewy bits in your licorice, which isn’t ideal. Just let it sit in the cool water for about 5-10 minutes until it looks like a solid jelly. When you’re heating the sugar syrup, stir it constantly! This is crucial for preventing crystallization. You want a smooth, clear syrup. I learned this the hard way after a batch turned grainy. For the cutting, a sharp knife or a pizza cutter works best. If your licorice is too soft to cut cleanly, it just needs a little more chilling time. You can even pop the whole slab back in the fridge for another 30 minutes if it’s too soft. For those who like a super tangy kick, I highly recommend adding a touch of citric acid to the sugar mixture. It really brightens up the fruit flavors and gives it that signature sour candy zing. If you don’t have corn syrup, you can sometimes get away with using golden syrup or even honey, but corn syrup really is the best for texture and preventing sugar crystallization. And remember, chilling time is key! Don’t rush it. The longer it sits in the fridge, the firmer and chewier it will become, making it easier to cut and handle.
Storing and Reheating Tips
Storing your homemade delights is super important to keep them tasting their best. If you’ve got any leftovers (which is rare in my house!), you can store them at ROOM TEMPERATURE. Just make sure they are in an airtight container. They should stay fresh for about a week, though they tend to get a little softer as the days go by. If your kitchen is particularly warm or humid, it’s probably best to store them in the REFRIGERATOR. This will help them maintain their firmness and prevent them from getting sticky. Again, an airtight container is your best bet. In the fridge, they’ll easily last for 1-2 weeks. Now, for FREEZER INSTRUCTIONS, these guys freeze surprisingly well! Wrap the licorice tightly in parchment paper first, then seal them in a freezer bag or an airtight container. They can stay frozen for up to 2-3 months. To thaw, just transfer them to the refrigerator overnight. Regarding the glaze, it’s best to apply it just before serving if you plan to store them for more than a day, especially at room temperature. If you’re glazing and then storing, the glaze might become a bit soft or sticky over time. For the firmest texture, always apply the glaze right before you plan to eat them.
Frequently Asked Questions
Final Thoughts
So there you have it – my go-to recipe for Homemade Kool-Aid Licorice! It’s more than just candy to me; it’s a little trip down memory lane, a fun project to do with the kids (or grandkids!), and a guaranteed crowd-pleaser. The way the vibrant colors pop and the intense fruit flavors hit your taste buds is just pure joy. It’s such a simple pleasure, really, but one that brings so much happiness. If you’re someone who loves those classic fruity, chewy candies, or if you’re just looking for a fun, easy, and incredibly rewarding recipe to try, I really hope you’ll give this one a whirl. It’s a fantastic alternative to store-bought sweets, and you get to customize it exactly to your liking. For those who enjoyed this, you might also like exploring other homemade candy recipes or even some fun fruit-flavored baked goods. I can’t wait to hear how your Homemade Kool-Aid Licorice turns out! Let me know in the comments what flavors you chose and if you added any of your own twists. Happy candy-making!
Homemade Kool-Aid Licorice
Ingredients
Main Ingredients
- 1 package Kool-Aid (any flavor)
- 0.5 cup Corn syrup
- 0.25 cup Water
- 2 cups Granulated sugar
- 0.5 teaspoon Citric acid
Instructions
Preparation Steps
- In a saucepan, combine corn syrup, water, and granulated sugar. Stir until sugar is dissolved.
- Bring the mixture to a boil over medium heat. Cook for about 5 minutes, or until it reaches the soft ball stage (235-240°F or 113-116°C on a candy thermometer).
- Remove from heat. Carefully stir in the Kool-Aid and citric acid until well combined.
- Pour the mixture into a greased 8x8 inch pan or onto a parchment-lined baking sheet.
- Let it cool for about 10-15 minutes until it's firm enough to handle but still pliable. You can lightly grease your hands with butter or oil to prevent sticking.
- Stretch and twist the candy into ropes or licorice shapes. You can also cut it into strips.
- Let the licorice cool completely before cutting or wrapping.


