


There are some recipes that just feel like a warm hug. They bring back memories of cozy mornings, the smell of something amazing baking, and that sheer joy of a perfectly executed treat. For me, that recipe is this homemade Danish. Not the super complicated, laminated dough kind you might be thinking of – oh no! This is a wonderfully approachable, utterly delicious version that’s perfect for anyone who’s ever dreamed of baking their own Danish pastries but felt a little intimidated. I remember the first time I tried making them; I was convinced it was going to be a disaster, a sticky, flour-dusted mess. But honestly? It was surprisingly straightforward, and the result was so incredibly good, so much better than anything store-bought. My family devoured them, and now they’re a staple for weekend breakfasts and special occasions. If you’ve ever loved a good Cinnamon Roll, you’re going to fall head over heels for these homemade Danish pastries. They’re a little bit magical, and I can’t wait to share them with you!
What is homemade Danish?
So, what exactly is this “homemade Danish” I’m raving about? Think of it as a delightful cross between a soft, slightly enriched bread and a decadent pastry. It’s not the incredibly labor-intensive, butter-layered Danish that requires days of folding and chilling. Instead, this recipe creates a tender, slightly sweet dough that’s perfect for rolling out and filling with a comforting cinnamon-sugar swirl. It’s essentially a simpler, more forgiving take on those beloved pastries you see in bakeries, made with ingredients you probably already have in your pantry. The “Danish” part comes from the inspiration, of course, but the “homemade” part is where the magic happens – it’s made with love, right in your own kitchen, and it tastes like it. It’s the kind of bake that makes your house smell incredible and brings everyone running to see what’s coming out of the oven.
Why you’ll love this recipe?
Honestly, there are so many reasons why this homemade Danish recipe has earned a permanent spot in my baking rotation. First and foremost, the FLAVOR is just out of this world. That warm cinnamon and sugar filling, kissed by the sweet, simple glaze, is pure comfort. It’s that perfect balance of sweet and spiced that makes you close your eyes with every bite. And then there’s the SIMPLICITY. I know “pastry” can sound daunting, but this dough is incredibly user-friendly. It’s soft, it’s easy to work with, and it doesn’t demand endless chilling and folding sessions. You can whip this up on a lazy Saturday morning and have them ready for brunch, or even get ahead on a Friday night. Plus, it’s SO COST-EFFECTIVE. When you compare the cost of the ingredients to the price of a single Danish pastry at a fancy bakery, you’ll be amazed at how much you save. And versatility? Oh yes! You can totally play around with the filling – add a few chopped nuts, a pinch of cardamom, or even a thin layer of jam. What I love most about this recipe, though, is the sheer satisfaction it brings. Baking these homemade Danish pastries makes me feel like a baking rockstar, and seeing the smiles on my family’s faces when they take their first bite? Priceless. It’s a recipe that delivers big on taste and nostalgia without requiring a professional baker’s skillset. It’s also a fantastic way to use up those zucchini that might be lurking in your garden – talk about a surprise ingredient that makes them even more tender and moist!
How do I make [Recipe Name]?
Quick Overview
This recipe is all about creating a wonderfully soft, slightly enriched dough, preparing a sweet cinnamon-sugar filling, and then bringing it all together for a beautiful swirl. We’ll mix the dough, let it rise briefly, prepare the filling, roll it out, spread, roll, slice, and bake. The final touch is a simple glaze that ties it all together. It’s a process that’s surprisingly quick for something that tastes so wonderfully indulgent. Trust me, the payoff for these few steps is enormous!
Ingredients
For the Main Batter:
– 1 cup warm milk (around 105-115°F): This is the perfect temperature to wake up your yeast and make the dough nice and soft. Don’t go too hot, or you’ll kill the yeast!
– 2 ¼ teaspoons active dry yeast: This is your standard packet of yeast, and it’s what gives our dough its lovely rise and texture.
– ½ cup granulated sugar: For sweetness and to feed the yeast.
– 1 large egg, at room temperature: Adds richness and helps bind everything together. Room temperature eggs incorporate better.
– ¼ cup unsalted butter, melted and slightly cooled: Adds tenderness and flavor. Make sure it’s not hot when you add it to the yeast mixture!
– 1 teaspoon vanilla extract: For that lovely hint of sweetness.
– 1 teaspoon salt: Balances the sweetness and enhances flavor.
– 3 to 3 ½ cups all-purpose flour: Start with 3 cups and add more as needed. You want a soft, slightly sticky dough, not a dry, crumbly one. I usually find 3 ¼ cups is my sweet spot. I’ve found that using a good quality all-purpose flour makes a difference in the final texture.
For the Filling:
– ½ cup packed light Brown Sugar: Gives a lovely caramel note to the filling.
– 1 tablespoon ground cinnamon: The star of the show! Use good quality cinnamon for the best flavor.
– ¼ cup unsalted butter, softened: This helps the sugar stick and creates those gorgeous, gooey pockets. Make sure it’s softened, not melted, so it spreads easily without making a mess.
For the Glaze:
– 1 cup powdered sugar: For that classic sweet glaze.
– 2-3 tablespoons milk or cream: Start with 2 tablespoons and add more until you reach your desired drizzling consistency.
– ½ teaspoon vanilla extract: Just a little boost of flavor!
Step-by-Step Instructions
Step 1: Preheat & Prep Pan
First things first, let’s get our oven ready and our baking sheet prepped. Preheat your oven to 375°F (190°C). I like to line a large baking sheet with parchment paper. This is a lifesaver for cleanup and ensures your homemade Danish won’t stick. You can also use a light sprinkle of flour if you don’t have parchment, but I highly recommend it!
Step 2: Mix Dry Ingredients
In a large mixing bowl, whisk together 3 cups of the all-purpose flour, the granulated sugar, and the salt. This ensures everything is evenly distributed. It might seem like a small step, but it really helps create a uniform dough and prevents pockets of salt or sugar.
Step 3: Mix Wet Ingredients
In a separate medium bowl, combine the warm milk and the active dry yeast. Give it a gentle stir and let it sit for about 5-10 minutes. You want to see it get nice and foamy – that means your yeast is alive and ready to work its magic! Once foamy, whisk in the room temperature egg, the melted butter, and the vanilla extract until everything is well combined. This mixture should smell wonderfully inviting already!
Step 4: Combine
Pour the wet ingredients into the bowl with the dry ingredients. Mix with a wooden spoon or a rubber spatula until a shaggy dough begins to form. It will look a bit messy, and that’s okay! Now, turn the dough out onto a lightly floured surface. Knead the dough for about 5-8 minutes, adding more flour, about a tablespoon at a time, only if necessary, until the dough is smooth and elastic. You’re aiming for a dough that’s soft and slightly tacky, but not sticky enough to cling to your hands. I usually end up using about 3 ¼ cups of flour in total. Once kneaded, place the dough in a lightly oiled bowl, cover it with a clean kitchen towel, and let it rise in a warm place for about 30-45 minutes, or until it’s doubled in size. While it’s rising, we can get our filling ready!
Step 5: Prepare Filling
In a small bowl, combine the packed light Brown Sugar and the ground cinnamon. Stir them together until they’re well mixed. Then, add the softened butter to this mixture. Use a fork or your fingers to work the butter into the sugar and cinnamon until it forms a crumbly paste. You don’t want big chunks of butter; it should be nicely incorporated. This filling is what gives you those glorious, gooey pockets of cinnamon goodness in every bite.
Step 6: Layer & Swirl
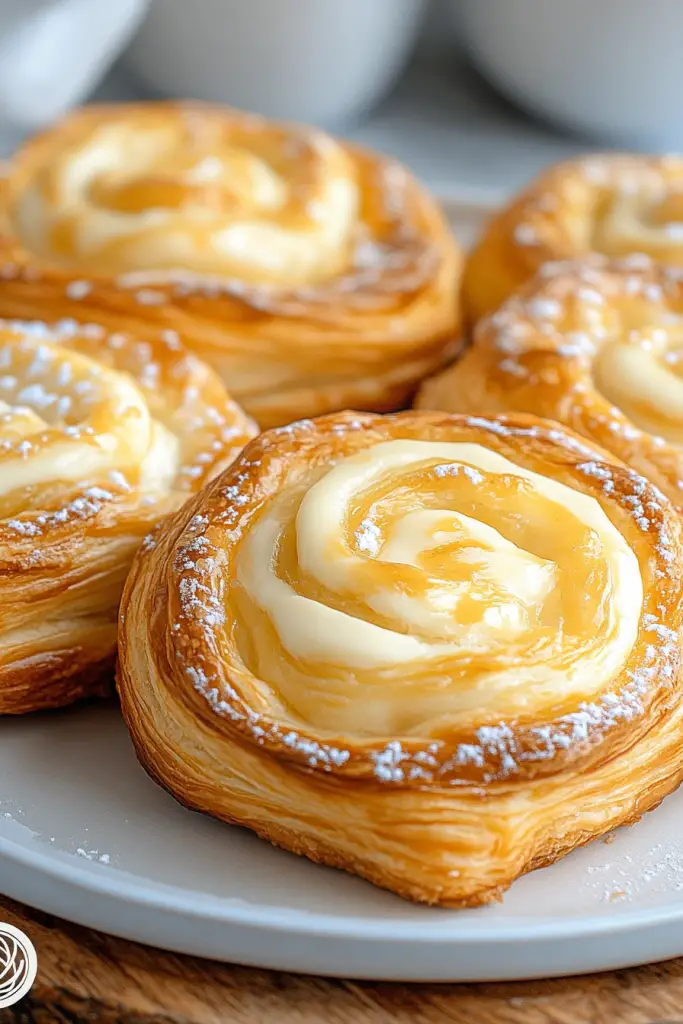
Once the dough has doubled, punch it down gently to release the air. Turn the dough out onto your lightly floured surface again. Roll it out into a large rectangle, about 12×18 inches and about ¼ inch thick. Try to get the edges as even as possible. Now, spread the prepared cinnamon-sugar filling evenly over the entire surface of the dough, leaving about a ½ inch border along one of the long edges. This border will help seal the roll. Starting from the long edge *opposite* the clean border, tightly roll up the dough, jelly-roll style. Pinch the seam to seal it well. Use a sharp knife or dental floss (my secret weapon for clean cuts!) to slice the roll into 12 equal pieces, about 1 ½ inches thick. Place the sliced swirls cut-side up onto your prepared baking sheet, leaving a little space between each one as they’ll puff up more.
Step 7: Bake
Pop the baking sheet into your preheated oven. Bake for 18-22 minutes, or until the tops are golden brown and the pastries are cooked through. Keep an eye on them, as ovens can vary! If you notice them browning too quickly, you can always loosely tent them with foil. I usually check the bottoms too – you want them to be golden, not pale.
Step 8: Cool & Glaze
Once baked, carefully remove the baking sheet from the oven. Let the homemade Danish cool on the baking sheet for about 10 minutes. This allows them to set up a bit before you move them. While they’re cooling, whisk together the powdered sugar, 2 tablespoons of milk (or cream), and the vanilla extract in a small bowl. Add more milk, a teaspoon at a time, until the glaze is smooth and reaches a drizzling consistency. It should be thick enough to coat but thin enough to drizzle. Once the pastries have cooled slightly, drizzle the glaze generously over the tops. You can use a spoon or a piping bag for a neater look, but I honestly just love a rustic drizzle!
Step 9: Slice & Serve
Let the glaze set up for a few minutes. These homemade Danish pastries are absolutely divine served warm, but they’re also delicious at room temperature. Carefully lift them off the baking sheet and arrange them on a serving platter. Get ready for the compliments!
What to Serve It With
These homemade Danish pastries are so wonderfully versatile, they fit into almost any occasion! For a classic BREAKFAST treat, they’re absolutely perfect alongside a steaming mug of coffee or a tall glass of cold milk. The richness of the pastry and the sweet glaze are the perfect counterpoint to a strong brew. If you’re planning a special BRUNCH, these make an elegant addition to your spread. I love serving them on a tiered stand with some fresh berries and perhaps a small bowl of yogurt. They look so impressive! As a decadent DESSERT, they’re simply divine. Imagine them warm, with a scoop of vanilla bean Ice Cream or a dollop of whipped cream. The contrast of warm pastry and cold ice cream is pure bliss. And for those COZY SNACKS when you just need a little something sweet? These are the answer. Grab one with your afternoon tea or a hot chocolate on a chilly evening. My family has a tradition of making these for Christmas morning, and the smell alone signals the start of a magical day. They’re also fantastic for weekend get-togethers where everyone can grab one as they mingle. Honestly, any time you’re craving something a little special, these homemade Danish pastries are the answer.
Top Tips for Perfecting Your Homemade Danish
Over the years, I’ve learned a few things that really help make these homemade Danish pastries absolutely perfect, every single time. First, on ZUCCHINI PREP: if you’re adding zucchini (which I highly recommend for moisture!), make sure to squeeze out as much liquid as possible after shredding. Use a clean kitchen towel or cheesecloth to really wring it out. Excess moisture can make your dough soggy. Grating on the larger holes of a box grater is usually best. For MIXING ADVICE, remember that you don’t want to overwork the dough once you add the flour. Gentle kneading until it’s *just* smooth is key. Overmixing can develop the gluten too much, leading to a tougher pastry. You’re looking for that soft, slightly tacky texture. When it comes to SWIRL CUSTOMIZATION, don’t be afraid to play! You can add a pinch of nutmeg or cardamom to the cinnamon sugar, or even a tablespoon of cocoa powder for a chocolatey twist. For a fancier swirl, try spreading a thin layer of apple or cherry jam before rolling. For Ingredient Swaps, if you’re out of brown sugar, you can use granulated sugar for the filling, but the brown sugar really adds that lovely depth of flavor. You can also experiment with different types of milk – I’ve had success with almond milk for a slightly different richness. For BAKING TIPS, oven temperature is crucial. Make sure your oven is properly preheated. If your oven has hot spots, rotating the baking sheet halfway through can help ensure even browning. I always like to test for doneness by gently pressing the center – it should spring back slightly. And finally, for GLAZE VARIATIONS, if you prefer a less sweet glaze, you can simply use a dusting of powdered sugar. Or, for a lemon kick, add a teaspoon of lemon zest and a squeeze of lemon juice to the glaze. Remember, these tips are born from making these countless times, so trust me on these!
Storing and Reheating Tips
These homemade Danish pastries are best enjoyed fresh, but they do store reasonably well. For ROOM TEMPERATURE storage, keep them in an airtight container for up to 2 days. They might lose a little of their crispness, but they’ll still be delicious. If you want to keep them longer, REFRIGERATOR STORAGE is your best bet. Store them in an airtight container in the fridge for up to 4 days. When you want to enjoy them again, you can eat them cold, or for a treat, pop them in a warm oven (around 300°F or 150°C) for 5-8 minutes until warmed through. This brings back some of that lovely fresh-baked texture. FREEZER INSTRUCTIONS are also a great option if you want to make a big batch. Once completely cooled, wrap individual pastries tightly in plastic wrap, then in foil, or place them in a freezer-safe bag. They’ll keep well in the freezer for up to 2-3 months. To thaw, place them in the refrigerator overnight, then warm them up as described above. For the glaze, I always recommend applying it *after* cooling and *before* serving for the best appearance. If you’re freezing them, it’s often better to glaze them after they’ve been reheated.
Frequently Asked Questions
Final Thoughts
There you have it – my absolute favorite homemade Danish recipe! I truly believe that baking doesn’t have to be complicated to be incredibly rewarding. This recipe is proof of that. It’s a wonderful way to bring a touch of bakery magic into your own kitchen, with that comforting smell filling your home and the incredible taste of something made with your own hands. It’s perfect for those lazy weekend mornings, for impressing guests, or simply for when you need a little sweet pick-me-up. If you enjoyed this recipe, you might also love my [link to another popular recipe, e.g., “Easy Cinnamon Rolls”] or my [link to another popular recipe, e.g., “Lemon Blueberry Scones”]. They share that same spirit of approachable deliciousness. Give these homemade Danish pastries a try – I promise you won’t regret it. I can’t wait to hear how yours turn out in the comments below! Don’t forget to leave a rating if you loved them, and feel free to share your own twists and variations. Happy baking!

Homemade Danish
Ingredients
Danish Dough
- 4 cups all-purpose flour
- 0.5 cup granulated sugar
- 0.005 cup instant yeast
- 0.5 teaspoon salt
- 0.5 cup warm milk about 105-115°F
- 0.25 cup unsalted butter, softened
- 1 large egg
Cream Cheese Filling
- 8 ounces cream cheese, softened
- 0.5 cup granulated sugar
- 1 large egg yolk
- 1 teaspoon vanilla extract
- 0.5 tablespoon lemon zest
Egg Wash and Glaze
- 1 large egg beaten with 1 tablespoon water
- 0.5 cup powdered sugar
- 1 tablespoon milk
Instructions
Make the Dough
- In a large bowl, whisk together flour, sugar, yeast, and salt.
- In a separate bowl, whisk together warm milk, softened butter, and egg. Add this wet mixture to the dry ingredients and mix until a shaggy dough forms.
- Turn the dough out onto a lightly floured surface and knead for 8-10 minutes until smooth and elastic. Place the dough in a lightly oiled bowl, cover, and let rise in a warm place for 1-1.5 hours, or until doubled in size.
Prepare the Filling
- In a medium bowl, beat together softened cream cheese and sugar until smooth. Stir in the egg yolk, vanilla extract, and lemon zest until well combined.
Assemble and Bake
- Punch down the risen dough and divide it into 8 equal portions. Roll each portion into a circle about 6 inches in diameter.
- Place about 2 tablespoons of cream cheese filling in the center of each dough circle. Fold the dough edges over the filling, pleating as needed to create a Danish shape. Ensure the filling is mostly enclosed.
- Place the assembled danishes on a baking sheet lined with parchment paper. Cover loosely and let them rest for another 20-30 minutes.
- Preheat your oven to 375°F (190°C). Brush the danishes with the egg wash.
- Bake for 20-25 minutes, or until golden brown and puffed.
- While the danishes are baking, whisk together powdered sugar and milk to make a glaze. Drizzle over the warm danishes once they are out of the oven.


