


I’m sitting in my cozy kitchen with the scent of chocolate and something cinnamon-spicy drifting through the air. My grandmother used to keep a tray of something similar in the fridge during the holidays, and I’d sneak a bite while she wasn’t looking—the crunch of the cookie crumbs, the smooth hug of Nutella, and that little jolt of warmth from a peppermint garnish. That memory is exactly why I keep a batch of holiday nutella bites on hand every December. They’re incredibly indulgent, yet incredibly easy, and they disappear in minutes at my house. Think of them as a grown-up truffle that doesn’t require a formal dessert night—these little gems are my lifesaver on busy weeknights when Santa’s coming to town, or when friends swing by for cocoa and conversation. The beauty is in the no-bake simplicity, the way the nutty cookie crumbs meet a glossy Nutella center, and the tiny, sparkly holiday glaze that makes them feel festive even before you bite in. If you’ve ever compared a homemade truffle to a store-bought confection and felt that personal, cozy glow, you’ll know exactly why holiday nutella bites became a family favorite here.
What is Nutella?
Holiday Nutella Bites are petite, no-bake treats that come together with a soft, fudgy core tucked inside a crumbly, buttery base. Think of them as bite-sized truffles you can roll by hand and chill into luscious little balls that melt on your tongue. The name is pretty straightforward: they’re festive, chocolatey bites made with Nutella as the star, rolled in crushed cookies or nuts, and finished with a glossy glaze that can be flavored for the season. It’s essentially a two-layer concept—a sweet, fudgy center and a sturdy, delicious shell—so you get contrast in texture with every bite. I love that this is a recipe you can customize for the person you’re feeding: sprinkle with crushed candy canes for peppermint fans, swap in almond brittle for a nutty crunch, or keep it classic with smooth chocolate and a dusting of cocoa. The best part? There’s a memory-making rhythm to them—once you’ve got the knobs dialed in, you’ll be handing these out like little edible hugs at every get-together.
Why you’ll love this recipe?
What I love most about holiday nutella bites is how the flavors feel both decadent and approachable. They’re the kind of treat you can pull together in under an hour and share with friends who drop by unannounced. Here’s why they’re a crowd-pleaser in my kitchen—and probably in yours, too.
- Flavor: The Nutella centers are rich and chocolatey, with a soft, creamy note that makes you close your eyes and smile. The shell carries a gentle crunch, and a kiss of peppermint or sea salt makes the chocolate sing.
- Simplicity: No complicated piping, no tempering chocolate. This recipe leans into a few pantry staples and a little patience in the fridge to set, which means you can focus on the little moments—like a mug of coffee, a cozy lamp, and a friend who’s asking for the next bite.
- Cost-efficiency: What is the best way to measure cost-efficiency?What are some of the best ways to enjoy a bite without spending a lot of money on fancy desserts?
- Versatility: The base can be adapted to any holiday vibe. Crushed ginger cookies for a warm spice, pistachios for color, or a dusting of gold sugar for a party-ready finish all feel effortless.
Another thing I adore: these are perfect on a weeknight when you crave something sweet but don’t want to bake a whole cake. They’re a tiny portion, but they feel indulgent enough to satisfy a late-night chocolate longing. And yes—my kids actually ask for seconds, which is the kind of confirmation every mom loves after a long day. If you’ve got a crowd that loves Nutella, this is the kind of recipe that gets remembered and requested for years to come. Holiday nutella bites aren’t just a treat; they’re a memory in the making.
How to Make Holiday Nutella Bites
Quick Overview
Here’s the quick version: you mix a fudgy Nutella-Cream Cheese base with crushed cookies to form a pliable dough, scoop and roll into bite-sized balls, then fill a portion with a swirled Nutella center before chilling until firm. Finally, you glaze with melted chocolate and a holiday-friendly topping. The beauty is in the simple steps—the dough comes together with a little whisking and folding, the center is a pretty little surprise, and the glaze ties everything together with a glossy, festive finish. It’s a no-fuss method that still feels special, and that’s exactly what holiday nutella bites should be.
Ingredients
For the Main Batter:
- 1 cup Nutella, softened just enough to scoop
- 8 oz cream cheese, softened
- 2 cups finely crushed shortbread cookies or graham cracker crumbs
- 2 tbsp unsalted butter, melted
- 1/4 cup powdered sugar (optional, for extra sweetness)
- 1/2 tsp vanilla extract
For the Filling:
- 1/2 cup Nutella
- 2 tbsp cream cheese, softened
- 1/4 cup powdered sugar
- Pinch of salt
For the Glaze:
- 1 cup semisweet chocolate chips
- 1 tbsp light corn syrup or coconut oil (to thin)
- 1/4 tsp peppermint extract (optional for a festive twist)
- Crushed candy canes, chopped pistachios, or sea salt for topping
Step-by-Step Instructions
Step 1: Preheat & Prep Pan
Grab a parchment-lined baking sheet or a silicone mat. You’re not baking, so you don’t need a hot oven—just a cool, clean workspace. If your Nutella feels a little stiff, give it a quick 10-second nudge in the microwave to loosen it up. This makes the dough come together more smoothly and gives you a silky texture that your teeth will thank you for later. Chill the prepared sheet in the fridge while you assemble the rest; it helps everything set up nicely and makes rolling easier.
Step 2: Mix Dry Ingredients
In a large bowl, combine the crushed cookies with the melted butter and powdered sugar. The goal is a cohesive, crumbly-dough texture that still holds together when you pinch it. If it looks a touch dry, add a teaspoon of cream or a splash more melted butter. If it’s too sticky, sprinkle in a little more cookie crumbs. The scent should be familiar and comforting—think holiday bakery meets your grandma’s kitchen.
Step 3: Mix Wet Ingredients
In a separate bowl, beat the Cream Cheese until fluffy, then whisk in the Nutella and vanilla extract until you’ve got a satin-smooth mixture. This is where the dreamlike chocolatey aroma starts to bloom. I like to stop just before it’s completely silky, so there’s a touch of body that helps the final bites hold their shape.
Step 4: Combine
Fold the wet mixture into the dry ingredients a little at a time. You want a dough that’s soft enough to scoop but sturdy enough to roll. If it feels too loose, chill it for about 15 minutes and test again. If it’s too firm, soften with a teaspoon of cream. No one wants to wrestle with crumbly cookies when you’re trying to create a glossy, chocolatey bite—so adjust as you go. The texture should be like a slightly sticky playdough that you can roll into balls with ease.
Step 5: Prepare Filling
Stir together the Nutella, Cream Cheese, powdered sugar, and a pinch of salt until smooth. This is your little surprise center. It should be thick enough to hold its shape, but not so stiff that it can’t be easily scooped. If you’re feeling fancy, chill this mixture for 10 minutes to make it easier to portion. Then set aside until you’re ready to assemble the bites.
Step 6: Layer & Swirl
Scoop out a rounded teaspoon of the main batter and flatten it in your palm. Place a small dollop of the filling in the center, then wrap the dough around to seal, rolling gently between your palms to form a smooth ball. If you’re going for a marbled swirl, gently press a bit of the Nutella center into the ball and use your finger to swirl the surface a touch. The goal is a pretty, uniform sphere with a hint of contrast showing through—like a tiny holiday package you can’t resist unwrapping.
Step 7: Chill to Set
Place the formed bites back on the parchment-lined sheet and chill in the fridge for at least 30 minutes, or 1–2 hours for best results. If you’re pressed for time, a quick 15-minute stint in the freezer will do, but be mindful not to freeze too long or the center can become too hard to bite into. The chill helps everything hold its shape and makes glazing easier later on.
Step 8: Glaze
Melt the chocolate chips with the corn syrup or coconut oil until smooth and glossy. You can do this gently in a microwave in 20-second bursts, stirring in between, or use a double boiler. Stir in the peppermint extract if you’re using it. Dip each bite halfway into the chocolate, letting the excess drip back into the bowl. Place back on the parchment and sprinkle with crushed candy canes, chopped pistachios, or a pinch of flaky sea salt while the glaze is still tacky. The glow of the chocolate and the crunch of toppings give these holiday nutella bites the festive sparkle everyone loves.
Step 9: Slice & Serve
Let the glaze set fully at room temperature or give it a quick 15-minute chill in the fridge to speed things up. Once firm, transfer the bites to a serving platter. They’re best served slightly chilled, which keeps the center delightfully fudgy while the outer shell remains pleasantly crisp. You can arrange them in rows or pile them into a glass cake stand—either way, they look irresistibly cute as a little centerpiece or a thoughtful host gift. When friends ask for the recipe, tell them the secret is in keeping the dough just a touch soft and giving the centers a playful swirl—that little detail makes all the difference in texture and presentation.
What to Serve It With
These bites are incredibly versatile, so you can tailor them to different moments. Here’s how I love to pair them with a few occasions:
For Breakfast: A quick, elegant addition to a holiday brunch lineup. Serve with a light cocoa or a robust coffee latte; the contrast between the rich center and morning beverage is perfect.
For Brunch: Place them on a tiered tray with citrus zest, a few fresh berries, and a gentle dusting of powdered sugar. A small glass of orange-spiced sparkling water or a cinnamon hot chocolate makes a fantastic companion.
As Dessert: Pair with vanilla bean Ice Cream or a dollop of whipped cream and a shimmery mint leaf. The mint brightens the chocolate and makes the plate feel festive.
For Cozy Snacks: A mug of peppermint tea or a hot chocolate bar with mini marshmallows turns a simple snack into a holiday moment. My family loves sprinkling extra Candy cane shards on top for extra crunch and holiday color.
Personally, I love presenting holiday nutella bites on a rustic wooden board with a few fresh sprigs of rosemary and a dusting of cocoa. It feels like a little gift—one that’s easy to share and hard to resist. And yes, there’s a little nostalgia in every bite, a reminder of chilly evenings and the first time I learned to hide a bite behind my back before my brother could swipe it. It’s these small moments that make the recipe worth passing down.
Top Tips for Perfecting Your Holiday Nutella Bites
Here are practical, home-kitchen-tested tips that have saved me more than once and kept these bites consistently delicious.
Nutella Prep: If Nutella is too stiff to scoop, warm it just enough to loosen the oils—about 10 seconds in the microwave—so it blends smoothly with the cream cheese. Don’t let it get hot; you want glossy, not runny. A little warmth makes a big difference in texture and ease of assembly.
Mixing Advice: Avoid overmixing once you combine wet and dry. You want a cohesive dough that’s tender, not a dense, crumbly ball. If the dough feels too sticky, chill it for 15 minutes and test again; if it’s too dry, splash in a teaspoon of cream or a touch more butter.
Swirl Customization: For a playful marbling effect, reserve a small portion of the main batter and fold in a bit of extra Nutella. Roll the centers with a gentle twist so you can see that inner swirl when you bite in. It’s visually satisfying and tastes just as good as it looks.
Ingredient Swaps: You can swap in crushed almond cookies for a nutty edge, or use coconut milk powder for a dairy-free version (though it will alter texture slightly). If you want to keep it gluten-free, opt for gluten-free cookies or finely crushed gluten-free crackers as the binding base.
Baking Tips: This is a no-bake recipe, but a few kitchen realities matter. Keep the bites cold when you’re not shaping them to prevent melting, and set the glaze in a cooler room or in the fridge to prevent it from sliding off. If your glaze thickens, re-warm it briefly and stir in a touch more oil or corn syrup to regain that velvet gloss.
Glaze Variations: Try white chocolate with a peppermint oil drop for a festive look, or dark chocolate with a pinch of chili for a subtle kick. You can also simply dust with cocoa or powdered sugar for a classic finish. The glaze should be pourable but not runny, so adjust with a tiny amount of oil if needed.
From my kitchen to yours, the simple truth is that holiday nutella bites are a product of patience turned playful. I’ve learned that a gentle hand, a little chill time, and a thoughtful finish make all the difference. The more I make them, the more I realize they’re less about perfection and more about sharing a moment of warmth with the people you love. And trust me on this one—the first bite makes the effort feel so worth it.
Storing and Reheating Tips
Storage and texture are where a lot of good intentions can go sideways, so I keep these bites in mind for best results.
Room Temperature: These are best kept refrigerated, but they’ll stay good at room temp for up to 2 hours if you’re entertaining and need to set them out. Any longer, and the center can soften too much. If you’ve got a warm kitchen, keep them in the fridge and set out just before guests arrive for a soft, chilled bite.
Refrigerator Storage: Store in an airtight container, layered with parchment paper to prevent sticking. They’ll stay delicious for up to 5 days in the fridge, with the center remaining fudgy and the glaze maintaining its shine.
Freezer Instructions: For longer storage, freeze unglazed bites on a sheet pan until firm, then wrap tightly and freeze for up to 1 month. Thaw in the fridge or at room temperature, then glaze just before serving for the best texture and gloss.
Glaze Timing Advice: If you’re freezing, glaze after thawing for best appearance. The glaze adheres better to bites that have been chilled and then glazed while still slightly cool. If you’re reheating, a quick 15-second warm-up in the microwave can refresh the center, but be careful not to melt the glaze.
These tips have saved countless batches in my kitchen—especially during the holiday rush when there are cookie trays and gift tins to assemble. A little planning, a couple of chill intervals, and a glossy finish make all the difference between “almost there” and “perfectly wrapped little bites.”
Frequently Asked Questions
Final Thoughts
These holiday nutella bites have become more than a dessert for me—they’re a small ritual that signals the start of cozy season and time with people I love. They’re not fussy, but they feel special; not too sweet, but decadently satisfying; and endlessly adaptable to whatever holiday vibe you’re chasing. If you’re new to them, I hope you’ll start with the classic version and then let your imagination take the lead—peppermint, orange zest, crushed hazelnuts, a sprinkle of sea salt—whatever makes your kitchen feel like a warm, welcome corner of the season. And if you try a twist I haven’t thought of, tell me in the comments below. I’m always curious to hear what little ritual or ingredient change makes these bites sing for you. Happy baking, friends, and may your holidays be as joyful as the first bite of these little chocolatey beauties. I can’t wait to hear how yours turns out!
holiday nutella bites
Ingredients
Main Ingredients
- 0.5 cup Nutella
- 2 whole eggs
- 0.5 cup sugar
- 0.25 cup milk
- 1 teaspoon vanilla extract
- 0.5 cup all-purpose flour
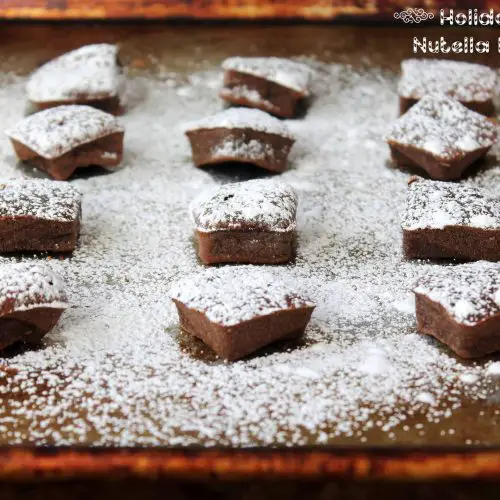
- Powdered Sugar for dusting
Instructions
Preparation Steps
- Preheat oven to 350°F (175°C).
- In a medium-sized mixing bowl, whisk together the Nutella, eggs, sugar, milk, and vanilla extract until well combined.
- Whisk in the flour until the mixture is smooth and creamy.
- Grease a mini brownie pan or mini cupcake pan with baking spray.
- Pour the Nutella mixture into each cavity, filling them about 2/3 full.
- Bake for 14 to 15 minutes, or until a toothpick inserted into the center comes out clean.
- Invert the pan onto a cooling rack and let the bites cool completely.
- Dust with powdered sugar before serving.


