


Oh, how I love this time of year! There’s just something magical about the crisp air, the twinkling lights, and the undeniable urge to curl up with a warm mug. And when that craving hits, there’s absolutely nothing that hits the spot quite like a decadent cup of Hot Chocolate. But forget the powdery stuff from a packet; we’re talking about the real deal, the kind that feels like a hug in a mug. This year, I’ve been completely obsessed with making my own hot cocoa bombs, and let me tell you, they are a game-changer! They’re so much more impressive than a simple mug of cocoa, and surprisingly, they’re not nearly as complicated as you might think. If you’ve ever loved those fancy Starbucks hot chocolates, imagine making them yourself, right in your own kitchen, with your favorite chocolate and fillings. It’s like a little bit of edible magic, and my kids, bless their hearts, ask for these hot cocoa bombs every single weekend!
What are hot cocoa bombs?
So, what exactly are these whimsical little wonders called hot cocoa bombs? Think of them as perfectly formed spheres of pure chocolate joy. The outside is a shell made from tempered chocolate – usually dark, milk, or White Chocolate, depending on what you fancy. Inside that chocolate shell, we pack all the good stuff: rich hot cocoa mix, a generous pinch of sugar (because let’s be real, we need that sweetness!), and often, a little surprise like mini marshmallows or even some chocolate chips. When you place one of these beauties into a mug and pour hot milk over it, it’s like a mini explosion of deliciousness! The chocolate shell melts away, releasing all those yummy ingredients into the milk to create the most incredibly rich and creamy hot chocolate you’ve ever tasted. It’s essentially a super-concentrated, super-fun way to make a single serving of the best hot chocolate ever. I think the name just perfectly captures that moment when the bomb “explodes” with flavor!
Why you’ll love this recipe?
Honestly, there are so many reasons why this recipe has become a staple in my kitchen, especially when the weather gets chilly. First and foremost, the flavor is just out of this world. We’re talking deep, satisfying chocolatey goodness with every single sip. The quality of the chocolate you use really makes a difference here, and I’ll get into that later, but even with good quality chocolate chips, the result is phenomenal. Then there’s the simplicity factor. Now, I know “tempering chocolate” might sound a little intimidating, but I promise you, once you get the hang of it, it’s a breeze. And the payoff is HUGE. You get these gorgeous, gourmet-looking treats that impress everyone, and they really don’t take that much longer than making a batch of cookies. Plus, they’re incredibly cost-effective. Buying fancy hot cocoa mixes or pre-made bombs can get pricey, but making them yourself is so much more budget-friendly, especially if you buy your chocolate in bulk. And oh, the versatility! You can customize these hot cocoa bombs endlessly. Want a hint of mint? Add some peppermint extract to the cocoa mix. Craving caramel? Drizzle some caramel sauce inside. My personal favorite is a little bit of cinnamon mixed in for a Mexican hot chocolate vibe. They’re perfect for gifting too – imagine a little box of these for a neighbor or a teacher! They’re so much more personal than a store-bought gift. What I love most about these hot cocoa bombs is the sheer joy they bring. It’s like a little moment of pure indulgence, and seeing the delight on people’s faces when they melt is just priceless.
How do I make hot cocoa bombs?
Quick Overview
Making these hot cocoa bombs is all about creating a beautiful chocolate shell, filling it with your favorite cocoa mix and treats, and then sealing them up. The process involves melting chocolate, coating silicone sphere molds, letting them set, filling one half, and then joining two halves together. It’s a bit of a delicate process, but it’s incredibly rewarding and much simpler than it looks. The key is patience and good quality chocolate. You’ll end up with these stunning, hollow chocolate spheres that, when placed in hot milk, melt into the most luxurious hot chocolate imaginable. It’s truly a magical experience from start to finish!
Ingredients
For the Main Batter (Chocolate Shell):
You’ll need about 16 ounces of good quality chocolate. I usually opt for semi-sweet chocolate chips or finely chopped chocolate bars. Using a good brand like Ghirardelli or Callebaut makes a huge difference in how smoothly it melts and how good it tastes. Avoid chocolate meant for baking that doesn’t melt well; chocolate chips are usually a safe bet. You can also use milk chocolate or White Chocolate if those are your preferences, but make sure it’s good quality for the best results.
For the Filling:
This is where you can really have fun! You’ll need about 1/4 cup of your favorite hot cocoa mix per bomb. I usually buy a good quality Dutch-process cocoa powder and mix it with sugar and a little vanilla powder, but a good store-bought mix works wonderfully too. And of course, you can’t forget the mini marshmallows! About 1-2 tablespoons per bomb, or as many as you can fit. You can also add a few chocolate chips or even some crushed peppermint candies for an extra flavor boost.
For the Glaze (Optional, for decorating):
A little extra melted chocolate (about 2-4 ounces) works perfectly for drizzling or piping decorative swirls on top of your finished hot cocoa bombs. You can also use a bit of royal icing if you prefer, or even just leave them plain – they’re gorgeous either way!
Step-by-Step Instructions
Step 1: Preheat & Prep Pan
Okay, so we’re not actually preheating an oven here, but this first step is all about getting your chocolate ready. You’ll want to melt your chocolate either in a double boiler or very carefully in the microwave. If you’re using the microwave, heat in 30-second intervals, stirring well after each interval, until the chocolate is smooth and glossy. Be super careful not to overheat it, or it can seize up and become unusable. Once melted, let it cool just slightly so it’s not scorching hot, but still pourable and fluid.
Step 2: Mix Dry Ingredients
While your chocolate is melting, grab a bowl and mix together your hot cocoa mix, sugar (if your mix isn’t sweet enough, or if you’re using pure cocoa powder), and any other dry flavorings like cinnamon or nutmeg. If you’re using pure cocoa powder, I usually add about 2 tablespoons of sugar per tablespoon of cocoa powder, plus a pinch of salt to enhance the chocolate flavor. Give it a good whisk so everything is well combined. This is the yummy stuff that will melt into your hot milk!
Step 3: Mix Wet Ingredients
For the hot cocoa bombs, the “wet ingredients” really refer to your melted and slightly cooled chocolate. You want it to be fluid enough to coat the molds but not so hot that it melts the silicone or makes it difficult to handle. I find that letting it sit for a few minutes after melting is perfect. You can also add a tiny bit of coconut oil (like 1/2 teaspoon) if you find your chocolate is too thick, but be careful not to add too much, or it can affect the setting. The goal is a smooth, pourable consistency.
Step 4: Combine
Now, we combine the chocolate with our sphere molds. This is the crucial step for creating the shell. You’ll need a silicone sphere mold – they come in various sizes, and 2.5-inch molds are pretty standard and work well for a good-sized mug. Spoon a generous amount of your melted chocolate into each cavity of the mold. Use the back of your spoon or a pastry brush to coat the entire inside of each sphere, making sure there are no gaps. You want a nice, even, and fairly thick layer. Let this set for a few minutes, then apply a second coat to ensure the shells are sturdy enough to hold the filling without breaking. Chill the molds in the refrigerator for about 10-15 minutes until the chocolate is completely set and firm.
Step 5: Prepare Filling
While the chocolate shells are chilling, prepare your filling. In a small bowl, combine your hot cocoa mix, sugar (if needed), and any other desired dry additions. If you’re adding mini marshmallows, have them ready in a separate container. You can also add chocolate chips or crushed candy canes at this stage. I like to pre-portion my filling ingredients into little bowls so they’re ready to go when the chocolate shells are out of the fridge.
Step 6: Layer & Swirl
Once the chocolate shells are completely firm, carefully pop them out of the silicone molds. You’ll have perfectly formed chocolate half-spheres. Now, take one half-sphere and fill it with your prepared hot cocoa mix. Don’t overfill it, or it will be difficult to seal. Add a generous handful of mini marshmallows on top of the cocoa mix. Now, to seal these, you need to “glue” two halves together. Take a clean, empty half-sphere and gently heat the rim by placing it rim-down on a warm (not hot!) baking sheet or skillet for just a few seconds until the edge is slightly melted. Immediately press this rim onto the rim of a filled half-sphere. The melted chocolate will create a seal. Gently press them together to ensure they are securely joined. Repeat this process until all your hot cocoa bombs are sealed. They should look like perfect little chocolate spheres!
Step 7: Bake
We’re not baking the bombs themselves, but this step is about ensuring they’re perfectly set. After you’ve sealed all your hot cocoa bombs, let them sit at room temperature for a few minutes for the “glue” to fully set. If your kitchen is very warm, you might want to pop them back into the fridge for about 5-10 minutes to make sure the entire bomb is firm and solid. This ensures they won’t melt or deform when you handle them for decorating or packaging.
Step 8: Cool & Glaze
Now for the fun part – decorating! Once your hot cocoa bombs are completely firm, you can add some extra flair. Melt a small amount of your reserved chocolate for drizzling. You can put this melted chocolate into a piping bag with a small tip, or just use a fork or toothpick to create drizzles or swirls on top of the bombs. You can also add sprinkles, edible glitter, or even a few extra mini marshmallows. Let the drizzle set completely before handling them further.
Step 9: Slice & Serve
These hot cocoa bombs are best served warm! To enjoy, place one hot cocoa bomb into a large mug. Heat up about 8-10 ounces of milk (you can use any kind of milk – whole milk is richest, but almond or oat milk works great too!) until it’s steaming hot, but not boiling. Pour the hot milk over the hot cocoa bomb and watch the magic happen! Stir gently until the chocolate melts completely and all the goodies inside are released. Stir in those marshmallows and enjoy your incredibly rich and creamy hot chocolate. It’s a truly indulgent experience!
What to Serve It With
These hot cocoa bombs are practically a party in themselves, but they pair wonderfully with a variety of things, depending on the occasion. For a cozy breakfast, I love to serve them alongside some fluffy pancakes or a warm croissant. The rich chocolate is a lovely contrast to a slightly sweet breakfast pastry. If you’re planning a lovely brunch, these make an impressive touch. Imagine serving them after the main course, alongside some fresh fruit salad or mini muffins. They add a touch of elegance without being too heavy. For a truly decadent dessert, pair your hot cocoa bomb with a slice of something rich and chocolatey, like a flourless chocolate cake or some brownies. The extra chocolatey goodness is a dream! On a more casual note, if you’re just craving something sweet and comforting in the evening, there’s nothing better than a hot cocoa bomb with a simple sugar cookie or some shortbread. My kids absolutely love having these as a special weekend treat, often with a side of homemade chocolate chip cookies. It feels so festive and special, turning an ordinary afternoon into a celebration!
Top Tips for Perfecting Your Hot Cocoa Bombs
Over the years, I’ve learned a few tricks that make creating these hot cocoa bombs even easier and more successful. First, about the chocolate itself: use good quality couverture chocolate if you can. It melts beautifully and has a wonderful snap. If you’re using chocolate chips, make sure they’re the kind meant for melting, not baking chips, as they contain stabilizers that can make them grainy. When coating your molds, don’t be shy with the chocolate! Two good, thick coats are essential for sturdy shells that won’t crack or break easily. Make sure to get chocolate all the way up the sides of the mold cavity. For the filling, I always pre-measure my hot cocoa mix and marshmallows into small bowls for each bomb. This makes assembly go so much faster and prevents accidental spills. If you’re having trouble sealing the two halves together, make sure the rim you’re heating is only slightly melted, not fully liquid. A quick touch on a warm surface is all you need. Gently press the two halves together, and if there’s a little gap, you can use a bit more melted chocolate on the outside to patch it up. For decoration, don’t overthink it! Simple drizzles of contrasting chocolate (like White Chocolate on dark, or vice-versa) look incredibly elegant. You can also add sprinkles, edible glitter, or even a dusting of cocoa powder. If you’re making these for a party, you can even add a tiny bit of edible gold leaf for a touch of luxury! I’ve found that different brands of chocolate behave differently, so if one type is giving you trouble, don’t be afraid to experiment with another. And remember, it’s okay if they’re not absolutely perfect! The slight imperfections add to their handmade charm. My kids once made a batch where one of the bombs completely collapsed – we just scooped out the filling and ate it with a spoon, and it was still delicious! So, even if things don’t go exactly to plan, the taste will still be amazing.
Storing and Reheating Tips
Storing these beautiful hot cocoa bombs is pretty straightforward, but a few tips will help keep them in tip-top shape. For short-term storage, like if you’re planning to use them within a few days, you can simply keep them in an airtight container at cool room temperature. I usually place them in a single layer so they don’t bump against each other. Avoid direct sunlight or warm spots, as even tempered chocolate can soften. If you’re making a big batch and want them to last longer, the refrigerator is your friend. Place them in an airtight container, again in a single layer if possible, and they should stay good for up to 2-3 weeks. Just be aware that they might develop a slight “bloom” on the surface, which is harmless and doesn’t affect the taste, but might not look as shiny. For really long-term storage, or if you want to prep them way in advance for holiday gifts, freezing is the best option. Wrap each bomb individually in plastic wrap, then place them in a freezer-safe airtight container or bag. They can last for 2-3 months in the freezer. When you’re ready to use a frozen bomb, let it thaw completely in the refrigerator first, then bring it to room temperature before pouring hot milk over it. This gradual thawing helps prevent condensation, which can make the chocolate shell soggy. When reheating, it’s really just about getting your milk nice and hot! You don’t need to reheat the bomb itself. The magic happens when the hot milk melts the chocolate shell. I always heat my milk on the stovetop or in the microwave until it’s steaming, ensuring a good temperature for melting. For the glaze, I usually add it just before serving or gifting, as it sets up nicely at room temperature. If you’re refrigerating or freezing, the glaze will likely harden, but it will soften again when you pour the hot milk over it.
Frequently Asked Questions
Final Thoughts
There you have it – my ultimate guide to making the most wonderful hot cocoa bombs! I really hope you give these a try. They’re more than just a delicious treat; they’re an experience. That moment when the chocolate melts and releases all the cozy goodness is pure magic, and it’s something special to share with loved ones. Whether you’re making them for a cozy night in, a fun activity with the kids, or as a thoughtful homemade gift, they’re guaranteed to bring smiles. Remember, the key is to have fun with it and don’t be afraid to experiment with different chocolate types and fillings. If you end up making these, I would absolutely LOVE to see how yours turn out! Tag me on social media or leave a comment below sharing your favorite flavor combinations. Happy hot cocoa bomb making, everyone!
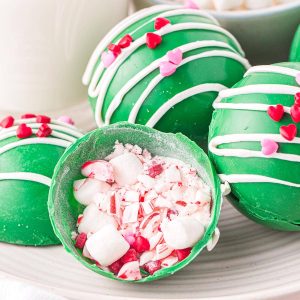
Hot Cocoa Bombs
Ingredients
Main Ingredients
- 12 ounces green candy melts
- 0.75 cup white hot chocolate mix (divided)
- 6 Tablespoons crushed candy cane (divided)
- 6 Tablespoons mini marshmallows (divided)
- 3 teaspoons heart sprinkles (divided)
For Decoration
- 0.5 cup white candy melts
- Additional sprinkles and candy canes (optional)
To Serve
- Steaming hot milk
Instructions
Preparation Steps
- Prepare a large baking sheet by lining it with parchment paper.
- In a medium sized, microwave safe bowl, heat the green candy melts for 30-45 seconds and then remove and stir well.
- Continue heating in 20-30 second intervals, stirring well in between, until the candy is completely melted and smooth. Do not overheat.
- Place 1 heaping Tablespoon of the green liquid in each circle of 2 (6 count) 3 inch diameter, semi sphere silicone molds. You will have some remaining in the bowl, set it aside for now, it will be used again later.
- Swirl each mold to spread the candy melts evenly, using a spoon if necessary to spread it onto the sides of the sphere, and then turn the mold upside down quickly onto the prepared baking sheet.
- Place the molds in the refrigerator for 15-20 minutes or until completely hardened.
- Once the spheres have completely set, remove the molds from the refrigerator and gently remove the green semi spheres.
- Fill half of the spheres (6 halves) with 2 Tablespoons of white hot chocolate, 1 Tablespoon of crushed candy cane, 1 Tablespoon of mini marshmallows and 0.5 teaspoon of heart sprinkles.
- Reheat the green candy melts for 30-45 seconds and stir well. Heat longer, if necessary, until the liquid is melted and smooth again.
- Take a sphere that has nothing in it and dip it into the melts. Gently swirl it and then place it on top of one of the filled spheres.
- Gently wipe off any excess or bulging green liquid and gently fill any holes, if necessary.
- Repeat with each empty sphere until you have 6 filled bombs. Place them back in the refrigerator for 5-10 minutes to set.
- Heat the white candy melts in a small, microwave safe bowl, for 30-45 seconds in the microwave and then stir them well.
- Heat again in 15-20 second increments, stirring after each heating, until they are completely melted and liquid.
- Drizzle the melted white candy over the bombs and then decorate with additional sprinkles or candy canes, optional.
- To serve, place in a large mug and pour in 1.25 cup of steaming hot milk. Stir well and enjoy!


