


Oh, you guys! I’m so incredibly excited to share this with you today. This Greek hummus, it’s… well, it’s more than just a dip for me. It’s a memory. It’s my Yiayia’s kitchen, the warm hum of the oven, the scent of lemons and garlic filling the air. Every time I whip up a batch, it’s like a little trip back home. It’s the kind of food that makes everyone gather around, reach for a pita chip, and just *sigh* with contentment. You know how sometimes you try a recipe that’s just *meh*? This is the polar opposite. This Greek hummus is the real deal. It’s creamy, it’s bright, it’s got this amazing depth of flavor that’s so much more than your average chickpea spread. If you’ve ever been intimidated by making your own hummus, trust me, this is the one to start with. It’s surprisingly simple and the results are just… chef’s kiss! Forget those tubs from the grocery store; this homemade version is a total game-changer.
What is Greek Hummus?
So, what exactly makes this hummus “Greek”? Well, at its heart, hummus is a delicious chickpea dip, famously originating from the Middle East. But when we talk about Greek hummus, we’re really talking about a few key twists that give it a distinctively Mediterranean flair. Think of it as hummus that’s had a delightful little vacation in Greece! It usually means a generous dose of good quality olive oil, a brighter, more pronounced lemon flavor, and often, a few extra aromatic touches like fresh herbs or a hint of garlic that’s just right, not overpowering. It’s essentially a celebration of fresh, vibrant ingredients. It’s not some super complicated dish; it’s built on simple, beautiful flavors that just sing together. It’s that perfect balance – creamy enough to be comforting, but bright and zesty enough to feel refreshing. It’s the kind of thing you want to keep dipping into, scooping up with warm pita, or even dolloping onto grilled meats. It’s familiar, yet excitingly different.
Why you’ll love this recipe?
What are some of the reasons why this Greek hummus recipe has earned a permanent spot in my recipe binder and my heart. First and foremostflavor. It’s just out of this world! The combination of creamy chickpeas, tangy lemon, rich olive oil, and that subtle whisper of garlic is pure magic. It’s not bland or one-dimensional; it’s got layers of deliciousness that keep you coming back for more. And then there’s the simplicity. You might think making hummus from scratch is fussy, but I promise you, it’s one of the easiest dips you can whip up. Seriously, it takes just minutes in a food processor, and the payoff is HUGE. No weird techniques, no fancy equipment needed – just a handful of pantry staples. It’s also incredibly cost-efficient. Buying good quality hummus at the store can get pricey, but making your own with dried or canned chickpeas isversatility. This Greek hummus is a superstar. It’s perfect for a casual get-together with friends, a quick snack on a busy afternoon, or even as a fancy appetizer for a dinner party. You can serve it with pita bread, fresh veggies, crackers, or use it as a spread on sandwiches and wraps. It’s the ultimate crowd-pleaser. What I love most about this specific recipe is how it bridges the gap between a classic hummus and something truly special. It’s familiar enough to be comforting, but elevated enough to impress. It’s the recipe I reach for when I want something delicious, healthy-ish, and guaranteed to be a hit. It’s the best of both worlds!
How to Make Greek Hummus
Quick Overview
Making this incredible Greek hummus is a breeze! You’re essentially going to blend a few simple ingredients until they’re super smooth and creamy. We’ll start with the base of cooked chickpeas, then add tahini (that’s sesame paste, a hummus essential!), plenty of fresh lemon juice for brightness, a touch of garlic, some ice-cold water to get it perfectly smooth, and of course, a generous pour of glorious olive oil. The key is blending everything until it’s lusciously creamy. A little secret tip I learned is to use ice water – it actually helps make the hummus fluffier and lighter. It’s all about getting that silky texture that’s just divine. You’ll be amazed at how quickly you can go from pantry staples to a bowl of hummus that tastes like it came from the most authentic Mediterranean eatery. It’s seriously that easy and that rewarding!
Ingredients
For the Main Hummus Base:
2 cans (15 ounces each) chickpeas, drained and rinsed (or about 3 cups cooked dried chickpeas)
1/4 cup tahini (good quality is key here; look for brands where the oil hasn’t separated too much)
1/4 cup fresh lemon juice (about 1-2 lemons, adjust to your tartness preference!)
1-2 cloves garlic, minced (start with one, you can always add more!)
1/4 cup ice-cold water (this is our secret to creaminess!)
1/2 teaspoon salt, or to taste
2 tablespoons extra virgin olive oil, plus more for serving
For the Greek-Inspired Toppings:
Extra virgin olive oil, for drizzling
Smoked paprika, for a pop of color and flavor
Fresh parsley, finely chopped, for freshness
Kalamata olives, pitted and halved (optional, but oh-so-good!)
Crumbled feta cheese (optional, for that extra Greek kick!)
Step-by-Step Instructions
Step 1: Prep the Chickpeas
This is a step I learned the hard way yields the best texture. If you’re using canned chickpeas, drain them really well and give them a good rinse under cold water. For an even creamier hummus, I like to quickly rinse them again and then peel off their skins. Yes, I know, it sounds tedious, but it makes a noticeable difference! The skins can make the hummus a little grainy. If you’re short on time, don’t stress too much, but if you have a few extra minutes, it’s worth it. If you’re using dried chickpeas, make sure they’re cooked until very tender – they should squish easily between your fingers. Make sure to drain them thoroughly.
Step 2: Combine Base Ingredients
In the bowl of your food processor, add the drained and rinsed (and preferably peeled) chickpeas, the tahini, fresh lemon juice, minced garlic, salt, and 2 tablespoons of olive oil. Give it a quick pulse just to combine everything a bit before we start blending.
Step 3: Blend to Smooth Perfection
Now, with the food processor running on low, slowly stream in the ice-cold water, a tablespoon at a time. This is where the magic happens! Keep blending until the mixture is incredibly smooth and creamy. You’re looking for a texture that’s light, airy, and silky. This can take anywhere from 3 to 5 minutes, depending on your food processor. Don’t be afraid to scrape down the sides of the bowl a few times to make sure everything is getting incorporated evenly. If it seems too thick, you can add another tablespoon or two of ice-cold water until you reach your desired consistency. Taste it now and adjust the salt or lemon juice if needed. I usually find I need a little more salt than I think!
Step 4: Taste and Adjust
Before you transfer it to a serving bowl, give your hummus another taste. This is your last chance to tweak the flavors. Does it need a little more zing? Add more lemon juice. Is the garlic too strong or too subtle? Adjust accordingly. Does it need more salt to make all those flavors pop? Go for it! This is your hummus, so make it taste exactly how *you* like it. It’s all about that perfect balance of creamy, tangy, and savory.
Step 5: Plate and Garnish
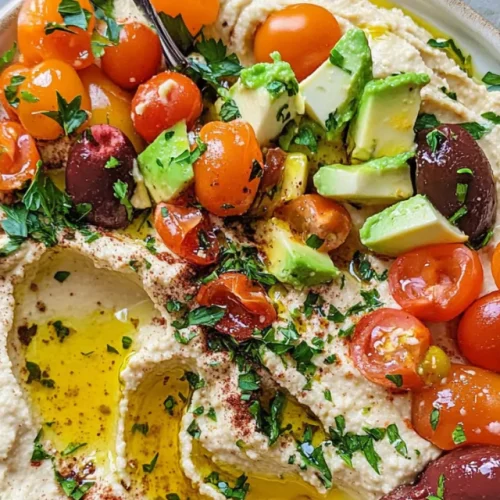
Spoon the hummus into a shallow bowl or platter. Now for the fun part – making it look as good as it tastes! Use the back of your spoon to create a little swirl on top. Drizzle generously with your best quality extra virgin olive oil. Sprinkle over some smoked paprika for a beautiful color and a hint of smokiness. Finish with a generous sprinkle of fresh chopped parsley. If you’re feeling extra Greek, a few halved Kalamata olives or a crumble of feta cheese are fantastic additions!
Step 6: Serve and Enjoy
Serve your gorgeous Greek hummus immediately with warm pita bread, crusty baguette slices, an assortment of fresh vegetables like carrots, cucumbers, bell peppers, and celery, or even with some pita chips. The possibilities are endless!
What to Serve It With
This Greek hummus is such a versatile star, you can literally serve it with almost anything! For breakfast, I love a little dollop on top of a fried egg or avocado toast. It adds a wonderful savory depth that’s just perfect to kickstart your day. Pair it with a strong cup of coffee, and you’re golden. For brunch, it’s a must-have on any mezze platter. Arrange it alongside some grilled halloumi, dolmades, olives, and fresh bread. It looks so elegant and inviting! For a light and satisfying dessert, hear me out: a small bowl of hummus with a drizzle of honey and a sprinkle of pistachios is surprisingly divine, especially if you’ve got a sweet tooth but want something a little different. It sounds strange, but the savory base with the sweet honey is truly delicious. And for those cozy snacks throughout the day, this is my go-to. A big scoop with some crunchy crudités is my idea of heaven. My family also loves it spread on simple toasted bread as a quick afternoon bite. We often have it as part of a “snack dinner” with a variety of dips, cheeses, and crackers – it’s always the first thing to disappear!
Top Tips for Perfecting Your Greek Hummus
I’ve made this Greek hummus more times than I can count, and through all those batches, I’ve picked up a few tricks that really elevate it. For that super smooth texture, I can’t stress enough the importance of peeling the chickpeas. It sounds fussy, but the difference in creaminess is remarkable. You can quickly rub them between your hands with a clean kitchen towel to loosen the skins. Another tip for the base ingredients is the quality of your tahini. A good tahini will be smooth and slightly fluid, not overly thick or bitter. Stir it well before measuring. When it comes to blending, patience is key. Let your food processor do its thing and don’t be afraid to let it run for a good 3-5 minutes. If it seems too thick, remember that ice-cold water is your best friend – it helps emulsify the hummus and make it lighter and fluffier than warm water ever could. Don’t be shy with the lemon juice and salt! These are the flavor powerhouses. I often find myself adding a little more of both than my initial instinct tells me. You want that bright, zesty flavor to really cut through the richness of the tahini and chickpeas. For the swirl and presentation, create a shallow well in the center of your hummus before you add the final drizzle of olive oil. This catches the oil beautifully and makes it look restaurant-worthy. And finally, don’t be afraid to play with the flavor additions. While the classic Greek style is fantastic, I’ve experimented with adding a pinch of cumin, a touch of smoked paprika directly into the hummus itself, or even a tiny bit of roasted red pepper for a smoky sweetness. The beauty of homemade is that you can tailor it perfectly to your taste buds!
Storing and Reheating Tips
The great news is that this Greek hummus stores beautifully, which makes it perfect for meal prep or just having a delicious dip on hand. If you’re planning to eat it within a day or two, storing it at room temperature is fine, especially if you’ve drizzled it with olive oil (the oil acts as a bit of a barrier). However, for longer storage and to maintain peak freshness, I highly recommend refrigerator storage. Transfer the hummus to an airtight container. I like to press a piece of plastic wrap directly onto the surface of the hummus before putting the lid on – this helps prevent a skin from forming. It will stay delicious in the fridge for about 4-5 days. If you notice it thickens up a bit after chilling, just give it a quick stir with a spoon, and you can add a tiny splash of water or lemon juice to loosen it up again. I haven’t personally frozen this hummus, but if you wanted to try, I’d recommend storing it without the final olive oil drizzle and toppings. Wrap it very tightly in plastic wrap, then in foil, or place it in a freezer-safe container. It should be good in the freezer for about 1-2 months. To reheat, thaw it slowly in the refrigerator overnight. Once thawed, give it a good stir, and then you can add your fresh olive oil and toppings. The key to good storage is always an airtight seal to keep out air and moisture.
Frequently Asked Questions
Final Thoughts
So there you have it – my absolute favorite Greek hummus recipe! It’s more than just a dip; it’s a little taste of sunshine, a connection to my family, and proof that the best things in life are often the simplest. I truly hope you give this a try. I know it sounds like a lot of steps, but each one is so straightforward, and the result is just so incredibly rewarding. Imagine serving this to your friends or family – the compliments will flow, and you’ll feel that wonderful satisfaction of creating something truly delicious from scratch. It’s the perfect thing to have on hand for unexpected guests or just when you need a little culinary pick-me-up. If you love this, you might also enjoy my recipe for [link to a related recipe, e.g., Whipped Feta Dip] or my guide to [link to another related recipe, e.g., The Ultimate Mezze Platter]. Let me know in the comments below how yours turns out! I can’t wait to hear about your creations and any fun twists you add. Happy dipping!
Greek Hummus
Ingredients
Main Ingredients
- 425 grams canned chickpeas rinsed and drained
- 0.5 cup tahini
- 0.25 cup lemon juice
- 2 cloves garlic minced
- 0.25 cup olive oil plus more for drizzling
- 0.25 teaspoon cumin
- 0.5 teaspoon salt or to taste
- 0.125 cup cold water adjust for consistency
Optional Garnishes
- paprika
- fresh parsley chopped
- kalamata olives
Instructions
Preparation Steps
- Add the rinsed and drained chickpeas, tahini, lemon juice, minced garlic, olive oil, cumin, and salt to a food processor.
- Process until the mixture is mostly smooth. Scrape down the sides of the food processor as needed.
- With the food processor running, gradually add the cold water, a tablespoon at a time, until the hummus reaches your desired creamy consistency.
- Taste and adjust seasoning if necessary. You might want to add more salt or lemon juice.
- Spoon the hummus into a serving bowl. Drizzle with a generous amount of olive oil.
- Garnish with paprika, chopped fresh parsley, and kalamata olives, if desired.
- Serve with pita bread, vegetables, or as a spread on sandwiches.


