


Oh, hello there! Come on in, grab a mug. I’ve been itching to tell you about this little gem I’ve been making lately. You know how sometimes you just want something a little fancy, a little *special*, but you also don’t have hours to spend in the kitchen? That’s exactly where this Gourmet Ricotta Pear Toast comes in. Honestly, it feels like a delightful secret, something you’d find at a chic little cafe, but it’s ridiculously easy to whip up right here at home. It’s a world away from your average piece of toast, that’s for sure. Think of it as an elevated breakfast, a sophisticated snack, or even a light, elegant dessert. It’s the kind of dish that makes you feel like you’ve got it all together, even if you’re still in your pajamas. I’ve tried a lot of fancy toasts in my day, but this one, with its creamy ricotta and sweet pears, just hits different. It’s quickly become a go-to for those moments when I need a little culinary hug.
What is a gourmet ricotta pear toast?
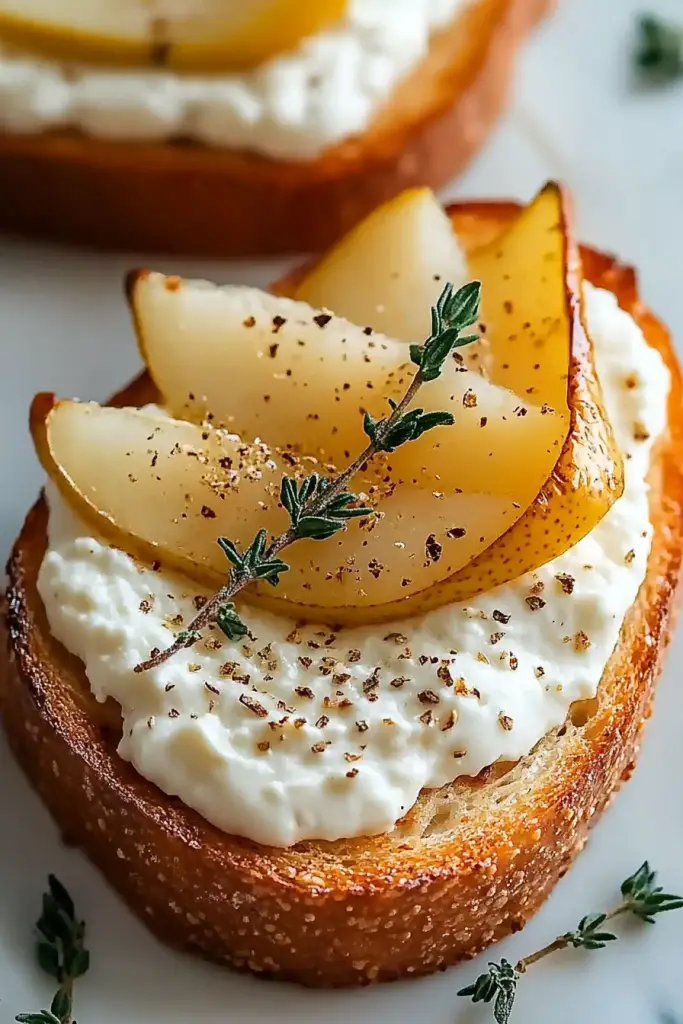
So, what exactly *is* Gourmet Ricotta Pear Toast? At its heart, it’s exactly what it sounds like: toasted bread, slathered with creamy ricotta cheese, and topped with beautiful slices of ripe pear. But oh, the magic is in the details! We’re not just talking about any old bread or any old pear. We’re talking about a thick, sturdy slice of artisan bread – something with a good chew and a lovely crust – toasted to golden perfection. Then, we add a generous dollop of full-fat ricotta, whipped just enough to make it extra smooth and luscious, almost like a cloud. The pears are usually lightly warmed or caramelized to bring out their natural sweetness, and then there’s the finishing touch, a drizzle of something sweet and maybe a sprinkle of something with a bit of crunch. It’s essentially a deconstructed dessert meets an elevated breakfast, all piled onto a piece of perfectly toasted bread. It’s simple, yes, but it’s the quality of the ingredients and the thoughtful assembly that truly elevate it into something gourmet.
Why you’ll love this recipe?
There are so many reasons why I think you’re going to absolutely adore this Gourmet Ricotta Pear Toast. First off, the flavor combination is just divine. You get that creamy, slightly tangy ricotta, which is the perfect canvas for the sweet, tender pear. The toast provides that satisfying crunch, and then any little additions – like a drizzle of honey or a sprinkle of cinnamon – just tie it all together. It’s a symphony of textures and tastes in every bite. What I especially love is how surprisingly simple it is. You don’t need any fancy techniques or hard-to-find ingredients. It’s something you can throw together in under 15 minutes, which makes it a lifesaver on busy mornings or when unexpected guests pop over. And let’s talk about cost-efficiency! Compared to buying a fancy pastry or a breakfast item from a cafe, making this at home is incredibly budget-friendly. You probably have most of the ingredients already. Beyond that, it’s wonderfully versatile. Want it for breakfast? Serve it with a cup of coffee. Craving something sweet after dinner? This is your answer without the guilt of a heavy dessert. It’s also fantastic for brunch because it looks so elegant on a platter. It’s not quite as rich as a decadent Chocolate Cake, but it hits that sweet spot perfectly when you want something comforting and satisfying. Honestly, it’s one of those recipes that feels like a treat without being fussy, and that’s a winning combination in my book!
How do I make a gourmet ricotta pear toast?
Quick Overview
This Gourmet Ricotta Pear Toast is a breeze to make! We’ll start by toasting up some good quality bread until it’s beautifully golden and crisp. While that’s happening, we’ll whip up some dreamy, creamy ricotta cheese. Then, we’ll lightly cook some sweet pears until they’re tender and fragrant. Finally, it’s all about assembling: spread that luscious ricotta onto your toast, top with the warm pears, and finish with a drizzle of honey and maybe a pinch of spice. It’s genuinely this simple, and the result is always stunningly delicious. You’ll be amazed at how something so easy can taste so sophisticated!
Ingredients
For the Toast Base:
4 thick slices of artisan bread (sourdough, country loaf, or challah work beautifully)
1 tablespoon unsalted butter, melted (optional, for extra crispiness)
For the Creamy Ricotta:
1 cup whole milk ricotta cheese, well-drained
1 tablespoon honey or maple syrup (adjust to taste)
1/2 teaspoon vanilla extract
Pinch of salt
For the Caramelized Pears:
2 ripe but firm pears (Bosc, Anjou, or Bartlett are great choices), peeled, cored, and thinly sliced
1 tablespoon unsalted butter
1 tablespoon Brown Sugar (or maple syrup)
1/4 teaspoon ground cinnamon
For Garnish (Optional):
Extra drizzle of honey or maple syrup
Pinch of ground cinnamon or nutmeg
Toasted chopped nuts (walnuts, pecans, or almonds)
Fresh mint leaves
Step-by-Step Instructions
Step 1: Preheat & Prep Pan
First things first, let’s get our bread ready. You’ll want to preheat your oven to about 375°F (190°C) if you’re toasting in the oven, or get your toaster ready. If you’re using the oven method, I like to lay the bread slices out on a baking sheet. If you want an extra layer of flavor and crispiness, brush each side of the bread with a little melted butter. This step is totally optional, but it really does make a difference!
Step 2: Mix Dry Ingredients
Wait, scratch that! There aren’t really dry ingredients to mix in this recipe in the traditional sense, but we do want to make sure our ricotta is properly drained. Take your ricotta out of its container and place it in a fine-mesh sieve set over a bowl. Let it sit for at least 15-20 minutes, or even longer if you have time. This is super important for getting that wonderfully creamy, not watery, texture. You can gently press down on it occasionally. Any water that drains out will make your ricotta spreadable and delicious, not soupy.
Step 3: Mix Wet Ingredients
Now for the dreamy ricotta! In a medium bowl, combine your well-drained ricotta cheese with the honey or maple syrup (start with 1 tablespoon, you can always add more), the vanilla extract, and a tiny pinch of salt. This salt might sound weird in a sweet dish, but trust me, it really brightens up all the flavors and prevents it from tasting flat. Grab a whisk or a fork and whip it all together until it’s super smooth and creamy. It should be light and spreadable, almost like whipped cream. Taste it and add a little more sweetener if you prefer it sweeter.
Step 4: Combine
We’ve already done our combining in the previous step by whipping the ricotta. The key here is gentle mixing. You don’t want to overwork it, just enough to make it smooth and luxurious. If you feel like it’s a little too thick after draining, you can always stir in a tiny splash of milk or cream to loosen it up to your desired consistency. The goal is a thick, spreadable creaminess.
Step 5: Prepare Filling
Now let’s get those beautiful pears ready. Melt the 1 tablespoon of butter in a skillet over medium heat. Add your thinly sliced pears, the Brown Sugar (or maple syrup), and the cinnamon. Cook for about 5-7 minutes, stirring gently, until the pears are softened and slightly caramelized. You want them tender but not mushy, with a lovely warm, sweet aroma. The brown sugar will help them get a nice golden hue. This step really transforms the pears, bringing out their natural sweetness and adding a wonderful warmth to the toast.
Step 6: Layer & Swirl
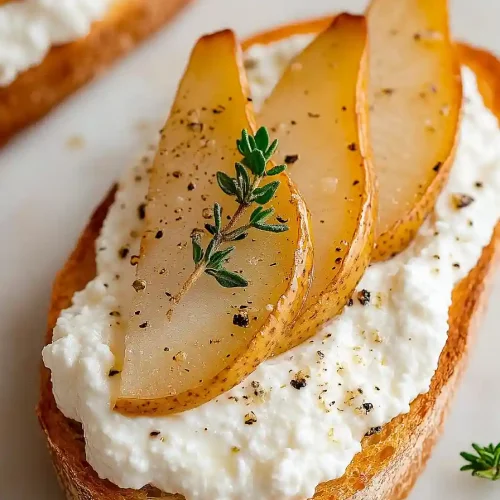
Once your bread is toasted to a lovely golden brown (whether in the toaster or oven), it’s time for assembly! Take your perfectly toasted bread slices and generously spread that luscious, creamy ricotta mixture all over them, right to the edges. Then, artfully arrange the warm, caramelized pear slices on top of the ricotta. You can layer them up nicely or scatter them – it’s your masterpiece! Don’t be shy with the ricotta or the pears!
Step 7: Bake
Actually, we’re done with baking at this point, since we toasted the bread earlier. If you chose to toast your bread in the oven, you might want to pop it back in for just a minute or two after adding the ricotta and pears, to warm everything through. I usually just assemble mine right after the bread is toasted and the pears are warm, and serve it immediately. This way, you get that contrast between the warm pears and toast, and the cool, creamy ricotta.
Step 8: Cool & Glaze
No cooling needed here, actually! We want this warm and ready to eat. The “glaze” in this case is our final drizzle. Once the pears are artfully arranged, take a little extra honey or maple syrup and drizzle it all over the top. If you’re feeling extra, sprinkle a little more cinnamon or nutmeg, or even some toasted nuts for added crunch. This final flourish is what really takes it from good to gourmet. It’s the little things, you know?
Step 9: Slice & Serve
This dish is best served immediately while the toast is still warm and crisp, the pears are tender, and the ricotta is cool and creamy. You can slice it in half diagonally if you like, or just present the whole glorious slice. Garnish with a few fresh mint leaves if you have them – the pop of green is lovely! It’s perfect on its own, but a cup of coffee or a delicate tea makes it a complete experience. Enjoy every single bite!
What to Serve It With
For Breakfast: This Gourmet Ricotta Pear Toast is practically a breakfast masterpiece on its own, but it pairs beautifully with a strong, freshly brewed coffee. A simple side of fresh berries like raspberries or blueberries adds a lovely tartness that cuts through the richness. If you’re feeling ambitious, a side of crispy bacon or a perfectly poached egg can make it a more substantial meal, turning it into a decadent brunch item. For me, though, it’s usually just the toast and my morning latte – pure bliss!
For Brunch: To elevate this for a brunch spread, think about presentation. Arrange a few slices on a beautiful platter, perhaps with a scattering of edible flowers or a sprinkle of pomegranate seeds for a pop of color. It’s lovely alongside a quiche, a frittata, or even some light salads. For beverages, consider a mimosa, a Bellini, or a sparkling rosé to match its elegant feel. It’s the kind of dish that makes guests feel pampered and special.
As Dessert: This is where it truly shines as a sophisticated, light dessert. Serve it warm, perhaps with a small scoop of vanilla bean Ice Cream or a dollop of whipped cream. A drizzle of balsamic glaze can add an unexpected but delightful savory note that complements the sweet pears beautifully. For a truly indulgent finish, a few dark chocolate shavings on top are divine. It’s much lighter than a heavy cake, making it perfect after a big meal.
For Cozy Snacks: On a chilly afternoon, there’s nothing better. Warm it up quickly, maybe add a sprinkle of nutmeg instead of cinnamon, and curl up on the sofa with a mug of hot chocolate or a soothing herbal tea. It feels incredibly comforting and satisfying without being overly filling. My kids love it when they come home from school, especially with a little extra honey drizzled on top. It’s that perfect little pick-me-up!
Top Tips for Perfecting Your Gourmet Ricotta Pear Toast
Pear Prep: When selecting your pears, aim for ones that are ripe but still a little firm. If they’re too soft, they’ll turn to mush when cooked. Peeling is usually best for the smoothest texture, but if you have a particularly nice pear skin, you can leave it on for a more rustic look and extra fiber. Slice them relatively thinly so they cook evenly and soften nicely. Don’t overcrowd the pan when caramelizing; cook them in batches if necessary to ensure they get a nice sear rather than just steaming.
Mixing Advice: The key to the ricotta is draining it well. If you skip this, your toast will be watery. For the smoothest texture, I like to use a full-fat, good-quality ricotta. Don’t be afraid to whip it with a whisk until it’s light and airy. If you find it’s too thick after draining, a tablespoon of milk or cream stirred in can work wonders. Conversely, if it’s still a bit too thin, you can let it drain a bit longer or even gently fold in a tiny bit of Cream Cheese (just a teaspoon!) for extra body.
Swirl Customization: While this recipe is more about layering than swirling, the “swirl” of flavor comes from the combination. For visual appeal, try arranging the pear slices in a circular pattern on top of the ricotta, or even a neat row. A final drizzle of honey in a zig-zag pattern across the top adds a beautiful finishing touch. For a bit of color, some pomegranate seeds scattered on top look stunning and add a delightful pop of tartness.
Ingredient Swaps: If you can’t find ricotta, mascarpone cheese is a luxurious alternative, though it’s richer and a bit more tart. For the pears, apples (like Honeycrisp or Fuji) would also work beautifully, just adjust the cooking time slightly as they’re firmer. If you’re not a fan of cinnamon, a pinch of cardamom or nutmeg works wonders. For a dairy-free option, use a good quality, unsweetened coconut yogurt or cashew cream instead of ricotta, and a plant-based butter alternative for the pears.
Baking Tips: Toasting your bread is crucial. Aim for a deep golden brown that’s crisp on the outside but still has a slight chew inside. If using the oven, keep an eye on it as bread can go from perfectly toasted to burnt very quickly! For the pears, medium heat is your friend. Too high and they’ll burn; too low and they’ll just get soggy. The goal is a gentle caramelization and softening.
Glaze Variations: The honey or maple syrup is essential for that touch of sweetness. But you can get creative! A good quality balsamic glaze adds a fantastic tang and depth. A sprinkle of toasted chopped nuts like walnuts, pecans, or pistachios adds a wonderful crunchy texture. Even a dusting of powdered sugar can work in a pinch if you don’t have any liquid sweetener. For a bit of zest, a tiny bit of orange or lemon zest mixed into the ricotta is lovely.
Storing and Reheating Tips
Room Temperature: Honestly, this is best enjoyed fresh! If you have leftovers, I wouldn’t leave it out at room temperature for more than an hour or two, especially if the ricotta is involved. It’s not a dish that holds up particularly well to sitting out for extended periods.
Refrigerator Storage: If you have any uneaten toast, the best way to store it is to carefully wrap each piece (or the components separately if you prefer) in plastic wrap or place them in an airtight container. The ricotta and pear topping can be stored separately from the toast for up to 2 days. The toast itself will likely lose some of its crispness, but it’s still salvageable. It’s best to assemble just before serving.
Freezer Instructions: I really don’t recommend freezing this assembled dish. The texture of the toasted bread would become very soggy, and the ricotta would likely separate. However, if you made extra caramelized pears or whipped ricotta, you could technically freeze those components separately. The pears would need to be thawed and gently reheated, and the ricotta might need a good whisking after thawing. But honestly, it’s so quick to make, I always prefer to whip up a fresh batch!
Glaze Timing Advice: For the best texture, apply any liquid glazes (like honey or balsamic) just before serving. If you are storing components separately, store the toast, ricotta, and pears individually, then assemble and glaze when you’re ready to eat. This preserves the crispness of the toast and the fresh texture of the toppings.
Frequently Asked Questions
Final Thoughts
Honestly, this Gourmet Ricotta Pear Toast has become such a simple pleasure in my kitchen. It’s proof that you don’t need complicated techniques or exotic ingredients to create something truly delicious and a little bit elegant. It’s the kind of recipe that makes you feel good about what you’re eating, whether it’s a quick breakfast before heading out the door or a sweet treat after dinner. It’s comforting, it’s beautiful, and best of all, it’s so easy to make your own. I really hope you give this a try! If you love this recipe, you might also enjoy my recipe for Lemon Blueberry Scones or my Easy Overnight Oats for more delicious breakfast ideas. Let me know in the comments how yours turns out, or if you’ve found any other fun ways to enjoy it! I can’t wait to hear about your creations. Happy cooking!
Gourmet Ricotta Pear Toast
Ingredients
Main Ingredients
- 4 slices Artisan Bread
- 0.5 cup Ricotta Cheese whole milk recommended
- 1 ripe Pear such as Bosc or Anjou, thinly sliced
- 1 tablespoon Honey or maple syrup
- 0.25 teaspoon Cinnamon
- Fresh Mint Leaves for garnish (optional)
Instructions
Preparation Steps
- Toast the bread slices until golden brown and slightly crispy.
- While the bread is toasting, spread a generous layer of ricotta cheese onto each slice.
- Arrange the thinly sliced pear over the ricotta cheese.
- Drizzle the honey or maple syrup over the pears.
- Sprinkle with cinnamon.
- Garnish with fresh mint leaves, if desired.
- Serve immediately.


