


I’m going to let you in on a little secret, one that I’ve guarded with my life (okay, maybe not my life, but definitely with a stern look when someone asks for the recipe before they’ve even taken a bite). It’s my beloved gooey butter cake. Now, I know what you might be thinking. “Gooey butter cake? Isn’t that just… a cake with butter?” Oh, my dear friend, it is so, so much more. It’s the kind of dessert that makes your eyes roll back in your head with pure bliss, the kind that has people subtly (or not so subtly) inquiring about its origin story. It’s a St. Louis classic, and honestly, once you try it, you’ll understand why it’s so revered. Forget your fancy layer cakes for a moment; this dense, rich, impossibly decadent treat is in a league of its own. It’s the kind of Comfort Food that whispers sweet nothings to your soul, perfect for those days when you just need something utterly soul-satisfying. This gooey butter cake is less about intricate decorating and more about pure, unadulterated deliciousness. It’s the dessert equivalent of a warm, cozy hug, and I’m so excited to finally share it with you!
What is gooey butter cake?
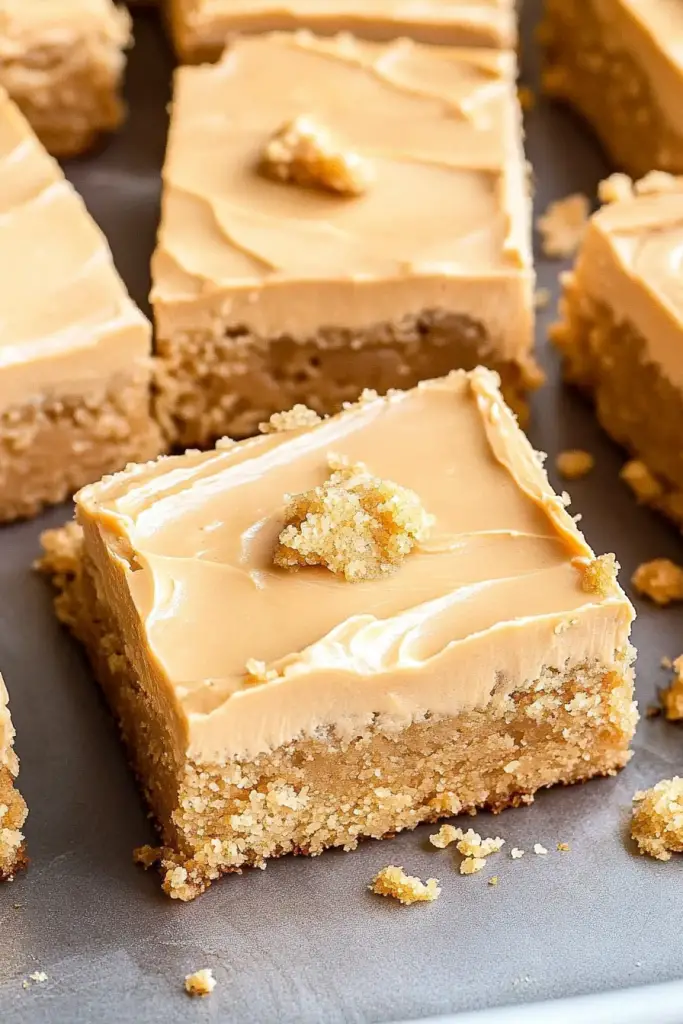
So, what exactly is this magical creation we call gooey butter cake? At its heart, it’s a two-layered dessert that’s less like a traditional cake and more like a divine intersection of a rich blondie and a dense, buttery pound cake, all topped with a slightly crisp, yet still wonderfully tender, crust. The bottom layer is a dense, almost cookie-like base made from a buttery, floury dough. On top of that, you pour this incredibly rich, custard-like filling – think Cream Cheese, butter, eggs, and a generous amount of sugar. When it bakes, the filling sets into this luscious, almost caramel-like layer that’s truly the star of the show. The name, “gooey butter cake,” really is spot-on. It’s a delightful paradox: dense yet wonderfully tender, intensely sweet but perfectly balanced by the rich butteriness. It originated in St. Louis, Missouri, back in the 1930s, and it’s a staple in local bakeries and homes. It’s not overly complicated, which is part of its charm. It’s rustic, it’s honest, and it’s pure, unadulterated comfort in every single bite. It’s essentially a love letter to butter and sugar, and who can argue with that?
Why you’ll love this recipe?
What are some of the best reasons to make gooey butter cake?flavor is just out of this world. It’s deeply, luxuriously buttery, with a sweetness that’s rich and satisfying without being cloying. The texture is where the magic really happens – that dense, slightly chewy bottom layer gives way to the incredibly soft, almost molten filling. It’s pure indulgence. Then there’s the simplicity. I know, it sounds fancy, but this cake is surprisingly easy to whip up. You don’t need any fancy equipment, and the steps are straightforward. It’s a lifesaver when you need a show-stopping dessert but don’t have hours to spend in the kitchen. I’ve even made it when I’ve only had about 45 minutes of active prep time, which is amazing for a dessert this decadent. It’s also incredibly cost-efficient. Most of the ingredients are pantry staples that you likely already have on hand. No exotic fruits or rare spices needed here!versatility! While it’s incredible on its own, it’s also a fantastic canvas for a few simple variations. Serve it warm with a scoop of vanilla ice cream for a truly over-the-top dessert, or enjoy a slice at room temperature with your morning coffee – it’s divine either way. Compared to a complicated Chocolate Cake or a fussy cheesecake, this gooey butter cake is just so approachable and reliably delicious. What I love most about this recipe, though, is the sheer joy it brings. It’s the kind of cake that garners gasps of delight and leads to repeat servings, and that’s always a win in my book. It’s also a fantastic option when you’re craving something sweet at 10 pm but don’t want to bake a whole, elaborate cake; this hits the spot perfectly.
How to Make Gooey Butter Cake
Quick Overview
This gooey butter cake comes together in a few simple stages, making it surprisingly approachable for even novice bakers. We’ll start by preparing a quick, buttery dough for the base, then whip up a rich, creamy filling that gets poured right on top. A brief bake, a cool down, and a simple glaze finishes it off. The magic happens in the oven, where these simple ingredients transform into a dense, decadent, and utterly irresistible treat. Trust me, the hardest part is waiting for it to cool!
Ingredients
For the Main Batter:
1 cup (2 sticks) unsalted butter, softened. I always use unsalted so I can control the saltiness, and make sure it’s really soft, almost spreadable, for the best texture.
1 box (18.25 ounces) yellow Cake Mix. Don’t worry, we’re not making a plain cake! This is the secret to that perfect dense, chewy base. You can also use a white cake mix, but yellow gives a lovely subtle flavor.
2 large eggs. Room temperature eggs incorporate much better.
1 teaspoon vanilla extract. Pure vanilla extract makes all the difference; no imitation here!
For the Filling:
1 package (8 ounces) Cream Cheese, softened. Make sure it’s fully softened so it blends smoothly without lumps. This is key for that luscious texture.
1 cup (2 sticks) unsalted butter, softened. Yes, more butter! It’s a butter cake, after all.
4 cups powdered sugar, sifted. Sifting is essential here to avoid any lumps in our creamy filling.
4 large eggs. Again, room temperature is best for a smooth incorporation.
1 teaspoon vanilla extract. For that extra flavor boost.
For the Glaze:
1 ½ cups powdered sugar, sifted. This needs to be sifted for a smooth, drizzly glaze.
2-3 tablespoons milk (or a dairy-free alternative like almond milk, which I’ve tested and it makes it even creamier!). Adjust for desired consistency.
½ teaspoon vanilla extract. A little touch of vanilla in the glaze is lovely.
Step-by-Step Instructions
Step 1: Preheat & Prep Pan
First things first, preheat your oven to 350 degrees Fahrenheit (175 degrees Celsius). Now, grab a 9×13 inch baking pan. I like to grease mine really well with butter or cooking spray, and then I usually line it with parchment paper, leaving an overhang on the sides. This makes it SO much easier to lift the cake out later. Seriously, thank me for that little tip!
Step 2: Mix Dry Ingredients
In a large bowl, combine the softened butter and the yellow cake mix. You want to mix this until it resembles coarse crumbs. I usually use a pastry blender or even just my fingertips for this, really squishing the butter into the dry mix. It should feel a bit like wet sand. Don’t overwork it; just get it well combined.
Step 3: Mix Wet Ingredients
To that crumbly mixture, add the 2 large eggs and the vanilla extract. Mix this all together. It will look a bit shaggy at first, but keep mixing until it forms a dough. It’s going to be pretty stiff, but that’s exactly what we want for the base of our gooey butter cake.
Step 4: Combine
Now, take that dough and press it evenly into the bottom of your prepared baking pan. Use your hands or the back of a spoon to get it all the way to the edges. This is the foundation of our amazing cake, so make sure it’s a nice, even layer.
Step 5: Prepare Filling
In a separate large bowl, beat the softened cream cheese and the 1 cup of softened butter together until they are nice and smooth. No lumps allowed! Then, gradually add the 4 cups of sifted powdered sugar, mixing until it’s well combined. It will be thick. Next, beat in the 4 large eggs, one at a time, making sure each is fully incorporated before adding the next. Finally, stir in the vanilla extract. This filling should be smooth, luscious, and wonderfully rich.
Step 6: Layer & Swirl
Carefully pour the filling mixture over the dough base in the pan. You want to spread it out as evenly as possible. Don’t worry if it doesn’t reach every single corner perfectly; it will spread a bit as it bakes. This is where the gooey magic starts!
Step 7: Bake
Pop that pan into your preheated oven and bake for about 30-40 minutes. You’re looking for the edges to be lightly golden brown, and the center should be set but still have a slight wobble. It’s not going to be completely firm like a traditional cake; that’s the “gooey” part! Overbaking will make it too dry, so keep an eye on it. I usually start checking around the 30-minute mark.
Step 8: Cool & Glaze
Once it’s baked, take the cake out of the oven and let it cool in the pan on a wire rack. This is important! Letting it cool allows the gooey center to set up properly. Once it’s completely cooled (or at least mostly cooled – I know, it’s hard to wait!), you can make the glaze. In a small bowl, whisk together the 1 ½ cups of sifted powdered sugar, 2-3 tablespoons of milk, and the vanilla extract until smooth. Drizzle this over the cooled cake. The glaze will set up slightly as it sits.
Step 9: Slice & Serve
Once the glaze has set a bit, you can cut the cake into squares. I find a sharp knife helps, and wiping it between cuts can give you cleaner edges. Serve it at room temperature or slightly chilled. The contrast between the firm base and the soft, gooey center is just divine.
What to Serve It With
This gooey butter cake is so versatile, it can honestly be a star at any meal or occasion. For Breakfast, a simple dusting of powdered sugar or that easy glaze is perfection. Pair it with a strong cup of coffee or a creamy latte – it’s like a sweet hug to start your day. My kids actually ask for this on weekend mornings, and it disappears in minutes! For Brunch, you can elevate it with a few fresh berries on the side – raspberries or strawberries add a lovely tartness that cuts through the richness. A mimosa or a glass of sparkling cider makes it feel extra special. As a Dessert, it truly shines. Serve it slightly warm with a scoop of good quality vanilla bean ice cream – the warm cake and cold ice cream is a classic combo for a reason! A drizzle of caramel sauce is also divine. For truly decadent moments, a dollop of fresh whipped cream is never a bad idea. And for those Cozy Snacks moments, when you just need a little something sweet to lift your spirits? A square of this cake with a glass of milk is pure comfort. I’ve also found it pairs surprisingly well with a dark roast coffee or even a mild herbal tea. My family has a tradition of having this after Sunday dinner, and it always feels like a special occasion, even on a regular Sunday. It’s just that good!
Top Tips for Perfecting Your Gooey Butter Cake
After making this gooey butter cake more times than I can count, I’ve picked up a few tricks that I think really make a difference. For the Base, don’t be afraid of that crumbly texture when you mix the butter and cake mix. It should feel a bit dry and sandy before you add the eggs. That’s what gives it that slightly chewy, cookie-like bottom. When you’re pressing it into the pan, make sure it’s even; a patchy base means an uneven cake. For Mixing the Filling, it’s all about that softened cream cheese and butter. If they’re not soft enough, you’ll end up with lumps, and nobody wants a lumpy gooey butter cake! I always whip them together until they’re super smooth before I even think about adding sugar. And please, please, sift your powdered sugar for the filling. It makes all the difference in achieving that silky, luscious texture. When it comes to the Swirl Customization, while this recipe doesn’t traditionally have a swirl, I’ve seen some gorgeous variations! If you wanted to add something, you could swirl in a tablespoon of melted chocolate or fruit puree into the filling *before* pouring it over the base, but I’m a purist and love it just as it is. For Baking, the key is not to overbake it. I know it’s tempting to want it firm, but that gooey center is the whole point! Start checking for doneness around the 30-minute mark. The edges should be golden, and the center should still have a slight jiggle. If it looks too jiggly, give it another 5 minutes, but be careful. Overbaked gooey butter cake is just sad. For Glaze Variations, while the simple milk and powdered sugar glaze is fantastic, I’ve also experimented with adding a touch of almond extract for a different flavor profile, or even using a bit of lemon juice instead of milk for a tangier finish. For a richer glaze, you could use half-and-half instead of milk. And remember, the consistency is key – you want it thick enough to coat but thin enough to drizzle nicely. If it’s too thick, add milk a teaspoon at a time. If it’s too thin, add more powdered sugar. These little adjustments can really take your gooey butter cake from great to absolutely unforgettable!
Storing and Reheating Tips
Proper storage is key to keeping your delicious gooey butter cake tasting its best. At Room Temperature, it’s best to store it in an airtight container for about 1-2 days. The glaze will help keep the top from drying out. If it’s quite warm in your kitchen, you might want to err on the side of refrigerating it. For Refrigerator Storage, this cake can last for up to a week. Keep it in an airtight container or tightly wrapped in plastic wrap. The texture might firm up a bit in the fridge, but it will still be delicious. I often find that letting a slice sit out at room temperature for about 15-20 minutes before serving helps it regain some of its lovely soft texture. If you’re planning on Freezer Instructions, this cake freezes beautifully! It’s best to freeze it *before* glazing. Wrap the cooled cake tightly in a double layer of plastic wrap, then a layer of aluminum foil. It can stay frozen for up to 2-3 months. To thaw, unwrap it and let it come to room temperature, which usually takes a few hours. Then, you can add your glaze. If you’ve already glazed it, the glaze might soften a bit upon thawing, but it’s still perfectly enjoyable. My personal favorite is to freeze individual slices wrapped well, so I can just pull one out when a craving strikes! For Glaze Timing Advice, if you plan to store it at room temperature or in the fridge, glazing it after it has cooled is ideal. If you’re freezing it, I highly recommend waiting to glaze until after it’s thawed. This prevents the glaze from becoming sticky or gummy during the freezing and thawing process. Trust me, a fresh glaze on a thawed cake makes all the difference!
Frequently Asked Questions
Final Thoughts
So there you have it, my friends – my absolute favorite gooey butter cake recipe! I truly hope you give this a try. It’s more than just a dessert; it’s an experience. It’s that rich, dense base giving way to that impossibly luscious, buttery filling that just melts in your mouth. It’s the kind of cake that brings people together, sparking joy and happy sighs with every bite. It’s my go-to for birthdays, holidays, potlucks, or just those days when a serious craving hits. It’s proof that sometimes, the simplest ingredients can create something truly magical. If you’re a fan of rich, decadent, comforting sweets, this gooey butter cake is absolutely going to be your new best friend. I can’t wait for you to experience it! If you try it, please let me know how it turns out in the comments below – I love hearing your stories and seeing your creations! And if you’re looking for other comforting bakes, you might also love my Perfectly Chewy Chocolate Chip Cookies or my Fudgy Brownie Recipe. Happy baking!
Gooey Butter Cake
Ingredients
Cake Base
- 1 cup unsalted butter softened
- 1 bag yellow cake mix 15.25 oz
- 2 large eggs
Topping
- 0.5 cup unsalted butter melted
- 1 package cream cheese 8 oz, softened
- 2 large eggs
- 1 teaspoon vanilla extract
- 1 bag powdered sugar 10x, about 4 cups
Instructions
Preparation Steps
- Preheat oven to 350°F (175°C). Grease and flour a 9x13 inch baking pan.
- In a large bowl, cream together the softened butter and the yellow cake mix until well combined and crumbly. Stir in the 2 eggs, one at a time, until a dough forms. Press this dough evenly into the bottom of the prepared baking pan.
- In a separate medium bowl, whisk together the melted butter, softened cream cheese, and 2 eggs until smooth. Stir in the vanilla extract.
- Gradually beat in the powdered sugar until the mixture is smooth and pourable.
- Pour the topping mixture evenly over the cake base in the pan.
- Bake for 35-40 minutes, or until the edges are golden brown and the center is set but still slightly gooey.
- Let cool completely in the pan before cutting and serving.


