


Oh, friends, gather ‘round! If there’s one dish that has earned its permanent spot in my family’s weekly rotation, it’s this Garlic Butter Chicken. Seriously, the smell alone when it’s roasting is enough to make my kids come running from wherever they are in the house, forks already in hand. It’s the kind of meal that feels fancy enough for guests but is surprisingly simple enough for a Tuesday night. I remember the first time I made it, thinking, “Okay, this looks and smells amazing, but will it actually taste as good as it looks?” Spoiler alert: it absolutely did. It’s like a cozy hug on a plate, but with that irresistible garlicky, buttery goodness that just makes everything better. If you’ve ever had those moments where you crave something incredibly satisfying without spending hours in the kitchen, this is your answer. It’s got that wow factor, but without any of the fuss, which is my kind of cooking!
What is garlic butter chicken?
So, what exactly is this magical concoction we call Garlic Butter Chicken? Think of it as the most succulent, tender chicken you’ve ever had, bathed in a rich, decadent sauce that’s brimming with the bold, aromatic punch of garlic and the luxurious embrace of butter. It’s not just chicken cooked *with* garlic and butter; it’s chicken that has truly married those flavors. The sauce is usually built on a foundation of melted butter, infused with plenty of minced garlic, often a splash of chicken broth or white wine to loosen it up, and seasoned to perfection. Sometimes there’s a hint of lemon to brighten it, or fresh herbs to add a pop of color and freshness. It’s a dish that’s universally loved because it hits all the right notes: savory, rich, comforting, and utterly delicious. It’s essentially comfort food elevated to its most delicious, satisfying form.
Why you’ll love this recipe?
Let me tell you, there are so many reasons why this Garlic Butter Chicken recipe has become my go-to. First and foremost, the flavor. Oh. My. Goodness. It’s an explosion of savory goodness. The chicken is always unbelievably juicy and tender, thanks to a simple trick I’ll share later, and that garlic butter sauce? It’s pure liquid gold. I could honestly drink it, but I try to refrain! Secondly, the simplicity. I’ve tried plenty of “easy” chicken recipes that end up being more work than they’re worth, but this one is the real deal. You can have this on the table in under an hour, and most of that is hands-off baking time. It’s a lifesaver on those evenings when you’re juggling a million things. Plus, it’s incredibly budget-friendly! Chicken thighs are usually quite affordable, and the rest of the ingredients are pantry staples. You get restaurant-quality flavor without the restaurant price tag. And the versatility! I love serving this with mashed potatoes to soak up all that glorious sauce, but it’s also fantastic over rice, with a side of roasted vegetables, or even tossed with pasta. It truly fits any mealtime need. Honestly, what I love most about this is that it consistently delivers, no matter how chaotic my kitchen is or how tired I am. It’s my culinary superhero!
How do I make garlic butter chicken?
Quick Overview
The beauty of this Garlic Butter Chicken lies in its straightforward approach. We’re talking about searing the chicken for a little bit of color, then letting it soak up all those incredible flavors in a glorious garlic butter bath while it bakes. It’s minimal active cooking time, maximum flavor payoff. You’ll be amazed at how few steps lead to such an extraordinary result. This method ensures the chicken stays incredibly moist and tender, while the sauce gets to meld and deepen beautifully in the oven. It’s perfect for anyone who wants a show-stopping meal without a whole lot of fuss.
Ingredients
For the Chicken:
You’ll want about 1.5 to 2 pounds of boneless, skinless chicken thighs. Thighs are my absolute favorite here because they stay so incredibly juicy and forgiving. You can use breasts if you prefer, but be extra careful not to overcook them – they can dry out much faster. I usually aim for pieces that are roughly the same size so they cook evenly. Make sure they’re patted really, really dry with paper towels; this is key for getting a nice sear later on!
For the Garlic Butter Sauce:
This is where the magic happens! You’ll need about 1/2 cup of unsalted butter. I always use unsalted so I can control the saltiness of the dish. You’ll also need a good amount of garlic – I’m talking at least 6-8 cloves, minced. Don’t be shy with the garlic; it’s garlic butter chicken, after all! A splash of dry white wine (like Pinot Grigio or Sauvignon Blanc) or chicken broth (about 1/4 cup) is great for adding depth and helping to create a lovely sauce. A squeeze of fresh lemon juice (about 1 tablespoon) at the end really brightens everything up and cuts through the richness. And of course, salt and freshly cracked black pepper to taste. Some fresh parsley, chopped, for garnish at the end adds a lovely freshness and pop of color.
Optional additions for the sauce:
A pinch of red pepper flakes if you like a little heat, or a tablespoon of Dijon mustard whisked in for a tangy kick. You can also add a teaspoon of dried herbs like thyme or rosemary to the sauce as it cooks.
Step-by-Step Instructions
Step 1: Preheat & Prep Pan
First things first, let’s get that oven heated up to 400°F (200°C). While the oven is warming, grab an oven-safe skillet. Cast iron is my absolute favorite for this because it heats so evenly, but any oven-safe skillet or even a baking dish will work beautifully. We want to get this skillet nice and hot over medium-high heat. Add a tablespoon of olive oil – just enough to coat the bottom. We’re going for a beautiful golden-brown sear on the chicken, not to cook it all the way through. That’s what the oven is for!
Step 2: Sear the Chicken
Carefully place your patted-dry chicken thighs into the hot skillet. Make sure you don’t overcrowd the pan; if necessary, sear the chicken in batches. We want each piece to get that lovely golden crust. Let them sear undisturbed for about 3-4 minutes per side. They won’t be cooked through, and that’s totally fine. We’re just building flavor here! Once they’re nicely seared, remove the chicken from the skillet and set it aside on a plate for a moment. Don’t wipe out the skillet; all those brown bits (fond!) are packed with flavor.
Step 3: Build the Garlic Butter Sauce
Reduce the heat to medium. Add the butter to the skillet. Let it melt, and then add your minced garlic. Oh, the smell at this stage is just incredible! Stir the garlic around in the butter for about 30 seconds to a minute, until it’s fragrant but not browned. We don’t want burnt garlic, trust me! Pour in your white wine or chicken broth and scrape up any browned bits from the bottom of the pan. Let it simmer for a minute to reduce slightly. This is your flavor base.
Step 4: Combine and Season
Now, nestle those seared chicken thighs back into the skillet, into the glorious garlic butter sauce. Spoon some of that sauce over the top of the chicken. Season everything generously with salt and freshly cracked black pepper. Taste a tiny bit of the sauce (carefully!) and adjust the seasoning if needed. It should be flavorful and rich.
Step 5: Bake to Perfection
Transfer the skillet to your preheated oven. Bake for about 20-25 minutes, or until the chicken is cooked through and the juices run clear. The internal temperature should reach 165°F (74°C). The exact time will depend on the thickness of your chicken thighs. I usually check one piece by cutting into it to make sure it’s no longer pink inside.
Step 6: Finish and Rest
Once the chicken is cooked, carefully remove the skillet from the oven. Stir in the fresh lemon juice. This really wakes up all the flavors. Let the chicken rest in the sauce for about 5-10 minutes. This resting period is crucial for keeping the chicken incredibly tender and juicy. It allows the juices to redistribute throughout the meat.
Step 7: Garnish and Serve
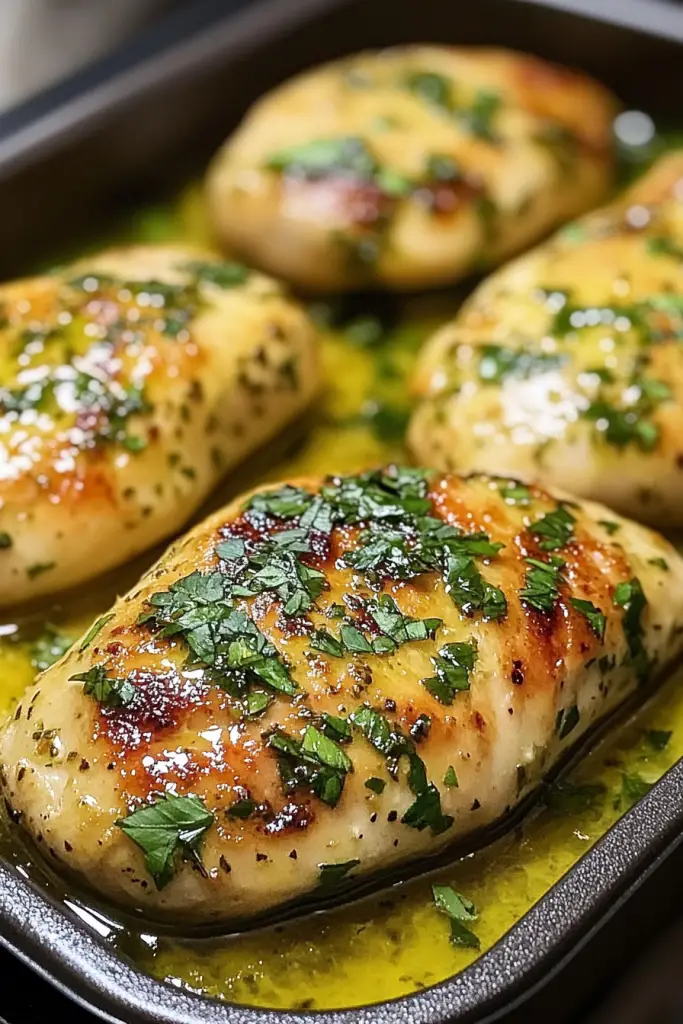
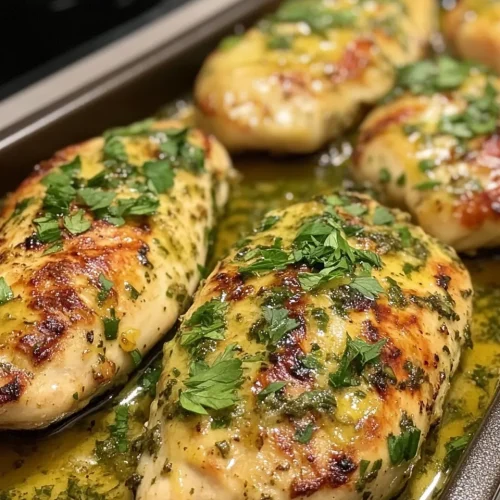
Just before serving, sprinkle with fresh chopped parsley. It adds a beautiful touch of color and a burst of freshness that complements the rich sauce perfectly. Then, serve it up! Spoon that luscious garlic butter sauce generously over each piece of chicken.
What to Serve It With
This Garlic Butter Chicken is so versatile, it fits into almost any meal scenario. For a classic breakfast or brunch, I love serving it alongside some fluffy scrambled eggs and maybe a side of crispy bacon. It’s a little decadent for breakfast, but hey, who doesn’t love a luxurious start to the day? For a more elegant brunch, you could serve it over a bed of creamy polenta or alongside some roasted asparagus and a light vinaigrette salad. It feels fancy without being complicated. As a main course for dinner, it’s an absolute winner. My go-to is always creamy mashed potatoes – they are the perfect vehicle for soaking up every last drop of that divine garlic butter sauce. Roasted root vegetables like carrots and potatoes are also a fantastic companion, adding a touch of sweetness and earthiness. If you’re looking for something lighter, a simple side of steamed green beans or broccoli, perhaps tossed with a little lemon zest, works beautifully. For a quick and satisfying snack, I’ve been known to pull some leftover chicken directly from the fridge and pile it onto a crusty piece of bread for an open-faced sandwich. It’s pure comfort!
Top Tips for Perfecting Your Garlic Butter Chicken
Over the years of making this, I’ve picked up a few little tricks that I think really elevate it. First, for the chicken, don’t skip patting it super dry. I used to rush this step, and I’d end up with more of a steamed chicken than a seared one. A dry surface means a better sear and more flavor development. When you’re searing, make sure your pan is genuinely hot before the chicken goes in. You should hear a confident sizzle. Resist the urge to poke and prod the chicken too much while it’s searing; let it develop that golden crust. For the garlic, I always mince it myself. Jarred minced garlic just doesn’t have the same punch, and it can sometimes have a metallic aftertaste. Fresh is best here, and don’t be afraid to use a generous amount! I’ve learned that if you’re worried about burning the garlic while it’s sautéing in the butter, you can always add it later in the sauce-making process, just before adding the liquid, to give it a little less direct heat. If you find your sauce is a bit too thin after baking, you can always remove the chicken and let the sauce simmer on the stovetop for a few extra minutes to reduce and thicken. Conversely, if it seems too thick, a tiny splash more broth or wine can loosen it up. My kids actually used to complain about the lemon juice, so one time I just omitted it, and it was good, but it definitely lacked that brightness. Now, I add just a *little* less, and they don’t even notice, but it still makes a huge difference for me. Another thing I learned is that if you’re using chicken breasts, they’re much easier to overcook. So, if you opt for breasts, slice them horizontally into thinner cutlets before searing, or cut them into chunks and cook them for a shorter time in the oven. I experimented with adding a sprinkle of Parmesan cheese to the sauce just before it went into the oven once, and it added a lovely salty, umami depth. It’s not traditional, but it was a delicious variation!
Storing and Reheating Tips
This Garlic Butter Chicken is fantastic for leftovers, which is a huge win in my book! If you find yourself with any (which is rare at my house!), here’s how I like to store and reheat it. First, let it cool down to room temperature before you put it away. For refrigerator storage, I usually transfer the chicken and any remaining sauce into an airtight container. It’ll keep nicely in the fridge for up to 3-4 days. The flavors actually tend to meld even more overnight, making it even more delicious! When it comes to reheating, I’m all about preserving that juicy texture. The best way, in my opinion, is to gently reheat it on the stovetop over low heat. You can add a tiny splash of chicken broth or water to the pan to help loosen up the sauce and keep the chicken moist. Alternatively, you can reheat it in the oven at a low temperature, around 300°F (150°C), covered, until warmed through. Microwaving is an option for speed, but I find it can sometimes make the chicken a little drier. If you do microwave, use a microwave-safe dish, cover it, and reheat in short bursts, checking frequently. If you’re planning to freeze it, this recipe holds up surprisingly well. Let the chicken cool completely, then wrap it tightly in a couple of layers of plastic wrap, followed by a layer of aluminum foil. This prevents freezer burn. It should be good in the freezer for up to 2-3 months. When you’re ready to use it, thaw it overnight in the refrigerator, then reheat as you would for refrigerator leftovers. I usually hold off adding fresh parsley until after it’s reheated, as it can get a bit wilted.
Frequently Asked Questions
Final Thoughts
So there you have it, my friends! My absolute favorite Garlic Butter Chicken. It’s a recipe that has brought so much joy to my table, and I truly hope it does the same for yours. It’s proof that you don’t need complicated steps or fancy ingredients to create a meal that tastes like it came from a five-star restaurant. The simplicity, the incredible flavor, and the sheer comfort it provides make it a winner every single time. If you’re looking for other chicken dishes that are equally satisfying and surprisingly easy, you might also love my [Link to another chicken recipe, e.g., Lemon Herb Roasted Chicken] or my super quick [Link to another chicken recipe, e.g., Sheet Pan Chicken Fajitas]. I can’t wait to hear what you think of this Garlic Butter Chicken! Please, if you make it, leave a comment below and let me know how it turned out, or share your own little twists. Your feedback means the world to me, and I love seeing your kitchen creations! Happy cooking, and enjoy every garlicky, buttery bite!
Garlic Butter Chicken
Ingredients
Main Ingredients
- 1.5 pounds chicken breasts cut into bite-sized pieces
- 4 tablespoons butter
- 4 cloves garlic minced
- 0.5 cup heavy cream
- 0.25 cup chicken broth
- 0.5 teaspoon salt
- 0.25 teaspoon black pepper
- 2 tablespoons fresh parsley chopped, for garnish
Instructions
Preparation Steps
- Season chicken pieces with salt and pepper.
- Melt butter in a large skillet over medium heat.
- Add minced garlic and cook until fragrant, about 1 minute, being careful not to burn it.1.5 pounds chicken breasts
- Add chicken to the skillet and cook until browned on all sides and cooked through, about 6-8 minutes.1.5 pounds chicken breasts
- Pour in chicken broth and heavy cream. Stir to combine.1.5 pounds chicken breasts
- Simmer for 5-7 minutes, or until the sauce has thickened slightly.
- Taste and adjust seasoning if needed.
- Garnish with fresh parsley before serving.1.5 pounds chicken breasts


