


There are certain recipes that just… become part of your family’s DNA. You know, the ones that are requested for birthdays, holidays, or just a random Tuesday when everyone needs a little extra comfort. For us, that recipe is this French Toast Casserole. I swear, the moment I pull it out of the oven, the entire house lights up. The aroma alone is enough to make anyone weak at the knees – that sweet, eggy, buttery scent that just screams “good morning” or “good evening,” depending on when you serve it. It’s got that perfect balance of custardy richness and slightly crisp edges, and honestly, it’s so much easier than standing over a griddle, flipping individual slices. If you’ve ever loved a good challah bread French toast but dreaded the fuss, then this French toast casserole is about to be your new best friend. It’s the effortless magic that makes weekend mornings (or weeknights!) feel like a special occasion without all the work. It’s easily one of my go-to’s, right up there with my famous apple crumble pie, but for a fraction of the effort!
What is French Toast casserole?
So, what exactly *is* this magical thing we call French toast casserole? Think of it as your favorite classic French toast, but on steroids and baked into a dreamy, cohesive dish. Instead of dipping individual slices of bread into an egg mixture, you soak cubes of bread overnight (or at least for a few hours!) in a rich custard. Then, you bake it all together in One Pan until it’s golden brown, puffy, and utterly irresistible. It’s essentially a bread pudding meets French toast, all rolled into one glorious baked breakfast (or brunch, or dessert!). The beauty of it is that all the bread soaks up that delicious eggy custard beautifully, ensuring every single bite is moist and flavorful. It’s the ultimate make-ahead breakfast, which, let’s be honest, is a lifesaver for busy families. It’s like a warm hug in a casserole dish!
Why you’ll love this recipe?
There are so many reasons why this French Toast casserole has earned a permanent spot in my recipe rotation, and I’m so excited to share them with you! First off, the flavor. Oh. My. Goodness. It’s the perfect symphony of sweet, eggy custard enveloping soft chunks of bread, with those delightful crispy edges that give it just the right amount of texture. It’s not overly sweet on its own, which is why the glaze is so fantastic, but it has this deep, comforting richness that just makes you feel good from the inside out. Then there’s the simplicity. I mean, it sounds fancy, right? But honestly, it’s incredibly easy. You just cube some bread, whisk together a few ingredients, and let it soak. The overnight soak is key, but that’s just passive time – no active work involved! Plus, it’s surprisingly budget-friendly. Stale bread that might otherwise go to waste gets transformed into something truly spectacular. It’s a fantastic way to use up that loaf of challah or brioche that’s getting a little past its prime. What I love most about this French toast casserole is its versatility. It’s the perfect thing to make when you’re craving something sweet and comforting but don’t want to spend hours in the kitchen. It’s fantastic for a lazy weekend morning, a special occasion brunch, or even as a surprisingly elegant dessert when served with a dusting of powdered sugar and some fresh berries. Honestly, it’s just pure comfort food, and that’s something I can always get behind.
How do I make French Toast Casserole?
Quick Overview
This French Toast casserole is all about maximizing flavor and minimizing morning stress. You’ll cube your favorite bread, soak it in a luscious custard, let it meld together overnight, then bake it to golden perfection. The result is a dish that’s custardy on the inside with those irresistible crispy edges everyone loves. It’s the ultimate make-ahead breakfast or brunch, so you can literally wake up and bake! This method ensures the bread absorbs all the goodness of the custard, making every bite tender and flavorful. It’s so simple, even a beginner cook can nail it!
Ingredients
For the Main Batter:
Let’s talk about the foundation of this glorious dish. You’ll need about 8 cups of cubed bread. Day-old challah or brioche is my absolute favorite because they’re rich and slightly sweet, which really amps up the flavor. But don’t worry if you don’t have those; a good French baguette or even a sturdy white bread will work beautifully! Just make sure it’s a day or two old – that slightly dry texture is crucial for soaking up all that delicious custard without becoming a soggy mess. You’ll also need 6 large eggs, 2 cups of whole milk (or half-and-half for extra richness, which I sometimes do when I’m feeling fancy!), 1/2 cup of granulated sugar (you can adjust this a bit based on your bread’s sweetness and your preference), 2 teaspoons of pure vanilla extract (don’t skimp on this, it adds so much warmth!), and 1 teaspoon of ground cinnamon. A little pinch of nutmeg is nice too, if you have it! Some people add a bit of orange zest here, which is a lovely bright addition, but I usually stick to vanilla and cinnamon for that classic French Toast vibe.
For the Filling:
This is where you can really get creative! For a basic, delicious version, I often use 1 cup of fresh berries (like raspberries or blueberries) or sliced apples (like Fuji or Honeycrisp). If you’re using apples, I like to toss them with a tiny pinch of cinnamon and a squeeze of lemon juice to keep them from browning and add a little zing. Some people love adding chocolate chips, chopped nuts, or even a swirl of jam right into the batter. My kids are obsessed with a cinnamon-sugar swirl baked into the middle. You can even do a layer of cream cheese mixed with a little sugar and vanilla. The options are truly endless and make each batch feel unique!
For the Glaze:
This glaze is like the cherry on top, the sparkle that makes everything shine. It’s so simple but elevates the whole dish. You’ll need 1 cup of powdered sugar, 2 to 3 tablespoons of milk (start with 2 and add more until you get your desired consistency), and 1/2 teaspoon of pure vanilla extract. For a little extra flair, you can add a tiny pinch of cinnamon or a few drops of lemon juice for a brighter flavor. The key is getting the consistency right – you want it to be pourable but thick enough to coat the casserole nicely. It shouldn’t be watery at all, or it’ll just soak into the bread and disappear. A nice, smooth, slightly thick drizzle is perfection!
Step-by-Step Instructions
Step 1: Preheat & Prep Pan
First things first, let’s get your oven ready. Preheat it to 350 degrees Fahrenheit (175 degrees Celsius). While the oven is warming up, grab a 9×13 inch baking dish. I like to give mine a good grease with butter or cooking spray. This is super important to make sure nothing sticks, because nobody wants to be scraping baked-on goodness out of the pan! You can also line it with parchment paper if you prefer, which makes for even easier cleanup. Just make sure the parchment doesn’t go all the way up the sides, or it might scorch. A quick buttering or greasing is usually all you need.
Step 2: Mix Dry Ingredients
In a large bowl, combine your cubed bread. If you’re adding any dry mix-ins like chocolate chips or nuts, now’s the time to toss them in. I usually just lightly toss the bread cubes to distribute them evenly in the bowl. Make sure your bread is indeed on the drier side; if it feels too fresh, you can lightly toast it in the oven for about 10 minutes before cubing. We want it to absorb the custard, not turn into mush!
Step 3: Mix Wet Ingredients
In a separate, equally large bowl, whisk together the eggs. Then, pour in the milk (or half-and-half), granulated sugar, vanilla extract, and cinnamon. Whisk everything together until it’s well combined and looks nice and uniform. You want the sugar to be mostly dissolved. I usually give it a good whisk for about 30 seconds to a minute, just to make sure there are no streaks of egg white or yolk left. If you’re using a pinch of nutmeg or orange zest, add it here too!
Step 4: Combine
Now for the magical part: combining the wet and dry. Pour the wet ingredients over the cubed bread in the large bowl. Gently toss everything together with a spatula or your hands (my preferred method, though it can get a bit messy!). Make sure all those bread cubes are coated in the custard. Don’t mash the bread; just gently fold and turn it until it’s all moistened. You’ll see the bread start to soften and absorb the liquid. It’s okay if some pieces are more coated than others; they’ll all bake up beautifully. This is the crucial step where the bread gets that perfect custardy texture.
Step 5: Prepare Filling
If you’re adding a filling, now’s the time to get it ready. If you’re using berries, just give them a gentle rinse and pat them dry. For sliced apples, chop them up into bite-sized pieces and toss them with a little cinnamon and lemon juice. If you’re doing a cinnamon-sugar swirl, mix about 2 tablespoons of brown sugar with 1 teaspoon of cinnamon in a small bowl. If you’re going with the cream cheese idea, beat softened cream cheese with a tablespoon of sugar and a splash of vanilla until smooth. This step is optional, but it really adds an extra layer of deliciousness!
Step 6: Layer & Swirl
Pour about half of the bread and custard mixture into your prepared baking dish, spreading it out evenly. If you’re using a filling, sprinkle it evenly over this first layer. If you’re doing the cinnamon-sugar swirl, dollop spoonfuls of the cream cheese mixture or sprinkle the cinnamon-sugar mixture over this layer. Then, pour the remaining bread and custard mixture on top, making sure to cover the filling. Gently press down the top layer with your spatula or hands to help it soak in. You want everything to be submerged in the custard as much as possible. If you’re swirling, you can use a knife to gently swirl the filling into the top layer of bread. This gives it that beautiful marbled look!
Step 7: Bake
Now, cover the baking dish with plastic wrap or foil. This is the crucial step for the overnight soak! Pop it in the refrigerator for at least 4 hours, but I always recommend overnight for the best results. The longer it soaks, the more the bread will absorb the custard, leading to an incredibly moist and tender casserole. When you’re ready to bake, take it out of the fridge about 30 minutes before baking and remove the plastic wrap. Bake in your preheated oven for 45-55 minutes, or until the casserole is puffed up, golden brown on top, and a knife inserted into the center comes out clean. You might see some caramelization on the edges, which is totally delicious!
Step 8: Cool & Glaze
Once it’s out of the oven, let the French toast casserole cool in the baking dish for at least 10-15 minutes. This allows it to set up a bit and makes it much easier to slice. While it’s cooling, whisk together the powdered sugar, vanilla extract, and 2 tablespoons of milk in a small bowl. Keep whisking until it’s smooth and creamy. Add more milk, a teaspoon at a time, if you want a thinner glaze, or more powdered sugar for a thicker one. You want a consistency that drizzles nicely but doesn’t run off immediately. Once the casserole has cooled slightly, drizzle that glorious glaze all over the top. It’s okay if some drips down the sides – that just adds to the rustic charm!
Step 9: Slice & Serve
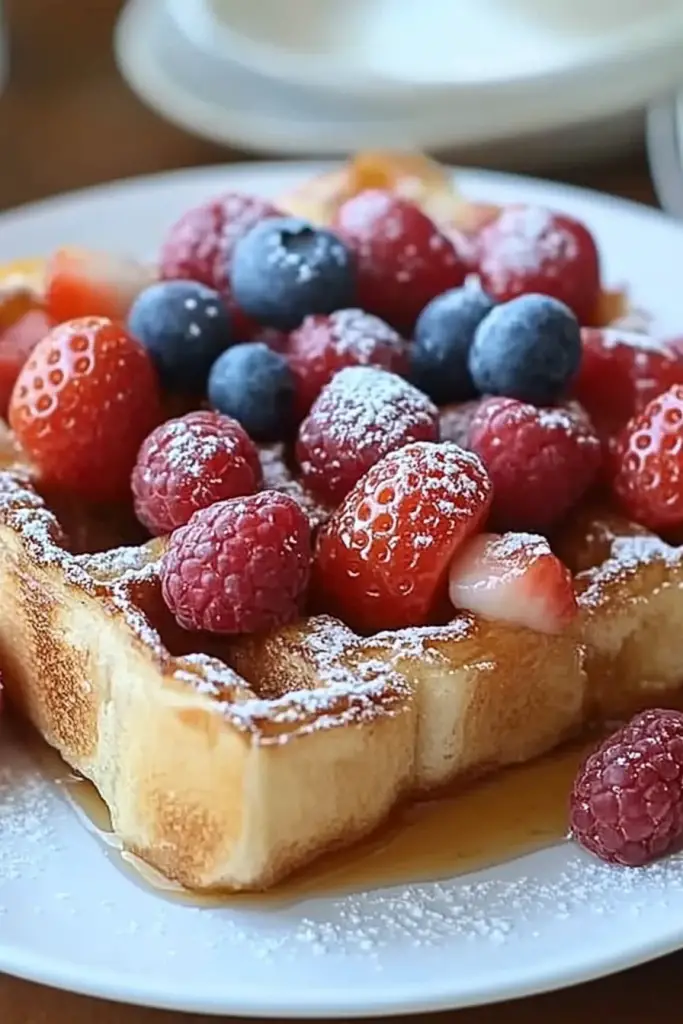
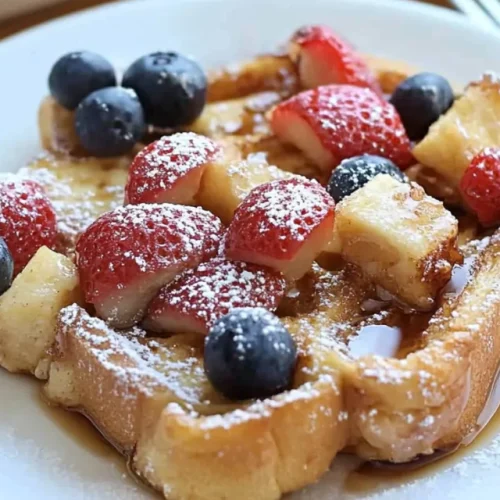
And there you have it! Your masterpiece is ready. Slice the French toast casserole into generous squares. I usually serve it warm, right out of the dish. The contrast of the warm, custardy casserole with the sweet glaze is just heavenly. A dusting of powdered sugar is always a welcome addition, and fresh berries or a dollop of whipped cream are perfect accompaniments. Enjoy every single delicious bite!
What to Serve It With
This French toast casserole is so versatile, it’s truly a star on its own, but pairing it with a few thoughtful sides can elevate it even further. For a classic breakfast, I love serving it alongside a perfectly brewed cup of coffee. The rich, dark coffee cuts through the sweetness beautifully. A side of crispy bacon or some mild breakfast sausage also provides a savory contrast that my family absolutely adores. For a more elegant brunch spread, I’ll often pair it with a fresh fruit salad. Think vibrant berries, melon, and maybe some kiwi – something light and refreshing to balance the richness of the casserole. A mimosa or a sparkling rosé is always a welcome addition to any brunch, too! If you’re looking to serve this as a dessert (and trust me, you should!), it’s phenomenal with a scoop of vanilla bean ice cream or a dollop of fresh whipped cream. A drizzle of warm caramel sauce or some sautéed peaches would also be divine. For those cozy, late-night snack cravings, a simple dusting of powdered sugar and a glass of cold milk is all you really need. My kids sometimes beg for it as a “dessert breakfast” when they’ve been particularly good, and honestly, who am I to say no?
Top Tips for Perfecting Your French Toast Casserole
Over the years of making this French toast casserole countless times, I’ve picked up a few tricks that I think really make a difference. One of the most important things is the bread. I cannot stress enough how much better it is with slightly stale bread. If your bread is too fresh, it will absorb too much liquid and become mushy. If you forget to buy bread ahead of time, you can always cube fresh bread and spread it on a baking sheet, then toast it in a 300°F (150°C) oven for about 10-15 minutes until it’s lightly dried out. For the custard, don’t whisk your eggs too vigorously, or you might end up with too many air bubbles, which can make the casserole a bit too airy and less custardy. Just a gentle, thorough mix is perfect. When it comes to soaking, patience is key! Giving it that overnight soak really allows the bread to absorb the custard fully, ensuring that every bite is moist and delicious. I’ve tried rushing it, and it’s just not the same. If you’re adding fruit, make sure it’s not overly juicy, or it can make the casserole watery. Draining any excess liquid from berries or patting them dry is a good idea. For the cinnamon-sugar swirl, I learned the hard way that if you put too much, it can burn on the bottom, so a moderate amount is best. When it comes to baking, ovens can be tricky! Keep an eye on it during the last 15 minutes. If the top is browning too quickly but the center isn’t set, you can loosely tent it with foil to prevent further browning. The doneness test is crucial: a knife inserted into the center should come out clean, and the casserole should be puffed up and golden. For ingredient swaps, I’ve experimented with different milks, and while whole milk or half-and-half give the richest flavor, you can use 2% milk or even a plant-based milk like almond milk, though the texture might be slightly less rich. Using almond milk actually made it surprisingly creamy, so it’s a good option if you need it! The glaze consistency is also something to play with. I like mine thick enough to coat, but not so thick it’s difficult to drizzle. If it’s too thick, add milk; if it’s too thin, add powdered sugar. These little tweaks have really helped me perfect this recipe over the years!
Storing and Reheating Tips
This French toast casserole is a dream for make-ahead meals, and thankfully, it stores and reheats beautifully. Once it’s completely cooled, you can store leftovers in an airtight container in the refrigerator for up to 3-4 days. I usually just cover the baking dish tightly with plastic wrap and foil and pop it in the fridge, or transfer portions into smaller containers. If you’re planning to freeze it, I highly recommend cutting it into individual portions *before* freezing. Wrap each portion tightly in plastic wrap, then in aluminum foil, or place them in freezer-safe bags. It should last in the freezer for about 1-2 months. When you’re ready to reheat, if it’s from the fridge, you can simply pop a slice (or more!) into the microwave for 30-60 seconds until warmed through. For a crispier texture, you can reheat individual slices in a toaster oven or a regular oven at around 350°F (175°C) for about 5-10 minutes, until heated through and slightly crisped. If reheating from frozen, it’s best to thaw it overnight in the refrigerator first, then reheat as you would refrigerated leftovers. For reheating a larger portion directly from the fridge, you can place the baking dish in a 350°F (175°C) oven for about 15-20 minutes, covered with foil, until heated through. A word of caution about the glaze: I always recommend adding the glaze *after* reheating, especially if you’re reheating individual slices, as the glaze can become sticky or melt completely if reheated multiple times. If you’ve stored the whole casserole with glaze already on it, it’s still fine, but the glaze might not be as vibrant.
Frequently Asked Questions
Final Thoughts
Honestly, this French toast casserole is more than just a recipe; it’s a memory maker. It’s the kind of dish that brings people together, that fills your home with the most incredible aroma, and that tastes like pure comfort and joy. It’s so forgiving and so adaptable, making it perfect for any skill level and any occasion. Whether you’re serving it for a special holiday brunch or a weeknight “brinner” (breakfast for dinner!), it’s guaranteed to be a hit. If you love the idea of a warm, custardy, slightly sweet breakfast treat that’s ridiculously easy to make, you’ve got to give this French toast casserole a try. It’s one of those recipes that I come back to again and again because it never fails to deliver. And if you’re a fan of this, you might also enjoy my Fluffy Pancake Recipe for that classic breakfast indulgence, or my Easy Blueberry Muffins for another fantastic make-ahead treat. I really hope you try this French toast casserole and that it becomes a cherished recipe in your own home. I can’t wait to hear how yours turns out and what delicious variations you come up with! Let me know in the comments below – I love hearing from you!
French Toast Casserole
Ingredients
Main Ingredients
- 1 loaf Brioche bread staled, cut into 1-inch cubes
- 6 large Eggs
- 2 cups Milk whole milk recommended
- 0.5 cups Heavy cream
- 0.5 cups Granulated sugar
- 2 teaspoons Vanilla extract
- 1 teaspoon Cinnamon ground
- 0.5 teaspoon Nutmeg ground
- Butter for greasing the baking dish
Instructions
Preparation Steps
- Grease a 9x13 inch baking dish with butter.
- Arrange the bread cubes evenly in the prepared baking dish.
- In a large bowl, whisk together the eggs, milk, heavy cream, granulated sugar, vanilla extract, cinnamon, and nutmeg until well combined.
- Pour the egg mixture evenly over the bread cubes, ensuring all pieces are soaked.
- Cover the dish and refrigerate for at least 30 minutes, or preferably overnight, to allow the bread to soak up the custard.
- Preheat your oven to 375°F (190°C).
- Bake for 40-50 minutes, or until the casserole is puffed, golden brown, and set in the center. If it starts to brown too quickly, loosely tent with foil.
- Let it cool for a few minutes before serving. Serve warm with your favorite toppings like maple syrup, powdered sugar, or fresh berries.


