


There’s something almost magical about the smell of brownies wafting through the kitchen, right? I remember when I first stumbled upon my microwave brownies recipe — it was one of those late nights when the sweet tooth hit hard, but I was just too tired to bake a whole batch the traditional way. Pop it in the microwave, and in minutes you’ve got warm, fudgy, chocolatey goodness. It’s like having the best of both worlds: rich dessert without the hours of effort. My kids ask for these all the time because they’re just that good and so fast. If you’ve ever thought brownies needed to be this complicated affair with a stack of bowls and a 350°F oven, trust me, microwave brownies might just change your mind forever.
What is microwave brownies?
Think of microwave brownies as the speedy sibling of classic baked brownies. Essentially, it’s the same rich, indulgent chocolate treat but crafted in a way that bypasses the usual baking time. Instead of an oven, you’re using a microwave to cook the batter in a matter of minutes. The name is quite literal—brownies made in the microwave! This method keeps things simple and approachable, especially if you don’t have much time or just want to satisfy a sudden craving without committing to a full batch. Plus, because microwaves cook quickly and evenly (if you know the little tricks), these brownies come out wonderfully moist and fudgy, without any paranoia about drying out or overbaking. It’s like the lovechild of convenience and comfort food.
Why you’ll love this recipe?
What I love most about microwave brownies is how they perfectly blend three things I’m always after in the kitchen: incredible flavor, ease, and flexibility. First, the flavor is just spot-on — deep, chocolatey, and with a hint of that slightly crunchy top edge you get from oven-baked versions, which is honestly surprising given how quick they are. You can add nuts, chocolate chips, or even swirl in some peanut butter for a twist. The simplicity can’t be overstated — no mixers, no fancy steps, and cleanup is a breeze. Plus, the ingredients are basic pantry staples, so you’re not hunting around for anything special or pricey. This recipe is a lifesaver for busy nights when you want to pull together something sweet in a flash or for an impromptu dessert with friends. I also love how versatile it is: I’ve made it in single-serve mugs when I just want a personal treat, but also in bigger dishes to share at brunch or family dinners. It’s quick, adaptable, and honestly, just wholesome comfort on demand.
How do you make microwave brownies?
Quick Overview
Making microwave brownies is about as fuss-free as you can get. The whole process involves mixing a few simple ingredients together in one bowl, pouring the batter into a microwave-safe dish or mug, and cooking it just until set. The microwave cooks these brownies fast — about two to three minutes — so you’ll have warm, gooey chocolate cake ready before you even start daydreaming about dessert. It’s perfect when you want something cozy without the oven preheat or dirty dishes drama.
Ingredients
For the Main Batter:
- ½ cup all-purpose flour — Make sure it’s fresh for the best texture.
- ⅓ cup unsweetened cocoa powder — The richer, the better. I always pick Dutch-processed for that deep color.
- ½ cup granulated sugar — Can substitute with coconut sugar for a subtle caramel note.
- ¼ teaspoon baking powder — To give just a little lift, keep it light.
- A pinch of salt — Always essential to balance the sweetness.
- ⅓ cup vegetable oil — Neutral flavor works best; coconut oil can add nice depth but changes the taste slightly.
- ¼ cup milk (any kind works) — I’ve tested almond and oat milk; both add a creamy touch!
- 1 teaspoon vanilla extract — Trust me, don’t skip this.
For the Filling:
- 2 tablespoons peanut butter or Nutella — Swirled in for a decadent twist.
- Optional: 2 tablespoons chocolate chips or chopped nuts — Adds texture and surprise bites.
For the Glaze:
- ¼ cup powdered sugar — Sifted for that silky smooth finish.
- 1 tablespoon milk — Adjust for consistency, thicker for drizzle, thinner for smooth glaze.
- ½ teaspoon vanilla extract — For subtle aroma enhancement.
- Optional: a pinch of cinnamon or espresso powder for a flavor kick.
Step-by-Step Instructions
Step 1: Preheat & Prep Pan
Alright, since microwaves don’t really preheat, we’re skipping that traditional step, but prepping your microwave-safe pan or mug is key! I usually grease my dish lightly with butter or non-stick spray — this prevents that sad sticking moment and helps the edges crisp up nicely. If you’re using a mug, lightly oil the inside and wipe away the excess.
Step 2: Mix Dry Ingredients
In a medium bowl, whisk together the flour, cocoa powder, sugar, baking powder, and salt until evenly combined. Make sure there are no lumps in the cocoa powder for that perfectly smooth batter. I always sift the cocoa because sometimes it clumps up, and clumps don’t microwave well (trust me, I learned the hard way!).
Step 3: Mix Wet Ingredients
In a separate small bowl or measuring cup, combine the oil, milk, and vanilla extract. Give it a good stir until the vanilla aroma starts to waft up. Temperature doesn’t matter a ton here, but room temp liquid mixes easier and avoids clumping when combined with the dry stuff.
Step 4: Combine
Pour the wet ingredients into the dry and fold gently with a spatula. Mix just until no dry spots remain but be careful not to overmix — a few little pockets of flour won’t hurt. You want the batter to stay nice and tender, so minimal stirring is your friend here.
Step 5: Prepare Filling
If you’re adding a swirl, soften your peanut butter or Nutella just a bit so it’s easier to work with — about 20 seconds in the microwave usually does the trick. You want it spreadable but not runny, which helps with that gorgeous marbled effect.
Step 6: Layer & Swirl
Pour about half of the brownie batter into your prepared dish or mug. Dot small spoonfuls of your filling over the batter, then pour the remaining brownie batter on top. Grab a knife or skewer and gently swirl through the layers to create that beautiful marble look. I love how it looks before cooking—like edible modern art!
Step 7: Bake
Microwave on high for about 2 to 3 minutes — times may vary based on your microwave’s power and the size of your dish. Start with 2 minutes and test for doneness by inserting a toothpick or fork; you want moist crumbs but no wet batter sticking. It continues to cook a little once out of the microwave, so don’t overdo it. If cooking single-serve mugs, 1 to 1½ minutes usually does it.
Step 8: Cool & Glaze
This part is important — let those brownies cool for at least 5 minutes before glazing so the glaze doesn’t melt into a thin puddle. Whisk your powdered sugar, milk, vanilla (and optional extras) together until smooth. If it’s too thick, add a drop more milk; too thin, sprinkle in another splash of powdered sugar. Drizzle or spread the glaze evenly over the top for a shiny finish that adds just the right touch of sweetness.
Step 9: Slice & Serve
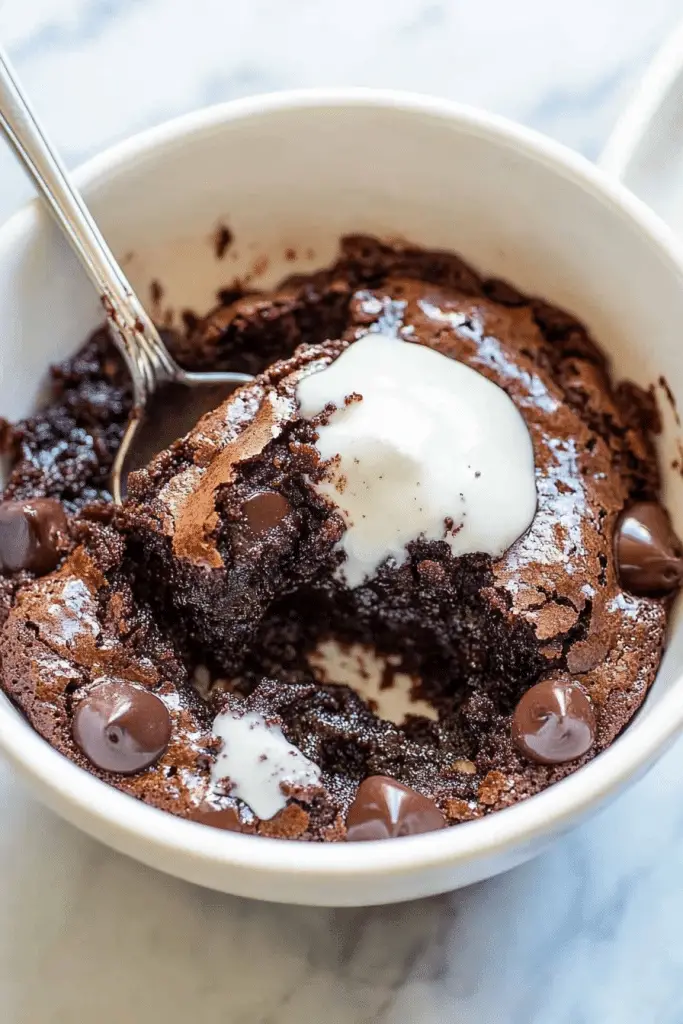
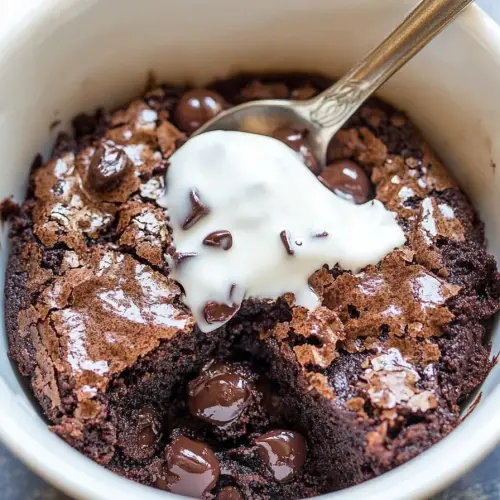
Run a sharp knife around the edges, then cut your brownies into squares or scoop straight from mugs if you went single-serve. They’re best served warm, just as the chocolate is melting and all that glory is at its peak. A scoop of vanilla ice cream or a dollop of whipped cream elevates it to pure comfort food heaven, especially on chilly nights.
What to Serve It With
For Breakfast: Pair your microwave brownies with a fresh cup of coffee or a creamy latte. Crumble a few over plain Greek yogurt and fresh berries for a decadent twist that won’t ruin your morning.
For Brunch: Serve on a small platter alongside fruit salad and a light sparkling juice or mimosa. It’s unexpected and feels a bit fancy for these fudgy treats!
As Dessert: They shine after dinner with a scoop of vanilla or salted caramel ice cream, maybe a drizzle of caramel sauce, or even a few fresh mint leaves for a pop of color and freshness. The warm chocolate flavor brings everyone back around the table.
For Cozy Snacks: Microwave brownies alongside a glass of cold milk or hot cocoa. My kids and I love wrapping these up in wax paper and snacking on them while watching movies or curled up with a book by the fire.
This recipe has become a family ritual on lazy Sundays or when unexpected guests arrive because it’s always a crowd-pleaser that feels just right — like a warm hug in dessert form.
Top Tips for Perfecting Your Microwave Brownies
Ingredient Quality: Don’t skimp on your cocoa powder or vanilla extract. These little details punch way above their weight and make your microwave brownies taste homemade, not rushed.
Mixing Magic: Always mix until just combined. I’ve learned from overenthusiastic stirring that the texture can get tough if overmixed. Fold gently and stop as soon as the flour disappears.
Swirl Customization: Play with patterns—try zigzags or concentric circles with your peanut butter or Nutella swirl. It’s fun to experiment and always a hit visually. A toothpick or butter knife works best for perfect marbling.
Ingredient Swaps: I’ve swapped vegetable oil for melted butter for a slightly richer flavor, but keep the quantity the same. For milk, any kind works here — oat milk makes it a bit creamier while almond milk gives a subtle nutty touch.
Baking Tips: Know your microwave wattage and adjust cooking time accordingly. Mine tends to run hot, so I nudge the time down by 10-15 seconds and check early. Sitting time post-microwave is crucial; the brownies will firm up in the dish.
Glaze Variations: Adding a pinch of espresso powder to the glaze enhances the chocolate flavor big time without making the glaze taste “coffee-like.” For a holiday twist, a dash of cinnamon or orange zest works wonders.
A few lessons learned: never rush the cooling part if glazing—glaze slides off if the brownies are too hot. Also, for larger batches, microwaving in shorter bursts with rest intervals helps cook evenly without drying out edges. Trust me, these little tweaks save you from “microwave brownie regrets.”
Storing and Reheating Tips
Room Temperature: These brownies keep fresh covered in an airtight container for up to 2 days. I usually use a plate with plastic wrap or a cake keeper — just make sure no air sneaks in to dry them out.
Refrigerator Storage: Store leftover brownies in an airtight container or wrap slices in foil to keep moisture in. They last about 5 days and will firm up nicely, making them easy to slice.
Freezer Instructions: For longer storage, wrap individual brownies tightly in plastic wrap and place them inside a freezer bag. They keep well for up to 3 months. When ready to eat, thaw at room temperature or pop them in the microwave for 15-20 seconds until just warm.
Glaze Timing Advice: If you’re storing brownies for later, it’s best to add glaze just before serving to keep that fresh sheen and prevent it from melting into a sticky mess. For immediate eating, glazing right after cooling is perfect.
I’ve found that microwaved brownies hold their moisture pretty well, especially when wrapped right away, so no need to stress if you want to prep in advance — just follow these storage tips!
Frequently Asked Questions
Final Thoughts
Microwave brownies have this sneaky way of turning any ordinary day into a little celebration. I’ve made these countless times—some evenings just to unwind, others for impromptu get-togethers. The best part? They’re quick, forgiving, and deliver that deep chocolate joy every single time without the fuss. If you’ve got a craving that won’t quit or a craving that sneaks up at 10 pm, these brownies are your new best friend. Don’t forget to experiment with swirls, toppings, and maybe even a splash of your favorite liqueur for grown-up fun. Give it a try and let me know how yours turns out! And if you have your own twists or secret ingredients, I’m all ears — share in the comments below. Happy baking!
microwave brownies
Ingredients
Main Ingredients
- 0.25 cup granulated sugar
- 3 tablespoon unsweetened natural cocoa powder
- 3 tablespoon water
- 2 tablespoon canola oil or vegetable oil
- 2 tablespoon light brown sugar packed
- 0.5 teaspoon vanilla extract
- pinch salt to taste
- 0.25 cup all-purpose flour
- 0.33 cup semi-sweet chocolate chips *optional
Instructions
Preparation Steps
- In a small microwave-safe bowl, whisk together sugar, cocoa powder, water, oil, brown sugar, vanilla extract, and salt until smooth.
- Add flour to the mixture and stir until just combined, being careful not to overmix.
- Fold in semi-sweet chocolate chips if using.
- Microwave on high for about 1 minute or until the brownie is set in the center. Check at 45 seconds and continue in 15 second increments if needed.
- Optionally top with ice cream or whipped topping and serve immediately for the best experience.


