


There’s something magical about that first bite of ice cream cake—the creamy coolness paired with a bit of cake’s softness, like the best of both worlds crashing into each other with a sweet, joyful bang. I remember my birthday parties growing up, where the ice cream cake was always the star. My mom used to surprise me with this incredible, homemade version that wasn’t fussy but so full of flavor that it disappeared in minutes. If you love traditional layer cakes but sometimes find baking a whole cake intimidating or time-consuming, this ice cream cake is a lifesaver. It’s a happier, cooler twist that feels like summer and celebration all rolled into one. Trust me, once you try it, it’s hard to go back to regular cake alone.
What is ice cream cake?
Think of ice cream cake as a delightful hybrid between two desserts you probably already adore: cake and ice cream. It’s essentially layers of cake (or sometimes cookie crumbs) and ice cream that get frozen together to make something creamy yet spongy with each forkful. The name says it all, really. Traditionally, it might be a fancy layered thing from a bakery, but at home, it’s all about mixing simplicity with fun. You can play around with flavors, textures, and toppings, turning it into whatever mood you’re in—vanilla with chocolate fudge, fruity with whipped cream, or even peanut butter swirl. It’s approachable for anyone who’s ever wanted a show-stopping dessert that doesn’t need an entire afternoon of baking or decorating.
Why you’ll love this recipe?
What I love most about this ice cream cake is how incredibly versatile it is. My kids actually beg for this instead of their usual ice cream scoop because it feels special but is crazy easy to pull together. The flavor combo? Insane. You get creamy, cold ice cream mingled with tender, moist cake—sometimes even crunchy bits if you sneak in cookie pieces or nuts—which hits so many satisfying spots all at once. Plus, it’s one of those recipes that basically pays for itself: you don’t have to buy fancy ingredients, and leftovers are usually nonexistent in my house.
This is a win on simplicity too. Unlike traditional cakes that require multiple bowls, layers, frosting, and lots of patience, ice cream cake is a bit more forgiving. You can prep most of it ahead of time, and that’s a blessing on busy nights or when you need a last-minute celebration treat. I’ve also experimented with different ice cream brands, homemade and store-bought, and found an easy way to layer them beautifully without the mess.
Bonus: it’s amazing for gatherings because it serves cold and feels fresh. If you’ve ever tried a fruit crumble or panna cotta, those elegant textures are in the same family of desserts that combine creamy and cakey in a friendly way, but ice cream cake edges them out in sheer childhood nostalgia and fun. Honestly, this recipe has quietly become the highlight of our family dinners and every birthday bash since I discovered it.
How do you make ice cream cake?
Quick Overview
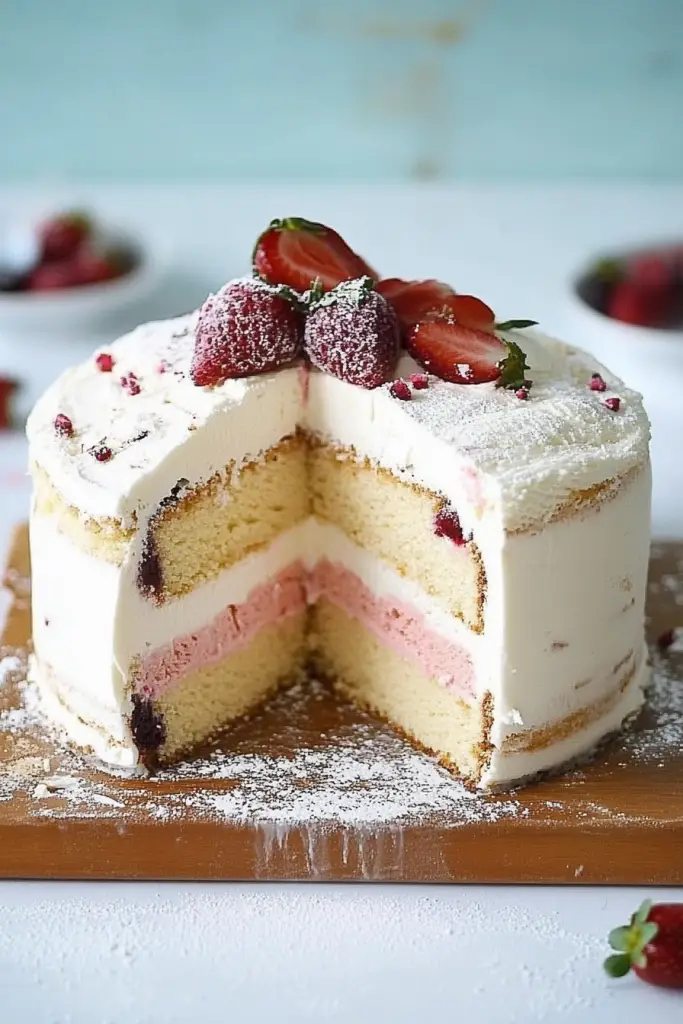
Making ice cream cake is like a fun, no-pressure kitchen project you can conquer even if you don’t consider yourself a baker. The process is basically layering cake and ice cream, freezing between steps so everything sets perfectly, then finishing with a simple glaze or topping. No fancy piping or decorating skills required—the best part is letting the flavors and textures do all the talking. It’s a thoughtful way to impress without sweating the small stuff, and the cake’s always moist because of the ice cream so it practically melts in your mouth.
Ingredients
For the cake base:
- 1 box of your favorite chocolate or vanilla cake mix (or homemade cake batter if you prefer) – I always use the box version for speed; it’s foolproof and moist.
- Eggs, oil, and water according to package directions – for perfect cake moisture.
- A pinch of salt – to balance the sweetness.
For the Ice Cream Layer:
- 1.5 quarts of quality vanilla ice cream (or any flavor you adore) – slightly softened for easy spreading.
- Optional mix-ins: chocolate chips, caramel drizzle, crushed cookies.
For the Glaze or Topping:
- 1 cup heavy cream – whipped or gently warmed for pourable glaze.
- 1/4 cup powdered sugar – helps sweeten and stabilize the cream or glaze.
- Fresh berries, sprinkles, or nuts for decorating – a little whimsy goes a long way.
Step-by-Step Instructions
Step 1: Preheat & Prep Pan
Start by preheating your oven to 350°F (175°C). I always line a 9-inch springform pan or cake pan with parchment paper to make the cake removal easier later on. Greasing is essential here so the cake won’t stick—that nightmare of cracked edges is no one’s friend.
Step 2: Mix Dry Ingredients
If you’re using a boxed mix, this part’s pretty straightforward; just whisk in a pinch of salt for balance. If you go homemade, sift your flour, baking powder, and salt to make sure everything’s light and airy before combining. A well-mixed dry base leads to a tender crumb, which is key for pairing with creamy ice cream.
Step 3: Mix Wet Ingredients
Combine your eggs, oil, and water (or milk for extra richness) as the package suggests. I like to use whole milk or even almond milk sometimes—it adds this subtle creaminess that’s a nice upgrade. Make sure your eggs aren’t cold straight from the fridge; room temp eggs blend better, giving you a smoother batter.
Step 4: Combine
Slowly fold your dry ingredients into the wet, being careful not to overmix. This is where many people mess up the texture—if you stir too hard or too long, you end up with a tougher cake. The batter should look smooth but still light and fluffy. Trust me, clumps of flour in the batter are no fun after baking.
Step 5: Prepare Filling
Scoop out your softened ice cream into a bowl. If you want to add crunchy bits or swirls of caramel or fudge, fold them in gently here. The ice cream should be just soft enough to spread without melting completely, about 10 minutes out of the freezer usually does the trick.
Step 6: Layer & Swirl
Pour half the cake batter into your pan and smooth it evenly. Then add a generous layer of your ice cream filling. Top with the remaining cake batter and swirl gently with a knife or spatula to create a pretty marbled effect. It’s a little artistic moment that always impresses guests—and makes the first slice so much more fun to look at!
Step 7: Bake
Pop the pan into the oven and bake for about 45-50 minutes, checking doneness by inserting a toothpick into the cake portion—if it comes out mostly clean (just a few moist crumbs), you’re golden. If that ice cream layer melts too much, no worries; this recipe is pretty forgiving and still tastes fantastic. Let it cool completely, which will help set those layers before the next step.
Step 8: Cool & Glaze
Once cool, either top your creation with a whipped cream glaze or gently warmed heavy cream mixed with powdered sugar. I’ve found that applying glaze while the cake is slightly warm lets it seep into the layers a bit, keeping everything moist. Then finish with fresh berries or chopped nuts for a punch of color and crunch.
Step 9: Slice & Serve
Slice ice cream cake like a regular cake, but a good tip is to use a very sharp knife, dipped in hot water and wiped dry between cuts—it makes clean slices every time. Serve immediately for the best texture combo, but honestly, leftovers (if you’re lucky enough to have any) taste just as dreamy after chilling. Watching everyone’s faces light up after their first bite is my favorite part.
What to Serve It With
For Breakfast: A tall glass of cold milk and a strong cup of coffee make a fun indulgence for special weekend mornings—like a treat before a day full of adventures. I sometimes add a sprinkle of cinnamon on top for a cozy twist.
For Brunch: Pair this cake with fresh fruit salad and maybe a mimosa or sparkling lemonade. It’s surprisingly elegant—like a little luxe moment in your casual brunch setup.
As Dessert: Nothing beats serving this with a drizzle of warm fudge or caramel sauce, plus lightly toasted almonds on the side. The temperature contrast between warm sauce and cold ice cream cake is a total crowd-pleaser, especially after a big family dinner.
For Cozy Snacks: Throw a scoop on a small plate and top with extra sprinkles or crushed cookies. Serve alongside hot chocolate or chai tea when you want to get a little playful with textures and temperatures on a chill afternoon.
Our family has this goofy tradition where we make joking “cake categories” for each holiday, and ice cream cake somehow sneaks into every celebration—from birthdays to random Fridays. It’s like comfort food but with a frosty twist, and I’ve never seen anyone turn down a slice when it’s around.
Top Tips for Perfecting Your Ice Cream Cake
Cake Prep: Using room temperature eggs and oil not only helps the cake batter blend effortlessly but also ensures a tender crumb. I learned this one after many chalky, dense loaf-like attempts. A quick whisk and no overmixing make all the difference.
Ice Cream Layer: Always let your ice cream soften just enough. If it’s too hard, spreading becomes a workout and might tear your cake; too melted, and you risk sogginess. Keeping the filling a bit firm lets you layer without chaos.
Swirling Magic: When swirling layers, less is more. A gentle hand with the spatula gives you beautiful marbling without blending the layers completely. I like to lift the spatula straight down and twist rather than drag—avoids turning it into a muddy color mix.
Ingredient Swaps: I’ve tried almond milk and coconut milk instead of water or dairy in the batter, and honestly, it adds a subtle richness that pairs with the ice cream in a surprisingly nice way. For gluten-free, a 1-to-1 flour usually works, but expect a slightly more delicate crumb.
Baking Tips: Position your oven rack in the middle and avoid opening the oven door too often. A hot oven blast combined with oven light watching broke many of my cakes in the past! Check your cake five minutes before time’s up—ovens can vary wildly.
Glaze Variations: Besides classic whipped cream, I often use a quick chocolate ganache glaze—it sets beautifully and gives a shiny finish that’s hard to resist. A little sea salt sprinkled on top balances all the sweetness in the best way.
One lesson I’ve learned the hard way? Don’t rush cooling. Ice cream cake’s texture is all about contrast, so letting layers set and flavors meld overnight in the fridge or freezer leads to the happiest crowd-sourced compliments at the table.
Storing and Reheating Tips
Room Temperature: I recommend serving and eating ice cream cake immediately once thawed, but if you’re waiting, leaving it at room temp for no more than 20-30 minutes is best to maintain structure and flavor. Cover loosely with foil to avoid drying out.
Refrigerator Storage: Store any leftover cake in an airtight container or cover tightly with plastic wrap for up to 2-3 days. This keeps the cake moist without turning ice cream rock solid again. Before serving, let sit out for 10 minutes so it’s easier to slice.
Freezer Instructions: Wrapped well in plastic wrap and foil, you can freeze your cake up to one month. Thaw in the fridge for several hours or overnight. I avoid thawing on the counter as it might create soggy spots or melting layers.
Glaze Timing Advice: If you’re freezing the cake, wait to apply the glaze or whipped topping until the last moment after thawing—it helps the topping stay fresh and beautiful without getting icy or weepy.
From experience, using freezer-safe containers or tins prevents freezer burn and keeps your cake tasting just like when you first made it, even if it’s been tucked away for a special occasion.
Frequently Asked Questions
Final Thoughts
I always say this ice cream cake is one of those recipes that feels like a hug in dessert form. It’s easy enough to throw together but yields that kind of wow-factor you want when you’re having company or just treating your own family. It’s the happy meeting point for cake lovers and ice cream fans alike, and once your house fills with that familiar scent, you’ll find everyone suddenly a little more patient and a lot more eager to dig in. If you’ve ever hesitated to bake because it felt complicated or time-consuming, give this a whirl—you won’t regret it. And if you do make it, I’d love to hear about your twist on flavors and what brought this cake to your table. Happy baking and even happier eating!
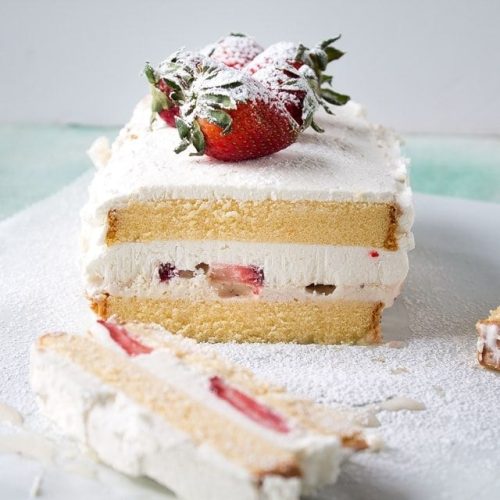
Strawberry Ice Cream Cake
Ingredients
Main Ingredients
- 1 pound cake all-butter pound cake cut into 8 slices
- 2 cups strawberry ice cream
- 10 whole strawberries sliced
- 1 cup cold heavy whipping cream
- 1 teaspoon pure vanilla extract
- 1 tablespoon sugar
Instructions
Preparation Steps
- Line 9×5-inch loaf pan with aluminum foil; leave an overhang on opposite sides to lift out the cake.
- Combine the heavy cream, sugar and vanilla in a large bowl and whip them together until stiff peaks form.
- Place half of cake slices in a single layer at the bottom of prepared pan.
- Using a spatula, spread the ice cream over the cake slices.
- Layer sliced strawberries over ice cream.
- Spread half of the prepared whipped cream over strawberries.
- Layer the rest of the cake slices over the cream.
- Spread the rest of the whipping cream on top and on the sides.
- Set in the freezer for 6 hours or overnight.
- Lift cake out of the pan, cut and serve.


