


There’s something about the smell of peanut butter mixed with a hint of sweetness that takes me straight back to cozy afternoons in my grandma’s kitchen. This peanut butter pie is my little family’s secret happy place — soft, creamy, and buttery with just the right touch of nostalgia. I can’t say it’s as classic as a chocolate chip cookie, but boy, it holds its own when you want that rich, dreamy indulgence without too much fuss. If you’re someone who loves peanut butter cups but hates baking something complicated, this pie is a lifesaver. The texture is so luscious you almost feel like you’re eating peanut butter mousse, but with a buttery crust that cuts through just right. I’ve made it countless times, and every time I do, it disappears in minutes—kids, adults, everyone’s obsessed. Trust me, this one’s a crowd-pleaser you’re going to want to keep in your go-to dessert repertoire.
What is peanut butter pie?
Think of peanut butter pie as a creamy, dreamy no-bake or lightly baked dessert that really showcases the nutty, rich flavor of peanut butter in a luscious, velvety filling. It’s essentially a chilled pie that features a peanut butter-flavored cream—usually whipped with cream cheese or heavy cream for that silky texture—and rests on a crumbly crust. The name is straightforward because it really is a pie where peanut butter shines front and center. It’s like that friend who’s just uncomplicated but totally reliable—you get a buttery base, a fluffy, peanut-buttery middle, and often, a chocolate or caramel drizzle on top if you want to get fancy. It’s approachable, easy to make, and just downright comforting. The best part? You don’t need to be a whiz in the kitchen to nail it, and it still tastes like you’ve spent hours crafting something special.
Why you’ll love this recipe?
Alright, here’s why my peanut butter pie has earned a permanent spot on my recipe list: First off, the flavor. It’s nutty but not overpowering, creamy but not too sweet, and just downright satisfying. If you love peanut butter sandwiches as a kid (or still do—no judgment!), imagine that cozy flavor transformed into a dessert that feels like a melt-in-your-mouth hug. The glorious thing is, this recipe is so darn simple—most of the ingredients are your kitchen staples or easy to pick up at any grocery store without breaking the bank.
The simplicity makes it a perfect last-minute dessert when you want to impress but don’t want to spend hours in the kitchen. Plus, peanut butter pie is incredibly versatile—I’ve served it at casual family dinners, potlucks, and even dressed it up for holidays with a sprinkle of chopped peanuts or a drizzle of dark chocolate. It’s sort of like that versatile little black dress of desserts. What I love most about this pie is that it’s forgiving, too. I’ve experimented with peanut butter varieties (crunchy vs. creamy) and swapping out dairy-heavy ingredients for almond or oat milk, making it a fun, adaptable recipe for all kinds of diets and preferences.
How do I make a peanut butter pie?
Quick Overview
Making this peanut butter pie couldn’t be simpler. You whip up a buttery, crumbly crust, blend together a few simple ingredients—like peanut butter, cream cheese, and whipped cream—for the silky filling, layer it up, and chill. No crazy techniques, no stress, and the payoff is pure gold. It’s all about balancing the creamy textures with that slightly crunchy crust and letting the pie chill enough to set perfectly. Honestly, I do this when I have guests coming over last minute or just when I need a sweet pick-me-up—plus it always smells amazing while it’s chilling in the fridge.
Ingredients
For the Crust:
- 1 12 cups graham cracker crumbs (for that crisp, buttery base; you can also use crushed digestive biscuits if
- ⅓ cup melted butter (unsalted is best, but salted works too—just skip extra salt in filling)
- 2 tbsp sugar (helps balance the peanut butter sweetness)
For the Filling:
- 1 cup creamy peanut butter (I’ve tried natural peanut butter here, but creamy classic works better for smooth texture)
- 8 oz cream cheese, softened (this is the secret to creaminess and stability)
- 1 cup powdered sugar (adjust for sweetness—you can go a bit less if you’re watching sugar)
- 1 tsp vanilla extract (trust me, it amps up the flavor)
- 1 cup heavy whipping cream, whipped to stiff peaks (or use chilled coconut cream for a dairy-free twist)
For the Glaze (Optional):
- ¾ cup semi-sweet chocolate chips
- 2 tbsp heavy cream or coconut milk (for silky chocolate drizzle)
- Chopped peanuts for garnish (adds a lovely texture)
Step-by-Step Instructions
Step 1: Preheat & Prep Pan
Start by grabbing a 9-inch pie pan and give it a quick spray or rub a little butter around the edges. Unlike some pies, you’re not baking the crust long, so no oven preheat needed here if you’re going no-bake. If you prefer a baked crust for extra crunch, preheat your oven to 350°F. I always do this when I want an extra golden crust with a toasty aroma filling the kitchen.
Step 2: Mix Dry Ingredients
Mix the graham cracker crumbs and sugar together in a bowl. This step is straightforward but combining these well upfront helps get an even sweetness and texture in the crust, so don’t skim over it.
Step 3: Mix Wet Ingredients
Pour your melted butter into the crumbs and stir gently but thoroughly until the mixture holds together when pinched. This is your crust base — buttery and balanced, the foundation of this pie’s magic.
Step 4: Combine
Press the crust mixture evenly into the bottom and up the sides of your pie pan. Use the back of a measuring cup or glass to pack it down firmly. If baking, pop it in the oven for 8-10 minutes until lightly golden. If no-bake, set it in the fridge while you make the filling.
Step 5: Prepare Filling
In a large bowl, beat the softened cream cheese and peanut butter until smooth and creamy—no lumps, please! Then add powdered sugar and vanilla extract, mixing just until combined. In another chilled bowl, whip your heavy cream to stiff peaks, then gently fold it into your peanut butter mixture. This keeps the filling airy and not too dense—a texture I learned to perfect after a few attempts when I accidentally overmixed and ended up with a heavy rather than fluffy filling.
Step 6: Layer & Swirl
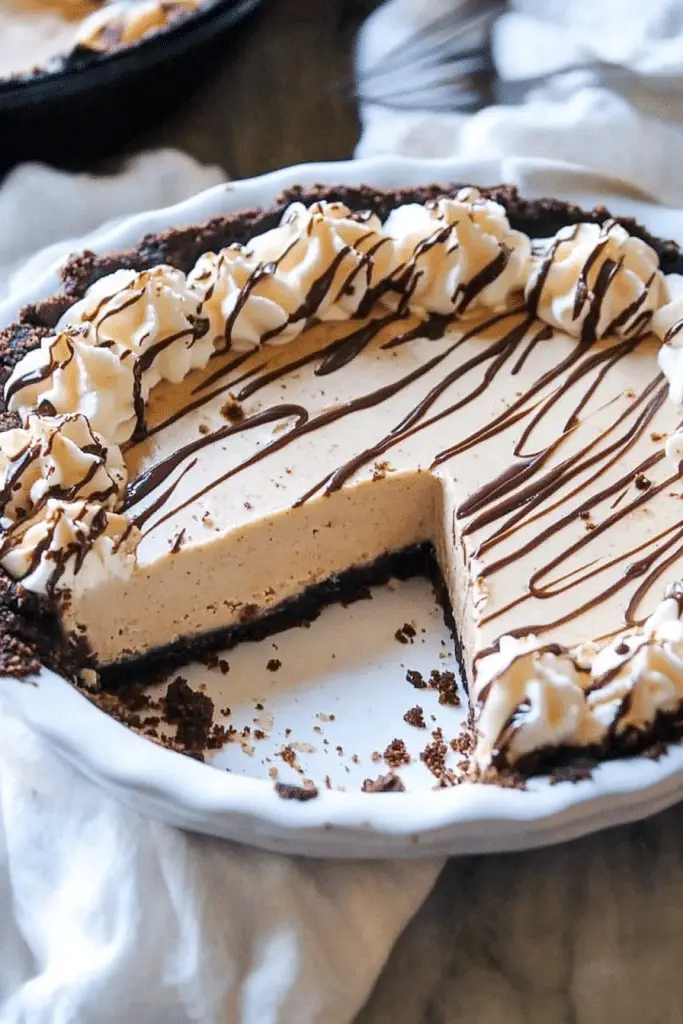
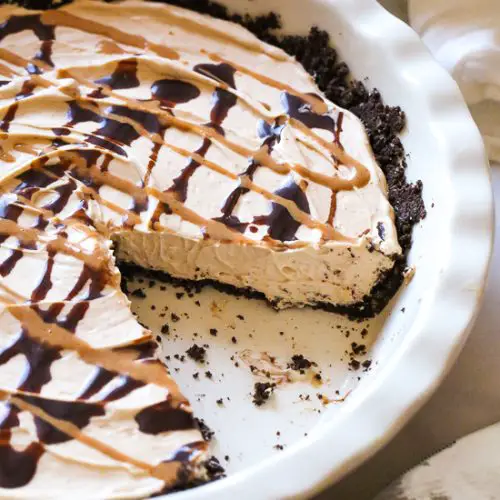
Pour the peanut butter filling into the crust and smooth it out with a spatula. If you want to get a little fancy, dollop some melted chocolate around the pie and swirl with a toothpick—it gives a gorgeous rustic look and that little surprise bite of chocolate throughout. Trust me, it impresses every time without extra work.
Step 7: Bake
If you’re baking your crust, remember the filling itself doesn’t need baking—it’s a chilled pie. Once your crust cools after baking, simply add your filling and follow the chilling instructions. No need to put the pie back in the oven.
Step 8: Cool & Glaze
Refrigerate the assembled pie for at least 4 hours, or ideally overnight. This step is crucial— it lets the flavors meld and the filling set just right. When ready, gently drizzle your chocolate glaze over the top and scatter chopped peanuts for that signature crunch and visual appeal. You’ll want to add glaze just before serving unless you plan to keep it chilled tightly covered overnight.
Step 9: Slice & Serve
Use a sharp knife dipped in hot water and wiped dry between slices to get those clean edges. This pie is best served cold, straight from the fridge. It’s a showstopper with a cup of black coffee or even a cold glass of milk if you’re in a nostalgic mood.
What to Serve It With
For Breakfast: Pair a small slice of this pie with a strong, dark roast coffee or even a vanilla latte—because who says dessert pies can’t be breakfast? The peanut butter flavor pairs beautifully with the bitterness of coffee, making mornings feel extra indulgent.
For Brunch: Serve alongside fresh berries and a dollop of whipped cream to lighten things up. A mimosa or sparkling rosé on the side elevates this simple pie into a glam brunch treat that’ll have everyone asking for your recipe.
As Dessert: Dress it up with a scoop of vanilla ice cream and drizzle warm caramel sauce over the slice for a decadent finale to any dinner. My family swears by adding a tiny pinch of flaky sea salt on top just before serving—it’s a little trick that makes the peanut butter pop.
For Cozy Snacks: On an evening when the kids are doing homework and the TV’s got that easy comedy running, this pie with some salted peanuts on the side hits the spot every time. It’s like a sweet secret to get through the day’s chaos, one spoonful at a time.
Top Tips for Perfecting Your Peanut Butter Pie
Peanut Butter Quality: I can’t stress this enough—use a good-quality creamy peanut butter. Some off-brand ones can be too oily or dry and affect texture. If you want to switch it up, natural peanut butter works but add a splash of milk or cream to keep it smooth.
Mixing Advice: When folding the whipped cream into the peanut butter mixture, do it gently. I learned the hard way that overmixing flattens the filling and makes it heavy. Use a rubber spatula and fold until you just don’t see streaks of white.
Swirl Customization: For adding those chocolate swirls, make sure your melted chocolate is warm but not hot—too hot can melt the filling. Use a toothpick or skewer and create random swirls for that homemade rustic charm.
Ingredient Swaps: Want a lighter spin? Use Greek yogurt instead of cream cheese (start with equal amounts, adjust for desired consistency). For dairy-free, coconut cream whipped works wonders but expect slight coconut notes.
Baking Tips: If you bake your crust, keep a close eye so it doesn’t burn—that usually happens in the last couple of minutes depending on your oven. I like to check at 8 minutes and then every minute until golden.
Glaze Variations: Feel like switching it up? Try peanut butter glaze (melt peanut butter with a bit of honey), or dust with cocoa powder and chopped peanuts for a rustic finish. I’ve even sprinkled a pinch of cinnamon on top for that extra cozy vibe.
Storing and Reheating Tips
Room Temperature: This pie really needs to stay cold, so I wouldn’t keep it out more than 2 hours. Cover tightly with plastic wrap to protect from drying out or absorbing fridge smells before serving.
Refrigerator Storage: Store in an airtight container or cover well with foil/plastic wrap. It’ll stay fresh up to 4 days—if it lasts that long! I always find it tastes even better the day after when all the flavors have had time to settle.
Freezer Instructions: Wrap slices individually in plastic and then tin foil for the best protection. Freeze for up to 2 months. Thaw overnight in the fridge before serving to keep that perfect creaminess intact.
Glaze Timing Advice: If freezing, skip the glaze or add it fresh after thawing. The glaze can get a little weird when frozen and thawed. When just refrigerating, add the glaze a couple hours before serving—this way it sets just right and stays glossy.
Frequently Asked Questions
Final Thoughts
This peanut butter pie has been one of those desserts I return to again and again because it’s comforting, unpretentious, and downright delicious. It reminds me of simpler days and those moments where good food brings everyone into the same room, sharing smiles and second helpings. If you’re a peanut butter lover, this pie is a must-try that doesn’t need any fancy equipment or hours of prepping. It adapts beautifully to whatever you have on hand and always delivers that creamy, dreamy slice of happiness. Go ahead, make the pie your own—experiment with toppings, sweetness, or crusts. And when you do, come back and tell me all about how yours turned out. Happy baking and even happier eating!
peanut butter pie
Ingredients
Main Ingredients
- 5 oz 1/3 less fat cream cheese softened
- 0.33 cup powdered sugar
- 0.33 cup Better 'n Peanut Butter
- 2.5 cups light whipped topping reduced-fat
- 1 pie crust graham cracker pie crust reduced-fat
- 2 tbsp Hershey's chocolate syrup for drizzling
Instructions
Preparation Steps
- Beat cream cheese and powdered sugar together in a medium bowl until smooth.
- Mix in Better 'n Peanut Butter and continue beating until smooth. Gently fold in the light whipped topping.
- Spoon the mixture into the graham cracker crust, cover, and refrigerate for at least 2 to 3 hours until firm.
- Drizzle with Hershey's chocolate syrup before serving.


