


Whenever I’m rushing through my morning routine or scrambling to pack a lunchbox, these granola bars are my secret weapon. I remember the very first time I made them—it was a Sunday afternoon, the house filled with the cozy smell of toasted oats and honey, and the kids couldn’t stop sneaking bites before I even finished slicing. There’s something about homemade granola bars that just hits differently than the store-bought ones, doesn’t it? They’re chewy yet crunchy, packed with just the right touch of sweetness, and best of all, you can customize them however you like. Whether you’re swapping nuts for seeds or throwing in a handful of chocolate chips, these granola bars adapt to your cravings. Honestly, they’ve become a sort of Comfort Food for me, especially when I want something nourishing but portable. If you’ve ever tried making energy balls or bought granola in bulk, this recipe feels like the perfect bridge—snackable, satisfying, and surprisingly easy.
What is granola bar?
Think of granola bars as those trusty little snack lifesavers—homemade is essentially oats, nuts, dried fruit, and a sweetener, pressed into a bar and baked or chilled until firm. The idea is simple but so versatile. You can dress them up with almond butter or keep them minimal with just honey and oats. The name “granola bars” comes from the classic granola mix that’s toasted and then compressed to make these portable treats. They’re kind of like a breakfast bar, a snack, or even a little dessert, all rolled into one. I like to think of them as the portable hugs of the food world—easy to take wherever, packed with energy, and comforting when you need a quick bite without the fuss of utensils or plates. If you’ve ever wished your snack could double as a mini meal or a sweet pick-me-up, these bars deliver every time.
Why you’ll love this recipe?
What I love most about these granola bars is the perfect balance they strike between flavor and simplicity. The oats toast gently in the oven, giving a warm, nutty backdrop to whatever you throw in—sun-dried cherries, toasted almonds, or maybe even a sprinkle of cinnamon for that cozy vibe. The honey and Brown Sugar combo melts everything into a chewy, satisfyingly sticky texture that you don’t get from dry packaged bars. Plus, they’re ridiculously easy to make! You literally mix, press, and bake—or chill if you’re skipping the oven—and you’re done. No fancy equipment, no long ingredient lists. And here’s something I always tell my friends: they’re way gentler on your wallet than buying $4 bars in the store every week.
Versatility is another big win. Feel like adding protein powder for a pre-workout boost? Go for it. Prefer vegan tweaks with maple syrup instead of honey? Absolutely. Want to throw in some dark chocolate chips last minute? I don’t blame you. I even use these as a handy breakfast stand-in on days when I’m running late, paired with a quick cup of coffee—the sweetness and crunch honestly wake me up better than any sugary cereal. Compared to Banana Bread or muffins, these bars don’t crumble, they’re less messy, and they can travel literally anywhere without losing their charm. Seriously, I’ve packed them on family hikes, work meetings, and even as emergency airplane snacks.
How do I make homemade granola bars?
Quick Overview
This recipe is surprisingly straightforward—first, you’ll mix your dry ingredients (oats, nuts, seeds) and wet ingredients (honey, melted butter, vanilla). Then, you combine everything, press it into a pan, and either bake until golden or chill until set. The magic is in the toasting and the tight press, which holds it all together perfectly so you get that satisfying snap when you bite in. It’s quick, no-fuss, and manageable even on Busy Days, which is why I keep coming back to it again and again.
Ingredients
For the Main Batter:
- 2 cups old-fashioned rolled oats – I always grab organic when I can for that fresh, hearty taste.
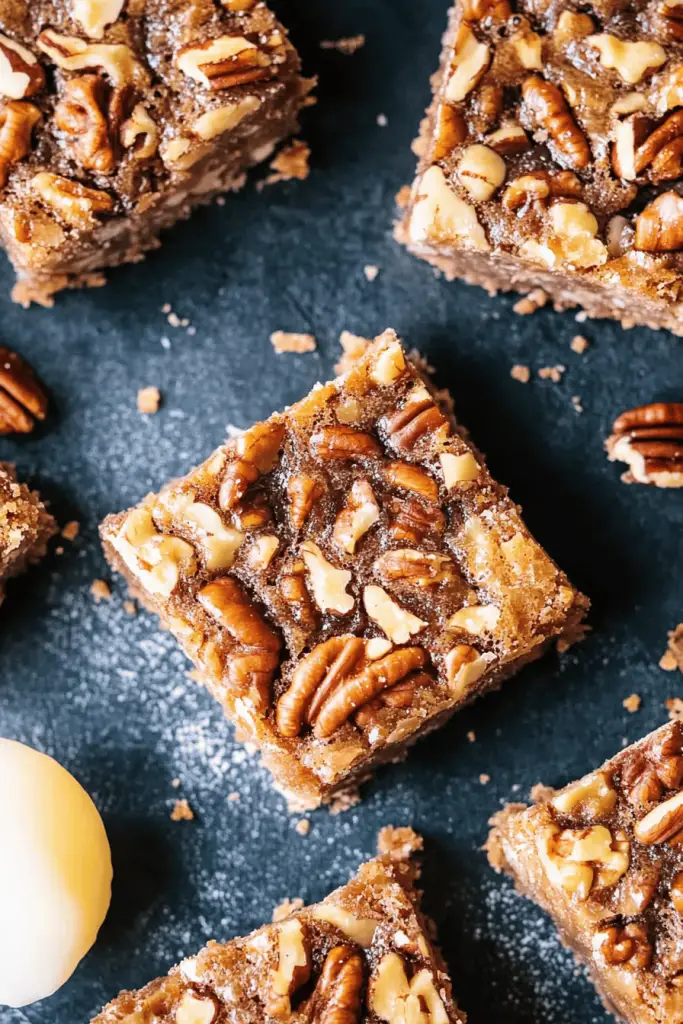
- 1 cup mixed nuts (almonds, walnuts, pecans), roughly chopped – fresh nuts toasted separately always taste better.
- ½ cup unsweetened shredded coconut – optional but adds a nice depth of flavor and texture.
- ½ cup pumpkin seeds or sunflower seeds – a little crunch boost and a hint of earthiness.
- 1/4 teaspoon salt – balances the sweetness perfectly.
For the Filling:
- ⅓ cup honey – use raw or local honey if possible for that floral undertone.
- ⅓ cup melted unsalted butter or coconut oil – I personally love using butter for the rich flavor.
- 1 teaspoon vanilla extract – it brightens the whole mixture beautifully.
- ¼ cup Brown Sugar, packed – adds caramel notes, but you can reduce slightly if you want less sweet.
- ½ cup dried fruit (cranberries, cherries, raisins, chopped apricots) – soak in warm water first for chewiness, or add straight for more bite.
For the Glaze (Optional):
- 2 tablespoons honey – thin it out with a teaspoon of hot water to drizzle.
- 1 tablespoon powdered sugar – helps it set faster and offers a slight sheen.
- A pinch of cinnamon or cardamom – for a subtle warm spice twist.
Step-by-Step Instructions
Step 1: Preheat & Prep Pan
Start by heating your oven to 325°F (160°C). Line an 8×8-inch baking pan with parchment paper, leaving about an inch of overhang on the sides for easy removal later. This step always saves me a lot of heartbreak—nothing worse than trying to pry bars out of a pan and ending up with a pile of crumbs.
Step 2: Mix Dry Ingredients
In a large bowl, toss together your oats, chopped nuts, seeds, coconut, and salt. Give everything a good stir until the mix looks evenly combined. I like to toast this dry mix for about 10 minutes in the oven or in a skillet beforehand to wake up those flavors, but it’s totally optional.
Step 3: Mix Wet Ingredients
In a smaller bowl, whisk together the honey, melted butter, brown sugar, and vanilla extract until everything is smooth and glossy. You’ll notice the mix is warm and sweet, with deep honey notes making your kitchen smell like a cozy bakery.
Step 4: Combine
Pour the wet ingredients over the dry and mix quickly but thoroughly. You want every oat and nut coated, but try not to overmix or the mixture can get too oily. If it feels dry, just add a splash more honey or a teaspoon of warm water.
Step 5: Prepare Filling
For the dried fruit, I usually soak it in warm water for 10 minutes so it stays soft and blends nicely into the bars. Drain and pat dry before folding into the mixture. If you’re adding chocolate chips, wait and sprinkle them on top before pressing.
Step 6: Layer & Swirl
Pour half the mixture into the pan and press down firmly with a spatula — trust me, this is the secret to bars that hold together. Then scatter your dried fruit or chocolate chips evenly, and top with remaining mixture. For a pretty touch, I swirl a bit of softened almond butter on top and drag a knife through it to create that marbled effect everyone loves.
Step 7: Bake
Pop the pan in the oven for about 20–25 minutes, rotating halfway. You want the edges to turn golden but don’t let it brown too much or it’ll get dry. The bars will still feel soft but will firm up as they cool. I find letting them cool completely in the pan makes slicing way easier.
Step 8: Cool & Glaze
Once cooled, gently lift the whole slab out using the parchment paper. If you’re glazing, drizzle the honey glaze over the top now — it adds a lovely shimmer and a little extra sweetness. Let it set for about 15 minutes before slicing. If you skip the glaze, you might want to brush a bit of melted butter on top before baking for that golden shine.
Step 9: Slice & Serve
Use a sharp knife to cut bars or squares—warm bars can crumble, so patience is key here. I like to slice mine into rectangles that fit perfectly in lunchboxes or a quick snack grab from the jar. They’re delicious served at room temp, but the crushed edges get a nice snap after chilling overnight in the fridge.
What to Serve It With
For Breakfast: These granola bars go hand-in-hand with your morning cup of coffee or a cold glass of almond milk. I often serve them alongside yogurt and fresh fruit for a breakfast that’s quick but feels special enough to linger over.
For Brunch: When I’m hosting, I like to arrange these on a wooden board with a selection of cheeses, nuts, and fresh berries. Pair with a light herbal tea or sparkling water infused with lemon for a laid-back but elegant vibe.
As Dessert: Don’t hesitate to serve these slightly warmed with a drizzle of dark chocolate sauce or a scoop of vanilla ice cream. My kids’ faces light up when I do this—it’s like dessert pretending to be healthy (shh, we won’t tell!).
For Cozy Snacks: On those chilly afternoons, nothing beats a granola bar straight from the fridge paired with a mug of hot cocoa or spiced chai. It’s the kind of treat that brings everyone back to the kitchen for a warm, shared moment.
These bars have been a family staple during road trips and after school meetups, often packed alongside apples and peanut butter. Every time I serve them, friends ask for the recipe, which is probably the best compliment I could hope for.
Top Tips for Perfecting Your Homemade Granola Bars
Oat Prep: Use rolled oats, not instant. They hold their shape better and give that wonderful chewy-yet-crunchy texture. Toasting them first is optional but highly recommended—it deepens flavor and adds a toasty aroma that fills your kitchen like fall in a bowl.
Mixing Advice: Be gentle when combining wet and dry ingredients. Overmixing can lead to bars that are too dense or oily. I learned this the hard way when my early batches turned out heavy and crumbly. A few strokes with a spatula are enough to evenly distribute—less really is more here.
Swirl Customization: For that pretty marbled effect, try warming a couple tablespoons of nut butter (almond or peanut) and pour in ribbons before pressing. Run a knife through in random zigzags, but don’t overdo it—you want to see distinct swirls, not a blended mess.
Ingredient Swaps: Playing with nuts and seeds is my favorite part! Swap walnuts for pecans, or use chia seeds instead of pumpkin seeds if that’s what you have on hand. If you’re vegan, coconut oil works wonders in place of butter, though the flavor is a bit more subtle.
Baking Tips: Ovens vary, so check your bars around 20 minutes if you’re unsure. Edges should be lightly golden and the center set but still a bit tacky. I usually rotate my pans halfway through to keep baking even. Don’t skip the cooling—cutting warm bars is a crumb trap.
Glaze Variations: I sometimes mix powdered sugar with a little lemon juice or maple syrup instead of honey for a tangy twist. The glaze really seals the deal on texture—it dries to a slight crisp that adds contrast to chewy centers.
One trick I learned? Press the bars very firmly before baking. If you don’t, they fall apart no matter how much binding agent you use. Trust me on this one—it’s worth the extra elbow grease!
Storing and Reheating Tips
Room Temperature: Store your chopped bars in an airtight container or a tin lined with parchment. They’ll stay fresh like this for about 3-4 days, and honestly, if they last that long at my house, it’s a miracle.
Refrigerator Storage: To keep them extra firm and extend shelf life up to a week, stash the container in the fridge. If you store them here, bring them back to room temperature for about 10 minutes before eating to soften the texture slightly.
Freezer Instructions: These bars freeze wonderfully if you wrap each individually in plastic wrap and place in a sealed freezer bag. They’ll keep for up to 3 months. When ready, thaw overnight in the fridge or for a quick snack, leave wrapped at room temp for 30 minutes.
Glaze Timing Advice: If you’re storing bars for more than a couple days, I recommend applying the glaze right before serving rather than before storage. This keeps it from getting sticky or too soft during refrigeration or freezing.
I’ve tested all these methods repeatedly with consistent results, so you don’t have to stress about the “best” way—just pick what fits your schedule!
Frequently Asked Questions
Final Thoughts
I honestly believe these homemade granola bars are a game-changer for anyone who needs a quick, wholesome snack that doesn’t taste like cardboard. They’ve been my fallback for busy mornings, impromptu picnics, and when I need a sweet fix without going overboard. Plus, the fact that you can tailor the mix-ins to what your pantry has or what your family prefers, makes this recipe a flexible kitchen staple. If you’re a fan of energy balls or homemade trail mixes, these bars will feel like a natural next step—easy to make, endlessly forgiving, and downright addictive. I can’t wait to hear how yours turn out, or what fun twists you bring to the recipe. Drop a comment, share a rating, or tell me your favorite combo—I’m always looking for new inspiration. Happy baking!
granola bars
Ingredients
Main Ingredients
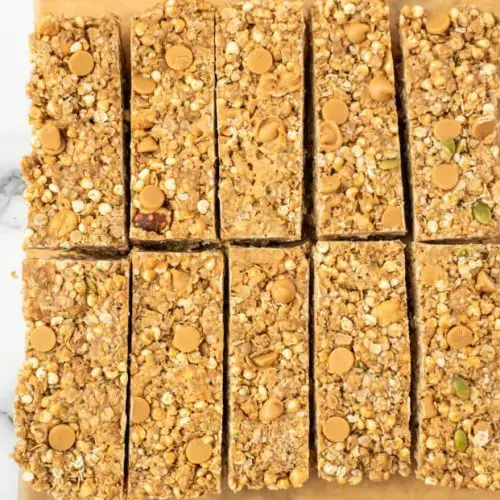
- 2 cups quick cook oats
- 1 cup puffed rice can use millet
- 0.5 cup mixed nuts combination of peanuts, pumpkin seeds, and hemp seeds
- 0.75 cup creamy peanut butter
- 0.5 cup honey
- 2 tsp cinnamon
- 0.5 cup peanut butter chips optional
Instructions
Preparation Steps
- Spread oats on a cookie sheet and bake in a 325°F oven for 2-3 minutes. This step is optional.
- Line a 9-inch square dish with parchment paper and set aside.
- In a large bowl, combine toasted oats, puffed rice, and nuts.
- Place peanut butter and honey in a microwave-safe bowl. Heat for 30 seconds to soften for easier mixing.
- Add cinnamon and mix until combined.
- Pour cinnamon peanut butter mixture over the dry oats mixture. Stir just until combined. Fold in peanut butter chips if desired.
- Press the mixture into the prepared pan. Refrigerate for one hour, preferably overnight.
- Remove from pan using the parchment paper. Cut into bars and store in an airtight container for up to 5 days.


