


Okay, confession time. There are nights when the thought of actually *cooking* feels like climbing Mount Everest. You know those nights? The ones where you’ve dragged yourself through work, battled traffic, maybe wrestled tiny humans into pajamas, and the idea of chopping, measuring, and standing over a hot stove feels… well, impossible. On those nights, my go-to is this incredible, ridiculously easy no-effort bread. It’s not just a recipe; it’s my secret weapon. It’s the kind of thing that makes you feel like a baking superhero without actually breaking a sweat. Honestly, it’s so simple, my seven-year-old can practically make it himself, which, let’s be real, is a huge win in my book. If you’re anything like me and crave that homemade bread goodness but dread the fuss, then buckle up, because this is about to change your life. It’s way simpler than your average Quick Bread, and the flavor? Oh, the flavor is just divine.
What is this “No-Effort” bread?
So, what exactly *is* this magical concoction we’re calling “easy no-effort bread”? Think of it as your Absolute Best friend in the baking world. It’s essentially a quick bread, meaning it doesn’t require any yeast or lengthy rising times, but it’s even more forgiving than most. The name says it all, really. It’s designed for those days when your energy reserves are running on fumes. There’s no complex kneading, no waiting for dough to double in size, just a few simple steps that result in a warm, comforting loaf. It’s like a hug in bread form. It’s proof that you don’t need to be a master baker to create something truly delicious and impressive. It’s the kind of recipe you’ll keep on repeat, tucked away as your reliable, “I’ve got this covered” solution for everything from unexpected guests to a sudden craving for something sweet and satisfying.
Why you’ll love this recipe?
Let’s dive into why this easy no-effort bread is an absolute keeper. First off, the taste is just phenomenal. It’s got this wonderful, slightly sweet, comforting flavor that’s not too overpowering, making it incredibly versatile. The texture is also spot-on – moist and tender, with just the right amount of crumb. What I love most is the sheer simplicity. You genuinely just throw things together, and it comes out beautifully. It’s perfect for a busy weeknight when you want something homemade but don’t have hours to spare. It’s also remarkably cost-effective; most of the ingredients are pantry staples, so you don’t need to break the bank. Unlike some recipes that feel like a huge commitment, this one is genuinely a lifesaver. Plus, it’s super adaptable! I’ve tinkered with it endlessly and it always delivers. It’s the kind of thing that makes your kitchen smell amazing, which is always a bonus, right? It’s so much easier than making a traditional loaf of yeast bread, and frankly, I think the texture is even better for what I want on a lazy Sunday morning or a quick afternoon pick-me-up. It really is the best of both worlds – that homemade charm without the demanding process.
How do I make this dreamy bread?
Quick Overview
The whole process is shockingly straightforward. You’ll whisk together your dry ingredients, mix your wet ingredients separately, then combine them until just mixed. No fuss, no muss. Then, into the oven it goes! The beauty of this easy no-effort bread is its minimal cleanup and maximum reward. It’s the kind of recipe that proves delicious, Homemade Baked goods are totally achievable, even when you’re short on time and energy. You’ll be amazed at how quickly it comes together and how wonderful your kitchen will smell.
Ingredients
For the Main Batter:
This is where the magic begins. We want simple, good-quality ingredients that come together harmoniously.
- 2 cups all-purpose flour: I usually go for a standard all-purpose flour. Make sure it’s fresh, not one that’s been lurking in the back of the pantry for ages!
- 1 ½ teaspoons baking powder: This is our leavening agent, giving us that lovely lift. Don’t skip it!
- ½ teaspoon baking soda: Works in tandem with the baking powder for an even better rise.
- ½ teaspoon salt: Just enough to balance the sweetness and bring out the flavors.
- ¾ cup granulated sugar: For that hint of sweetness. You can adjust this slightly depending on your preference, but this is a good starting point.
- 1 large egg: Acts as a binder and adds richness. Make sure it’s at room temperature for easier incorporation.
- ½ cup unsalted butter, melted and slightly cooled: Melted butter makes for a tender crumb. Let it cool just enough so it doesn’t cook the egg!
- 1 cup milk: Whole milk gives the best richness, but I’ve also tested this with 2% and even unsweetened almond milk, and it worked beautifully. It actually made it even creamier!
- 1 teaspoon vanilla extract: Because what’s a baked good without vanilla?
For the Swirl (Optional but highly recommended!):
This is where you can get creative and add an extra layer of deliciousness.
- ½ cup packed Brown Sugar: Adds a lovely caramel note.
- 2 tablespoons all-purpose flour: Helps create that gooey swirl texture.
- 1 teaspoon ground cinnamon: The classic pairing with brown sugar.
- ¼ cup chopped nuts (walnuts or pecans): Totally optional, but adds a nice crunch!
For the Glaze:
This is the crowning glory that takes it from great to irresistible.
- 1 cup powdered sugar: The base for our smooth, sweet glaze.
- 2-3 tablespoons milk: Add this slowly until you reach your desired drizzling consistency.
- ½ teaspoon vanilla extract: For extra flavor oomph.
Step-by-Step Instructions
Step 1: Preheat & Prep Pan
First things first, get your oven preheated to 350°F (175°C). While it’s warming up, grease and flour a standard 9×5 inch loaf pan. You can also line it with parchment paper, leaving an overhang on the sides – this makes lifting the bread out a breeze! A well-greased pan is crucial to prevent sticking, especially when you’re in a hurry.
Step 2: Mix Dry Ingredients
In a large bowl, whisk together the flour, baking powder, baking soda, salt, and granulated sugar. Whisking well ensures that the leavening agents and salt are evenly distributed throughout the flour, which leads to a consistent rise and flavor. You want to get rid of any lumps.
Step 3: Mix Wet Ingredients
In a separate medium bowl, whisk together the egg, melted (and slightly cooled) butter, milk, and vanilla extract until well combined. The egg should be fully incorporated, and the mixture should be smooth.
Step 4: Combine
Pour the wet ingredients into the bowl with the dry ingredients. Stir with a spatula or wooden spoon until *just* combined. Be careful not to overmix! A few small lumps are perfectly fine. Overmixing develops the gluten too much, which can result in a tough loaf. We’re going for tender here!
Step 5: Prepare Filling
If you’re adding the swirl, this is where you whip it up. In a small bowl, combine the Brown Sugar, flour, cinnamon, and chopped nuts (if using). Mix it with a fork until it resembles coarse crumbs. This little bit of effort adds so much flavor and visual appeal.
Step 6: Layer & Swirl
Pour about half of the batter into your prepared loaf pan. Sprinkle about half of the brown sugar mixture evenly over the batter. Then, pour the remaining batter on top, followed by the rest of the brown sugar mixture. Now, here’s the fun part: take a knife or a skewer and gently swirl the brown sugar mixture into the batter. Don’t overdo it; you want distinct swirls, not a uniform color. Just a few gentle passes will do the trick!
Step 7: Bake
Bake for 50-60 minutes, or until a wooden skewer or toothpick inserted into the center comes out clean. Baking times can vary slightly depending on your oven, so keep an eye on it after the 50-minute mark. If the top starts to brown too quickly, you can loosely tent it with foil.
Step 8: Cool & Glaze
Let the bread cool in the pan for about 10-15 minutes before carefully inverting it onto a wire rack to cool completely. This is important! If you try to glaze it while it’s too hot, the glaze will just melt off. Once it’s completely cool, whisk together the powdered sugar, 2 tablespoons of milk, and vanilla extract until smooth. Add more milk, a teaspoon at a time, if you want a thinner consistency. Drizzle this over the cooled loaf. Let the glaze set for a few minutes before slicing.
Step 9: Slice & Serve
Once the glaze has set, slice your beautiful, easy no-effort bread and enjoy! It’s best served at room temperature. The smell alone is enough to make everyone gather in the kitchen. This is perfect for breakfast, a snack, or even a light dessert.
What to Serve It With
This easy no-effort bread is so wonderfully versatile, it truly fits into any part of your day. For a simple, comforting Breakfast, I love it toasted with a smear of butter. It pairs perfectly with a hot cup of coffee or a glass of orange juice. It’s surprisingly filling and satisfying when you need a quick start. When it comes to Brunch, this bread can be elevated easily. Serve thick slices alongside fresh fruit salad, perhaps with a dollop of whipped cream or Greek yogurt. For a slightly more elegant presentation, try arranging slices on a tiered stand. It’s also fantastic alongside a quiche or frittata. As a Dessert, it’s a revelation. Imagine serving warm slices with a scoop of vanilla bean ice cream or a drizzle of caramel sauce. The cinnamon swirl really shines here. It’s the perfect, easy way to satisfy a sweet tooth without all the fuss of a formal dessert. And for those Cozy Snacks moments, when you just need something warm and comforting? This bread is it. Grab a slice with a glass of milk, or even a hot chocolate. It’s pure comfort food, perfect for curling up with a book on a rainy afternoon. My family loves it with a bit of cream cheese, which is another delightful twist!
Top Tips for Perfecting Your Easy No-Effort Bread
After making this countless times, I’ve picked up a few tricks that help ensure this easy no-effort bread turns out perfectly every single time. For the Zucchini Prep, if you decide to add it (which I highly recommend for added moisture and a hint of flavor), make sure to squeeze out as much excess moisture as possible after shredding. Using a clean kitchen towel or cheesecloth works wonders. Grating it finely is usually best for even distribution. When it comes to Mixing Advice, I can’t stress enough: do NOT overmix the batter. Seriously, stop as soon as you don’t see any dry flour streaks. A few lumps are your friends here! It’s the secret to that tender, moist crumb. For Swirl Customization, don’t go crazy with the swirling. You want beautiful ribbons of cinnamon-sugar goodness, not a muddy mess. Just a few gentle passes with a knife are sufficient for a gorgeous marble effect. For Ingredient Swaps, I’ve played around quite a bit. If you’re out of regular milk, buttermilk also works beautifully and adds a lovely tang. For a richer loaf, you can substitute some of the milk with heavy cream, but be mindful that it might bake a bit faster. I tested this with almond milk and it actually made it even creamier! When it comes to Baking Tips, know your oven. If it tends to run hot, reduce the temperature by about 25°F. Always use the toothpick test for doneness. Insert it into the thickest part of the loaf, avoiding any pockets of swirl if you can. For Glaze Variations, if you prefer a less sweet topping, you can simply dust the cooled loaf with powdered sugar. Or, for a citrusy kick, add a little lemon zest to the glaze. A thin, delicate glaze is usually my preference so it doesn’t overpower the bread itself.
Storing and Reheating Tips
This easy no-effort bread is quite forgiving when it comes to storage, which is another reason I love it so much. For Room Temperature storage, keep the cooled, unglazed loaf (or loaf with set glaze) in an airtight container or tightly wrapped in plastic wrap. It stays fresh for about 2-3 days. However, if you live in a very humid climate, it might be best to move it to the refrigerator after day one to prevent it from getting soggy. For Refrigerator Storage, wrap the cooled loaf tightly in plastic wrap, then in foil, or place it in an airtight container. It can last for up to a week in the fridge, though the texture might become a bit firmer. When you’re ready to eat it, let it come to room temperature or gently warm it. For Freezer Instructions, this bread freezes remarkably well. Wrap the completely cooled loaf tightly in plastic wrap, then in a layer of aluminum foil, or place it in a heavy-duty freezer bag. It will keep for up to 2-3 months. To thaw, simply unwrap it and let it come to room temperature on the counter. For a slightly warmed treat, you can pop slices into a toaster oven or a low-heat oven for a few minutes. My advice on Glaze Timing is to glaze it only when you plan to eat it within a day or two, especially if storing at room temperature. If freezing, it’s often best to glaze it *after* thawing. This prevents the glaze from becoming sticky or watery when it thaws.
Frequently Asked Questions
Final Thoughts
So there you have it – my absolute favorite easy no-effort bread! It’s the recipe I turn to when I need a little bit of homemade comfort without any of the fuss. It’s proof that deliciousness doesn’t have to be complicated. I truly believe that everyone should have a recipe like this in their arsenal; it’s a game-changer for busy lives and unexpected cravings. It’s the kind of bake that brings joy with minimal stress, and that’s what cooking should be all about. If you’re looking for more simple yet satisfying recipes, you might also enjoy my [Link to another easy recipe, e.g., “One-Bowl Chocolate Chip Cookies” or “Quick & Easy Banana Muffins”]. I can’t wait to hear how yours turns out! Don’t be shy about sharing your own variations or tips in the comments below. Happy baking, my friends!
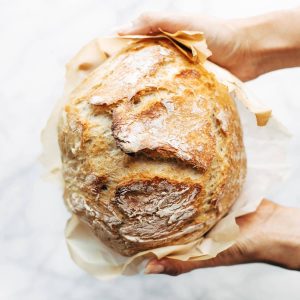
easy no effort bread
Ingredients
Main Ingredients
- 3 cups all-purpose flour
- 1.5 teaspoons salt
- 0.5 teaspoons instant yeast
- 1.5 cups room temperature water
Instructions
Preparation Steps
- In a large mixing bowl, whisk the flour, salt, and yeast together until mixed. Stir in the water until a chunky, thick dough forms. If it needs a little more water, add a few more tablespoons, just enough to get it barely wet throughout. It’s gonna look scrappy and weird and you’re going to question me on whether or not this will work, but it will. Cover the mixing bowl with plastic wrap and let it rest for 12-18 hours at room temperature.
- When you’re ready to bake, preheat the oven to 450°F. Stick a 6-quart Dutch oven with a lid in the oven for about 30 minutes to heat. At this point, the dough should be big and puffy and pretty loose, with little bubbles in it. Gently scrape the dough out onto a well-floured surface. Gently shape it into a ball with flour on the outside, set on a piece of parchment paper, and cover with plastic while your pot heats up.
- Remove the plastic from the dough. Lift the dough and parchment together into the hot Dutch oven, so the parchment lines the bottom of the pot (be careful not to touch the pot since it’s very hot). Bake, covered, for 30 minutes. Remove the cover and bake another 10-15 minutes to get the exterior nice and golden brown and crispy. Enjoy your delicious homemade bread!


