


There’s something utterly magical about popping a little chocolate-covered cake ball into your mouth — the perfect bite of moist, rich cake paired with a silky smooth coating. I remember first making these on a chilly Saturday afternoon, my kitchen smelling like freshly baked chocolate and melted candy melts, my kids peeking over the counter, barely able to wait for the first batch to cool. This recipe quickly became a lifesaver for birthdays, last-minute parties, and those evenings when you just want a sweet treat without baking a whole cake. If you’ve ever baked a smear-worthy chocolate cake and wished you could turn it into something that’s both festive and convenient, cake balls answer that craving perfectly — dreamy little poppable treasures that are surprisingly easy and endlessly customizable.
What is cake ball?
Think of cake balls as the lovechild of a classic cake and a truffle — bite-sized, coated goodies made from crumbled cake mixed with frosting or binding agents, then dipped into chocolate or candy coating. The name is pretty straightforward: it’s cake formed into balls, but the magic lies in their dense, fudgy texture combined with a crisp outer shell. They’re sometimes called cake pops when you add sticks, but in my kitchen, they go naked — no sticks needed to enjoy these delights! Essentially, cake balls let you enjoy the flavor of cake without fussing over slicing or plating, making them perfect for when you want dessert to feel like a mini celebration all day long.
Why you’ll love this recipe?
What I love most about these cake balls is just how versatile they are. First off, the flavor is classic chocolate — rich but not overpowering, with just the right balance of sweetness and that molasses-y depth that I crave. It’s like having a chocolate cake, but in a form that’s easily shared or packed for a sweet lunchbox surprise.
They’re shockingly simple to make, too. I always keep a box of cake mix and some frosting on hand to whip these up in under an hour if I’m feeling spontaneous. Plus, using ingredients you probably already have saves tons of money — no need to buy expensive, fancy equipment.
Another big win: you can switch up the flavors endlessly. Use vanilla cake with strawberry frosting, pumpkin spice cake with cream cheese, or even pumpkin and cinnamon around Thanksgiving. Ever tried dip the cake balls in peanut butter chocolate or sprinkle them with toasted coconut? Trust me, the possibilities are endless (and delicious).
This recipe has saved my skin more times than I can count — especially on busy weeknights or last-minute parties when baking a full cake feels like climbing Everest. My kids actually beg for seconds and thirds, so I usually double the batch just in case. If you’re a fan of simple, crowd-pleasing desserts that bring everyone to the table, these are your new go-to.
How do I make cake balls?
Quick Overview
The idea here is simple—bake a batch of your favorite cake, crumble it up, mix it with some luscious frosting, then shape the mixture into bite-sized balls. Next, you dip them into melted chocolate or candy coating, pop them in the fridge to set, and voilà! The whole process is straightforward, forgiving, and pretty fun. What makes this method special is how it turns the familiar into something bite-sized, shareable, and perfect for any occasion — no slicing or fancy plating needed.
Ingredients
For the Main Batter:
- 1 box of good-quality chocolate cake mix (or your favorite homemade recipe) — fresh cake always gives the best texture.
- Ingredients called for on the cake mix box (usually eggs, oil, and water) — I like using buttermilk instead of water for a slightly tangy richness.
For the Filling:
- ½ to ¾ cup of chocolate or vanilla frosting — cream cheese frosting works too, but I keep it classic.
- Optional: a splash of milk or cream to loosen it up if needed.
For the Glaze:
- 2 cups of candy melts or good-quality chocolate chips — choose white, milk, or dark depending on your mood.
- 1 teaspoon coconut oil or vegetable shortening — this thins the chocolate and helps with a smooth finish.
- Optional toppings: sprinkles, crushed nuts, mini chocolate chips, or shredded coconut.
Step-by-Step Instructions
Step 1: Preheat & Prep Pan
Preheat your oven to 350°F (175°C). Line a 9×13 inch baking pan with parchment paper or lightly grease it — I like parchment because it makes lifting the cake out a breeze and avoids sticking. This is the foundation to get that perfect cake texture that holds just right for crumbling.
Step 2: Mix Dry Ingredients
Mix up your cake mix batter according to the box or your recipe, combining the dry elements with wet ingredients until smooth. You’re looking for a moist, glossy batter — not too thick or runny. Give it a light stir; overmixing can make it dense, and nobody wants dense cake balls!
Step 3: Mix Wet Ingredients
If you’re using homemade batter, be sure your eggs and any dairy are at room temperature before mixing. This encourages even blending. Once combined, the batter will smell rewarding — like fresh chocolate with that hint of vanilla.
Step 4: Combine
Pop the batter into the oven and bake for 30–35 minutes or until a toothpick comes out mostly clean with a few moist crumbs. Let the cake cool COMPLETELY — this is crucial, trust me! Warm cake will ruin the texture when combined with frosting. Once cooled, crumble the cake into fine crumbs in a big bowl.
Step 5: Prepare Filling
Add your frosting to the cake crumbs a little at a time, mixing with your hands or a spoon. The consistency should be like playdough — pliable but not sticky. I always save some frosting if I want to add swirls or marbling in the glaze later.
Step 6: Layer & Swirl
This part is all about shaping — roll small balls, roughly 1 inch in diameter, making them as smooth as you can with your hands. If the mixture feels too crumbly, add more frosting; if too soft, chill it for 10–15 minutes. For extra fun, you can gently swirl in a bit of a different-colored frosting to make marbled, pretty balls before dipping.
Step 7: Bake
Actually, you don’t bake cake balls themselves — a common misconception! Since the cake is already baked, you just chill the balls in the fridge or freezer for about 30 minutes to firm them up before dipping.
Step 8: Cool & Glaze
Melt your candy melts or chocolate with coconut oil using a double boiler or microwave in 30-second bursts, stirring frequently. Dip each chilled ball into the melted coating, allowing the excess to drip off, then place on parchment paper. Add sprinkles immediately before the coating sets.
Step 9: Slice & Serve
These little delights don’t need slicing — one bite and you’re hooked! Serve them at room temperature so the ganache-like interior is soft and melty. They look gorgeous on a platter, nestled in mini cupcake liners, and are perfect for sharing.
What to Serve It With
For Breakfast: Pair cake balls with a creamy latte or a bold cup of coffee — the chocolate tones wake you up nicely without being too heavy first thing.
For Brunch: Lay them out alongside fresh berries and a light sparkling mimosa or iced tea. The bite-sized sweetness balances out savory brunch dishes and looks super inviting.
As Dessert: Serve with a scoop of vanilla ice cream or dollop of whipped cream. For an extra cozy touch, drizzle warm caramel or espresso sauce on the side. These cake balls have a nostalgic quality, perfect for winding down with loved ones.
For Cozy Snacks: My family loves pairing these with hot cocoa on chilly evenings — they feel indulgent but not overwhelming, just enough to satisfy the sweet tooth without going overboard.
Over the years, we’ve turned these into a little tradition. Birthday parties, holiday gatherings, or just random Tuesday afternoons, cake balls bring a smile and somehow manage to disappear in minutes.
Top Tips for Perfecting Your Cake Balls
Zucchini Prep: Okay, so strictly no zucchini here, but if you’re thinking of sneaking in veggies for healthier tweaks, make sure to squeeze out every drop of moisture or your balls will fall apart. I’ve tried grating zucchini into cake balls once — it was a fun experiment, but moisture is tricky.
Mixing Advice: Resist the urge to overmix when combining crumbs and frosting — you want a delicate balance where the cake still shines through. Overmixing makes it gummy, which just isn’t as pleasant.
Swirl Customization: For fun options, try dropping tiny dots of colored frosting into your chocolate coating and dragging a toothpick through for a marbled effect. It makes a simple batch look so much fancier.
Ingredient Swaps: I tested almond milk instead of regular milk in the cake, and it gave a subtle nuttiness that pairs beautifully with dark chocolate glaze. For frosting, cream cheese variations add a luscious tang. Use whatever you love the flavor of — this recipe’s forgiving.
Baking Tips: Oven temps vary, so use a toothpick tester rather than relying fully on the clock. If your oven tends to run hot, lower the temperature by 25°F to avoid a dry crumb. And always cool the cake completely — a mistake I made once that left me with melted, messy balls.
Glaze Variations: Instead of candy melts, try tempered dark chocolate for a shiny, snap-worthy finish. Add a pinch of sea salt for a salted chocolate twist or infuse your melted coating with a little orange zest for a citrus kick. Consistency is key: too thick and it’ll clump, too thin and it won’t coat well. Add coconut oil slowly until it’s just right.
Storing and Reheating Tips
Room Temperature: Store cake balls in an airtight container at room temp for up to two days. I usually keep them covered to avoid drying out. They’re best eaten fresh but still delicious the next day if protected well.
Refrigerator Storage: For longer storage (up to a week), refrigerate in an airtight container. Bring them to room temperature for about 15 minutes before serving — this brings back that soft, melty core we all love.
Freezer Instructions: Cake balls freeze beautifully! Wrap each one individually in plastic wrap and place in a freezer-safe container or bag for up to 2 months. Thaw in the fridge overnight, then sit at room temperature for 15-30 minutes before eating.
Glaze Timing Advice: If you’re planning to freeze, wait to glaze after thawing for the crispiest finish. If eating within a few days, glaze right away and store carefully to avoid condensation, which can dull the shine.
Frequently Asked Questions
Final Thoughts
Taking a homemade cake and transforming it into little, luscious cake balls always feels like a small kitchen victory to me. These bites are proof that dessert doesn’t have to be complicated to be utterly irresistible — they bring a sense of joy and nostalgia every time I make them, and I hope they’ll do the same for you. Whether you keep it simple with classic chocolate or get adventurous with swirls and toppings, these cake balls are sure to become a staple in your dessert rotation. So go ahead—grab that bowl of crumbs and frosting, invite in the magic, and share the love (and the cake balls!). I can’t wait to hear what flavors you dream up and how your family reacts. Happy baking!
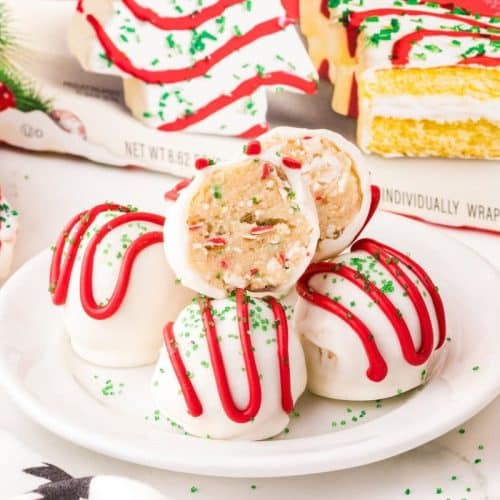
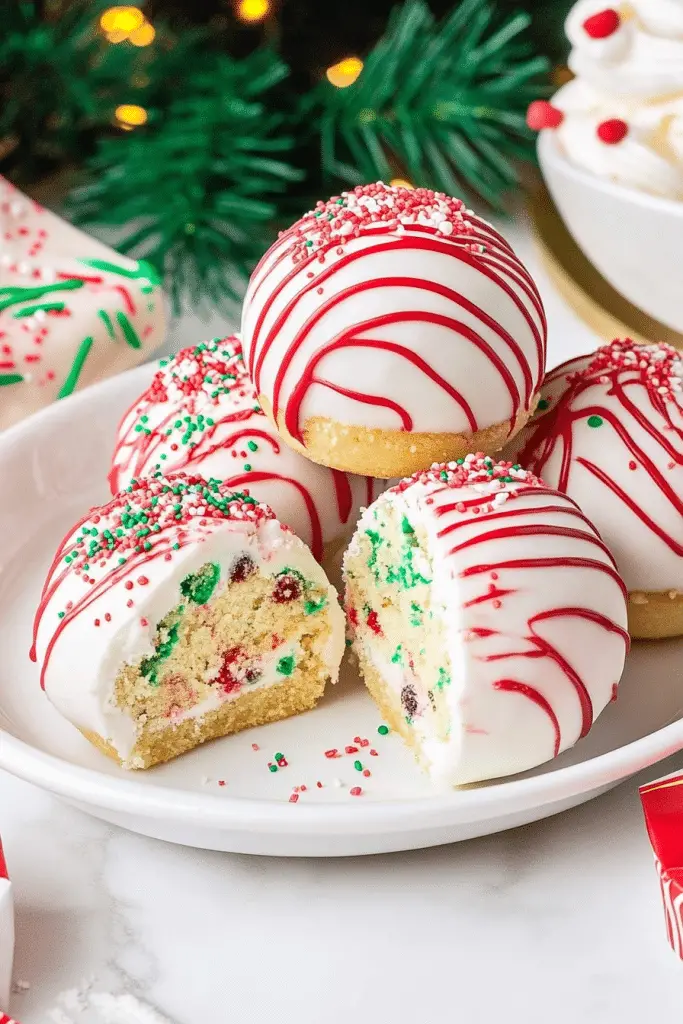
cake balls
Ingredients
Main Ingredients
- 10 pieces Little Debbie vanilla Christmas tree snack cakes unwrapped from 2 boxes (8.62 oz each)
- 8 ounce cream cheese softened to room temperature
- 20 ounce white chocolate melting wafers Ghirardelli brand preferred
- 6 ounce red vanilla flavored melting candy wafers Wilton brand preferred
- 1 tablespoon green sanding sugar sprinkles
Instructions
Preparation Steps
- Line two large baking sheets with parchment paper or a silicone mat and set aside.
- In a large mixing bowl, beat softened cream cheese on medium speed with a handheld mixer until smooth and fluffy, about 1-2 minutes.
- Break the Little Debbie vanilla Christmas tree snack cakes into small pieces and add to the cream cheese. Mix on low speed until combined but still slightly chunky.
- Using a small cookie scoop or tablespoon, scoop out portions and gently roll between palms to form smooth balls.
- Place formed cake balls onto one prepared baking sheet. Repeat until all mixture is used.
- Freeze the cake balls for 30-45 minutes until solid to make dipping easier.
- Melt white chocolate wafers in a medium bowl following package instructions, stirring until smooth.
- Melt red vanilla candy wafers in a separate bowl according to package directions. Transfer to a piping bag with the tip cut off.
- Dip each frozen cake ball into melted white chocolate, coating all sides. Lift with a fork and gently tap to remove excess chocolate.
- Place coated cake balls on the second prepared baking sheet and pipe decorative zig-zag patterns with red candy melts. Sprinkle green sanding sugar over top to mimic a Christmas tree look.
- Allow cake balls to set for 15-20 minutes until coating is firm before serving.


