


There are some treats that just instantly transport you back to childhood, right? For me, it’s that magical, airy, shatteringly crisp honeycomb candy. You know the one – it looks like it’s straight out of a fairy tale, all bubbly and golden. My grandma used to make it, and the smell alone would fill our little house with pure joy. I’ve tried to replicate that childhood magic countless times, and I’ve finally landed on a version that I think is even better, if I do say so myself! It’s surprisingly simple to make, and honestly, it’s the perfect thing to whip up when you need a little bit of sweet sunshine without a whole lot of fuss. Forget those complicated layered cakes or fussy pastries; this honeycomb candy is pure, unadulterated deliciousness, and it’s way easier than you might think.
What is honeycomb candy?
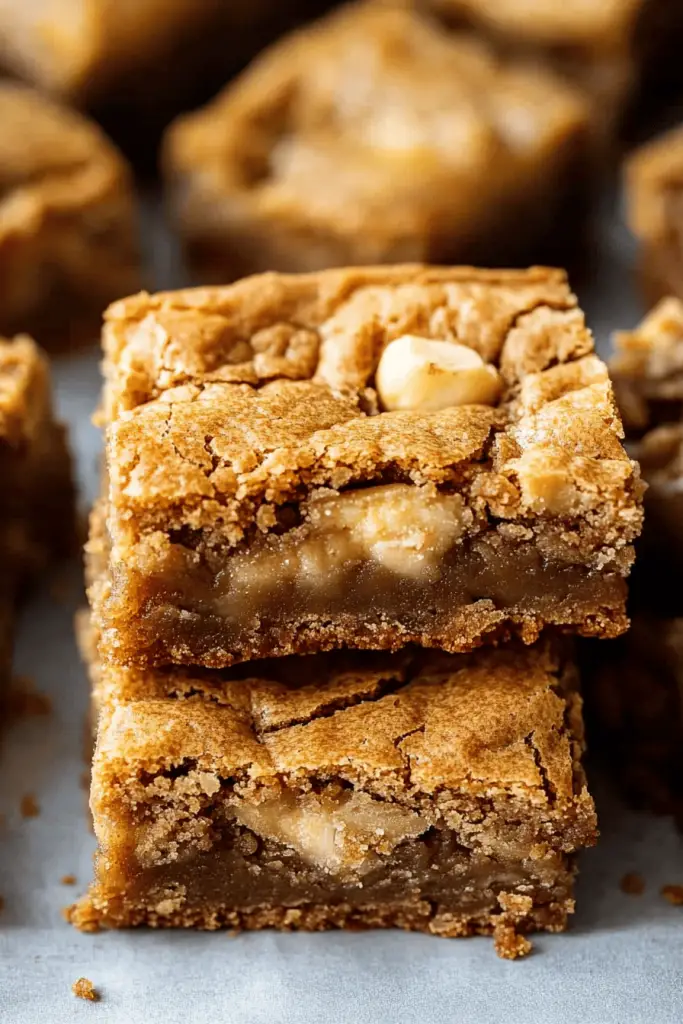
So, what exactly *is* this delightful confection? Honeycomb candy, sometimes called cinder toffee or sponge candy, is basically a caramelized sugar mixture that’s been aerated with baking soda. When you add baking soda to the hot sugar syrup, a chemical reaction happens, creating all those tiny bubbles that give it that signature porous, honeycomb-like structure. It’s light as air but with an intense, sweet flavor that’s just a little bit toffee-like, with subtle notes of honey. The name really says it all – it looks like a piece of edible honeycomb, and the texture is unlike anything else. It’s brittle and crunchy, and when you bite into it, it just dissolves on your tongue in the most satisfying way. Think of it as a magical sugar cloud that’s been kissed by heat and transformed into pure bliss. It’s not overly complicated, but that transformation from simple ingredients to this airy wonder is truly fascinating.
Why you’ll love this recipe?
Honestly, there are so many reasons why I keep coming back to this honeycomb candy recipe, and I just know you’re going to fall in love with it too. First off, the flavor is just out of this world. It’s that perfect balance of sweet and slightly caramelized, with just a hint of that lovely honey undertone. It’s not just sugary; there’s a depth to it that’s incredibly satisfying. Then there’s the texture. Oh, the texture! It’s this incredible, light, airy crunch that just shatters in your mouth. It’s so addictive! And the best part? It’s ridiculously easy to make. Seriously, you only need a few pantry staples, and the whole process takes less time than preheating your oven for cookies. I’ve spent years perfecting this, and I can tell you with certainty that it’s incredibly forgiving, which is a huge win in my book. It’s also wonderfully cost-effective; you’re not looking at fancy ingredients here, just sugar, syrup, and a couple of basics. Plus, it’s so versatile! You can eat it on its own, chop it up and sprinkle it over Ice Cream or yogurt, or even use it as a decoration. It’s a real showstopper without any of the usual baking stress. What I love most about this is how it feels like a special treat, but it’s so achievable on a weeknight when you need a little pick-me-up. It’s definitely a crowd-pleaser, and my family devours it every single time I make a batch.
How do you make honeycomb candy?
Quick Overview
This recipe is all about transforming simple pantry staples into a dazzling, airy confection. We’ll melt sugar and syrup to a precise temperature, then whisk in baking soda to create a magnificent foaming reaction. The key is to work quickly but carefully, pour it into a prepared pan, and let it cool undisturbed. The result is a light, crunchy, golden treat that’s incredibly satisfying. Don’t be intimidated by the sugar work; it’s more about following a few key steps than complex techniques. You’ll be amazed at how quickly this comes together, and the visual transformation is honestly half the fun!
Ingredients
For the main mixture:
1 ½ cups granulated sugar (use regular white sugar for the best caramelization)
½ cup golden syrup or corn syrup (this helps prevent crystallization and gives it that lovely chew)
¼ cup water (just enough to get things started)
1 ½ teaspoons baking soda (make sure it’s fresh and not expired, as this is crucial for the lift)
For Preparing the Pan:
A 9×9 inch baking pan or a similarly sized baking sheet
Vegetable oil or non-stick cooking spray (for greasing)
Parchment paper or foil (optional, but makes cleanup a breeze)
Step-by-Step Instructions
Step 1: Preheat & Prep Pan
First things first, let’s get our workspace ready. Line a 9×9 inch baking pan with parchment paper or foil, leaving some overhang on the sides. This is going to be your best friend for easy cleanup later! Then, lightly grease the parchment paper or foil with a neutral oil like vegetable oil, or give it a good spray with non-stick cooking spray. You want a nice, even, thin layer. This prevents the hot candy from sticking. Have everything ready to go because once the candy is ready, you need to work fast!
Step 2: Mix Dry Ingredients
In a small, heatproof bowl, whisk together your baking soda. Make sure it’s a good quality, fresh baking soda – expired baking soda just won’t give you that amazing lift we’re looking for. Give it a quick stir with a fork or whisk to make sure there are no lumps. Set this aside. This step is super important because you’ll be adding it all at once later, and you don’t want any clumps!
Step 3: Mix Wet Ingredients
Grab a medium-sized, heavy-bottomed saucepan. Add your granulated sugar, golden syrup (or corn syrup), and water to the pot. Stir these ingredients together gently over medium heat, just until the sugar has dissolved. You don’t want to stir too much once it starts to boil, as this can encourage crystallization, but at this stage, a gentle stir is fine to ensure everything dissolves smoothly.
Step 4: Combine
Once the sugar is dissolved, increase the heat to medium-high. Clip a candy thermometer to the side of the pot, making sure the tip is submerged in the syrup but not touching the bottom. Let the mixture boil *without stirring* until it reaches exactly 300°F (150°C) on the candy thermometer. This is the “hard crack” stage. It will be a beautiful amber color. Be patient with this part; it can take about 8-15 minutes depending on your stove. Once it hits 300°F, immediately remove the pot from the heat. Working very carefully, quickly whisk in the pre-measured baking soda. The mixture will immediately foam up dramatically, like a science experiment! Whisk it in for about 10-15 seconds until it’s just combined and looks wonderfully frothy and bubbly.
Step 5: Prepare Filling
This step isn’t really for a separate filling in this recipe, but it’s more about preparing the “filling” of air bubbles within the candy itself. The baking soda is what creates this airy, bubbly interior structure. It’s the magic ingredient that transforms a simple sugar syrup into the delightful honeycomb we’re aiming for. No extra preparation needed here; just the baking soda doing its wonderful job!
Step 6: Layer & Swirl
As soon as the baking soda is whisked in and the mixture has foamed up, immediately and carefully pour the bubbling mixture into your prepared pan. Do NOT spread or stir it once it’s in the pan. Just let it settle naturally. You’ll see all those beautiful bubbles forming and expanding. The magic of the honeycomb structure happens on its own as it cools.
Step 7: Bake
This recipe doesn’t actually require baking in the oven! The “baking” happens in the saucepan on the stovetop when we cook the sugar syrup to the hard crack stage, and then the magic continues as it cools and the bubbles set. So, no oven needed for this part!
Step 8: Cool & Glaze
Let the honeycomb candy cool completely in the pan on a wire rack for at least 1-2 hours, or until it’s completely firm and set. Resist the urge to poke it! Once it’s fully cooled, you can lift it out of the pan using the parchment paper or foil overhang. At this point, you can add a glaze if you like. For a simple chocolate glaze, melt about 1 cup of good quality chocolate chips (milk or dark, your choice!) with a teaspoon of coconut oil or vegetable oil. Drizzle it over the cooled honeycomb, or dip the bottoms in. Let the glaze set completely before breaking or cutting.
Step 9: Slice & Serve
Once the honeycomb (and glaze, if using) is completely cooled and set, you can break it into pieces by hand or carefully chop it with a sharp knife. It will shatter quite easily. Store in an airtight container at room temperature. I love breaking it into rustic, irregular pieces for a more charming look. Serve it on its own, or use it to adorn desserts!
What to Serve It With
This honeycomb candy is so delightful on its own, but it also plays incredibly well with other flavors and textures. For breakfast, I love breaking off a few small pieces and crumbling them over a bowl of thick Greek yogurt with some fresh berries. The crunch and sweetness are a fantastic contrast to the creamy yogurt. For a more elegant brunch, imagine serving it alongside a delicate vanilla panna cotta or a light lemon mousse. The dramatic, bubbly look of the honeycomb adds instant sophistication. As a dessert, it’s an absolute dream scattered over a scoop of rich Vanilla Bean ice cream or even a warm chocolate lava cake. The contrast of the cold ice cream or warm cake with the brittle, airy candy is just divine. And for those cozy snack times when you just need a little something sweet, it’s perfect simply enjoyed with a cup of hot tea or coffee. My kids absolutely adore it when I crumble some over their hot chocolate – it melts just a little and creates these incredible chocolatey, caramelly ripples. It’s also a fun way to add a bit of crunch to a simple fruit salad if you’re feeling adventurous!
Top Tips for Perfecting Your Honeycomb Candy
I’ve made this honeycomb candy more times than I can count, and through a few sticky situations (pun intended!), I’ve picked up some tricks that really make a difference. First, about the baking soda: make sure it’s fresh! If it’s old, your candy won’t bubble up properly, and you’ll end up with a dense, hard disc instead of airy honeycomb. I always give my baking soda a good sniff test before I use it. For the sugar mixture, using a heavy-bottomed saucepan is really key. It distributes heat more evenly, preventing scorching. And when you’re cooking the sugar syrup to 300°F, resist the urge to stir it! Swirling the pan gently is okay if you see dark spots forming, but constant stirring can cause crystallization, making your candy grainy. Patience is a virtue here; let that thermometer do its work. When it comes to pouring, speed is essential but so is safety. Wear oven mitts, and pour it into the prepared pan swiftly and carefully. Don’t try to level it out with a spatula; just let gravity do its thing. You want those natural bubbles to form. If you’re thinking about ingredient swaps, I’ve found that golden syrup gives the most authentic flavor and texture, but corn syrup is a perfectly acceptable substitute. Just make sure you’re using a light-colored one. Some people like to add flavorings, like a touch of vanilla extract or a pinch of cinnamon to the sugar mixture *before* it boils, but I personally love the pure, unadulterated caramel-honey flavor. For the glaze, milk chocolate makes it extra decadent, but Dark Chocolate offers a lovely contrast. Just be sure your honeycomb is completely cool before you attempt to glaze it, otherwise, you’ll have a melted mess! Finally, remember that humidity can be the enemy of crispy candy. On a very humid day, your honeycomb might not stay as crisp for as long, so it’s best to enjoy it the same day or store it in a truly airtight container. I learned that the hard way after a particularly sticky summer batch!
Storing and Reheating Tips
Storing honeycomb candy properly is crucial to keeping it that delightful, airy crispness. Once it’s completely cooled and set, break it into pieces. The best way to store it is in an airtight container at room temperature. This is really important because any exposure to moisture in the air will make it soften and become chewy, which isn’t the texture we’re after. Avoid storing it in the refrigerator; the cold, damp environment there can also negatively affect its texture. If you live in a very humid climate, you might find it helps to put a small food-safe desiccant packet (like those little silica gel packets you find in new shoes or electronics) in the container with the candy to absorb excess moisture, but make sure it’s not something your family or pets can get into. Properly stored, your honeycomb candy should stay wonderfully crisp for at least a week, though honestly, it rarely lasts that long in my house! I’ve never really needed to reheat it, as it’s best enjoyed at room temperature, but if it does get a little soft and you want to try and crisp it up, you could try placing it in a very low oven (around 200°F or 100°C) for just a few minutes, watching it very carefully to prevent burning. This isn’t a guaranteed fix, so enjoying it fresh is always the best approach. If you’re adding a glaze, especially chocolate, the storage advice is the same – airtight container at room temperature, and it’s best consumed within a few days for optimal glaze texture.
Frequently Asked Questions
Final Thoughts
Honestly, making this honeycomb candy is one of those kitchen moments that feels like pure magic. It’s so rewarding to see simple ingredients transform into something so beautiful and delicious. The airy crunch, the deep caramel notes – it’s just an experience! It’s the kind of treat that makes people ask, “Wow, you made this yourself?!” and that’s always a great feeling. It’s proof that you don’t need a fancy patisserie to create something truly special. If you enjoy this recipe, you might also love my recipe for homemade caramel sauce or my easy no-bake Chocolate Cookies; they both have that satisfying homemade charm. Give this honeycomb candy a try – I promise it’s worth every bubbly second. I can’t wait to hear how yours turns out and what you think of this little bit of sweet joy. Happy candy-making!

Honeycomb Candy
Ingredients
Main Ingredients
- 300 g granulated sugar
- 59 ml water
- 59 ml light corn syrup
- 1 tablespoon baking soda
For Dipping (Optional)
- 170 g milk or semi-sweet chocolate chips
Instructions
Preparation Steps
- Generously oil a large cookie sheet or jelly roll pan with vegetable oil. Set aside.
- Add sugar, water, and corn syrup to a saucepan. Stir to combine and place over medium-high heat. Bring to a boil and heat without stirring until a candy thermometer reaches 300°F (150°C), about 10-12 minutes.
- Stir in the baking soda (make sure there are no clumps and sprinkle it evenly over the candy mixture). Pour the mixture quickly onto the oiled baking sheet. The candy will bubble up and become amber in color when you add the soda. Let harden completely, then break into pieces.
- If using, melt the chocolate chips, adding a teaspoon or two of vegetable oil or shortening if needed. Dip the hardened honeycomb candy in the melted chocolate and place on waxed paper to set.
- Enjoy this crunchy and sweet candy!


