


Oh, you guys, I am SO excited to share this recipe with you today! It’s one of those things that feels like a total cheat, but it’s so, so good. You know those days when you’re just craving something sweet, something that tastes like a fancy candy bar you’d buy, but you *really* don’t want to spend an hour baking a whole cake or fussing with complicated chocolates? Yeah, that’s where these homemade candy bar bites come in. Seriously, my family devours these. I’ve made them for everything from impromptu dessert emergencies to potlucks, and they always disappear faster than you can say “more, please!” They remind me a little bit of those beloved caramel Nougat Bars, but with a richer, more homemade flavor that you just can’t replicate from a wrapper. These little gems are my absolute secret weapon for satisfying that sweet tooth without any fuss. And honestly, the smell that fills the kitchen when these are baking? Pure magic!
What are homemade candy bars?
So, what exactly are these magical little treats we’re talking about? Think of them as the ultimate shortcut to that satisfying, multi-layered candy bar experience you love, but in a bite-sized, totally manageable form. They’re essentially a no-bake or minimal-bake confection that combines creamy, chewy, and sometimes crunchy elements, all bound together and often topped with a smooth chocolate glaze. The “homemade” part really lets you control the quality of ingredients and tailor the flavors exactly to your liking. It’s essentially taking all the best parts of your favorite chocolate bars – the gooey caramel, the chewy nougat, the satisfying crunch of nuts or crispy bits – and consolidating them into these perfectly portioned, incredibly addictive little squares. They’re less about precise tempering of chocolate and more about bringing together a few simple, delicious components to create something that tastes utterly decadent and, dare I say, even better than the store-bought versions. They are the ultimate easy indulgence!
Why you’ll love this recipe?
I know that this recipe is a staple in my kitchen, but I know that you will too!flavor is just out of this world. We’re talking layers of sweet, rich, satisfying goodness. The combination of textures – the soft, chewy base, the gooey caramel-like center, and the smooth chocolate topping – is pure bliss. It’s like a party in your mouth! And then there’s the simplicity. Seriously, you don’t need any fancy equipment or years of pastry experience. Most of the ingredients are likely already in your pantry, and the assembly is surprisingly straightforward. This one’s a lifesaver on busy nights when the craving hits hard. It’s also incredibly cost-effective. Buying a box of fancy candy bars can add up quickly, but making a big batch of these homemade candy bar bites is soversatility is a huge win! You can easily customize them with different nuts, add-ins, or even change up the flavor of the glaze. If you love my No-Bake Peanut Butter Cups, you’ll adore these. They hit a similar note of homemade candy perfection but offer a different, equally delightful flavor profile. What I love most about these bites is that they strike that perfect balance: they feel incredibly indulgent and special, but they’re so easy to whip up that you can make them whenever the mood strikes. They are perfect when you’re craving something sweet at 10 pm but don’t want to bake a whole cake!
How to Make Homemade Candy Bar Bites
Quick Overview
This recipe is all about bringing together a few key components to create a layered candy bar experience without the fuss. We’ll start with a simple, no-bake base, then layer in a rich, chewy filling, and finish it all off with a decadent chocolate glaze. It’s a straightforward process that yields incredibly impressive results, and the best part is, you can customize it to your heart’s content. The whole thing comes together in under an hour of active time, making it perfect for those moments when you need a sweet fix fast!
Ingredients
For the Main Batter:
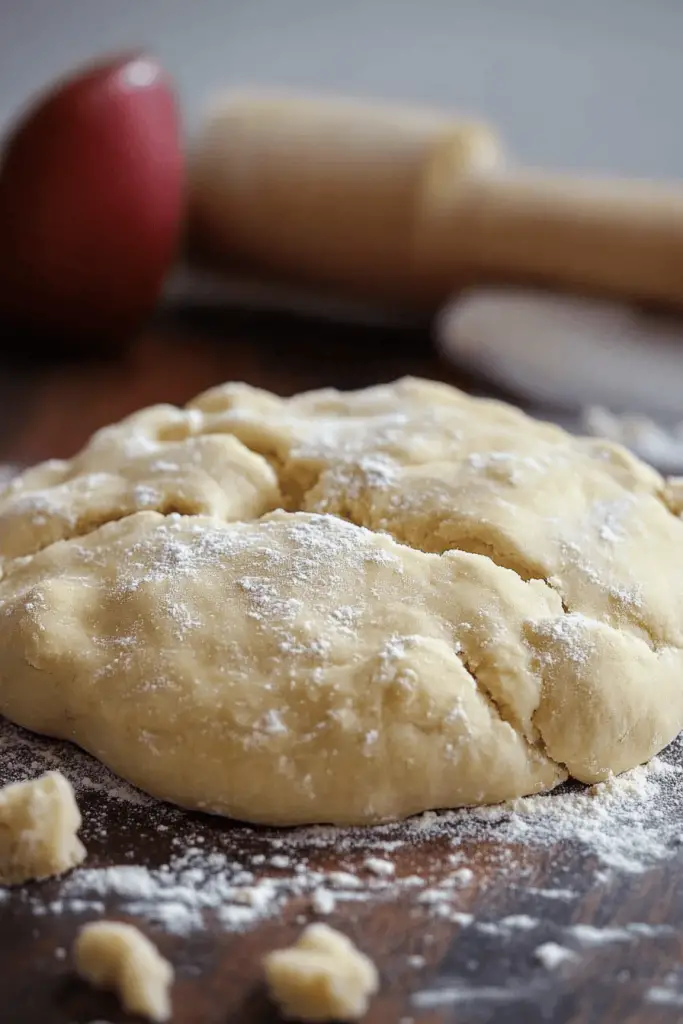
Here’s where we build our chewy foundation. I always use good quality graham crackers for the best flavor and texture. You can crush them in a food processor for a fine crumb, or put them in a zip-top bag and bash them with a rolling pin for a more rustic texture – either works great! If you can’t find graham crackers, digestive biscuits or even Shortbread Cookies can work in a pinch, though they might slightly alter the flavor profile.
- 2 cups graham cracker crumbs (about 14-16 full crackers)
- 1/2 cup unsalted butter, melted
- 1/4 cup granulated sugar
- 1/4 teaspoon salt
For the Filling:
This is the heart of our candy bar! It’s a rich, gooey, caramel-like mixture that’s incredibly satisfying. Using good quality Sweetened Condensed Milk is key here; it provides that perfect sweetness and creamy texture. If you like a bit of crunch, this is where you can add your favorite nuts – toasted and chopped almonds, peanuts, or even pecans are fantastic. I’ve also thrown in some crispy rice cereal for an extra textural element, and let me tell you, it’s a game-changer! Some people even like to add mini chocolate chips here, but I usually save the chocolate for the topping.
- 1 cup packed light brown sugar
- 1/2 cup unsalted butter
- 1/4 cup sweetened condensed milk
- 1 teaspoon vanilla extract
- 1/2 cup chopped toasted nuts (optional – almonds, peanuts, pecans)
- 1/2 cup crispy rice cereal (optional)
For the Glaze:
A smooth, shiny chocolate glaze ties everything together. I prefer using semi-sweet chocolate chips because they offer a nice balance of sweetness and slight bitterness that complements the filling. Make sure to use good quality chocolate for the best melt and flavor. If you want a richer glaze, you can use bittersweet chocolate. For a thinner glaze, you can add a tablespoon or two of milk or cream. The key is to get it smooth and pourable.
- 2 cups semi-sweet chocolate chips
- 2 tablespoons unsalted butter
- 1 teaspoon vanilla extract
Step-by-Step Instructions
Step 1: Preheat & Prep Pan
First things first, let’s get our pan ready. I like to use an 8×8 inch baking pan for these bites because it gives them a nice thickness. Line the pan with parchment paper, leaving some overhang on the sides. This makes lifting the whole slab out so much easier later on – a total lifesaver! Lightly grease the parchment paper too, just to be extra sure nothing sticks. You don’t need to preheat the oven for this part, but having your pan prepped means you’re ready to go when everything else is mixed.
Step 2: Mix Dry Ingredients
In a medium bowl, combine your Graham Cracker crumbs, granulated sugar, and salt. Give it a good whisk to make sure everything is evenly distributed. This dry mixture is going to form the base of our candy bar bites, giving them structure and a subtle sweetness. I always make sure there are no big clumps of sugar; a uniform mixture is key for a consistent base.
Step 3: Mix Wet Ingredients
Now, for the wet ingredients for the base. Pour the melted butter into the dry mixture. Use a fork or a spatula to stir it all together until the crumbs are evenly moistened and resemble wet sand. You should be able to squeeze a bit and have it hold its shape. This is the perfect consistency; if it seems too dry, you can add another tablespoon of melted butter, a little at a time.
Step 4: Combine
Press this crumb mixture firmly and evenly into the bottom of your prepared pan. I usually use the bottom of a glass or a measuring cup to get it nice and compact. You want a solid, even layer so your candy bar bites hold their shape. This base is what gives them their structure, so don’t skimp on pressing it down!
Step 5: Prepare Filling
Now for the star of the show – the filling! In a saucepan over medium heat, combine the packed Brown Sugar, butter, and sweetened condensed milk. Stir constantly until the butter is melted and the mixture is smooth. Bring it to a gentle simmer, and continue to cook, stirring, for about 5-7 minutes. You’re looking for it to thicken up nicely, almost like a thick caramel sauce. It should coat the back of a spoon. Once it reaches that consistency, remove it from the heat and stir in the vanilla extract. If you’re adding nuts or crispy rice cereal, stir those in now. This filling is what gives it that incredible chewy, gooey texture that makes these so addictive.
Step 6: Layer & Swirl
Carefully pour the warm filling mixture evenly over the graham cracker base in the pan. Spread it out with a spatula so it covers the entire surface. You can gently swirl it a bit if you like a more marbled effect, but I usually aim for an even layer so the chocolate topping sits nicely. This is where the magic really starts to happen!
Step 7: Bake
Now, pop the pan into a preheated oven at 350°F (175°C). You’re going to bake this for about 20-25 minutes, or until the edges are golden brown and the center is set. It might still look a little soft, but it will firm up as it cools. Keep an eye on it; you don’t want the edges to burn. I always check mine around the 20-minute mark. The aroma that fills your kitchen during this stage is just heavenly – so sweet and inviting!
Step 8: Cool & Glaze
Once baked, take the pan out of the oven and let it cool completely on a wire rack. This is crucial! Don’t try to glaze it while it’s hot, or the chocolate will just melt away. Once it’s fully cooled, you can start on the glaze. In a heatproof bowl set over a saucepan of simmering water (or in the microwave in 30-second intervals), melt the chocolate chips and butter together. Stir until it’s completely smooth and glossy. Stir in the vanilla extract. Once melted and smooth, pour this luscious chocolate glaze over the cooled base and filling. Spread it evenly with an offset spatula or the back of a spoon. You want a nice, even coating.
Step 9: Slice & Serve
Let the chocolate glaze set. You can leave it at room temperature for a couple of hours, or speed things up by popping it in the refrigerator for about 30 minutes. Once the chocolate is firm, use the parchment paper overhang to lift the entire slab out of the pan onto a cutting board. Now for the fun part: slice it into small, bite-sized squares. I usually aim for about 1-inch squares, hence the “bites”! You can use a sharp knife to get clean cuts. For the best results, make sure the chocolate is fully set before slicing. These are delicious right away, or you can chill them for a firmer texture.
What to Serve It With
These homemade candy bar bites are so versatile, they fit in anywhere! For a simple morning pick-me-up, I love to pair them with a strong cup of coffee. They’re a perfect little treat to have with your first cup of the day, especially if you’re running late – just grab one and go! For a more elegant brunch spread, I’ll cut them into slightly smaller squares and arrange them on a tiered dessert stand alongside fresh berries and maybe some mini muffins. They add a lovely touch of homemade indulgence. As a dessert, they’re incredible served slightly chilled, perhaps with a scoop of vanilla bean ice cream or a dollop of fresh whipped cream. They’re also fantastic as an after-dinner treat, a little sweet something to finish a meal. And for those cozy evenings, when all you want is a comforting snack, they are absolutely perfect. My personal favorite? I love to have one (or two!) with a glass of cold milk after the kids are finally in bed. It’s my little moment of peace and quiet indulgence. My family also loves them crumbled over a bowl of homemade ice cream – it’s like deconstructed candy bar sundae!
Top Tips for Perfecting Your Homemade Candy Bar Bites
Over the years, I’ve made these countless times, and I’ve picked up a few tricks that I think will help you achieve candy bar bite perfection. First, when it comes to the base, make sure your graham cracker crumbs are fine enough. If they’re too chunky, the base won’t hold together as well. Also, don’t over-melt your butter; just warm enough to combine. For the filling, the key is to stir constantly while it simmers. This prevents scorching and ensures a smooth, caramel-like consistency. If you’re adding nuts, toasting them first really brings out their flavor. My personal “aha!” moment was realizing that slightly undercooking the filling by about 30 seconds still results in a delicious gooeyness that sets up perfectly as it cools. For the swirl customization, if you want a more visually appealing swirl on top, you can reserve a small amount of melted chocolate and drizzle it over the filling *before* baking, then gently swirl it with a toothpick. It adds a nice marbled effect. When it comes to ingredient swaps, you can absolutely use different types of cookies for the base, like chocolate wafers or shortbread. For the filling, if you want a richer caramel flavor, try using dark brown sugar instead of light. And for the glaze, don’t be afraid to experiment! A sprinkle of sea salt on top of the fresh glaze is heavenly, or you could try adding a touch of espresso powder to the chocolate for a mocha flavor. My biggest baking tip here is patience with the cooling. Resist the urge to slice into them too soon! Letting them cool properly ensures clean cuts and the perfect texture. I learned this the hard way after trying to cut them when they were still warm and ended up with a messy, melted chocolate situation!
Storing and Reheating Tips
These homemade candy bar bites are surprisingly resilient when it comes to storage, which is another reason I love them so much. If you’re planning to enjoy them within a day or two, you can simply keep them at room temperature. Just make sure to cover them tightly with plastic wrap or store them in an airtight container. They tend to stay nice and fresh for about 3-4 days this way. If you need them to last a bit longer, the refrigerator is your best friend. Pop them into an airtight container, and they’ll stay delicious for up to a week, sometimes even a little longer! The cold also makes them wonderfully firm, which some people (myself included!) really enjoy. For serious long-term storage, these freeze like a dream. Wrap individual bites or small stacks in plastic wrap, then place them in a freezer-safe bag or container. They can stay frozen for up to 2-3 months. To thaw, just transfer them to the refrigerator overnight, or let them sit at room temperature for an hour or two. The glaze timing advice is important: if you plan to freeze them, it’s best to glaze them *before* freezing. If you’re storing them at room temperature or in the fridge, you can glaze them just before serving if you want the freshest possible chocolate coating, but they hold up perfectly fine if glazed beforehand.
Frequently Asked Questions
Final Thoughts
So there you have it – my absolute favorite homemade candy bar bites! I truly believe these are a game-changer when it comes to satisfying that sweet craving. They’re incredibly easy, delightfully decadent, and always a crowd-pleaser. The combination of that crunchy, buttery base, the chewy, caramel-like filling, and the smooth chocolate topping is just perfection. If you’re someone who loves those classic candy bar flavors but wants something a little more special and homemade, you absolutely have to give this recipe a try. It’s a recipe that I keep coming back to, and it never fails to bring smiles to my family’s faces. For those who enjoyed these, you might also love my recipe for Easy No-Bake Energy Balls – they offer a slightly healthier take on sweet treats but with that same homemade charm! I can’t wait to hear how yours turn out! Please leave a comment below with your thoughts, any variations you tried, or even just to say hello! And if you snap a picture, don’t forget to tag me on social media – I love seeing your creations!
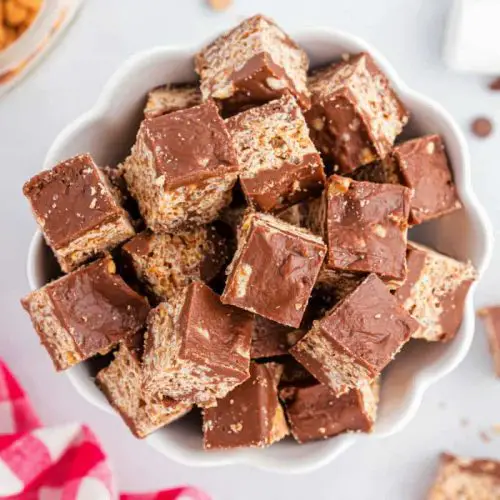
homemade candy bar bites
Ingredients
Main Ingredients
- 0.75 cup unsalted butter melted
- 0.75 cup heavy cream
- 1.5 cup granulated sugar
- 25 regular marshmallows
- 12 ounce milk chocolate morsels
- 1 ounce unsweetened baking chocolate
- 4.5 cup rice krispies cereal or any puffed rice cereal
- 11 ounce butterscotch morsels
- 1 cup peanut butter morsels can substitute with more butterscotch for nut-free
Instructions
Preparation Steps
- In a large mixing bowl, add marshmallows, milk chocolate morsels, and unsweetened baking chocolate. Set aside.
- In a large pot, bring butter, heavy cream, and granulated sugar to a boil over medium-high heat. Once boiling, reduce heat slightly and boil for exactly 4 minutes, stirring constantly. Remove from heat.
- Pour the hot mixture over the chocolate and marshmallows. Using an electric mixer, beat for about 2 minutes until smooth and fully combined.
- In a microwave-safe bowl, combine butterscotch and peanut butter morsels. Microwave for 1 minute, stir, then heat in 30-second intervals until fully melted and smooth.
- In a large bowl, mix rice krispies cereal with melted butterscotch mixture and about one-third of the chocolate mixture. Stir until completely combined.
- Line a 13x9 inch baking dish with parchment paper. Spread one-third of the chocolate mixture evenly on the bottom. Top with the cereal mixture and press firmly. Finish with the remaining chocolate mixture, spreading evenly over the top layer.
- Refrigerate for 1 to 2 hours until completely set. Remove from pan, cut into 1-inch squares or bite-sized pieces, and enjoy! Store in an airtight container.


