


There’s something magical about a bagel that still feels like a hug in bread form. I remember the first time I tasted a truly chewy, glossy bagel straight from a tiny bakery in a new city, steam fogging the window and the air smelling faintly of malt and cornmeal. Since then, I’ve chased that perfect bite at home, chasing adjustments and little tricks until it finally clicked. The result isn’t a fancy, bakery-only thing—it’s Easy Homemade bagels you can whip up on a weekend morning, with a crust that crackles when you bite and a soft, chewy interior that makes you grin. Think of these as the warm, less intimidating cousin of your favorite bakery version. It’s not just about the recipe; it’s the ritual—boiling, shaping, and watching the kitchen fill with that toasty aroma while you chat with a friend over coffee. This is my go-to for busy mornings, lazy Sundays, and anytime I crave something comforting and genuinely satisfying. And yes, it’s surprisingly simple to pull off—you’ll wonder why you ever bought bagels in the first place.
What is easy homemade bagels?
Easy homemade bagels aren’t a quick bread or a plain roll turned into a circle. They’re a sandwich bread with a heartier chew, achieved by a sturdy dough, a quick rise, and a brief boil before baking. The name here isn’t about rushing through a recipe; it’s about accessibility. Think of it as a traditional bagel technique simplified with kitchen-friendly proportions and a forgiving, forgiving dough that rewards patience with that signature glossy crust and springy crumb. The “bagel” vibe comes from the twisty shape, the boil, and the golden-brown crust—an iconic texture you’ll recognize in every bite. I love that this is a versatile vehicle for all kinds of toppings and fillings, from almond Cream Cheese swirls to scallion and sesame crunch. It’s essentially a sturdy, cheerful bread that doubles as a savory vessel or a cream-cheese-laden treat. If you’ve ever wondered whether you could make bagels without a fancy mixer or a long fermentation, you’ll find the answer here: yes, you absolutely can.
Why you’ll love this recipe?
What I love most about this easy homemade bagels is how approachable they feel without sacrificing that bakery-worthy bite. The aroma of yeast blooming in warm water, the sheen on the dough as it rests, and the satisfying crackle you hear when you bite into a freshly baked bagel—that’s the good stuff. Flavor-wise, these bagels carry a gentle malt-sweetness with a touch of tang from the dough, and that just-for-you homemade tang you get when you let the dough rest long enough to strengthen. Simplicity is a big win here: you mix, shape, boil, and bake with reliable steps that you can repeat week after week. Budget-friendly ingredients keep this friendly to your wallet, too; there’s no need for exotic flours or fancy gadgets. And the versatility? Oh, the versatility. You can go classic with sesame or poppy seeds, or turn it into a breakfast party with a honey glaze, or a fancy lunch by stuffed fillings—everything from herby Cream Cheese to smoked trout makes sense in these bagels. What I love most about this recipe is its everyday magic—the kind that turns a ordinary morning into a small celebration. It’s a lifesaver on busy nights, a kid-friendly project on weekends, and a crowd-pleaser at brunch. If you’ve got a craving for a comforting, chewy bagel, you’ve found your new favorite.
How do I make homemade bagels?
Quick Overview
Here’s the heart of it: mix a sturdy dough, give it a light rise, portion and shape into rings, boil briefly to set the crust, then bake until deeply golden. The magic is in the boil—those 60–90 seconds per side in gently salted water makes the crust glossy and the crumb beautifully chewy. You’ll end up with eight rolls ready for any filling or topping you dream up. The process is straightforward, and if you’ve got a few tricks from other bread adventures (like weighing ingredients and using bread flour for chew), you’ll see how forgiving this is. It’s a joyful kitchen routine that doesn’t demand perfection—just patience and a little attention to texture. And yes, you can adapt this for sweet versions or savory ones with toppings right before baking. It’s simple, it’s doable, and it tastes like a homemade victory every single time.
Ingredients
For the Main Batter:
- 4 cups bread flour (about 520 g) — bread flour gives that chewy bite bagels are known for; all-purpose works in a pinch, but you’ll miss a touch of chew.
- 1 1/2 cups warm water (about 360 ml), around 110°F/43°C — warm enough to wake the yeast but not kill it.
- 2 teaspoons instant yeast — fast-acting and reliable for a quick rise.
- 1 tablespoon sugar or honey — a tiny sweetness helps with browning and flavor balance.
- 1 1/2 teaspoons salt — essential for flavor and structure.
- 1 tablespoon malt powder, barley malt syrup, or a pinch of diastatic malt (optional) — for that glossy crust and extra chew.
For the Filling:
- 8 oz Cream Cheese, softened — the canvas for savory or sweet fillings.
- 2–3 tablespoons finely chopped chives or green onions (optional)
- 1 teaspoon lemon zest or a squeeze of lemon juice — brightens the cream cheese.
- Salt to taste
- Variations: for a veggie-forward swirl, add finely chopped dill, cucumber bits, or smoked salmon ribbons.
For the Glaze:
- 2 tablespoons honey or maple syrup
- 1 tablespoon water
- A pinch of coarse sugar (optional) for extra sparkle
Step-by-Step Instructions
Step 1: Preheat & Prep Pan
Heat your oven to 425°F (220°C). Line a rimmed baking sheet with parchment or a silicone mat. Have a large pot ready for boiling and a slotted spoon to transfer bagels. I like to set a cooling rack nearby so the first batch can rest while the rest go into the oven. If you’ve got a pizza stone, you can use it for an extra crisp bottom, but a regular Sheet Pan works beautifully too. The moment the dough comes together, you’ll feel that satisfaction—like a small victory you earned with your own two hands.
Step 2: Mix Dry Ingredients
In a big bowl, whisk or stir together the flour, yeast, sugar, and salt. If you’re using malt powder, add it here. This step sets the stage for the dough’s texture, so don’t skip it. Your goal is to have an even distribution of everything so the dough doesn’t end up dense or uneven.
Step 3: Mix Wet Ingredients
In a separate container, warm the water and then whisk in any sweetener you’re using. If you’re using malt extract, dissolve it into the water first. You don’t want the water too hot—aim for a warm bath that activates the yeast without scalding it. The smell of the warm liquid should be yeasty and inviting, almost like a small memory waking up in the kitchen.
Step 4: Combine
Pour the wet into the dry and mix until a shaggy dough forms. Then knead on a lightly floured surface for about 6–8 minutes, until it’s smooth and elastic. If you have a stand mixer with a dough hook, you can do this with lower effort, about 5–6 minutes on medium speed. The dough should pass the windowpane test (stretch a piece; it should become thin enough to see light through without tearing). If it’s too sticky, sprinkle in a tablespoon or two of flour, a little at a time.
Step 5: Prepare Filling
While the dough rests, whip up your cream cheese filling. In a bowl, beat the cream cheese until smooth, then fold in chives, lemon zest, and a pinch of salt. Taste and adjust. You want a spreadable mixture that isn’t runny. If you’re going for a marbled effect, reserve a portion of the filling plain and mix the rest with your chosen herbs or smoked salmon scraps—this is where you get to play. Chill the filling so it’s easy to handle when you’re shaping your bagels.
Step 6: Layer & Swirl
Divide the dough into eight equal pieces. To make stuffed or swirled bagels, roll each piece into a rectangle, spread a thin line of filling along the center, and carefully roll the dough to enclose the filling. Seal tightly and place seam-side down. If you’re keeping things classic, you can skip filling and simply shape a ball with a hole and then gently flatten to form the traditional ring. For swirls, you can create a flick of the filling to mimic a marbled look by half-swirl rolling. The goal here is a compact log or ring with a hint of filling visible at the edges as you bake. I’ve learned that chilling for 15 minutes after shaping helps hold the form during boiling, especially with fillings.
Step 7: Boil & Bake
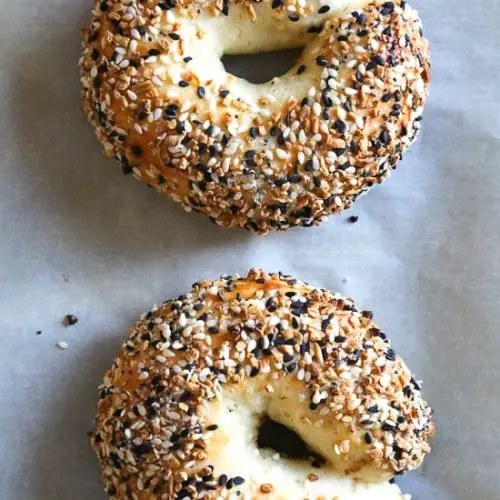
Bring a wide pot of water to a gentle boil and add 1–2 tablespoons of sugar or honey to create surface tension. Lower the bagels in, a few at a time, for 60–90 seconds per side. The longer you boil, the chewier the crust becomes. Remove with a slotted spoon and place on the prepared pan. If you want sesame, poppy, or everything seasoning on now, press the seeds onto the surface while the dough is still a little tacky. Bake for 20–22 minutes, until deeply golden and glossy. If you’re using a stone, you may need to rotate halfway through for even browning. The aroma during bake is what makes the house feel like home—nutty, toasty, and a little sweet from the malt if you used it.
Step 8: Cool & Glaze
Transfer to a rack to cool for at least 10 minutes before glazing. If you’re glazing, warm your honey or maple glaze and brush it lightly over the tops while still warm. A light glaze adds a gentle sheen and a touch of sweetness that pairs beautifully with a savory bagel. If you prefer no glaze, simply let them rest and enjoy the shine from the bake itself. The crust will feel crisp at first bite and soften a bit as the crumb settles—perfection, really, in a warm, comforting bite.
Step 9: Slice & Serve
Slice with a serrated knife, or if you’re feeling indulgent, just break apart with your hands for a rustic look. Spread generously with cream cheese, or layer on smoked salmon, cucumber slices, and a sprinkle of dill. For a quick breakfast, slather with almond butter and a drizzle of honey. These bagels are best enjoyed warm, straight from the oven or toaster, when the crust crackles and the center stays satisfyingly chewy. My kids actually ask for seconds, and that’s how I know we’ve nailed it.
What to Serve It With
Bagels are built for pairing, so I like to think in moments. Here are a few ideas that feel like a little celebration, no matter the occasion.
For Breakfast: A cup of strong coffee or a latte, and a plate of bagels with plain or honey-chive cream cheese. I adore a simple tomato slice and a few ribbons of cucumber for brightness. It’s a bright, satisfying start to the day.
For Brunch: A small board with a few toppings: cucumber ribbons, smoked salmon, capers, dill, a soft scrambled egg topping, and a bowl of tangy herb cream cheese. It looks fancy but comes together quickly—great for guests who drift in at all hours.
As Dessert: Sweet glaze versions with a cinnamon-sugar finish can be a playful ending. A light cream cheese with lemon zest and a whisper of vanilla makes a dessert-y center, especially when paired with fresh berries or a citrus compote.
For Cozy Snacks: Toast slices brushed with butter and a dab of jam, or a warm bagel half piled with a thick layer of garlic-herb cream cheese. It’s comfort in a crusty, chewy bite, perfect for chilly evenings or movie nights.
Over the years, I’ve found that serving suggestions aren’t just about taste—they’re about moments. A small plate of warm bagels with coffee after a late afternoon swim, or bagels sliced and laid out like a casual spread for a family game night. It’s these tiny rituals that make easy homemade bagels feel like a family tradition in progress. If you’re curious about variations or want a nod to a flavor your family loves, check out some of my related favorites: everything bagels, sesame seed bagels, or blue cheese and chive bagels.
Top Tips for Perfecting Your Easy Homemade Bagels
Here are some bite-sized tricks I’ve learned along the way, organized by technique so you can pick what to try next.
Zucchini Prep: Not relevant for bagels, but a quick note on moisture control for any fillings: if you’re adding vegetables, pat them dry and squeeze out as much liquid as possible. Moisture is the enemy of a clean swirl and a firm dough.
Mixing Advice: Don’t overwork the dough. You’re aiming for a smooth, elastic ball, not a tight, stiff one. If you’ve got time, a 20–30 minute rest after the initial knead helps develop gluten, making the bagels a touch lighter. If you’re rushed, you can go straight into shaping after a quick knead.
Swirl Customization: If you want a prettier swirl, lay the filling along the edge of the dough rectangle and roll it tightly from one side to the other. The seam should be along the bottom when you seal, so it stays closed during boiling.
Ingredient Swaps: You can swap bread flour for a mix of 3 cups bread flour and 1 cup whole-wheat for a nuttier flavor and a bit more density. If you’re avoiding dairy, you can still use dairy-free cream cheese or whipped almond-based spreads in the filling, but know the texture may change slightly.
Baking Tips: An oven rack in the middle position helps even browning. If your oven runs hot, lower the temp to 420°F (215°C) and keep a close eye on the color. Use a shallow pan of hot water on the bottom of the oven for a bit of steamy humidity—this helps with crust development if you’re after a crisper finish.
Glaze Variations: For a glossy finish with zero sweetness, brush with a light olive oil mist and sea salt just after baking. For a sweeter glaze, mix a bit of maple syrup with warm water and brush lightly. You can even sprinkle sesame seeds or everything bagel seasoning after glazing for extra crunch and aroma.
I’ve learned that the best bagel texture comes from focusing on balance: a robust crust, a chewy interior, and a filling that doesn’t weep. The biggest lesson? It’s worth letting the dough rest and shaping with care. The more you practice, the more confident you’ll be, and your bagels will go from “pretty good” to “my family asks for these every weekend.”
Storing and Reheating Tips
Bagels store beautifully, and a little planning makes leftovers feel almost as good as when they’re fresh.
Room Temperature: In a paper bag or in a bread box, bagels stay fresh for 1–2 days. If you’re not planning to eat them within that window, freeze them for longer life. Keep them whole; slicing before freezing makes thawing a little easier.
Refrigerator Storage: Bagels stored in a plastic bag in the fridge will dry out more quickly. If you must refrigerate, slice first and keep in an airtight bag—then reheat in a toaster or 350°F (175°C) oven for 5–7 minutes until warm.
Freezer Instructions: Wrap individually in plastic wrap, then seal in a freezer bag. They’ll last up to 3 months. Thaw at room temperature, then toast to re-crisp the crust. For the best texture, you can re-boil for 30 seconds before toasting to bring back that chew.
Glaze Timing Advice: If you’re freezing, skip the glaze and apply it after reheating. Glazes can dull a crust that’s already chilled, so glazing at the end keeps that glossy, inviting finish.
These tips help you keep that warm bakery feel even on a Tuesday, when you’re juggling lunch boxes and last-minute homework reminders. I’ve done both and can confirm: proper storage saves you from the midweek bagel crisis!
Frequently Asked Questions
Final Thoughts
If you’ve read this far, you’ve earned a little encouragement: you can absolutely make easy homemade bagels that feel like a small triumph in your own kitchen. The process rewards you with warmth, a satisfying chew, and a universe of toppings that let you tailor every batch to your mood. I’m forever grateful for that moment when a batch came out perfectly—crisp, shiny, and just the right density—because it reminded me that cooking should feel like a friendly chat with someone you love, not a test you must pass. Give these a try, tweak the fillings to your family’s favorites, and tell me how your swirl looks. I’d love to hear about your topping experiments and any new tips you discover. Happy baking!
If you enjoyed this, drop a comment with what you swirled into your bagel and how you served it. Rate the recipe and share your variations so other home cooks can steal a bit of your genius. Here’s to cozy mornings, warm crusts, and the simple joy of homemade bread.
Easy Homemade Bagels
Ingredients
Main Ingredients
- 1 cup all-purpose flour or whole wheat or gluten-free mix
- 2 teaspoons baking powder ensure it's not expired
- 0.75 teaspoons kosher salt use less if using table salt
- 1 cup non-fat Greek yogurt e.g., Stonyfield; avoid regular yogurt as it can be too sticky
- 1 egg white beaten, or use a whole egg
Optional Toppings
- Everything bagel seasoning
- Sesame seeds
- Poppy seeds
- Garlic powder
- Onion powder
- Salt
Instructions
Oven Method:
- Preheat oven to 375°F (190°C). Line a baking sheet with parchment paper or a silicone mat. If using parchment paper, lightly spray with oil to prevent sticking.
- In a medium bowl, whisk together the flour, baking powder, and salt. Add the Greek yogurt and mix with a fork or spatula until well combined, forming crumbles.
- Lightly dust a work surface with flour. Remove the dough from the bowl and knead a few times until it's tacky but not sticky (about 15 turns). The dough should not stick to your hands when you pull away.
- Divide the dough into 4 equal portions. Roll each portion into a 3/4-inch thick rope and join the ends to form a bagel shape. Alternatively, form a ball and poke a hole in the center, then gently stretch it to form a bagel.
- Brush the bagels with the beaten egg white and sprinkle with your desired toppings on both sides. Place on the prepared baking sheet. Bake on the top rack of the oven for 25 minutes, or until golden brown. Let cool for at least 15 minutes before cutting.
Air Fryer Method:
- In a medium bowl, whisk together the flour, baking powder, and salt. Add the Greek yogurt and mix with a fork or spatula until well combined, forming crumbles.
- Lightly dust a work surface with flour. Remove the dough from the bowl and knead a few times until it's tacky but not sticky (about 20 turns). The dough should not stick to your hands when you pull away.
- Divide the dough into 4 equal portions. Roll each portion into a 3/4-inch thick rope and join the ends to form a bagel shape.
- Brush the bagels with the beaten egg white and sprinkle with your desired toppings on both sides.
- Preheat your air fryer to 280°F (140°C). Carefully transfer the bagels to the air fryer basket in a single layer, avoiding overcrowding. Bake for 15 to 16 minutes, or until golden brown. They do not need to be turned. Let cool for at least 15 minutes before cutting.


