


I still remember the first time I made this coffee dip — it was one of those chilly Sunday mornings when the whole house was wrapped in quiet except for the soft hum of the coffee maker. The rich aroma of brewed coffee flooded the kitchen, and I wanted something that matched that comforting, warm feeling but with a fun, twisty kick. This coffee dip quickly became my go-to for weekend mornings, especially when I needed a quick, feel-good treat. It’s like having your favorite coffee shop moments right at home, only this time you get to dunk, swirl, and savor every bite. If you think of those luscious coffee cakes but wish they were a bit creamier and ready in a snap, this dip nails it with way less fuss. Plus, getting the swirl just right is oddly satisfying—like little edible art on your plate. I promise, once you try this, it’ll be your easy crowd-pleaser too.
What is coffee dip?
Think of coffee dip as the best of a coffee cake and a dip all rolled into one. It’s essentially a sweet, creamy batter layered and swirled with rich coffee flavors, baked until soft and slightly gooey on top. The “dip” part comes from its texture—it’s thick enough to scoop but still moist and cozy, sort of like a dessert casserole you want to dig into with a spoon or your favorite biscotti. The idea comes from those old-school coffee breaks where a small treat complements your morning cuppa, but this twist lets you indulge in all those mocha vibes without the fuss of slicing and serving a cake. I like to think of it as a warm hug in food form, tender and caffeinated just right to brighten your day.
Why you’ll love this recipe?
What I love most about this coffee dip is how it pulls together a bunch of really simple ingredients into something that feels so special. The coffee flavor is deep but not bitter, subtle enough to make your kitchen smell heavenly but balanced so even coffee skeptics in my house dig in happily. Plus, the swirled glaze adds that perfect touch of sweet creaminess that just ties it all together. It’s crazy how easy this one is to whip up — no fancy kitchen gadgets, no complicated steps. Honestly, if I’m ever rushed but want to impress guests or myself, this is my lifesaver.
The ingredients are all budget-friendly, which means you don’t need to raid the store for anything fancy or exotic. You probably have everything ready to go in your pantry and fridge. And versatility? Oh yes. I’ve served it as a quick breakfast treat, a simple dessert after dinner, and even as a cozy afternoon snack with a big mug of hot chocolate for the kids. It reminds me a lot of my favorite cinnamon swirl coffee cake recipe but with a much smoother, “dip-like” texture that’s easier to portion and serve—no crumbly mess, just creamy coffee comfort.
Honestly, my kids ask for this all the time, especially on weekends when they know I’m brewing a fresh pot of coffee. And if you’re curious, I experimented once swapping almond milk for regular milk, and it actually made the dip tastier and creamier — a pleasant surprise that’s great for anyone who’s dairy-free or wants a little twist.
How do you make a coffee dip?
Quick Overview
Making this coffee dip couldn’t be simpler. You start by mixing your dry ingredients to get that perfect balance of flavors and texture, then whisk the wet ingredients until smooth and creamy. The real treat is in layering the coffee filling and swirling it through the batter before popping it in the oven. The magic happens as it bakes—soft, delicate, and bursting with coffee goodness. It’s one of those recipes where you get all the perks of a fancy bakery item with none of the stress. Plus, it bakes up beautifully in a standard pan, which makes cleanup a breeze.
Ingredients
For the Main Batter:
- 2 cups all-purpose flour — I always sift mine for a lighter texture
- 1 1/4 cups sugar — fine granulated works best to dissolve smoothly
- 1 teaspoon baking powder — fresh is key for a good rise
- 1/2 teaspoon baking soda — for that perfect tender crumb
- 1/2 teaspoon salt — balances sweetness and brings out coffee flavor
- 1 cup buttermilk — adds tang and moisture (you can substitute with almond milk mixed with a teaspoon of white vinegar)
- 2 large eggs — room temperature to mix more easily
- 1/2 cup unsalted butter, melted and slightly cooled — gives richness without weighing it down
- 1 teaspoon vanilla extract — for warmth and complexity
For the Filling:
- 1/2 cup strong brewed coffee, cooled — the heart of the flavor, so use your favorite blend
- 3/4 cup brown sugar, packed — deep notes that complement coffee perfectly
- 1 teaspoon ground cinnamon — warms up the dip and plays with the coffee
- 1/4 cup unsalted butter, melted — helps create the luscious swirl
For the Glaze:
- 1 cup powdered sugar — sifted to avoid lumps and keep glaze silky
- 2-3 tablespoons brewed coffee — start with less, then add to reach drizzling consistency
- A pinch of salt — enhances sweetness without overpowering
- Optional: splash of vanilla or bourbon for extra flavor layers
Step-by-Step Instructions
Step 1: Preheat & Prep Pan
Preheat your oven to 350°F (175°C). I always line my 9×9-inch baking pan with parchment paper or lightly grease it with butter. This ensures the dip can lift out easily—and trust me, you want to serve it in neat squares for those glorious swirls to shine! Set the pan aside while you get your ingredients ready.
Step 2: Mix Dry Ingredients
In a large bowl, whisk together the flour, sugar, baking powder, baking soda, and salt. This step might seem basic, but it’s essential to evenly distributing the raising agents and sugar so the dip rises and flavors blend just right. I learned the hard way that skipping this led to dense spots in my dip, and no one wants that.
Step 3: Mix Wet Ingredients
In another bowl, beat together the buttermilk, eggs, melted butter, and vanilla until smooth and glossy. The mixture should look creamy and slightly thick — that’s your sign that the eggs are incorporated perfectly and the dip will be moist and tender.
Step 4: Combine
Pour the wet ingredients into the dry and gently fold together with a spatula just until no flour streaks remain. Be careful not to overmix here—overworking the batter can lead to toughness. The batter should be thick but pourable, almost like a thick cake batter. This is the foundation for a soft, dreamy coffee dip.
Step 5: Prepare Filling
In a small bowl, whisk the brewed coffee, brown sugar, cinnamon, and melted butter until combined. This filling is where all the magic happens—it’s sweet, deep, and smells irresistible. If you like, try adding a sprinkle of nutmeg or cardamom for an extra cozy vibe.
Step 6: Layer & Swirl
Pour half of the batter into your prepared pan and smooth it evenly. Drizzle half of the coffee filling over the batter. Add the remaining batter in dollops on top, then finish with the rest of the filling. Now grab a butter knife or skewer and gently swirl through the layers to create signature marbling. Don’t dig too deep—just light swirls are enough to mix those flavors without blending them away.
Step 7: Bake
Bake for 35-40 minutes, or until the top looks set and a toothpick inserted near the center comes out mostly clean with just a few moist crumbs. If your oven runs hot, check around 30 minutes to avoid overbaking. The dip should be soft and fragrant, with a slightly caramelized top that practically melts in your mouth.
Step 8: Cool & Glaze
Let the coffee dip cool completely in the pan—this is crucial for clean slicing and a glaze that sets beautifully. Once cooled, whisk up your glaze: mix powdered sugar and coffee until smooth and drizzling consistency. Pour gently over the top, allowing it to pool in the swirls and crackles. If you’ve got time, pop the glazed dip back in the fridge for 15 minutes to firm up the glaze a bit.
Step 9: Slice & Serve
Using a sharp knife (warm the blade under hot water and dry before slicing for clean cuts), slice into squares. Serve at room temperature or slightly chilled with a big cup of your favorite brew. This dip also pairs wonderfully with crunchy biscotti or toasted nuts for a textural twist. It’s impossible not to scoop up a second helping!
What to Serve It With
For Breakfast: Nothing sets the tone like a warm mug of strong black coffee or a frothy latte alongside this dip. I like to add fresh berries or a dollop of whipped cream for a simple yet decadent touch. It’s great unfolded next to scrambled eggs and crisp bacon for those weekend brunches that linger.
For Brunch: Serve your coffee dip plated with a side of smoked salmon or a citrusy salad. The rich coffee notes contrast so beautifully with tangy fruit, making it feel just a bit fancy. Champagne brunch? This dip holds its own with a bubbly mimosa too!
As Dessert: I sometimes spoon this warm with vanilla ice cream or drizzle with caramel. The smell alone fills the kitchen and nudges everyone toward the table. Throw in some chopped toasted almonds or walnuts for crunch, and you have a dessert that’s both texturally and flavorfully addictive.
For Cozy Snacks: When the afternoon slump hits or the rain taps gently on the windows, this dip with a steaming cup of coffee or chai is my warmest comfort. Sometimes, I invite neighbors over just to share this simple, joyful treat — it disappears in minutes!
One of my favorite family rituals is breaking this out on a Sunday morning, everyone gathered around sipping coffee as the swirls get broken up and savored. It’s such an easy recipe that feels undeniably special, and now it might become your household favorite too.
Top Tips for Perfecting Your Coffee Dip
Quality Coffee Matters: Use a good-quality strong brewed coffee or espresso. The richer and fresher the coffee, the more vibrant your dip’s flavor. I like dark roast for depth but medium roast works if you prefer it lighter.
Batter Texture: When you mix the batter, fold gently but thoroughly — the goal is a smooth mix with a thick but soft consistency. Too dry? Add a splash more buttermilk or milk; too runny? A pinch more flour helps without toughening it.
Swirl Patterns: For a pretty effect, swirl in gentle ‘S’ shapes or circles with a butter knife or skewer. Don’t overdo the swirling or the flavors will just blend to one flat note. Less is more here.
Milk Substitutes: I tested this with almond and oat milk — both work great, especially adding a teaspoon of vinegar or lemon juice to mimic buttermilk’s tangy moisture. The almond milk version actually feels creamier!
Baking for Perfect Doneness: Oven heat can vary, so start checking your coffee dip at 30 minutes. The top should be set with slight softness underneath; remember it will firm up as it cools. Overbaked coffee dip gets dry and loses its melt-in-your-mouth quality.
Glaze Variations: Want to mix it up? Add a dash of cinnamon or a splash of bourbon to the glaze for extra warmth. If you’re skipping glaze, a light dusting of cinnamon sugar works wonders.
One lesson I learned after too many tries: don’t rush the cooling step before glazing. Applying glaze while warm makes it runnier and less pretty. Patience here pays off in neat slices and an irresistible surface shine.
Storing and Reheating Tips
Room Temperature: You can keep coffee dip covered with plastic wrap or a loose foil tent on the counter for up to 2 days. Keep it away from direct sunlight or heat to maintain moisture and prevent the glaze from melting into a puddle.
Refrigerator Storage: Store leftovers in an airtight container or covered pan in the fridge for up to 5 days. The flavor stays fresh, but the glaze firms up nicely, making slices easy to reheat or serve chilled.
Freezer Instructions: Yes, you can freeze this! Wrap individual slices in plastic wrap, then tuck them into a freezer-safe bag or container for up to 3 months. To thaw, move slices to the fridge overnight or defrost gently at room temp for about an hour.
Glaze Timing Advice: For longer storage, I recommend glazing after thawing or just before serving. If you glaze first and freeze, the glaze can become cracked or brittle. Fresh glaze is always pretty and spoonable!
Frequently Asked Questions
Final Thoughts
So, here’s the thing about this coffee dip—it’s that effortless blend of comfort and flavor that somehow feels like you’ve treated yourself without any fuss or frills. The deep coffee notes, the sweet swirl, and that smooth, tender crumb just come together to create a little moment of joy in your kitchen. I’ve made this countless times, and each time, it’s a warm, inviting centerpiece that everyone flocks to as soon as it’s sliced. If you enjoy cozy baking and the smell of fresh coffee, you’re going to adore sharing this recipe with friends and family. Feel free to play around with the swirl or ingredients to make it your own, then come back and tell me all about it — I can’t wait to hear how yours turns out! Happy baking and even happier sipping.

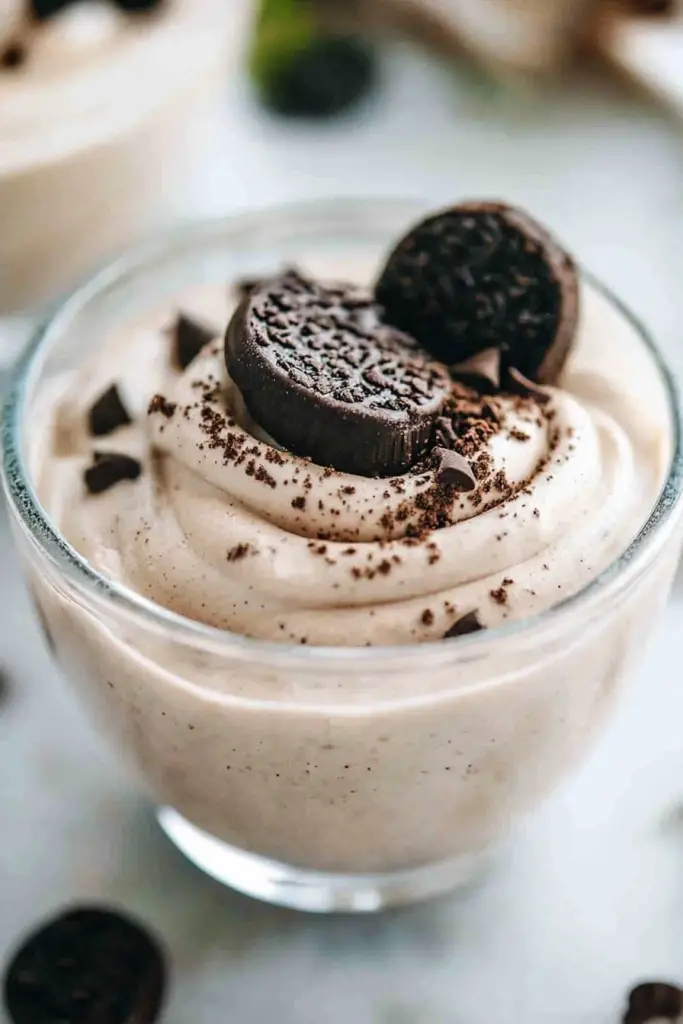
coffee dip
Ingredients
Main Ingredients
- 8 oz cream cheese softened
- 2 cups powdered sugar
- 1 tbsp cocoa powder
- 0.25 tsp ground cinnamon
- 0.25 cup milk
- 1 tsp instant espresso granules or instant coffee granules
- 8 oz whipped topping like Cool Whip
Instructions
Preparation Steps
- In a large bowl, beat softened cream cheese and powdered sugar with an electric mixer until smooth.
- Add cocoa powder and ground cinnamon, mix on low speed until fully combined.
- Pour in milk and instant espresso granules, continuing to beat until thoroughly blended.
- Gently fold in whipped topping using a rubber spatula until incorporated evenly.
- Spoon the coffee dip into serving bowls and refrigerate for at least 1 hour before serving.


