


What are some recipes that just stick with you, weaving themselves into the fabric of your family’s story, and this gooey chocolate!pudding cake is absolutely one of them. I remember the first time I made it – it was a dreary, rainy Saturday, the kind where everyone in the house was a little grumpy, and I just wanted to conjure some warmth and cheer. I’d seen a basic idea for a chocolate cake that sort of created its own sauce while baking, and my curiosity was piqued. After a few tweaks, a dash of extra vanilla, and a moment of pure genius (if I do say so myself!) with the chocolate layers, this magic happened. The aroma alone, a deep, comforting cocoa whisper, filled our home and instantly lifted spirits. It’s like a molten lava cake had a beautiful, less fussy baby with a classic chocolate sheet cake. Seriously, if you’re craving something deeply chocolatey, incredibly comforting, and surprisingly simple, you *have* to try this pudding cake. It’s become a tradition, a go-to, and frankly, a lifesaver on those nights when only chocolate
What is the best gooey chocolate cake?
What is a “what is”?pudding cake, especially my gooey chocolate version? Think of it as a dessert marvel that bakes itself into two distinct, yet perfectly harmonious, layers. You start with a rich, fluffy chocolate cake batter on the bottom. But here’s where the magic happens: you pour a simple, almost watery chocolate sauce *over* that batter before baking. As it bakes, the cake rises and bakes through, while the chocolate sauce sinks to the bottom, transforming into a glorious, warm, gooey pudding-like layer. It’s essentially a self-saucing dessert! It’s not a cake with pudding layered on top after baking, nor is it a cake with pudding mixed *into* the batter. It’s a brilliant, bake-in-one-pan wonder where the “pudding” creates itself right there in the oven. It’s truly a unique and utterly delicious experience, perfect for when you want something more exciting than a regular cake but without all the fuss of making a separate sauce.
Why You’ll Love This Recipe
Honestly, what’s *not* to love about this incredible pudding cake? Let me count the ways! First off, the **Flavor**: Oh my goodness. Imagine a deep, dark, intensely chocolatey cake layer that’s moist and tender, perfectly complemented by a rich, warm, fudgy sauce pooling at the bottom of every bite. It’s sweet, but not overly so, with just enough bitterness from the cocoa to make it feel sophisticated. My husband says it reminds him of his grandma’s homemade hot fudge, but with cake! Secondly, the **Simplicity**: This one’s a lifesaver on busy nights, I promise you. You don’t need any fancy techniques or equipment. It’s essentially a mix-and-pour situation, which means even beginner bakers can nail it. I’ve made this countless times when I’m short on time but *really* want to impress, and it never fails. It’s way less work than making a layered cake or even many traditional puddings. Thirdly, it’s incredibly **Cost-efficiency** – most of the ingredients are pantry staples you probably already have: flour, sugar, cocoa powder, milk, eggs. No need for expensive chocolates or specialty items, which is always a win in my book! Finally, its **Versatility** is amazing. While it shines hot out of the oven with that glorious gooey center, it’s also delightful at room temperature, and leftovers (if there ever are any!) are still wonderfully moist. It’s perfect for a weeknight family dessert, but elegant enough to serve to guests. What I love most about this pudding cake is that it perfectly marries the comfort of a classic chocolate dessert with the exciting surprise of a self-saucing wonder. It’s truly a standout!
How to Make My Ultimate Gooey Chocolate Pudding Cake
Quick Overview
Making this gooey chocolate pudding cake is seriously easier than you might think! The basic idea is simple: you whip up a straightforward chocolate cake batter, spread it into your baking dish, and then, here’s the clever part, you sprinkle a dry chocolate-sugar mixture over the top, which you then carefully pour hot water (or coffee!) over. This forms the magical self-saucing layer. As it bakes, the cake puffs up through the liquid, creating a lovely cake layer on top and leaving a decadent, rich chocolate pudding sauce beneath. It’s a brilliant trick that yields fantastic results every single time, giving you a warm, comforting dessert with minimal fuss. Trust me, it feels more complicated than it is, and the payoff is huge!
Ingredients
For the Main Batter:
- 1 ½ cups all-purpose flour: The backbone of our cake, keeping it light yet sturdy.
- ¾ cup granulated sugar: For that perfect level of sweetness in the cake itself.
- ¼ cup unsweetened cocoa powder: Go for a good quality Dutch-processed cocoa here for a deeper, richer chocolate flavor. It really makes a difference in this pudding cake!
- 2 teaspoons baking powder: Our leavening agent for a nice, airy cake.
- ½ teaspoon salt: Balances the sweetness and enhances all those chocolate notes.
- 1 cup milk (any kind!): I’ve used whole, 2%, even almond milk – they all work beautifully. Almond milk actually made it even creamier once!
- ¼ cup vegetable oil: For moisture and tenderness in the cake.
- 1 teaspoon vanilla extract: A must for any chocolate dessert; it really makes the chocolate shine.
For the Gooey Sauce:
- ½ cup granulated sugar: Sweetens our pudding layer.
- ⅓ cup unsweetened cocoa powder: Again, choose a quality cocoa for intense chocolate flavor.
- 1 ½ cups hot water (or hot coffee!): This is the magic liquid that transforms into the sauce. Coffee intensifies the chocolate, but water works just as well.
For Serving (Optional, but highly recommended!):
- Vanilla ice cream or whipped cream: The ultimate accompaniment to this warm pudding cake.
- A dusting of powdered sugar: For a pretty finish.
Step-by-Step Instructions
Step 1: Preheat & Prep Pan
First things first, preheat your oven to 350°F (175°C). Then, grab an 8×8-inch or 9×9-inch baking dish. You don’t need to butter or flour it for this pudding cake, as the sauce creates its own non-stick layer, but if you’re worried, a light spray of cooking oil won’t hurt. I always do this when I’m using a new pan, just for peace of mind!
Step 2: Mix Dry Ingredients for Cake Batter
In a large mixing bowl, whisk together the flour, the first measure of granulated sugar (¾ cup), the first measure of cocoa powder (¼ cup), baking powder, and salt. Make sure there are no lumps and everything is well combined. This ensures even distribution of all the leavening and flavor. A good whisk here saves you from a lumpy cake later!
Step 3: Mix Wet Ingredients for Cake Batter
In a separate medium bowl, whisk together the milk, vegetable oil, and vanilla extract until they’re well combined. Give it a good stir, just ensuring everything is homogenous. This step prepares your liquids to be easily incorporated.
Step 4: Combine Cake Batter
Pour the wet ingredients into the dry ingredients. Mix with a spatula or spoon until just combined. Don’t overmix! A few lumps are totally fine; overmixing can lead to a tough cake. We want tender and moist for our pudding cake. This usually takes me about 30 seconds of gentle stirring.
Step 5: Prepare Sauce Topping
Spread the chocolate cake batter evenly into your prepared baking dish. In a small bowl, combine the second measure of granulated sugar (½ cup) and the second measure of cocoa powder (⅓ cup). Whisk them together well. This dry mixture is key for the gooey sauce! Ensure it’s nice and uniform.
Step 6: Layer & Pour
Evenly sprinkle the dry sugar-cocoa mixture over the top of the cake batter in the pan. Don’t mix it in! Then, very carefully, pour the hot water (or hot coffee, if you’re using it) evenly over the entire surface. Again, do not stir. It might look a little strange, like a watery mess, but trust me, this is where the magic of the pudding cake happens!
Step 7: Bake
Carefully transfer the baking dish to your preheated oven. Bake for 30-35 minutes, or until the top cake layer is set and springs back when lightly touched. The sauce underneath will still be bubbly and gooey – that’s exactly what you want! Ovens can vary, so keep an eye on it after 28 minutes. My oven usually takes a full 33 minutes for the perfect gooey center.
Step 8: Cool & Serve
Once baked, remove the pudding cake from the oven. Let it cool for just 5-10 minutes before serving. This short cooling period allows the sauce to thicken slightly and become even gooier. It’s absolutely divine served warm! The smell alone brings everyone to the kitchen.
Step 9: Slice & Serve
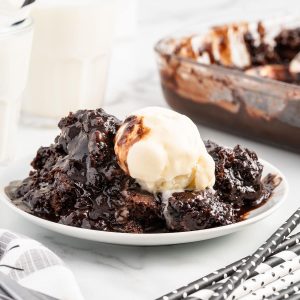
To serve, simply spoon out generous portions directly from the pan. Make sure each serving gets a good scoop of that incredible warm, gooey chocolate sauce from the bottom. It’s phenomenal on its own, but honestly, a scoop of vanilla ice cream melting into that hot chocolatey goodness? Pure bliss. My kids actually ask for seconds, which is always a good sign!
What to Serve It With
This gooey chocolate pudding cake is a superstar on its own, but oh, does it shine with the right companions! It’s so versatile, you can tailor it to almost any occasion, which is why I love it so much.
For Breakfast: Okay, maybe not a *typical* breakfast, but on a lazy Sunday morning? Absolutely! A warm slice of this pudding cake alongside a strong cup of freshly brewed coffee is pure heaven. The slight bitterness of the coffee cuts through the sweetness beautifully. I usually pull out my best mugs for this and make it a little ritual.
For Brunch: Elevate your brunch game! Serve individual portions in small bowls with a dollop of crème fraîche or a light dusting of powdered sugar. A mimosa on the side? Yes, please! It adds a touch of indulgence without being overly heavy, making it a perfect sweet treat after savory brunch items.
As Dessert: This is where it truly shines. Hot out of the oven, with a scoop of premium vanilla bean ice cream melting into that warm, fudgy sauce, is non-negotiable in my house. The cold creaminess against the warm, rich cake is just perfection. A sprinkle of flaky sea salt on top of the ice cream can also be a game-changer, enhancing all those chocolate flavors. Or, if you prefer, a cloud of freshly whipped cream works wonders too. It’s the ultimate comforting ending to any meal.
For Cozy Snacks: This pudding cake is perfect when you’re craving something sweet at 10 pm but don’t want to bake a whole cake. Just a small square, slightly warmed, with a glass of cold milk or a mug of herbal tea. It’s my go-to for a rainy afternoon or a quiet evening by the fire. It’s truly a hug in a pan, no matter how you serve it.
Top Tips for Perfecting Your My Ultimate Gooey Chocolate Pudding Cake
After making this chocolate pudding cake countless times, I’ve picked up a few tricks and learned from a couple of mishaps. Here are my tried-and-true tips to make sure your pudding cake is absolutely perfect every single time:
Cocoa Powder Quality: This is probably my biggest tip! Since cocoa powder is such a prominent flavor here, investing in good quality, unsweetened Dutch-processed cocoa powder makes a huge difference. It gives you a deeper, richer chocolate flavor that’s not bitter. I learned this trick after years of making it with generic cocoa and finally splurging – it changed everything!
Don’t Overmix the Batter: When combining your wet and dry ingredients for the cake layer, mix *just* until the flour streaks disappear. Overmixing develops the gluten too much, leading to a tough, dense cake. We want light and tender for our pudding cake! A few small lumps are perfectly fine and will bake out.
Pour Hot Water Gently: When you pour the hot water (or coffee) over the sprinkled sugar-cocoa mixture, do it slowly and evenly. Try to pour it over the back of a spoon to distribute it gently across the surface. This helps prevent disturbing the dry mixture too much and ensures the sauce forms properly beneath the cake. If you pour it too fast in one spot, you might end up with an uneven sauce layer.
Hot Water Temperature Matters: Make sure your water is truly hot, ideally just off the boil. This helps dissolve the sugar and cocoa more effectively, creating that silky, rich sauce layer as it bakes. Lukewarm water won’t achieve the same magical self-saucing effect.
Avoid Opening the Oven Door: I know it’s tempting to peek, but resist! Especially during the first 20-25 minutes of baking. Opening the door can cause the cake to sink, and we want a beautiful, light cake layer on top of our gooey sauce. Trust your oven and the timing.
Don’t Overbake: This is a pudding cake, so the bottom layer is *supposed* to be gooey! You’re looking for the top cake layer to be set and spring back, but the bottom will still be liquidy and bubbling. Overbaking will dry out the delicious sauce layer, and we definitely don’t want that! When in doubt, err on the side of slightly underbaking for maximum gooiness.
Ingredient Swaps: Feel free to experiment with the milk! I tested this with almond milk and it actually made it even creamier and slightly lighter, which was a pleasant surprise. You could also try adding a pinch of cinnamon or a tiny dash of cayenne pepper to the cocoa mixture for a subtle Mexican chocolate kick, especially if you’re feeling adventurous!
Storing and Reheating Tips
While this gooey chocolate pudding cake is undeniably best served warm, fresh from the oven, it’s totally possible (and delicious!) to enjoy it later. Here’s how I handle the rare occasion we have leftovers:
Room Temperature: If you plan to eat the entire pudding cake within a day, you can keep it covered loosely with foil or plastic wrap at room temperature for up to 24 hours. The sauce will thicken considerably as it cools, transforming into more of a dense fudge layer. It’s still wonderful, just a different texture! I find it’s great for a casual afternoon snack this way.
Refrigerator Storage: For longer storage, once the pudding cake has cooled completely, cover it tightly with plastic wrap or transfer individual portions to airtight containers. It will last beautifully in the refrigerator for up to 3-4 days. The sauce will become very firm and fudgy when cold, almost like a thick ganache. This is actually quite nice for a different kind of treat, like a dense brownie with a chewy fudge bottom.
Freezer Instructions: Yes, you can freeze this pudding cake! Once completely cooled, cut the cake into individual servings. Wrap each piece tightly in plastic wrap, then again in aluminum foil, or place them in freezer-safe containers. It will keep well in the freezer for up to 2-3 months. Thaw frozen portions overnight in the refrigerator before reheating.
Reheating Tips: The best way to bring that gooey goodness back is in the microwave. For individual servings, microwave on medium power for 30-60 seconds, or until warmed through and the sauce is deliciously molten again. For larger portions from the fridge, you can gently reheat it in the oven. Cover the dish with foil to prevent drying out and warm at 300°F (150°C) for about 15-20 minutes, or until the sauce is bubbly and hot. This is perfect when you want that “freshly baked” experience without actually baking!
Glaze Timing Advice: If you were to add a glaze, I’d suggest waiting until just before serving, especially if you plan on storing the cake. Glazes can become sticky or weep during storage, so it’s best to apply them when you’re ready to enjoy.
Frequently Asked Questions
Final Thoughts
And there you have it, my friend! My ultimate gooey chocolate pudding cake. This isn’t just a recipe; it’s an invitation to create warmth, comfort, and pure chocolatey joy in your own kitchen. It’s got that incredible deep flavor, that surprising ease, and that utterly delightful two-layer magic that makes everyone smile. I truly hope you give it a try – it’s become one of our family’s most cherished desserts, a go-to for celebrations, quiet evenings, and everything in between. The smell alone is enough to transport you to a happy place! If you love this one, you might also enjoy exploring other self-saucing puddings or even a classic molten lava cake. Don’t forget to let me know how yours turns out in the comments below, and please share any of your own tips or serving ideas! Can’t wait to hear how this little hug in a pan brings joy to your home. Happy baking!
Pudding Cake
Ingredients
Cake Ingredients
- 1 cup all-purpose flour (spooned and leveled)
- 0.67 cup granulated sugar
- 0.33 cup unsweetened Dutch cocoa powder
- 2 teaspoon baking powder
- 1 teaspoon salt
- 0.625 cup half and half
- 4 tablespoon vegetable oil
- 2 teaspoon pure vanilla extract
Pudding Topping
- 0.5 cup granulated sugar
- 0.5 cup light brown sugar (tightly packed)
- 4 tablespoon unsweetened Dutch cocoa powder
- 1.125 cup boiling water
Instructions
Preparation Steps
- Preheat the oven to 350°F. Generously spray an 8x8 baking dish with nonstick cooking spray. Set it aside.
- Add the flour, sugar, cocoa powder, baking powder, and salt to a medium-sized mixing bowl. Whisk to combine.
- Whisk in the half and half, oil and vanilla. Whisk just until combined.
- Evenly spread the cake batter into the prepared baking dish.
- Add the sugars and cocoa powder to a small mixing bowl. Whisk to combine.
- Sprinkle the dry mixture over the cake batter.
- Pour the boiling water over the dry ingredients. Do not stir. Bake for 30-35 minutes. Remove from the oven and allow the cake to rest for 15-20 minutes before serving.


