


There’s something about the smell of baking that instantly brings me back to cozy afternoons in my grandmother’s kitchen. One of those forever-favorites she’d whip up, and that I still can’t get enough of, is this chocolate biscotti. It’s got that lovely crunch on the outside and a slightly tender, chewy bite on the inside, just begging to be dunked in a warm mug of coffee or tea. I remember my kids absolutely going nuts for it at breakfast — the chocolate swirls are like little treasures hiding in every bite. It’s a bit like your classic biscotti but with this luscious, chocolatey twist that feels a bit more indulgent without being too rich. If you’ve ever loved a biscotti and thought, “How can this get any better?” well, stick around — I’m about to share with you the recipe that’s brought so much joy at my kitchen table.
What is chocolate Biscotti?
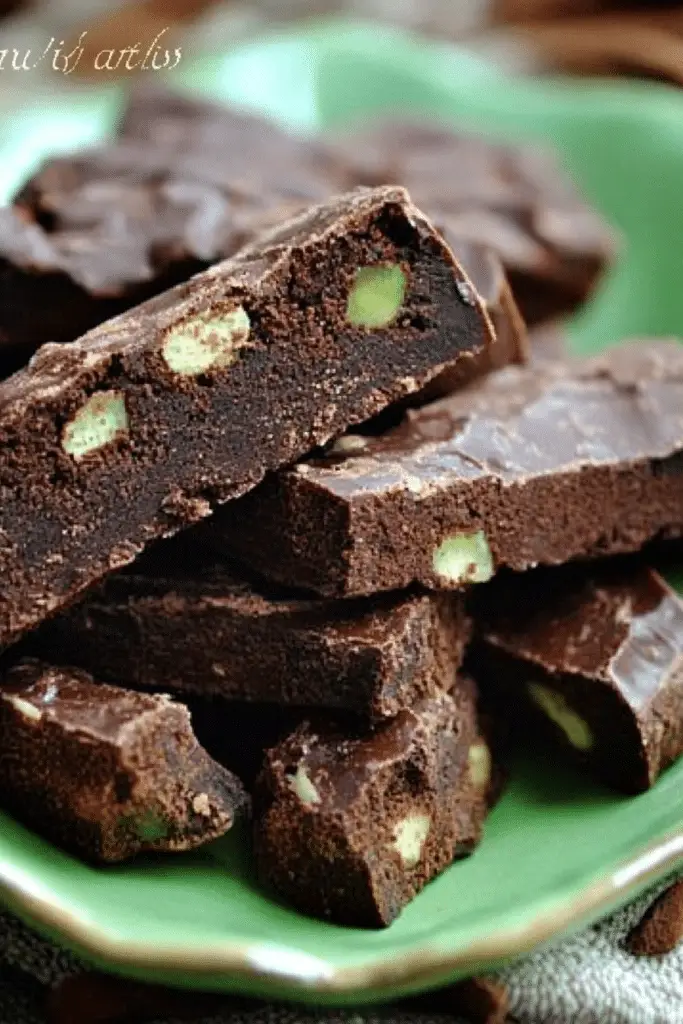
Think of chocolate biscotti as that charming Italian cookie you dunk in coffee, but with an ultra-yummy chocolate makeover. The word “biscotti” actually means “twice-baked,” which explains its signature crispy texture that stands up perfectly to a good soak in your favorite hot drink. It’s essentially a long, narrow loaf of dough baked once, sliced, and then baked again to get that perfect crunch. What makes this chocolate biscuit even more fun is the marbled swirl of chocolate running through it — kind of like a cozy dance between the dough and chocolate that makes every slice a little work of art. It’s approachable for home bakers, even if you’ve never tried biscotti before, because it doesn’t call for any weird ingredients or tricky steps. Plus, it’s one of those treats that somehow feels fancy and comforting all at once.
Why you’ll love this recipe?
What I love most about this chocolate biscotti recipe is how it hits all the right notes without any fuss. First off, the flavor is a complete winner — you get this deep, rich chocolate mixed with the subtly sweet dough, and a touch of vanilla that ties it all together. It’s not overly sweet, so you can enjoy it anytime, whether you’re craving something after lunch or a cozy late-night snack. Honestly, this biscotti wins points just for how straightforward it is to make. You mix up the batter in one bowl, swirl in the chocolate filling, and pop it in the oven. No special equipment or complicated steps — a relief when you want homemade without the headache. The budget factor is a bonus, too. Most ingredients are pantry staples you likely have on hand, making it an easy grab for unexpected guests or last-minute cravings. And the versatility! My family likes it best with a simple chocolate glaze drizzled over top, but it’s just as good plain or with a dusting of powdered sugar. Sometimes, I add chopped nuts or a splash of espresso powder for a grown-up twist. If you’re into biscotti but want a change from the classic almond or anise, this chocolate version is a fantastic new go-to.
How do I make chocolate Biscotti?
Quick Overview
This recipe is so uncomplicated and yet delivers a biscotti that feels bakery-made. You’re basically creating a tender dough, preparing a chocolate filling, and giving it that fun marbled swirl effect before baking it twice to get that iconic crunch. The best part? It’s forgiving if you’re a little nervous about baking — I always let it cool a bit before the second bake, and it comes out crispy but not crumbly. Plus, you don’t have to wait long to taste; after the second bake, you’ve got warm, fragrant biscotti that make your kitchen smell like a café. No fancy ingredients, no stress.
Ingredients
For the Main Batter:
- 2 cups all-purpose flour – I always sift mine for a lighter texture
- 1 tsp baking powder – helps keep it balanced, not too dense
- ½ tsp salt – to bring out flavors
- ¾ cup sugar – feel free to cut back if you like less sweet
- 2 large eggs – room temperature for best mixing
- 1 tsp pure vanilla extract – trust me, fresh vanilla means more flavor
- ¼ cup vegetable oil – keeps it tender, but you could swap for melted coconut oil for a subtle twist
For the Filling:
- 4 oz semi-sweet chocolate, melted – go with quality chocolate for richness
- 2 tbsp unsweetened cocoa powder – to deepen the chocolate flavor
- 2 tbsp sugar – balances the bitter cocoa
- 1 tbsp butter, melted – adds smoothness
- Optional: pinch of cinnamon or espresso powder for a subtle spice note
For the Glaze:
- ½ cup powdered sugar – sifted for smoothness
- 1–2 tbsp milk (any kind) – add slowly until glaze is pouring consistency
- 1 tsp vanilla extract or a splash of coffee for extra flavor
Step-by-Step Instructions
Step 1: Preheat & Prep Pan
First things first, preheat your oven to 350°F (175°C). Line a baking sheet with parchment paper or a silicone mat — this prevents sticking and keeps your biscotti perfectly shaped. I always use parchment because it makes clean-up a breeze. If you’re feeling fancy, just a touch of butter on the sides can help your dough not stick.
Step 2: Mix Dry Ingredients
In a big bowl, whisk together the flour, baking powder, salt, and sugar. I like to sift these all at once to avoid lumps and get the mixture silky smooth. This step sets the foundation for a tender biscotti, so take a quick moment to make sure everything’s blended well before moving on.
Step 3: Mix Wet Ingredients
In a separate bowl, beat the eggs lightly, then add the vanilla extract and vegetable oil. You want this mixture to be smooth but not frothy. It’s like the glue that brings everything together. I sometimes find using a fork works just as well for this step — no need to drag out a mixer unless you want to.
Step 4: Combine
Pour the wet ingredients into the dry, stirring gently with a spatula or wooden spoon. The dough will be a bit sticky but not overly wet. Trust me, the dough shouldn’t be doughy like bread — it’s more dense. Avoid overmixing here; if you get impatient and stir too much, your biscotti will lose that tender crumb. I usually stop as soon as it looks uniform and all the flour pockets are gone.
Step 5: Prepare Filling
While the dough rests, whisk together the melted chocolate, cocoa powder, sugar, and melted butter until smooth. This mixture should be rich and glossy. If it’s too thick, add a dab more melted butter or a tiny splash of milk. I sometimes swirl in a pinch of cinnamon or espresso powder here for a little surprise kick — makes friends think I’m fancy.
Step 6: Layer & Swirl
Divide the dough in half. Press one half evenly into a log shape on your prepared pan (about 12 inches long and 3 inches wide). Spoon the chocolate filling over the top, smoothing it out with a spatula. Then, take the second half of dough, gently press it into a log and place it on top of the filling. Now, grab a knife or skewer and gently swirl through the layers to create that beautiful marbled effect. Don’t overwork it or you’ll lose the pattern — just light, confident swirls do the trick. This one step always makes me feel like a kitchen artist.
Step 7: Bake
Bake the log in your preheated oven for 30–35 minutes, until it’s golden and firm to the touch. I poke mine a bit with a toothpick—if it comes out clean, you’re golden. If the surface is browning too quickly, tent it loosely with foil. When it’s ready, pull it out and let it cool for about 15 minutes — just enough so you can handle it for slicing.
Step 8: Cool & Glaze
Now, slice your baked log diagonally into ¾-inch thick slices. Lay them cut-side down on the baking sheet. Bake again for an additional 12–15 minutes until crispy but not burnt. Let the biscotti cool completely before drizzling the glaze. For the glaze, mix powdered sugar with milk and vanilla until it’s just thin enough to drizzle and not run off the edges. A quick drizzle over the biscotti is the perfect finishing touch — it adds a sweet, shiny contrast and makes them totally irresistible.
Step 9: Slice & Serve
Once glazed and fully cooled, serve your biscotti alongside your favorite warm drink. If you want to be extra charming, break off pieces to dip and enjoy that soft-then-crunch texture! My kids love them slightly warmed — it kind of melts the glaze and makes the chocolate pop. I hope you find yourself going back for seconds too.
What to Serve It With
For Breakfast: I always serve these chocolate biscotti with a strong cup of freshly brewed coffee — nothing too fancy, just good, black coffee or a creamy latte. The biscotti soaked just a tad in your morning cup is a heavenly way to start the day. When guests come over, I lay them out with fresh fruit and yogurt for a crunchy-sweet vibe.
For Brunch: These biscotti turn brunch into a little celebration when paired with a nice glass of chilled almond milk or a sparkling espresso martini (yes, I did try it!). Arrange slices on a pretty platter with some fresh berries and a whipped cream dip — the rich chocolate notes complement the fruit beautifully.
As Dessert: If you’re serving dessert, chocolate biscotti make a lovely companion to a scoop of vanilla ice cream or a rich hot chocolate. A little dollop of mascarpone on the side feels luxurious and pairs perfectly with those crispy, chocolaty bites.
For Cozy Snacks: On lazy afternoons, I grab a biscotti with a warm mug of chai or cinnamon-spiced tea. The spices in the drink highlight the swirled chocolate in the biscotti. It’s surprisingly soothing and always turns into a moment of calm — great for unwinding with a good book or chat.
Top Tips for Perfecting Your Chocolate Biscotti
Dough Prep: I learned early that using room temperature eggs makes a big difference in how the batter comes together — cold eggs slow down the mixing, and the dough feels stiffer than it should. Also, lightly oiling your hands or spatula when shaping the logs helps prevent the dough from sticking.
Mixing Advice: Overmixing is the biggest hiccup I see with biscotti newcomers. Stop stirring as soon as the flour disappears — a few pockets of flour aren’t the worst and won’t affect your final texture much. Overworked dough leads to tough biscotti, and trust me, no one wants that.
Swirl Customization: When swirling the chocolate filling through the dough, less is often more. Gentle, confident swirls create an eye-catching marbled effect without muddling flavors. If you swirl aggressively, the chocolate ends up mixed in like chocolate chips, which is tasty but defeats the elegant look.
Ingredient Swaps: For a gluten-free version, I’ve tested a cup-for-cup gluten-free blend with good results. The texture is a bit softer but still delicious. Coconut oil or butter can replace vegetable oil, adding subtle flavor variations — just be sure the butter is melted before adding. You can also swap the semi-sweet chocolate for dark or milk depending on your family’s preferences.
Baking Tips: Oven temperatures vary, so keep an eye on the biscotti during both bakes. If your oven runs hot, reduce baking time by 5 minutes per stage. I rotate my pan halfway through to ensure even baking — this little effort makes a big difference in consistency.
Glaze Variations: I sometimes mix espresso powder into the glaze or use orange zest and a splash of freshly squeezed juice for a citrus twist. If you prefer dairy-free, a simple dusting of cocoa powder or powdered sugar works beautifully without adding extra sweetness.
Storing and Reheating Tips
Room Temperature: Store biscotti in an airtight container at room temp for up to one week. Make sure they’re totally cooled before sealing to avoid sogginess. I usually stash mine in a tin lined with parchment paper to help keep moisture out.
Refrigerator Storage: While not essential, you can refrigerate biscotti wrapped tightly in plastic wrap or in a sealed container — they’ll keep for about two weeks. Just bring them to room temp before serving so the chocolate flavor shines through.
Freezer Instructions: Freeze biscotti wrapped individually in plastic wrap and then placed in a freezer bag for up to 3 months. When you want a treat, just thaw at room temperature or warm them for a few minutes in a low oven (300°F) to bring back crispness.
Glaze Timing Advice: I recommend glazing right before serving if you plan to store them for a while — the glaze can soften the biscotti’s crunch over time. If you want to glaze early, keep them refrigerated and enjoy within a day or two for best texture.
Frequently Asked Questions
Final Thoughts
This chocolate biscotti isn’t just another cookie — it’s a little celebration wrapped up in every crispy bite. What I find really special is how it brings people together, whether it’s a hectic morning or a quiet afternoon. I always get a little thrill when I catch my kids sneaking back to the kitchen for “just one more,” and it never fails to spark those cozy conversations over coffee. If you loved making this, I’ve got other biscotti variations and chocolate treats you might enjoy too — mixing things up is half the fun in baking. So go ahead and give it a try, and please pop back in to share your tweaks and stories. Happy baking, and here’s to many delicious biscotti mornings ahead!

chocolate biscotti
Ingredients
Main Ingredients
- 1.67 cup all purpose flour
- 0.5 cup unsweetened cocoa powder good quality
- 1.5 tsp baking powder
- pinch salt
- 0.75 cup whole pistachios
- 0.25 cup butter softened (2 oz)
- 0.75 cup superfine sugar can put sugar in food processor
- 2 large eggs
Instructions
Preparation Steps
- Preheat oven to 375°F. Line a baking sheet with parchment paper.
- In a medium bowl, combine flour, cocoa powder, baking powder, and salt.
- Add pistachios and mix well.
- In a mixer, cream butter and sugar on medium speed for one and a half minutes.
- Add eggs one at a time, mixing after each addition.
- Slowly add the dry ingredients and mix on low speed until just combined to form a dough.
- Divide the dough into two or three pieces and shape each into an 8 inch long by 1.5 inch wide flat log.
- Place logs on the lined baking sheet and bake for 20 minutes.
- Let cool enough to handle, then slice the logs diagonally into 0.5 inch thick slices using a serrated bread knife.
- Place biscotti slices back on baking sheet and bake for an additional 3-4 minutes per side until crisp.


