


There are some recipes that just feel like a warm hug, aren’t there? This Easy Cherry Danish is definitely one of those for me. I can still remember the first time I tried making something similar, years ago, and how intimidated I was by the thought of fancy pastries. But this version? Oh, it’s a game-changer! It tastes like you spent hours slaving away in the kitchen, but in reality, it’s surprisingly straightforward. I’ve made this more times than I can count, especially when that sweet craving hits late at night and I want something truly delicious without a whole production. It’s honestly my go-to when I need to whip up a little something special for guests or just want to treat myself. If you’ve ever thought Danish pastries were out of reach for a weeknight treat, get ready to be amazed. This easy cherry Danish is about to become your new best friend.
What is easy cherry Danish?
So, what exactly *is* this Easy Cherry Danish we’re talking about? Think of it as a delightful shortcut to a classic pastry experience. Traditionally, Danishes involve laminated dough, which means a whole lot of folding, chilling, and patience. My version skips all that fuss but keeps all the deliciousness. It’s essentially a wonderfully tender, slightly sweet cake-like base that’s swirled with a bright, tangy cherry filling and finished with a simple, sweet glaze. It’s not a flaky croissant-style Danish, but rather a softer, more cakey rendition that’s incredibly forgiving and oh-so-satisfying. The “easy” part comes from using simple pantry staples and a straightforward mixing method. It’s less about intricate pastry work and more about achieving that wonderful balance of soft cake, vibrant fruit, and sweet topping. It’s the kind of treat that feels indulgent but is genuinely simple to pull off, making it perfect for impromptu get-togethers or just a delightful solo indulgence.
Why you’ll love this recipe?
Okay, let’s get down to why I’m so absolutely head-over-heels for this easy cherry Danish. First off, the flavor is just out of this world. You get that lovely sweet cake mingling with the burst of tart cherries, all topped off with a delicate sugary glaze. It’s the perfect combination of sweet and slightly tart, and it just sings. But what really seals the deal for me is how incredibly simple it is. Seriously, if you can stir a few things together, you can make this. It’s a lifesaver on those days when you want something impressive without the stress. And the cost? Forget spending a fortune at a fancy bakery. The ingredients are all super budget-friendly and readily available. I’ve found that I always have most of them in my pantry already! Plus, it’s ridiculously versatile. Want it for breakfast? Perfect. Need a quick dessert? Absolutely. Craving a sweet pick-me-up with your afternoon tea? You bet. What I love most about this easy cherry Danish is that it delivers maximum flavor and enjoyment with minimal effort. It’s a true winner in my book, and I have a feeling it’s going to be a huge hit in your kitchen too.
How do I make [Recipe Name]?
Quick Overview
The magic of this easy cherry Danish lies in its simplicity. We’ll whip up a quick, tender batter, prepare a vibrant cherry filling, swirl them together in a pan, bake until golden, and finish with a sweet glaze. It’s a no-fuss approach that guarantees a delicious result every single time. You get all the charm of a traditional Danish with a fraction of the effort, making it perfect for any day of the week when a little indulgence is called for. Trust me, the whole process is quite straightforward and incredibly rewarding.
Ingredients
For the Main Batter:
This is the foundation of our delicious Danish, keeping it tender and slightly sweet. I always make sure my butter is softened just right – not melted, but yielding to the touch. This helps it cream beautifully with the sugar.
– 1 cup (2 sticks) unsalted butter, softened
– 1 ½ cups granulated sugar
– 2 large eggs, at room temperature
– 1 teaspoon vanilla extract
– 2 ½ cups all-purpose flour
– 1 teaspoon baking powder
– ½ teaspoon salt
For the Filling:
This is where the bright, cherry flavor comes from! I prefer using good quality cherry preserves or pie filling. If you use canned pie filling, you might want to drain off some of the extra syrup if it seems very liquidy. My kids love it when I add a tiny pinch of almond extract here, but vanilla is perfectly lovely too.
– 1 ½ cups cherry preserves or cherry pie filling
– 1 tablespoon lemon juice (optional, but adds a nice zing!)
– ½ teaspoon almond extract (optional)
For the Glaze:
This simple glaze brings everything together with a touch of sweetness. I aim for a consistency that’s thick enough to coat but thin enough to drizzle. If it’s too thick, a tiny splash of milk or water will do the trick. Too thin? A little more powdered sugar.
– 1 cup powdered sugar, sifted
– 2-3 tablespoons milk or cream
– ½ teaspoon vanilla extract
Step-by-Step Instructions
Step 1: Preheat & Prep Pan
First things first, let’s get our oven ready. Preheat it to 350°F (175°C). Then, grab an 8×8 inch baking pan (a square or even a round springform pan works beautifully here). Grease it generously with butter or non-stick cooking spray, and then give it a light dusting of flour. Tap out any excess. This step is super important for ensuring your easy cherry Danish doesn’t stick, making for a much cleaner release and presentation.
Step 2: Mix Dry Ingredients
In a medium-sized bowl, whisk together your all-purpose flour, baking powder, and salt. Give it a good whisk to make sure everything is evenly distributed. This ensures that your leavening agent (baking powder) is spread throughout, which will help your Danish bake up light and fluffy. Set this bowl aside for now.
Step 3: Mix Wet Ingredients
Now for the creamy part! In a large bowl, use an electric mixer (or a sturdy whisk and some elbow grease) to cream together the softened butter and granulated sugar until it’s light and fluffy. This usually takes about 3-5 minutes. You’ll see it become pale and airy – that’s exactly what we’re looking for. Beat in the eggs, one at a time, making sure each is fully incorporated before adding the next. Then, stir in the vanilla extract. Your mixture should look smooth and well combined.
Step 4: Combine
Time to bring it all together! Gradually add the dry ingredients to the wet ingredients, mixing on low speed (or stirring gently) just until *barely* combined. It’s crucial not to overmix here. A few streaks of flour are okay – they’ll disappear during baking. Overmixing can lead to a tougher texture, and we want this easy cherry Danish to be wonderfully tender!
Step 5: Prepare Filling
In a small bowl, gently stir together your cherry preserves (or pie filling) with the lemon juice and almond extract, if you’re using them. Give it a quick mix. This step is simple, but it ensures the filling is well-distributed and ready to add that gorgeous burst of cherry flavor. If your preserves are very thick, you can warm them slightly for about 10 seconds in the microwave to make them easier to swirl.
Step 6: Layer & Swirl
Spoon about two-thirds of the Danish batter into your prepared baking pan and spread it evenly across the bottom. Dollop spoonfuls of the cherry filling over the batter. Then, take the remaining one-third of the batter and dollop it over the cherries. Now, using a butter knife or a skewer, gently swirl the batter and filling together. You don’t need to go crazy here; just a few gentle swirls will create beautiful marbling. Don’t over-swirl, or you’ll lose the distinct layers.
Step 7: Bake
Pop the pan into your preheated oven. Bake for about 30-40 minutes, or until a toothpick inserted into the center comes out clean, and the edges are golden brown. Keep an eye on it towards the end of the baking time, as oven temperatures can vary. You want it to be cooked through but not dry.
Step 8: Cool & Glaze
Once baked, let the easy cherry Danish cool in the pan for about 15-20 minutes. This allows it to set up nicely. While it’s cooling, whisk together the powdered sugar, 2 tablespoons of milk, and the vanilla extract in a small bowl. Add more milk, a tiny bit at a time, until you reach your desired drizzling consistency. Once the Danish has cooled slightly, drizzle the glaze generously over the top. It will set as it cools further.
Step 9: Slice & Serve
After the glaze has set a bit (you can even pop it in the fridge for 10-15 minutes to speed this up), cut the easy cherry Danish into squares or rectangles. I love serving it warm, but it’s also delicious at room temperature. The aroma alone when you cut into it is divine!
What to Serve It With
This easy cherry Danish is truly a star on its own, but it also plays wonderfully with other flavors and occasions. For a simple breakfast, I love pairing a warm slice with a freshly brewed cup of coffee. The richness of the coffee cuts through the sweetness beautifully. For a more elegant brunch spread, I’ll cut it into smaller, bite-sized squares and arrange them artfully on a tiered stand alongside fresh fruit and maybe some light quiches. A glass of sparkling cider or even a mimosa makes it feel extra special. As a dessert, it’s fantastic on its own, but a small scoop of vanilla bean Ice Cream or a dollop of whipped cream takes it to the next level. Imagine serving this after a lovely dinner party – it’s impressive without being fussy. And for those cozy afternoon snacks? It’s just perfect with a glass of milk or a comforting cup of tea. My family has a tradition of having a slice with hot chocolate on the first snow day of the year; it’s become our little comfort ritual.
Top Tips for Perfecting Your Easy Cherry Danish
Over the years, I’ve picked up a few tricks that I think really elevate this easy cherry Danish from good to absolutely fantastic. First, about the cherries: if you’re using preserves, make sure they’re good quality. Sometimes, using a lower-pectin, fruit-forward preserve gives a better texture than one that’s overly gelled. If you use pie filling, give it a quick taste; if it’s super sweet, a little extra lemon juice in the filling mixture can really balance it out. When it comes to mixing the batter, I can’t stress enough about not overmixing. Seriously, stop as soon as you don’t see big streaks of dry flour. A few small ones are perfectly fine and will lead to a tender crumb. Overworking the gluten is the enemy of a soft bake! For the swirl, don’t go too deep or too vigorously. You want distinct ribbons of cherry and batter, not a muddy mess. Just gentle nudges with a knife are enough to create that beautiful marbled effect. If you’re feeling adventurous with ingredient swaps, I’ve found that using half whole wheat flour in place of some of the all-purpose flour can add a lovely nutty depth without sacrificing tenderness too much. Just be careful not to add too much, as it can absorb more liquid. For baking, always get to know your oven. If yours tends to run hot, you might want to start checking for doneness a few minutes earlier than the recipe suggests. The toothpick test is your best friend here – it should come out clean. For the glaze, I usually start with 2 tablespoons of milk and add more only if needed. It’s easier to thin out a thick glaze than to thicken a runny one. Aim for a drizzly but not watery consistency. And a little secret I learned? If you’re short on time and want a bit more flavor, a tiny pinch of cinnamon in the batter or a sprinkle of sliced almonds on top before baking can add another dimension. It’s all about making it your own!
Storing and Reheating Tips
One of the best things about this easy cherry Danish is how well it stores, making it perfect for making ahead. If you’ve got leftovers (which is rare in my house!), I usually store them at room temperature in an airtight container for up to 2 days. It stays wonderfully moist and delicious. If I know it will be longer than that, or if my kitchen is particularly warm, I’ll tuck it into the refrigerator. In the fridge, it can last for up to 4-5 days. Just make sure it’s well-covered; plastic wrap pressed directly onto the surface can help prevent it from drying out, or a good quality airtight container works too. Now, about the glaze – I almost always apply the glaze *after* the Danish has cooled slightly. If you plan to store it for more than a day, you might even consider glazing just before serving to keep the glaze looking its freshest. If you’ve frozen portions (which is a fantastic idea!), wrap them tightly in plastic wrap, then in foil, and they’ll keep for about 2-3 months. Thaw them overnight in the refrigerator. For reheating, if it’s been refrigerated and you want it warm, a short stint in a low oven (around 300°F or 150°C) for about 5-10 minutes usually does the trick, bringing back that fresh-baked warmth and aroma. You can also gently reheat a slice in the microwave for about 15-20 seconds, but be careful not to overheat it, as it can become rubbery.
Frequently Asked Questions
Final Thoughts
There you have it – the easiest, most delightful cherry Danish that’s going to become a staple in your kitchen, I just know it! It’s a recipe that proves you don’t need complicated techniques to achieve something truly special. The combination of that tender cake, the sweet-tart cherry swirl, and the simple glaze is just pure bliss. It’s the kind of treat that brings smiles and requests for more, every single time. If you’re a fan of fruit-filled baked goods, you might also enjoy my [Link to another recipe, e.g., “Easy Apple Crumble Bars”] or perhaps my [Link to another recipe, e.g., “Lemon Blueberry Scones”]. They share that same spirit of deliciousness made simple. I truly hope you give this easy cherry Danish a try. I can’t wait to hear how yours turns out, and I’d absolutely love to see your creations! Feel free to leave a comment below with your thoughts, any tweaks you made, or just to say hello. Happy baking!
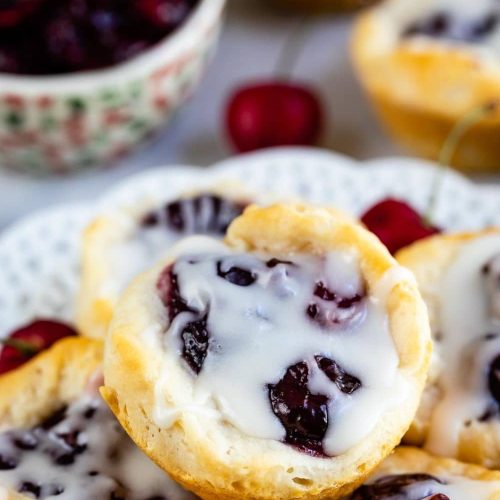
Easy Cherry Danish
Ingredients
Main Ingredients
- 1 recipe Cherry Pie Filling
- 1 package Pillsbury Grands! Biscuits (8 biscuits)
Almond Glaze
- 0.5 cup powdered sugar
- 0.25 teaspoon almond extract
- 2 tablespoons heavy whipping cream plus more for drizzling consistency
Instructions
Preparation Steps
- Preheat oven to 375°F. Spray muffin pans with nonstick cooking spray.
- Open the can of biscuits and slice each in half horizontally.
- Flatten each biscuit half with your fingers, then press each into the bottom and up the sides of each muffin cavity.
- Fill each biscuit cup with about 2 tablespoons of cherry pie filling.
- Bake for 15-25 minutes, or until the biscuits are golden and puffy. Cool for 10 minutes in the pan, then use a butter knife to help remove the danishes. Cool completely before frosting.
- To make the almond glaze, whisk together powdered sugar, almond extract, and 1 tablespoon of heavy whipping cream. Add more cream, a teaspoon at a time, until the desired drizzle consistency is reached. Drizzle over the cooled danishes.


