


Oh, where do I even begin with this recipe? This buckeye candy recipe is, hands down, one of my absolute favorites. It’s the kind of treat that brings back a flood of memories from my childhood, sneaking them from my grandma’s candy dish whenever I visited. There’s just something magical about that perfect balance of smooth, rich Peanut Butter Fudge and sweet, decadent chocolate. It’s not quite a cookie, not quite a truffle, but something entirely its own delightful thing. If you’ve ever loved those classic peanut butter cups, you are going to go absolutely wild for these. They’re surprisingly simple to make, which is a lifesaver when you need a quick, impressive dessert or a sweet pick-me-up. Honestly, I’ve tried a lot of buckeye candy recipes over the years, and this one, this is the one that’s stuck. It’s the perfect balance, the perfect texture, and the perfect way to satisfy that sweet craving without breaking a sweat. It’s the star of every holiday cookie tray and always disappears first!
What is Buckeye candy?
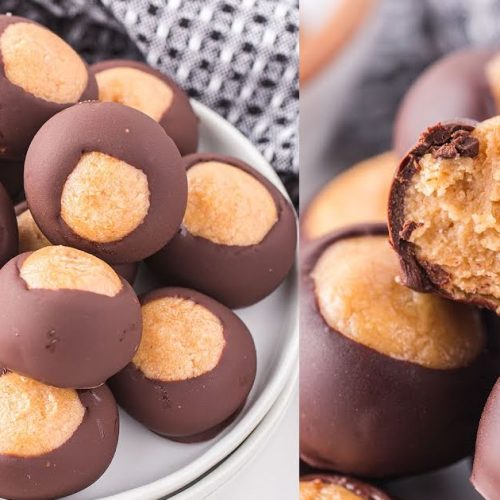
So, what exactly is this delightful little creation we call buckeye candy? At its heart, it’s a two-part confection that hails from Ohio, hence the name “buckeye” – it resembles the nuts from the Ohio state tree. The first part is a creamy, sweet Peanut Butter Fudge ball, and the second, and most iconic, part is a rich chocolate coating that only covers about two-thirds of the peanut butter center, leaving a little “eye” of peanut butter peeking through. Think of it as a super-sophisticated, homemade version of your favorite peanut butter candy, but with a texture that’s just unbelievably smooth and melt-in-your-mouth. It’s essentially a little nugget of pure joy, a delightful combination of nutty, sweet, and chocolatey goodness that’s incredibly satisfying. It’s not complicated, but the combination is just divine.
Why you’ll love this recipe?
Let me tell you why this particular buckeye candy recipe is a keeper. First and foremost, the flavor is just out of this world. That rich, Creamy Peanut Butter filling is perfectly sweetened and has just the right amount of saltiness to make the chocolate coating sing. Speaking of the chocolate, using good quality chocolate makes such a difference – it coats beautifully and has that satisfying snap when you bite into it. But what I honestly love even more is how surprisingly simple this recipe is. You don’t need any fancy equipment, and the steps are straightforward. Even if you’re a beginner baker, you can totally nail this! And if you’re watching your budget, this recipe is a winner because the ingredients are all pantry staples. Plus, it’s incredibly versatile. You can make them for holidays, parties, or just because. The kids go absolutely nuts for them, and they’re always the first thing to disappear from any dessert spread. I’ve also found that this recipe is way more forgiving than some other candy recipes I’ve attempted. It’s just consistently delicious, and that’s what really makes it stand out in my kitchen. It’s that perfect sweet treat that doesn’t require hours of baking and cooling.
How do you make Buckeye candy?
Quick Overview
This recipe is wonderfully straightforward. You’ll whip up a simple peanut butter dough, roll it into balls, let them firm up a bit, and then dip them in melted chocolate. That’s it! The key is in the texture of the Peanut Butter Balls and getting a nice, even chocolate coating. It’s a no-bake wonder that delivers maximum deliciousness with minimal fuss. Seriously, this is a recipe you can whip up in the afternoon and have ready for dessert or snacking by evening.
Ingredients
For the Main Batter (Peanut Butter Centers):
- 2 cups creamy Peanut Butter: I always go for a standard creamy peanut butter, not the natural kind that separates. It gives the best, smoothest texture.
- 1/2 cup (1 stick) unsalted butter, softened: Make sure it’s softened but not melted!
- 1 teaspoon vanilla extract: This little touch really enhances the peanut butter flavor.
- 4 cups powdered sugar: Sifted, if you want to be extra sure there are no lumps, but usually it’s fine.
For the Filling (Optional, but highly recommended for extra richness):
- 1/4 cup creamy peanut butter: Just a little extra to make the centers extra peanut buttery.
- 1/4 cup powdered sugar: To balance the extra peanut butter.
For the Glaze (Chocolate Coating):
- 2 cups semi-sweet chocolate chips: Good quality chocolate chips melt beautifully and give a lovely flavor. You can also use milk chocolate if that’s your preference!
- 1/4 cup paraffin wax (optional, but recommended for a smooth, shiny finish): This helps the chocolate stay fluid for dipping and gives it that professional sheen. If you don’t have it, you can skip it, but the coating might be a bit thicker.
Step-by-Step Instructions
Step 1: Preheat & Prep Pan
Actually, for this recipe, there’s no baking involved! So, we skip the preheating. What we *do* need to do is line a baking sheet with parchment paper or wax paper. This is crucial because those yummy peanut butter balls will need a place to firm up without sticking.
Step 2: Mix Dry Ingredients
In a large bowl, combine the 2 cups of creamy peanut butter, the softened unsalted butter, and the vanilla extract. Give it a good stir until everything is nicely incorporated. It might look a little strange at first, but trust me, it all comes together.
Step 3: Mix Wet Ingredients
This is where the magic happens! Gradually add the sifted powdered sugar to the peanut butter mixture, about a cup at a time, mixing well after each addition. You’ll need to switch to a sturdy spoon or even use your hands once it gets too thick for a mixer. You want to achieve a dough-like consistency that you can roll into balls. If it seems too sticky, add a little more powdered sugar, a tablespoon at a time. If it’s too dry and crumbly, add a tiny bit more softened butter or peanut butter.
Step 4: Combine
This step is already done in Step 3 as you gradually add the powdered sugar to the peanut butter and butter mixture. The goal is to create a firm, pliable dough that holds its shape. Don’t be afraid to get your hands in there to really mix it well! It should feel like playdough but taste way better.
Step 5: Prepare Filling
If you’re doing the optional extra-rich filling, in a small bowl, mix together the extra 1/4 cup of peanut butter with the 1/4 cup of powdered sugar. Stir until it’s smooth and creamy. You can then gently press a tiny bit of this into the center of your peanut butter balls before rolling them, or just let the main dough be the star.
Step 6: Layer & Swirl
Now, take small portions of the peanut butter dough (about 1 inch in diameter) and roll them into smooth balls. Place these balls on your prepared baking sheet. Once you have them all rolled, pop the baking sheet into the refrigerator for at least 30 minutes, or the freezer for about 15 minutes. This chilling step is super important; it makes them firm enough to dip in chocolate without falling apart.
Step 7: Bake
No baking required for this recipe! We are going straight from chilling to dipping.
Step 8: Cool & Glaze
Melt your semi-sweet chocolate chips and the paraffin wax (if using) in a microwave-safe bowl. Microwave in 30-second intervals, stirring between each, until completely smooth. Alternatively, you can use a double boiler. Once melted and smooth, dip each chilled peanut butter ball about two-thirds of the way into the chocolate using a toothpick or a small fork. Let the excess chocolate drip off, then place the candy back on the parchment-lined baking sheet. Repeat with all the balls. If you used paraffin, the chocolate will set up beautifully and shiny. If not, it will still be delicious!
Step 9: Slice & Serve
Allow the chocolate to set completely at room temperature or in the refrigerator for about 15-20 minutes. Once set, these buckeye candies are ready to be devoured! You don’t slice them, you just pick them up and enjoy that perfect bite. I like to arrange them in a pretty dish or a festive tin.
What to Serve It With
These buckeye candies are honestly so versatile, they fit into almost any occasion. For breakfast? They’re a bit of a treat, but a tiny one alongside your morning coffee is pure indulgence! I sometimes pop one in my mouth after my second cup of coffee if I’m feeling a bit sluggish – it’s like a little jolt of happy. For brunch, they make an elegant addition to a dessert table. I’ll often place them in mini cupcake liners and arrange them around a fruit salad or a more substantial dessert. They add that little bit of homemade charm that people really appreciate. As dessert, they’re simply divine after a hearty meal. They’re small enough that you don’t feel too guilty, but rich enough to satisfy your sweet tooth. I love serving them with a glass of milk or a rich espresso. And for cozy snacks? Oh my goodness, they are the ultimate cozy snack. They’re perfect for movie nights, a little afternoon pick-me-up with a cup of tea, or just when you need a little something sweet to brighten your day. My family has a tradition of making a big batch around the holidays, and we’ll have them with hot chocolate. It’s pure comfort!
Top Tips for Perfecting Your Buckeye Candy
I’ve made these buckeye candies so many times that I’ve picked up a few tricks along the way that I think make all the difference. First, about the peanut butter: I really stress using the standard creamy kind. The natural stuff just doesn’t hold its shape in the same way, and you can end up with a much softer, sometimes crumbly center that’s tricky to dip. For the dough consistency, it’s a bit of an art. If it’s too sticky, don’t just keep adding powdered sugar. Sometimes, a few extra minutes in the fridge can firm it up enough to handle. Conversely, if it’s too dry, a tablespoon of softened butter or a tiny splash of milk can bring it back. When you’re rolling the balls, try to make them as uniformly sized as possible. This not only makes for a prettier presentation but also ensures they all melt and firm up evenly. Chilling is your best friend here! Don’t skimp on the chilling time. It makes a world of difference when you’re dipping. If the balls are too soft, they’ll just melt into the chocolate, and you’ll have a mess. For the chocolate coating, I swear by that little bit of paraffin wax. It’s not strictly necessary, but it makes the chocolate so much easier to work with – it stays liquid longer, it gives a beautiful shine, and it sets up with a nice snap. If you can’t find it or prefer not to use it, you can use a good quality melting chocolate or add a tablespoon of vegetable shortening to your chocolate chips as they melt. When dipping, a toothpick works well, but I sometimes use a fondue fork or even just my fingers for better control. Just make sure you get that nice two-thirds coverage. For a really professional look, let them set on parchment paper and then gently lift them off once the chocolate is firm. If you’re making these ahead of time, store them in an airtight container at room temperature, as the chocolate can get a bit soft in the fridge and then develop condensation when brought back to room temperature.
Storing and Reheating Tips
Storing these buckeye candies is thankfully quite easy, and they stay delicious for quite a while! At room temperature, they’re best eaten within 3-5 days. Just keep them in an airtight container. I like to place wax paper or parchment paper between layers if I’m stacking them to prevent the chocolate from sticking. If your house is on the warmer side, or if you want them to last a bit longer, the refrigerator is a great option. They’ll be good for up to two weeks in the fridge, again, stored in an airtight container. Just a little heads-up: when you take them out of the fridge, let them sit at room temperature for about 15-20 minutes before eating. This allows the chocolate to soften just a bit, so you don’t get that super hard, brittle bite. For longer storage, these candies freeze beautifully! Wrap them well in plastic wrap, then pop them into a freezer-safe bag or container. They can last for up to 3 months in the freezer. To thaw, simply transfer them from the freezer to the refrigerator overnight, and then let them come to room temperature as mentioned above. Regarding the glaze timing, it’s best to glaze them completely before storing. If you’re planning to freeze them, it’s a good idea to make sure the chocolate coating is fully set and firm before wrapping them up. This prevents any smudging or damage to the beautiful chocolate shell.
Frequently Asked Questions
Final Thoughts
Honestly, this buckeye candy recipe is one of those gems that I’m always thrilled to share. It’s the perfect embodiment of simple pleasures – incredibly delicious, relatively easy to make, and always a crowd-pleaser. It’s the kind of treat that makes you feel like you’ve accomplished something special, even if you spent less than an hour in the kitchen. It truly embodies that sweet spot between a simple snack and an impressive confection. If you love peanut butter and chocolate, I can practically guarantee you’ll fall head over heels for these. They’re a testament to how a few humble ingredients can come together to create something truly magical. If you enjoy this recipe, you might also love my recipe for homemade fudge or my classic chocolate chip cookies. They share that same comforting, homemade feel. I really hope you give this buckeye candy recipe a try. I can’t wait to hear how your creations turn out! Happy candy making!
buckeye candy recipe
Ingredients
Main Ingredients
- 0.5 cup creamy peanut butter
- 4 ounce cream cheese, softened half of an 8-ounce package
- 0.5 tsp vanilla extract
- 0.5 tsp salt
- 2 cups powdered sugar
- 1.5 cups dark chocolate chips
- 1 tbsp vegetable oil
Instructions
Preparation Steps
- Use a stand or hand mixer to blend together the peanut butter, cream cheese, vanilla and salt in a medium sized mixing bowl until fully combined and fluffy, about 3-5 minutes.
- Gradually beat in the powdered sugar, using a spatula to scrape down the sides of the bowl as needed. You should have a light, tan, soft dough.
- Cover a baking sheet with parchment paper.
- Form 1 inch balls out of the dough and place them on the cookie sheet. The dough will be slightly soft but it should hold its shape once formed.
- Place a toothpick in the top of each ball and place them in the freezer for 20 minutes.
- When you are ready to coat the Buckeyes, prepare a second baking sheet by lining it with parchment paper.
- Melt the chocolate chips and oil together in a shallow bowl in the microwave. Microwave in 20 second increments, stirring between each cooking time, until completely melted. It should take 1-2 minutes to melt all of the chips.
- Remove about 6 Buckeyes from the freezer and place them on the prepared baking sheet. Dip them, one by one, in the melted chocolate, using the toothpick.
- Give them a little swirl in the chocolate to cover all but a small circle of the filling, allow the excess to drip off and then place them back on the baking sheet.
- Remove another 6 Buckeyes from the freezer and repeat steps 8 and 9. Continue until all Buckeyes have been dipped in chocolate.
- Remove the toothpicks from the tops of the Buckeyes and smooth over the hole using a toothpick, an offset spatula or your finger.
- Return the Buckeyes to the freezer until set, up to 1 hour, and then place in a covered container in the refrigerator until ready to serve.
- Buckeyes can be served straight from the refrigerator or at room temperature.


