


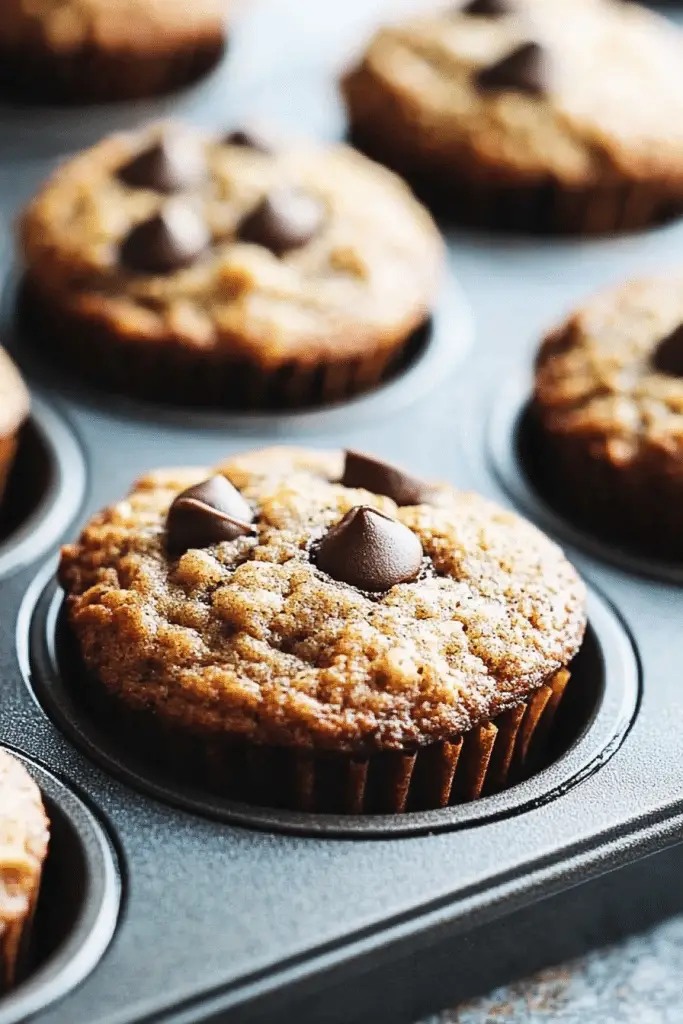
There’s something about the smell of ripe bananas, sugar, and vanilla filling up your kitchen that just hits you right in the nostalgic feels. I remember making banana muffins with my mom as a kid — she’d mash those bananas until they were almost liquidy, and the whole house smelled like warm comfort in under 30 minutes. These banana muffins somehow manage to be both incredibly soft and just the right amount of moist, with little pockets of sweetness that make every bite a tiny celebration. If you’ve ever loved banana bread, this is like that but in perfectly portable, fluffy muffin form — which, let’s be honest, makes them way easier to share (or not share because who wants to?). Plus, they’re hands down my go-to when I’ve got a few bananas hanging around, and my kids can’t get enough of them. Let me tell you, these little beauties are worth every minute of the wait.
What is banana muffin?
Think of banana muffins as the cozy cousin of banana bread — same warm, sweet banana flavor but baked in individual portions that are perfect for breakfast on-the-go or an afternoon treat. It’s essentially a muffin recipe that uses mashed bananas as a key ingredient, bringing natural sweetness and moisture, so you don’t need to pile on the sugar. The name’s pretty straightforward, but don’t let that fool you — these muffins are anything but boring! They’re soft, fluffy, with just a tiny bit of that caramelized banana magic baked right in. Plus, you can bulk these muffins up however you like — nuts, chocolate chips, or a little swirl of peanut butter make them even more irresistible. It’s the kind of recipe that’s both fuss-free and crowd-pleasing, perfect for family breakfasts, school snacks, or just a quiet moment with your favorite mug of coffee.
Why you’ll love this recipe?
What I love most about these banana muffins is that they feel like a warm hug, but in muffin form. The flavor is just spot on, with that deep banana sweetness mingling with a hint of vanilla and a touch of cinnamon that sneaks up on you. It’s never overpowering, just the right balance that hits all the taste buds just right. And honestly, they’re simpler to throw together than you’d think. There’s no need for fancy equipment or weird ingredients — just pantry staples and those overripe bananas sitting on your counter waiting to be used. This recipe has saved me more than once when I needed a last-minute treat or something to send along with the kids’ lunches. Plus, it’s budget-friendly — bananas are cheap and this recipe doesn’t call for anything fancy. You can mix and match add-ins, which means no two batches have to be the same. On a rainy day, these banana muffins pair beautifully with a steaming latte, while in spring, I actually love packing them for picnics. They’re just that versatile.
How do you make banana muffins?
Quick Overview
The whole process is refreshingly quick and straightforward — mash your ripe bananas, mix them into a simple batter, add your dry ingredients, and scoop into muffin tins. Then, pop them in the oven for about 18-22 minutes and watch that golden top form. What makes this method special is how little fuss there is and how forgiving these muffins are — they won’t dry out or get rubbery if you’re a minute late pulling them out. I always do a toothpick check, but honestly, these muffins smell so good it’s harder not to sneak a taste while they bake. You don’t have to be a baking wizard to nail this one.
Ingredients
For the Main Batter:
– 3 very ripe bananas (the mushier the better for flavor and moisture)
– 1/2 cup unsalted butter, melted (sometimes I swap half for coconut oil, and it’s delicious)
– 1 cup granulated sugar (feel free to reduce to 3/4 cup if you like things less sweet)
– 2 large eggs, room temperature (helps keep things light and fluffy)
– 1 teaspoon vanilla extract (trust me, this little splash makes a world of difference)
– 1 1/2 cups all-purpose flour (sifted for ease and lightness)
– 1 teaspoon baking soda (the rising hero)
– 1/2 teaspoon salt (balances the sweetness)
– 1 teaspoon ground cinnamon (optional but highly recommended)
For the Filling:
– 1/2 cup chopped walnuts or pecans (toasted if you’re feeling fancy)
– 1/3 cup dark chocolate chips or chunks (because, well, chocolate)
– Optional swirl of peanut butter or Nutella (try spreading a teaspoon in each muffin before baking)
For the Glaze:
– 1 cup powdered sugar, sifted
– 2-3 tablespoons milk or cream (adjust for pouring consistency)
– 1/2 teaspoon vanilla extract or a tiny squeeze of lemon juice for brightness
Step-by-Step Instructions
Step 1: Preheat & Prep Pan
Preheat your oven to 350°F (175°C) — that’s a nice, even heat that lets the muffins cook through without browning too fast. Line a muffin tin with paper liners, or if you’re like me and want less cleanup, just grease it generously with butter or baking spray. Pop that on the counter so it’s ready for the batter as soon as it’s mixed.
Step 2: Mix Dry Ingredients
In a large bowl, whisk together the all-purpose flour, baking soda, salt, and cinnamon. Doing this separately helps mix the leavening agent evenly throughout, which means no weird lumps or uneven rising. I always sift these if I’m not feeling rushed — it just makes the batter lighter and the muffins fluffier.
Step 3: Mix Wet Ingredients
In a separate bowl, mash your ripe bananas until they’re almost liquid, then add melted butter, sugar, eggs, and vanilla extract. Whisk until smooth but don’t worry about little lumps of banana – they make the muffins extra special. If your eggs are cold from the fridge, pop them in warm water for a few minutes first; it helps everything blend nicely.
Step 4: Combine
Pour the wet ingredients into the bowl with the dry. Use a spatula to gently fold everything together — don’t go wild stirring, or you risk tougher muffins. It’s okay if the batter is a little lumpy. Overmixing is the #1 mistake that makes muffins dense instead of light and fluffy. Stop as soon as the ingredients come together.
Step 5: Prepare Filling
If you’re adding nuts or chocolate chips, fold them gently into the batter now. Toasting walnuts beforehand brings out their nuttiness — I learned this trick the hard way after a batch tasted kind of bland. For a swirl, set aside a spoonful of peanut butter or Nutella to drop in later.
Step 6: Layer & Swirl
Scoop half the muffin batter into each tin hole, add a small dollop of your peanut butter or Nutella swirl in the middle, then top with the remaining batter. Grab a toothpick or skewer and gently swirl it around to create a pretty marbled effect. It’s about as much artistry as I’m willing to do on a weekday morning, and it makes the muffins look way fancier than they really are.
Step 7: Bake
Pop the tray in the preheated oven and bake for 18-22 minutes, checking at the 18-minute mark with a toothpick inserted into the center. If it comes out clean or with just a few moist crumbs, they’re done. Remember, ovens vary, so watch closely after 15 minutes if yours runs hot. Let the tops brown slightly but don’t let them dry out.
Step 8: Cool & Glaze
Once baked, remove the muffins from the tin and let them cool on a wire rack for about 10 minutes. While waiting, mix your glaze ingredients until smooth and drizzly. Drizzle it over warm muffins for a shiny, sweet finish, or wait until fully cool if you want a thicker glaze top. You’ll thank me when you taste that sugary, slightly tangy contrast.
Step 9: Slice & Serve
These muffins are best enjoyed warm but also make awesome leftovers. Serve them with a smear of butter or simply as-is with your morning coffee or tea. For a fun twist, halve them and toast lightly — the edges get a bit crispy and bring out more banana flavor. Grab a napkin, because they’re delightfully moist and slightly crumbly in the best way.
What to Serve It With
For Breakfast: Nothing beats these banana muffins with a steaming cup of dark roast coffee or a creamy latte. I like to plate them with a small bowl of Greek yogurt and fresh berries on the side for a nice balance of flavors and textures.
For Brunch: Serve banana muffins alongside a frittata or scrambled eggs with fresh herbs to elevate that mid-morning vibe. Add a glass of freshly squeezed orange juice or a mimosa if you’re celebrating — they actually pair wonderfully.
As Dessert: A scoop of vanilla ice cream or a dollop of whipped cream makes these muffins feel decadent and indulgent after dinner. I sometimes sprinkle a bit of cinnamon sugar on top before serving to add some sparkle.
For Cozy Snacks: Perfect with a mug of hot cocoa or chai tea on a lazy afternoon. Wrap a couple in parchment paper and bring them outside for a little treats picnic during fall or winter. This has become our family tradition on chilly weekends.
Top Tips for Perfecting Your Banana Muffins
Banana Quality: Use bananas that are overripe — with brown spots all over. They’re sweeter and mash easier, imparting the best flavor and moisture.
Mixing Advice: Always fold the batter gently after combining wet and dry ingredients. Overmixing is a rookie mistake I learned early on — one batch ended up solid as a rock because I was too eager!
Swirl Customization: For a pretty swirl, gently drag a toothpick through the dollop of peanut butter or Nutella just once or twice. Overdoing it blends the flavors too much and loses that visual pop.
Ingredient Swaps: I’ve swapped the butter for coconut oil (1:1 ratio), which makes the muffins a little creamier with a subtle tropical note. You can use whole wheat flour too, just swap half for softer texture. Almond or oat milk work great if you need dairy-free.
Baking Tips: Position your muffin tray in the center rack for even heat. Rotate halfway through baking if your oven tends to have hot spots. If your muffins brown too fast on top, tent with foil during the last few minutes.
Glaze Variations: Try mixing maple syrup or honey into the powdered sugar glaze for a deeper sweetness. A sprinkle of chopped toasted nuts or coconut flakes on the glaze doubles the indulgence.
Storing and Reheating Tips
Room Temperature: Store these banana muffins in an airtight container on the counter for up to 2 days. I love this because you can grab one quick without waiting for the fridge to warm things up.
Refrigerator Storage: Keep the muffins in a sealed container in the fridge for up to 5 days. Bring to room temperature or warm gently in the microwave (about 15 seconds) to revive that fresh-baked softness.
Freezer Instructions: Wrap each muffin tightly in plastic wrap or foil, then store in a freezer bag. They’ll keep for up to 3 months. To thaw, leave out at room temp for a few hours or microwave for 20-30 seconds for a quick warm-up.
Glaze Timing Advice: If you plan to store in the fridge or freezer, I recommend glazing after thawing or just before serving to keep the glaze from melting or becoming soggy. Fresh glaze adds just the right finishing touch.
Frequently Asked Questions
Final Thoughts
This recipe has been a staple on my countertop for years — it feels like a little piece of home whenever I make it. The combination of bananas, just enough sweetness, and that tender crumb is pure comfort food, but without any fuss. I love how forgiving these muffins are; whether you’re a beginner or a seasoned baker, they’ll come out tasty every single time. If you liked this one, try adding your own spin — some cinnamon, nuts, or even swapping in pumpkin puree for a seasonal twist. Drop a comment and let me know how your batch turned out! Happy baking, and don’t forget to sneak a warm muffin before the rest of the family catches on.
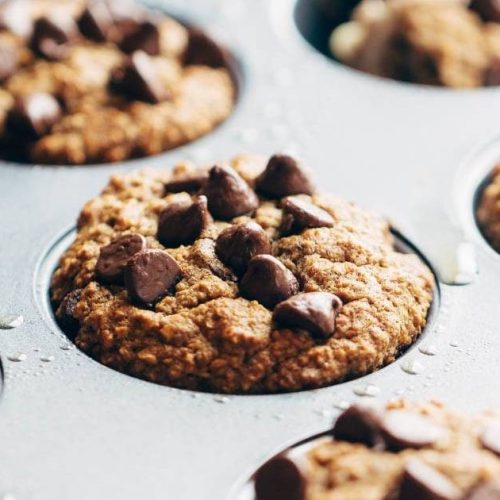
banana muffins
Ingredients
Main Ingredients
- 2 cups rolled oats
- 3 large ripe bananas mashed
- 2 large eggs
- 0.75 cup pitted whole dates softened
- 1 teaspoon baking soda
- pinch salt optional
- teaspoon ground cinnamon optional
- cup chocolate chips optional
Instructions
Preparation Steps
- Preheat the oven to 350°F (175°C).
- Grease a muffin tin or line with paper liners.
- Combine oats, bananas, eggs, dates, baking soda, salt, and cinnamon in a blender or food processor. Blend until smooth.
- Pour the batter into the muffin tin, filling each cup about 3/4 full. Sprinkle chocolate chips on top if using.
- Bake for 15-20 minutes or until a toothpick inserted in the center comes out clean. Allow to cool before serving.


