


There’s something truly magical about waking up to the smell of baked eggs gently bubbling in the oven—creamy whites set just right, golden yolks still a bit runny, and that subtle warmth that seeps into your bones on a chilly morning. I first discovered baked eggs on a sleepy weekend when I was craving something eggy but without the fuss of flipping or scrambling. Honestly, it reminded me a bit of a delicate soufflé but oh-so-much simpler. My family fell in love fast—my kids actually ask for it all the time now, especially when we’re looking for that sunshine-on-a-plate vibe for breakfast. Baked eggs might not be as flashy as avocado toast or as classic as a fried egg sandwich, but they have this soft, comforting quality that’s just pure food joy. If you’ve never tried making baked eggs, trust me, it’s about to become your new favorite morning ritual.
What is baked egg?
So, what exactly are baked eggs? Think of them as eggs, but given a gentle oven spa treatment. It’s essentially eggs cracked into a cozy little ramekin or baking dish, sometimes with a splash of cream or other delicious add-ins, then baked gently until the whites set and the yolks reach that perfect, tender doneness. This method is actually an old classic, often called “œufs cocotte” in French cuisine, which simply means eggs cooked in a small pot. The beauty of baked eggs is how tender and custardy they become without all the hands-on cooking you usually need with eggs. It’s super approachable and customizable, making it super easy for anyone to whip up a special breakfast without needing any fancy skills.
Why you’ll love this recipe?
What I love most about baked eggs—besides the ridiculously creamy texture—is how straightforward it is. Seriously, it’s one of those dishes that’s both impressive and incredibly forgiving. Flavor-wise, you can go so many directions: add herbs like thyme or chives, sprinkle with cheese for that irresistible melt, or toss in sautéed mushrooms for an earthy vibe. And honestly, it all comes together with minimal mess. Unlike scrambling or frying, you set it in the oven and just keep an eye on it. I appreciate how it feels a bit fancy without requiring me to be a pro cook.
Plus, it’s budget-friendly: eggs and a few pantry items usually do the trick, so you don’t need to make a special trip to the gourmet store. This recipe with baked eggs is wonderfully versatile, too—you can serve it solo for a light breakfast or pile on fresh greens and toast for a heartier meal. It’s a little like the cozy cousin of shakshuka or eggs benedict—simple but hits the spot every time. Honestly, my weeknights get a little lighter with this in my repertoire, especially when I’m too tired to fuss for dinner but still want something comforting and protein-packed.
How do I make baked eggs?
Quick Overview
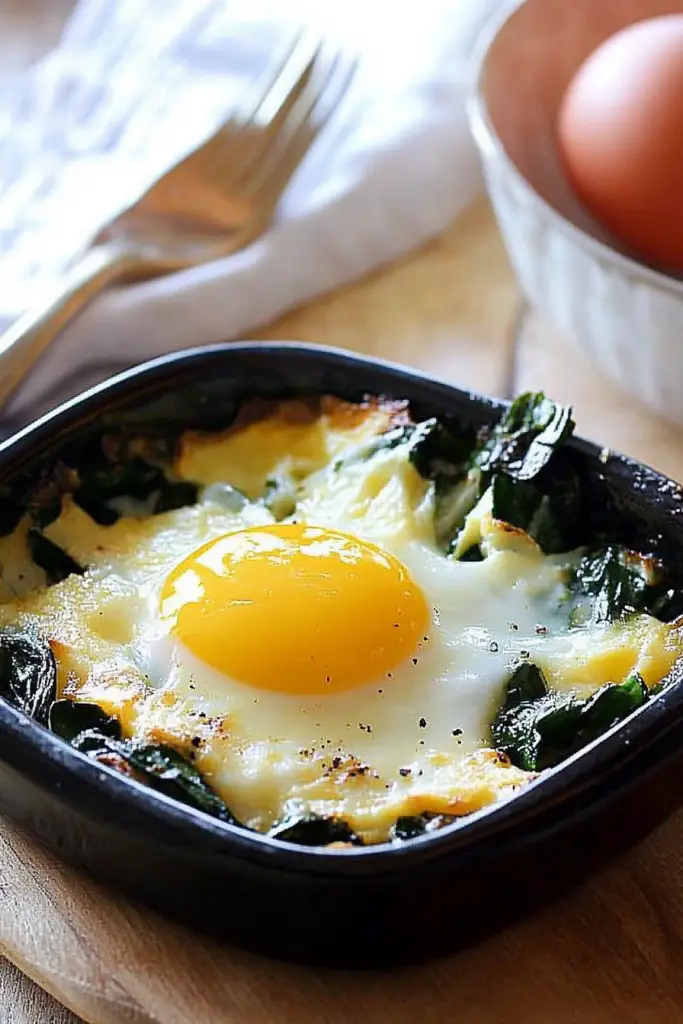
Getting baked eggs just right boils down to three things: gentle heat, patience, and a touch of love. It’s about cracking your eggs into small baking dishes (ramekins are ideal, but small oven-safe bowls work too), adding a little cream or butter to keep things luscious, seasoning well, and carefully sliding them into a warm oven. The magic happens in about 12-15 minutes when the whites are set but the yolks still have that golden ooze. I always keep a close watch past the 10-minute mark since ovens vary, but it’s basically foolproof if you keep an eye on it. The beauty? There’s no flipping, no scrambling—just a delicate bake that yields gentle, dreamy eggs every time.
Ingredients
For the Main Batter:
- Fresh large eggs (2 per person is my go-to)—you want quality eggs here for the best flavor and color.
- Heavy cream or half-and-half (about 1 tablespoon per ramekin) adds a silky richness that’s pure comfort.
- Salt and freshly ground black pepper, to taste, because a little seasoning makes a big difference.
For the Filling:
- Grated cheese (Gruyère, cheddar, or Parmesan)—about 1 tablespoon per ramekin adds a beautiful savory kick.
- Fresh herbs like chives, parsley, or thyme, finely chopped, for that fragrant pop.
- Optional extras: sautéed mushrooms, chopped spinach, diced tomatoes, or crisp bacon bits. These jazz up the eggs but are totally optional.
For the Glaze:
- A small pat of butter on top before baking adds that glossy finish and golden color.
- Alternatively, a sprinkle of smoked paprika or a drizzle of truffle oil after baking for a flavor twist.
Step-by-Step Instructions
Step 1: Preheat & Prep Pan
Start by preheating your oven to 350°F (175°C). While it heats, lightly butter your ramekins or small baking dishes—this step is key because it keeps the eggs from sticking and adds a gentle richness around the edges. You could also brush them with a bit of olive oil if you prefer. Have your baking dishes snugly fit into a baking pan since you’ll be creating a water bath, which keeps the eggs cooking evenly without drying out.
Step 2: Mix Dry Ingredients
Since baked eggs don’t really have a traditional “dry mix,” this step is more about prepping your toppings—grating cheese, chopping herbs, or sizzling your veggies. This way, everything’s ready to go once the eggs are cracked in. A quick tip: if you’re using mushrooms or spinach, cook them down a bit to remove extra moisture and avoid soggy eggs.
Step 3: Mix Wet Ingredients
Pour about a tablespoon of cream or half-and-half into each ramekin, which helps create that silky texture. If you’re using butter, melt a small pat and set it aside to add on top later. No other wet mixing needed here since we want the egg whites and yolks to stay whole and distinct.
Step 4: Combine
Crack your eggs gently into each ramekin over the cream. Be delicate to keep the yolks intact—just like making a little egg nest. If your eggs are extra fresh, they’ll hold together beautifully. Season with salt and pepper, then sprinkle your prepared fillings on top. Remember, less is more here to keep the eggs cooking perfectly.
Step 5: Prepare Filling
If you want to add veggies or meat, this is the time to get creative! I love a combo of sautéed spinach and sharp cheddar, but diced tomatoes and basil are fantastic for a fresh twist. Just make sure any filling is heated through and drained well to keep the texture perfect!
Step 6: Layer & Swirl
For a little flair, sprinkle the cheese and herbs on top, then gently swirl with a toothpick or the tip of a knife—this isn’t mandatory but it gives the surface a gorgeous marbled effect and lets those flavors mingle.
Step 7: Bake
Place the ramekins into a larger baking dish, then pour hot water halfway up the sides to create a water bath—this keeps the baking gentle and even. Slide the whole setup into the oven and bake for about 12-15 minutes. I always start checking around 10 to avoid overcooking. The key is whites set but yolks still a little jiggly and smooth when you gently shake the dish.
Step 8: Cool & Glaze
Once baked, carefully remove the ramekins from the water bath and place them on a cooling rack for a few minutes. Right after, add your glaze—whether it’s a tiny pat of butter that melts over the hot eggs or a drizzle of smoky oil, these last touches take the dish to the next level.
Step 9: Slice & Serve
Baked eggs don’t really require slicing, but if you’ve served them in a wide shallow dish, a gentle spooning motion helps plate those tender eggs with all their luscious toppings. Serve immediately while still warm, ideally with toasted rustic bread or fresh fruit on the side. The contrast between creamy, warm eggs and crunchy toast? Pure bliss.
What to Serve It With
For Breakfast: Nothing beats a strong cup of coffee or a bright lemony tea alongside baked eggs. I love setting the table with some buttered sourdough toast, a dollop of ricotta, and fresh seasonal fruit to balance the richness.
For Brunch: Elevate your baked eggs with a side salad of arugula tossed in a lemon vinaigrette and a chilled mimosa or sparkling water with fresh mint. The crisp, fresh flavors contrast beautifully and make your table feel extra special.
As Dessert: Although baked eggs are savory, you could experiment with a sweet version by baking eggs with a splash of vanilla and topping with cinnamon and honey. Pair with fresh berries and a dollop of whipped cream for a light, unexpected treat.
For Cozy Snacks: This is my weekend comfort go-to—grab a lazy afternoon with a good book, some crusty bread, and your baked eggs for that satisfying, simple pleasure that fills your soul.
In my house, it’s become a tradition to gather around the kitchen whenever this recipe comes out—kids reaching for their ramekins, little fingers smearing a bit of butter, and everyone savoring those first creamy bites. It’s more than a meal; it’s those quiet moments that feel just right.
Top Tips for Perfecting Your Baked Eggs
Egg Freshness: I can’t stress enough how fresh eggs make all the difference here. Fresh eggs hold their shape better and give you that beautiful, thick white and firm yolk.
Water Bath Magic: The water bath is a game-changer—it creates gentle steam heat, preventing rubbery whites. Always use hot water, and keep the water level at least halfway up the ramekin sides.
Don’t Overcrowd Fillings: Less is more with fillings; too many can weigh down the eggs or add excess moisture, which changes the texture. I learned this the hard way when my first batch turned out too watery.
Watch Your Oven Time: Ovens vary, so start checking at 10 minutes and keep watching. For softer yolks, pull them a little earlier; firmer yolks need a touch more time.
Try Different Creams: I experimented with almond milk and found it surprisingly creamy, especially for a dairy-free option. Coconut cream works beautifully too but lends a subtle sweetness, so keep that in mind.
Glaze It Up: Adding butter or oil right after baking enhances flavor and gives this seductive sheen. Smoked paprika or a few chili flakes added here bring a smoky warmth that I adore.
Have Fun With Herbs: Fresh herbs make a huge sensory difference—chives bring a mild onion crunch, thyme adds earthiness, and basil offers a bright finish. Mix and match based on season and mood.
Storing and Reheating Tips
Room Temperature: Baked eggs are best enjoyed fresh, but if you have leftovers, cover them loosely with foil or a light cloth and eat within 2 hours to keep the texture nice.
Refrigerator Storage: Place cooled baked eggs into airtight containers or cover the ramekins tightly with plastic wrap. They’ll stay good for up to 2 days, but the texture will start to firm up a bit.
Freezer Instructions: I don’t recommend freezing baked eggs since the texture changes noticeably — the whites become rubbery and the yolks grainy after thawing. If you do freeze, wrap as tightly as possible and thaw overnight in the fridge, then reheat gently.
Glaze Timing Advice: Add your glaze only right before serving. Applying butter or oil before refrigerating or freezing can cause the eggs to take on a greasy or off flavor when reheated.
Frequently Asked Questions
Final Thoughts
Baked eggs might seem simple, but the comfort, warmth, and luscious texture they bring to the table have made them a beloved staple in my kitchen. Whether you’re feeding a crowd or just treating yourself on a quiet morning, this recipe feels like a gentle hug in food form—rich but light, straightforward but special. If you enjoy this, I’d encourage you to explore other cozy egg dishes like shakshuka, eggs en cocotte, or even a simple frittata—you’ll find each brings its own magic. I’m genuinely excited for you to try this one at home and hear what you think, so drop me a comment or share your tweaks—I love swapping stories and innovations! Happy baking, and here’s to many delicious mornings ahead.
baked eggs
Ingredients
Main Ingredients
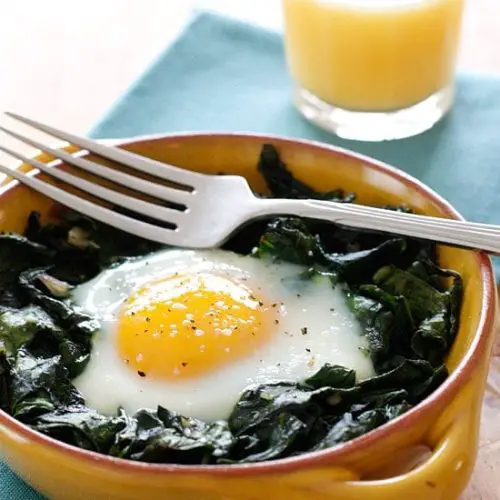
- 2 tsp olive oil
- 0.25 cup diced shallots
- 1.5 lb baby spinach large stems removed
- 4 large eggs
- salt and freshly ground pepper to taste
- 2 tbsp Asiago cheese shredded or Parmesan
- baking spray
Instructions
Preparation Steps
- Preheat an oven to 400°F.
- Lightly spray four oven-safe dishes or ramekins with cooking spray.
- Heat a large skillet over medium-low heat, add olive oil and diced shallots, cook for 2-3 minutes.
- Add baby spinach, salt and pepper, and cook until spinach wilts, about 2-3 minutes.
- Mix in Asiago cheese and remove from heat.
- Divide the wilted spinach among the oven-safe dishes, making a well in the center of each.
- Break an egg into each dish and season with salt and pepper.
- Place the ramekins on a rimmed baking sheet and bake until the whites are set and the yolks are firm around the edges but still soft in the center, about 17 minutes.
- Serve immediately.


