


There’s something downright magical about the smell of fresh bagels baking in your kitchen. I still remember the first time I made my own easy bagel dough—it was a Sunday morning ritual that completely transformed my weekend breakfasts. Unlike those dense, store-bought kinds, homemade bagels are chewy, slightly crispy on the outside, and soft right in the middle—almost like a warm, doughy hug. This Dough Recipe is ridiculously simple, a total lifesaver when you want that fresh-out-of-the-oven goodness without spending hours in the kitchen. Honestly, it beats any boxed mix I’ve tried (and my family agrees). If you’ve ever been intimidated by the idea of making bagels from scratch, this one’s for you. It’s straightforward, forgiving, and the results will have everyone asking for seconds (my kids ask for this all the time!). Plus, you’ll feel like a local NYC baker in no time!
What is easy bagel dough?
Think of easy bagel dough as the starting point for your quintessential fresh bagel experience. It’s essentially a yeasted dough made with basic pantry staples—flour, water, yeast, and a pinch of salt—that comes together quickly and bakes into that classic chewy crust and pillowy interior bagels are famous for. The “easy” part? The recipe skips any complicated steps like lengthy rises or insane kneading techniques. Instead, it embraces a simple process that anyone can manage, whether you’ve baked before or if this is your first dough project. The beauty of this dough is it captures the soul of traditional bagels—dense, slightly sweet, with that perfect bite—without any fuss. So, if you’ve ever wondered how those bakery bagels get that perfect texture, this dough is your answer!
Why you’ll love this recipe?
What I love most about this easy bagel dough is how it marries simplicity with spot-on flavor. The crust crisps up just right, giving you that satisfying “snap” when you bite into it, but inside it’s soft and chewy—exactly how a bagel should be. You don’t need any special ingredients or weird equipment, just simple stuff you likely have on hand. The recipe is forgiving, so even when you rush or make little mistakes (trust me, I’ve been there), it still turns out fantastic. Plus, it’s super budget-friendly, making homemade bagels cheaper than grabbing a dozen from your local shop. I often think of it like my go-to no-fail bread recipe—you can dress it up with toppings or fillings, and it’ll shine in any variation. If you love other quick breads or yeasted treats, think of this as your new baking BFF. Whether you load them with Cream Cheese, smash some avocado on a warm bagel, or toast and butter them for a quick snack, this dough’s got you covered.
How do I make bagel dough?
Quick Overview
This recipe is all about keeping things straightforward. You mix your dry ingredients, activate the yeast in warm water, combine everything without overworking the dough, shape into rounds with a hole in the middle, and then boil briefly before baking. Boiling is the secret step for that bagel-like chew and shiny crust. The process is surprisingly quick and satisfying, especially once you get the hang of the shaping. I always find that the smell of boiling dough just before baking fills the kitchen with such a cozy, comforting vibe—you’ll know you’re doing it right.
Ingredients
For the Main Batter:
- 4 cups bread flour (I swear by bread flour for that chewy texture—it’s worth the splurge!)
- 1 tablespoon sugar (just enough to feed the yeast and add a hint of sweetness)
- 2 teaspoons instant yeast (easy to work with, no proofing needed!)
- 1 ½ teaspoons salt (balances out the flavor nicely)
- 1 ¼ cups warm water (about 110°F—think warm, not hot!)
For the Boil:
- 4 cups water
- 1 tablespoon sugar or honey (helps the crust caramelize beautifully)
For Toppings (Optional):
- Poppy seeds, sesame seeds, Everything Bagel seasoning, or coarse salt
Step-by-Step Instructions
Step 1: Preheat & Prep Pan
First things first, preheat your oven to 425°F. Line a baking sheet with parchment paper—this keeps the bagels from sticking and helps with even baking. If you want, you can lightly grease the parchment too, but I usually skip that. Getting the oven nice and hot ahead of time is key because bagels bake best in that instant blast of heat, giving them that lovely crust.
Step 2: Mix Dry Ingredients
In a big bowl, whisk together your bread flour, sugar, salt, and yeast. If you’re using instant yeast, you can mix it directly in without proofing, which saves a step. Take your time to distribute everything evenly—this little step helps your dough rise and bake evenly without dense spots.
Step 3: Mix Wet Ingredients
Pour your warm water into a separate container or cup and make sure it’s just right—too hot can kill the yeast, too cold slows the rise. Warm water wakes the yeast up like a good morning cup of coffee. Slowly add it to the dry ingredients, stirring gently with a wooden spoon or your hands until a shaggy dough forms.
Step 4: Combine
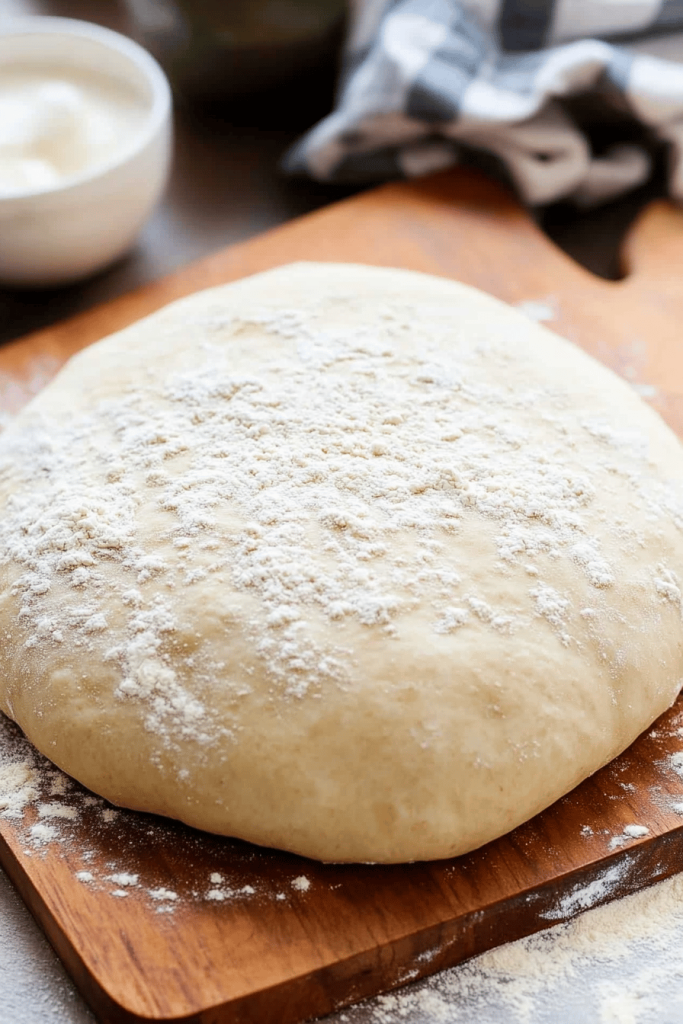
Now comes the fun part. Turn the dough onto a clean, lightly floured surface and knead for about 8-10 minutes. If you’re like me, you might skip the kneading tool—there’s something deeply satisfying about squishing the dough with your hands. The dough should feel smooth and slightly tacky but not overly sticky. If it sticks, sprinkle a tiny bit of flour, but try not to add too much to keep the bagels tender. Don’t rush this—it’s what builds the chewy texture we crave.
Step 5: Prepare Filling
Okay, this dough is best enjoyed plain or with toppings, but if you want to jazz up your bagels with a filling (think cinnamon sugar swirl or savory cheese), prepare that while the dough rests. For example, mix softened Cream Cheese with fresh herbs or cinnamon with brown sugar for a quick spread you can stuff inside before shaping. Just make sure the filling isn’t too wet, or it’ll seep out when boiling.
Step 6: Layer & Swirl
If you’re going for the classic plain bagel, simply shape your dough balls into rounds and poke a hole through the center with your finger, gently stretching it to about 2 inches wide. For swirled or filled bagels, roll out the dough, add your filling, and carefully roll it up, then twist to create a nice marbled effect. This step is where your bagels start looking like something from a fancy bakery!
Step 7: Bake
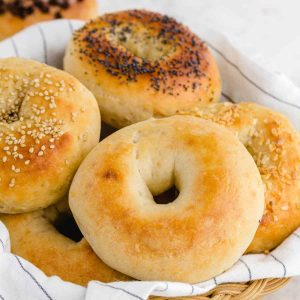
Before baking, boil a large pot of water with sugar or honey for sweetness. Gently drop the shaped bagels into the boiling water, two or three at a time, and boil each side for about 1 minute. This boiling step gives bagels that signature chew and shiny crust. Use a slotted spoon to remove them, letting excess water drip off, then place them on your prepared baking sheet. Sprinkle with your favorite toppings now if you’d like. Bake for 20-25 minutes or until they’re golden brown. Keep an eye on them—every oven’s a little different!
Step 8: Cool & Glaze
Let the bagels cool on a wire rack for at least 15 minutes before you glaze or eat them. If you want a shiny glazed finish, brush them lightly with honey-water or egg wash right out of the oven while they’re still warm. This step adds a lovely sheen and a little extra sweetness without overpowering the bagel’s flavor. I usually go for the honey glaze—it’s my secret touch to make kids swoon.
Step 9: Slice & Serve
Use a serrated knife to slice your bagels—this lets you get that clean cut without squishing the dough. Serve warm with Cream Cheese, butter, smoked salmon, or whatever your heart desires. Freshly toasted with a pat of butter? Absolutely heavenly. And yes, these bagels taste just as fantastic the next day, either toasted or fresh.
What to Serve It With
For Breakfast: Nothing beats a warm bagel with melted butter and a strong cup of your favorite coffee. My morning ritual is simple—spread cream cheese, drizzle a little honey, and sip a latte while the kids scramble eggs next to me.
For Brunch: Elevate your bagels with smoked salmon, capers, thinly sliced red onion, and fresh dill. Pair with a crisp mimosa or fresh-squeezed orange juice for a feel-good weekend spread that’ll impress guests without any fuss.
As Dessert: Try a sweet cream cheese and berry compote filling or a cinnamon sugar swirl bagel with a drizzle of vanilla glaze. My family loves those on chilly evenings when we want a cozy little treat.
For Cozy Snacks: Toasted bagel halves slathered with almond butter and banana slices are my go-to quick fix around 3pm when energy dips. They’re comforting, filling, and keep you going without feeling heavy.
One weekend, we even made bagel sandwiches stacked with turkey, avocado, and spinach—completely turned dinner into a fun, casual affair that’s kid-approved and easy to whip up last minute. From simple breakfasts to casual dinners, these bagels fit right in with whatever you’re craving.
Top Tips for Perfecting Your Easy Bagel Dough
Dough Work: Don’t rush the kneading. It’s worth those extra minutes to get a smooth dough—watch the texture shift from shaggy to soft and elastic. This is what makes the difference between chewy and dense.
Water Temperature: Getting the water just right is key. Too hot and you’ll kill the yeast; too cold and the rise takes forever. A cozy warm feel—think bath water temperature—is your sweet spot.
Boiling Wisdom: The boiling step is non-negotiable for that perfect chewy bagel crust. If you forget this, your bagels will be more like bread rolls. Adding sugar or honey to the boil water helps with golden caramelization and gives that slight sweetness that makes bagels auto-addictive.
Swirl Customization: Want to add swirls? Roll your dough out flat, sprinkle in cinnamon sugar or cheese, then roll tight into a log before slicing. Don’t overfill or the filling can ooze out during boiling.
Flour Substitutions: I’ve tried whole wheat bread flour for a nuttier flavor, and while it’s a bit denser, it’s still delightful. Just swap half the bread flour for whole wheat to start—your dough may require a bit more water.
Oven Placement: Bake your bagels in the middle rack for even heat. If they brown too fast, tent gently with foil and keep baking until done.
Glaze Ideas: Beyond honey glaze, I’ve used a light egg wash for a shiny golden top, or for a little flair, brush melted butter mixed with fresh garlic and herbs right after baking for savory lovers.
Over the years, I’ve learned that patience and these little tricks are what elevate a homemade bagel from good to unforgettable. Plus, no two batches come out exactly the same—and that’s part of the charm.
Storing and Reheating Tips
Room Temperature: Keep your bagels in a paper bag or loosely wrapped in a kitchen towel for up to 2 days. Paper traps moisture better than plastic, so the crust stays crisp.
Refrigerator Storage: Contrary to what you might think, storing bagels in the fridge can dry them out. If you must refrigerate, keep them in an airtight container or zip-top bag and consume within 3-4 days. Warm gently before eating.
Freezer Instructions: For longer storage, slice bagels in half and wrap each tightly in plastic wrap and foil or store in heavy-duty freezer bags. They last up to 3 months this way. To enjoy, toast them straight from the freezer or thaw at room temperature before warming.
Glaze Timing Advice: If you plan to freeze or store bagels for a while, don’t add glaze until serving day. Applying glaze fresh keeps that glossy shine and flavor crisp instead of sticky or soggy.
One last tip: nothing revives day-old bagels better than slicing and toasting while lightly buttered. It’s like a fresh batch all over again. Trust me—my family refuses to toss leftovers because reheated bagels taste almost as good as fresh out of the oven.
Frequently Asked Questions
Final Thoughts
There’s something so satisfying about making your own easy bagel dough from scratch. It feels like a little weekend celebration in the kitchen—warm, comforting, and joyful. This recipe has become a staple in my home because it’s unpretentious but delivers those classic bagel vibes that light up any breakfast or snack time. Don’t be surprised when your house smells like a bakery and everyone starts crowding around the oven! If you try this recipe out, I’d love to hear how you make it your own—any twists, toppings, or even funny kitchen anecdotes. Baking homemade bagels is more than just food; it’s a tasty way to bring a little happiness and warmth into your day. Happy baking, friend!
2-Ingredient Bagels
Ingredients
Main Ingredients
- 2 cups self-rising flour do not substitute all-purpose
- 2 cups Greek yogurt I used 2% Fage
Instructions
Preparation Steps
- Preheat oven to 350°F.
- Mound flour on clean countertop or cutting board.
- Scoop yogurt into center of flour.
- Use your hands to scoop flour from the outside into the inside of the mound, kneading it together with the yogurt until it forms a dough.
- Continue kneading the dough until it has some elasticity (can be stretched) and is somewhat smooth and no longer sticky.
- Form a ball with the dough and slice into 8 separate pieces.
- Roll each piece into a log and loop the two ends together to form the bagels.
- Place bagels on a sheet pan lined with parchment paper.
- Bake for 15 minutes. Turn oven temperature up to 500°F and continue baking bagels until they are browned on top (3-5 minutes).
- Optional: Brush tops and sides of bagels with an egg wash before initial baking and add toppings.


