


I still remember the first time I made cashew chicken—it was one of those nights when I had zero inspiration but a hungry family waiting. The smell of toasted cashews and savory sauce filled the kitchen, and within minutes, it was a hit with everyone, especially the kids who randomly declared it their new favorite. There’s just something about this dish: crunchy nuts, tender chicken, and a sauce that’s sweet and salty, a bit like the classic sweet and sour chicken but with a cozy twist. I’ve tried so many versions over the years, but this one landed perfectly, easy to whip up and forever comforting. If you’ve ever fallen for the charm of stir-fries, then you’re going to love how cashew chicken brings a little extra heart to your weeknight dinner table.
What is cashew chicken?
Think of cashew chicken as a delicious stir-fry where tender chunks of chicken meet crunchy roasted cashews in a savory-sweet sauce that coats every bite. It originally comes from Chinese-American cuisine and has become a staple in many kitchens because it’s approachable and so satisfying. The idea is simple: stir-fry the chicken quickly over high heat, toss in veggies and those addictive cashews, and finish with a sauce that balances soy, a hint of sweetness, and a little tang. It’s essentially a quick one-pan meal that feels fancy but isn’t fussy at all—perfect for throwing together after work or when you’re craving something that hits all the cozy notes without too much hassle.
Why you’ll love this recipe?
What I love most about this cashew chicken is how fast it comes together. Seriously, it’s a lifesaver on busy nights when you want real flavor without spending forever chopping and prepping. The combination of crunchy cashews and juicy chicken coated in that sticky, savory glaze? It’s pure magic. Plus, the ingredient list won’t break the bank; chicken thighs or breasts, simple pantry staples like soy sauce, and roasted nuts do the trick—no fancy exotic sauces needed. Another great thing is the versatility: you can toss in any veggies you have on hand, swap cashews for peanuts, or add a little heat if you’re feeling adventurous. My family gets excited when I bring this out because it’s familiar but never boring—they always ask for seconds, which tells me I’m doing something right. If you’re a fan of homemade stir-fries or your classic orange chicken, this one deserves a spot in your recipe box for how straightforward and bursting with flavor it is.
How do I make cashew chicken?
Quick Overview
Here’s the deal: this recipe is all about quick skillet action and layering flavors without a mess. You start by cooking the chicken until golden, then stir-fry some crunchy veggies, add in toasted cashews, and finish everything off with a simple homemade sauce that clings beautifully. The whole thing takes just around 30 minutes, and the sauce is a game-changer—you won’t find a sweeter, tangier, more perfect coating for those cashews. If you’re worried about fiddly steps, don’t be. This method is straightforward, with a few quick stirs and an easy sauce mix. Once you nail it, you’ll feel like a stir-fry pro every time.
Ingredients
For the Chicken:
- 1 lb boneless, skinless chicken thighs or breasts, cut into bite-size pieces (thighs stay juicy, but breasts work too)
- 1-2 tbsp cornstarch (for that slight crisp on the outside)
- Salt and pepper, to taste
- 2 tbsp vegetable or peanut oil (something neutral with a high smoke point)
For the Vegetables & Add-ins:
- 1 cup roasted cashews (unsalted, or lightly salted)
- 1 red bell pepper, diced
- 1 cup snap peas or green beans (fresh and crisp)
- 3 scallions, sliced (white and green parts separated)
- 2 garlic cloves, minced
- 1 tsp fresh ginger, grated (optional, but adds lovely brightness)
For the Sauce:
- 1/4 cup low-sodium soy sauce
- 2 tbsp hoisin sauce (sweet and smoky depth)
- 1 tbsp rice vinegar or apple cider vinegar
- 1 tbsp brown sugar or honey (for that caramelized touch)
- 1/2 cup chicken broth or water
- 1 tsp cornstarch mixed with 1 tbsp water (to thicken)
- Optional pinch of red pepper flakes if you want a little heat
Step-by-Step Instructions
Step 1: Preheat & Prep Pan
Heat a large wok or skillet over medium-high heat until it’s hot but not smoking. Adding oil to a hot pan helps the chicken get a nice sear and prevents sticking. I swear by tossing in a little in the pan and swirling it—once it shimmers, you’re ready to cook. Don’t overcrowd the pan, or the chicken steams instead of browns.
Step 2: Mix Dry Ingredients
In a bowl, toss your chicken pieces with salt, pepper, and cornstarch until they’re all lightly coated. This step is key to getting that just-a-little-crisp outside texture that contrasts so well with the soft insides. It also helps the sauce stick better later on.
Step 3: Mix Wet Ingredients
Whisk together the soy sauce, hoisin, vinegar, brown sugar, broth, and red pepper flakes in a small bowl. I like to do this before I start cooking, so it’s all ready to go when the time comes. The sauce should smell sweet, salty, and a little tangy — a true crowd-pleaser.
Step 4: Combine
Start by cooking the chicken in the hot oil, letting it brown on all sides for about 4-5 minutes. Work in batches if needed to keep that heat steady. Once golden and mostly cooked through, transfer the chicken to a plate and set aside.
Step 5: Prepare Filling
In the same pan, toss in garlic, ginger, and the white parts of scallions. Let them sizzle for 30 seconds to release their fragrance before adding the bell peppers and snap peas. Stir often but don’t overcook; you want the veggies bright and just tender.
Step 6: Layer & Swirl
Return the chicken to the pan, sprinkle in cashews, then pour your sauce over everything. Give it a good stir so the sauce evenly coats all the ingredients. Then add your cornstarch slurry and keep stirring; this thickens the sauce beautifully without it getting gloopy. You’ll know it’s right when the sauce clings to every chunk of chicken and nut, shining a little in the pan.
Step 7: Cook Until Glazed
Give everything a final handful of fresh green scallions and stir one last time. Let the pan rest off the heat for a minute or two—this helps flavors meld. That sticky, glossy finish is the hallmark of a great cashew chicken.
Step 8: Serve
This is best served immediately. Spoon it over jasmine rice or alongside some steamed broccoli for a quick family dinner that feels celebratory. The smell alone will have everyone in the kitchen.
What to Serve It With
For Dinner Midweeks: Simply steaming a pot of fluffy jasmine rice pairs wonderfully. Add a side of stir-fried green beans or bok choy for freshness. At my house, rice bowls with heaps of cashew chicken always disappear fast.
For a Casual Lunch: Wrap it in warm tortillas or flatbreads with a drizzle of sriracha mayo or hoisin sauce for a fun twist. It’s surprising how nicely this works as a sandwich filling!
For a Family Gatherings: Consider serving it alongside egg rolls or wontons to amp up the takeout vibes. Pair with a cold Asian-inspired cucumber salad tossed in rice vinegar and sesame oil.
For Cozy Nights: I like to plate a smaller portion with a side bowl of miso soup and crunchy pickled vegetables. It’s comfort food that feels a little fancy. My kids always jump in to add extra cashews on top — it’s their favorite part.
Top Tips for Perfecting Your Cashew Chicken
Chicken Prep: Pat your chicken pieces very dry before tossing with cornstarch. Too wet, and they won’t crisp up; too much cornstarch will leave a gummy texture.
Vegetable Crunch: Cook your veggies quickly over high heat so they retain their snap. Overstepping this will turn your peppers limp and sad, and no one wants that.
Swirl Technique: When you add the sauce, mix gently. You want every bite coated but not swimming in liquid. The cornstarch slurry is your friend here; add it slowly while stirring.
Ingredient Swaps: Sometimes I swap cashews for roasted peanuts or almonds — each gives a slightly different crunch and flavor but all delicious. Coconut aminos can replace soy for a gluten-free twist, though it does change the taste a bit.
Baking Tips: This dish doesn’t bake but cooks on the stovetop, which keeps the chicken juicy and the cashews crunchy. Don’t hesitate to crank the heat for a few minutes and get a better sear.
Sauce Variations: I’ve played with adding a teaspoon of toasted sesame oil at the end for a nutty depth, or a splash of orange juice for sweetness. Totally up to your flavor mood.
I learned after a few botched batches that rushing the sauce thickening ruins the texture—so patience here is key. Also, make sure your pan is hot and your chicken pieces spaced out; crowding leads to soggy meat. Trust me, these little things make all the difference.
Storing and Reheating Tips
Room Temperature: Cashew chicken is best fresh but can sit for a couple hours, covered loosely with foil or a clean cloth. Beyond that, the nuts start to soften and lose their crunchy appeal.
Refrigerator Storage: Store leftovers in airtight containers for up to 3 days. Reheat gently in a skillet over medium heat to revive crunch. Avoid the microwave if you can—it tends to make everything a bit soggy.
Freezer Instructions: You can freeze cooked cashew chicken, but I recommend freezing the chicken and sauce separately from the nuts if possible. Wrap tightly with plastic wrap and place in freezer bags for up to 2 months. Thaw overnight in the fridge, then reheat as usual, adding fresh cashews if desired.
Glaze Timing Advice: If you add any optional finishing sauces or extra toppings, do it just before serving, never before storing. The nuts absorb moisture too quickly and get soft.
Frequently Asked Questions
Final Thoughts
This cashew chicken recipe isn’t just a meal; it’s one of those kitchen staples that reliably brings everyone around the table with smiles. The mix of tender chicken, crunchy nuts, and that rich, sticky sauce feels both nourishing and indulgent—exactly what I want after a long day. I’ve made it countless times and it never disappoints; it’s my go-to when I want dinner to taste like a warm hug. If you enjoy this, you might want to check out my recipes for orange chicken or mapo tofu for a little extra variety while keeping that comforting homemade vibe. Can’t wait to hear how your version turns out—drop a comment or share your tweaks! Happy cooking, friend.
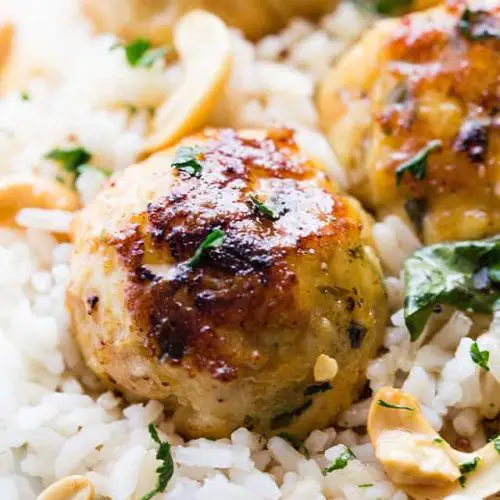
Cashew Chicken
Ingredients
Main Ingredients
- 2 tablespoons all purpose flour
- 1 tablespoon vegetable oil
- 1 pound ground chicken
- 0.5 cup plain panko crumbs
- to taste salt and pepper to taste
- 1 small onion finely diced
- 0.25 cup fresh basil chopped
- 0.25 cup fresh parsley chopped
- 0.33 cup cashews chopped
- 1 small orange zest only
- 0.5 cup cream cheese room temperature
- 0.25 cup brown sugar packed
- 0.25 cup white vinegar
- 0.25 cup water
Instructions
Preparation Steps
- Preheat oven to 400°F.
- Place the flour in a shallow dish and set aside.
- In a large mixing bowl, combine ground chicken, panko crumbs, salt, pepper, onion, basil, parsley, cashews, orange zest, and cream cheese.
- Mix until everything is thoroughly combined.
- In a skillet, heat the vegetable oil over medium heat until hot.
- Roll meat into 1-inch meatballs, place in flour, turn to lightly coat on all sides, and add to hot oil.
- Cook and turn for 2 minutes, or until meatballs are slightly browned on all sides.
- Transfer meatballs and hot oil to a 9 x 13 baking dish.
- Bake for 18 minutes, or until meatballs are cooked through.
- Prepare the sweet and sour sauce by combining brown sugar, white vinegar, and water in a skillet.
- Bring to a boil, whisk frequently, and continue to cook over medium-high heat for 4 minutes or until sauce is reduced by half.
- To serve, remove meatballs from oven and pour the prepared sauce over the meatballs.


