


Oh, banana bread. It’s one of those things that just feels like a warm hug, isn’t it? I swear, the scent of ripe bananas and cinnamon baking fills my kitchen with such pure comfort. This particular moist banana bread recipe is my absolute go-to, the one I’ve tinkered with over years and years until it was *just* right. You know, the kind of recipe that makes you feel like a baking superhero even if you’re just throwing things into a bowl? Yep, this is it. It’s the perfect answer when you’ve got those sad, overripe bananas staring you down, or when that 10 pm sweet craving hits and you *really* don’t want to start a whole elaborate cake. It’s so good, so incredibly moist, that my kids have been asking for it by name since they were tiny tots. Forget those dry, crumbly disappointments you might have encountered elsewhere; this is the real deal. It’s got that perfect balance of sweet, comforting banana flavor and a texture so tender, it practically melts in your mouth. If you’ve ever struggled to get your banana bread just right, stick with me, because this one’s a lifesaver.
What is Moist Banana Bread?
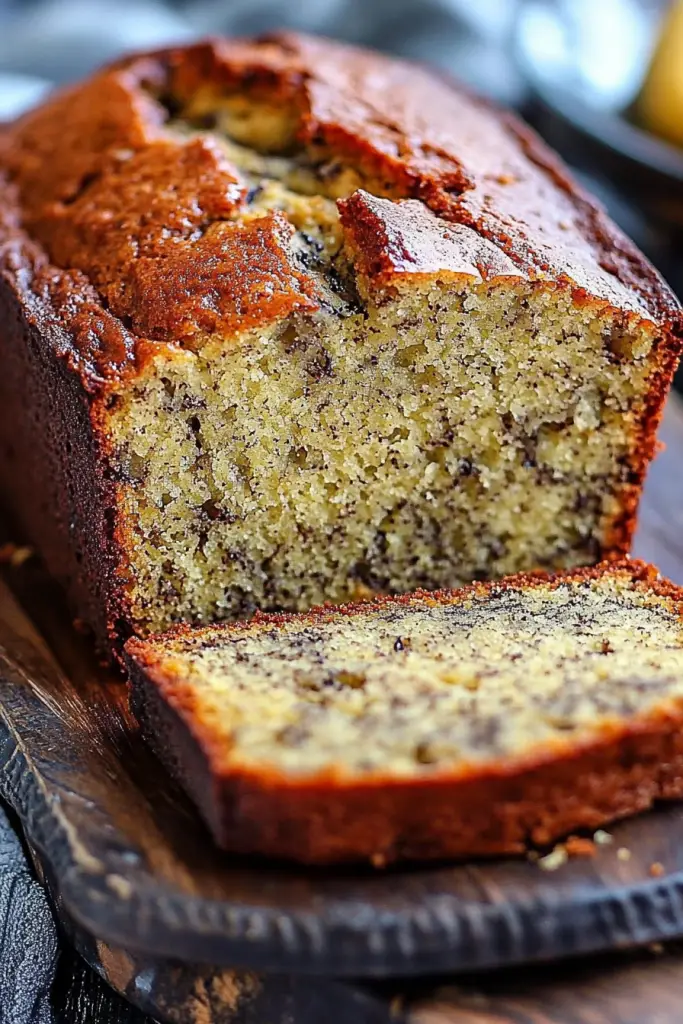
So, what exactly makes this “moist banana bread” so special? Think of it as the ultimate comfort baked good, elevated. It’s essentially a quick bread, meaning it uses chemical leaveners like baking soda and baking powder instead of yeast, which is why it’s so wonderfully simple and quick to whip up. The “moist” part? That comes from a few key players: super ripe bananas, of course, which bring natural sweetness and moisture, but also a smart combination of fats and liquids that ensure every bite is tender and never dry. It’s not a cake, though it’s certainly sweet enough to feel like a treat. It’s not a muffin, though it’s perfectly portionable for grab-and-go goodness. It’s just… Perfect banana bread. The kind that stays wonderfully soft for days (if it even lasts that long!). It’s the quintessential coffee-break companion, the breakfast star, and the afternoon pick-me-up all rolled into one.
Why you’ll love this recipe?
Honestly, I could gush about this recipe all day, but let me break down why I think you’re going to fall head over heels for it. First and foremost, the FLAVOR. It’s a symphony of sweet banana goodness, with hints of warm spice that just sing. It’s not overly sweet, which I appreciate, but it’s sweet enough to feel like a real indulgence. Then there’s the SIMPLICITY. I mean it when I say this is surprisingly easy. You don’t need any fancy equipment or complicated techniques. Just a few bowls, a whisk, and a spatula. It’s the kind of recipe that’s perfect for beginner bakers, but even seasoned pros will appreciate how foolproof it is. And let’s talk COST-EFFICIENCY! Bananas are usually pretty budget-friendly, and the other ingredients are pantry staples. This is a recipe that won’t break the bank, making it perfect for a regular treat. But what really sets this apart is its VERSATILITY. While it’s absolutely divine on its own, I love that it’s a fantastic base for add-ins. Chocolate chips? Obviously. Walnuts or pecans? Yes, please. A swirl of Cream Cheese or a simple glaze on top? It handles it all beautifully. I’ve made this countless times, and it never, ever fails to impress. It’s a recipe that brings smiles to faces and that’s what cooking is all about for me!
How do I make banana bread?
Quick Overview
This is your express lane to Banana Bread bliss. We’re talking about mashing those ripe bananas, whisking together some simple wet and dry ingredients, combining them gently, and then baking until golden and fragrant. The magic really happens in the ratios and the gentle mixing – it’s what guarantees that signature moist crumb. You’ll have a delicious, comforting loaf ready to impress in under an hour and a half, from start to finish, with minimal fuss.
Ingredients
For the Main Batter:
Ripe Bananas: You’ll need about 3 to 4 very ripe, mashed bananas. The spottier and softer, the better! They should almost be mush. This is non-negotiable for that intense banana flavor and essential moisture.
Unsalted Butter: 1/2 cup (1 stick), melted and slightly cooled. Using melted butter helps create a tender crumb and adds richness without the greasiness you can sometimes get with oil.
Granulated Sugar: 3/4 cup. You can adjust this slightly based on how sweet your bananas are and your personal preference. I find this amount perfect.
Eggs: 2 large eggs, at room temperature. Room temperature eggs incorporate better and help create a more even texture.
Vanilla Extract: 1 teaspoon. A good quality vanilla extract really boosts all the flavors.
All-Purpose Flour: 1 3/4 cups. I’ve tested this with a good quality all-purpose flour, and it works like a charm. Don’t pack it into the measuring cup!
Baking Soda: 1 teaspoon. This is crucial for the rise and tender texture. Make sure it’s fresh!
Salt: 1/2 teaspoon. Balances the sweetness and enhances the other flavors.
Ground Cinnamon: 1 teaspoon. This is my personal favorite spice to add. It just elevates the whole Banana Bread experience!
For Optional Add-ins (like chocolate chips or nuts): 1/2 cup. Totally optional, but if you love them, stir them in at the end!
For the Simple Glaze (Optional, but highly recommended!):
Powdered Sugar: 1 cup, sifted. Sifting prevents lumps and gives you a smooth glaze.
Milk or Cream: 1-2 tablespoons. Start with 1 tablespoon and add more, a teaspoon at a time, until you reach your desired drizzling consistency. Water works in a pinch too!
Vanilla Extract: 1/2 teaspoon. For that extra flavor boost.
Step-by-Step Instructions
Step 1: Preheat & Prep Pan
First things first, let’s get our oven ready. Preheat it to 350°F (175°C). While it’s warming up, grab a standard 9×5 inch loaf pan. Grease it generously with butter or non-stick spray, and then I like to dust it lightly with flour or a sprinkle of cocoa powder if I’m feeling fancy (especially if I’m adding chocolate chips!). This extra step is a lifesaver and ensures your beautiful loaf slides out perfectly every time. No one wants stuck banana bread!
Step 2: Mix Dry Ingredients
In a medium-sized bowl, whisk together your flour, baking soda, salt, and cinnamon. Give it a good whisking – not just a stir. This step is super important because it ensures all those leavening agents and spices are evenly distributed throughout the flour. This means no surprise pockets of baking soda or clumps of cinnamon in your finished loaf. You’re looking for a uniformly combined mixture.
Step 3: Mix Wet Ingredients
Now, in a larger bowl, add your beautifully mashed ripe bananas. Pour in the melted and slightly cooled butter, then add your granulated sugar, room temperature eggs, and vanilla extract. Whisk everything together until it’s well combined and fairly smooth. You’ll notice the mixture will start to look lovely and golden. Make sure there are no streaks of egg white floating around.
Step 4: Combine
This is where the magic of not overmixing comes in! Pour your dry ingredients into the bowl with your wet ingredients. Now, using a spatula or a wooden spoon, gently fold the ingredients together until *just* combined. Seriously, stop mixing as soon as you don’t see any dry streaks of flour. A few small lumps are perfectly okay! Overmixing develops the gluten in the flour, which can lead to a tough, dense bread, and we’re aiming for that melt-in-your-mouth moistness here.
Step 5: Prepare Filling (Optional Add-ins)
If you’re adding chocolate chips, nuts, or any other goodies, this is the time! Gently fold them into the batter now. Don’t go crazy stirring them in; just a few gentle folds to distribute them evenly. This step is where you can really personalize your banana bread. My kids love it with a generous handful of mini chocolate chips!
Step 6: Pour Batter into Pan
Spoon your batter evenly into the prepared loaf pan. You can smooth the top with your spatula if you like, or just leave it a little rustic. It will spread and bake beautifully either way. Make sure to scrape every last bit of that delicious batter out of the bowl – no waste here!
Step 7: Bake
Pop that pan into your preheated oven. Bake for 50-65 minutes. The exact time will depend on your oven, so start checking around the 50-minute mark. You’ll know it’s ready when a wooden skewer or toothpick inserted into the center comes out clean, or with just a few moist crumbs attached (but no wet batter). The top should be a beautiful golden brown and it should smell absolutely divine!
Step 8: Cool & Glaze
Once it’s out of the oven, let the banana bread cool in the pan for about 10-15 minutes. This allows it to set up a bit. Then, carefully invert it onto a wire rack to cool completely. If you’re adding the glaze, wait until the bread is mostly or completely cool before drizzling. For the glaze: whisk together the sifted powdered sugar, 1 tablespoon of milk/cream, and vanilla extract. Add more liquid, a teaspoon at a time, until it’s the consistency you want for drizzling. Drizzle generously over the top of your cooled bread.
Step 9: Slice & Serve
Once the glaze has set a little (or if you skipped it!), slice into thick, delicious pieces. This bread is fantastic warm, at room temperature, or even slightly chilled. I love serving it with a cup of coffee or a glass of milk. Enjoy every single moist, tender bite!
What to Serve It With
This moist banana bread is a star all on its own, but it also plays wonderfully with other flavors and for different occasions. For breakfast, it’s a dream alongside a steaming mug of coffee or a tall glass of cold milk. I love slicing it thick and just enjoying it as is to kickstart my day. For a more leisurely brunch, it elevates the whole spread. Imagine it nestled on a platter with fresh fruit, maybe some yogurt parfaits, or even alongside a savory quiche. It’s that perfect sweet counterpoint. As a dessert, it’s pure comfort. Serve a warm slice with a scoop of vanilla bean ice cream, or a dollop of whipped cream and a sprinkle of toasted nuts. It’s surprisingly decadent for how simple it is! And for those cozy snack moments? Oh, this is it. I often toast a slice lightly and spread it with a bit of butter or even some cream cheese. It’s my go-to when I need a little something sweet after dinner but don’t want to commit to a whole dessert. My family loves it dunked in hot chocolate on a chilly afternoon. It really is that versatile!
Top Tips for Perfecting Your Moist Banana Bread
Over the years, I’ve picked up a few tricks that I think really make a difference in getting this moist banana bread recipe just right. First, Zucchini Prep (wait, what? Oh, you mean BANANA prep!). My biggest tip for bananas is to use the ripest you can find. Seriously, don’t shy away from those black, mushy ones! They are packed with sugar and moisture, which is exactly what we need. Mash them really well with a fork; I like to leave a few small chunks for texture. For mixing, remember my mantra: DON’T OVERMIX. This is probably the single most important tip. Once the dry ingredients meet the wet, mix only until they’re *just* combined. A few streaks of flour are better than a tough loaf. You’re building tenderness, not developing gluten structure like you would for a yeast bread. When it comes to adding things like chocolate chips or nuts, gentle folding is key. You don’t want to break them up or overwork the batter. Baking tips are crucial too. Always preheat your oven thoroughly. I also find that placing the loaf pan in the center of the oven ensures even baking. If your oven tends to run hot, you might want to tent it loosely with foil during the last 15-20 minutes of baking to prevent the top from getting too dark before the inside is cooked. For glaze variations, don’t be afraid to experiment! A little sprinkle of cinnamon in the powdered sugar glaze, a hint of lemon zest, or even a swirl of melted chocolate on top can totally change the vibe. And if you find your bananas aren’t quite ripe enough, a quick trick is to pop them on a baking sheet and bake them in their skins at 300°F (150°C) for about 15-20 minutes until they’re soft and fragrant. Trust me, it works wonders!
Storing and Reheating Tips
Proper storage is key to keeping this moist banana bread heavenly for days. At room temperature, if it’s well-wrapped (in plastic wrap or an airtight container), it should stay lovely for about 2-3 days. However, in my house, it usually disappears much faster than that! If you need it to last longer, or if your kitchen is particularly warm, refrigerator storage is your best bet. Wrap it tightly in plastic wrap, then place it in an airtight container. It will keep well in the fridge for up to a week, though I find the texture is best within the first 4-5 days. When you’re ready to enjoy a slice from the fridge, you can eat it cold, or I highly recommend warming it up gently. For freezer instructions, this bread freezes beautifully! Wrap the entire cooled loaf (or individual slices) very tightly in a layer of plastic wrap, then add a layer of aluminum foil or a freezer-safe bag. It can be stored in the freezer for up to 3 months. To thaw, simply unwrap and let it come to room temperature on the counter. If you’ve glazed it, I usually wait to add the glaze *after* thawing and reheating, as the glaze can sometimes get a little sticky or melt in the freezer. For reheating, a quick zap in the microwave (15-20 seconds per slice) is usually enough to bring back that fresh-baked warmth. You can also pop slices in a toaster oven at a low temperature for a few minutes. It really brings out that delicious, moist texture.
Frequently Asked Questions
Final Thoughts
So there you have it – my absolute favorite moist banana bread recipe. I truly believe this is the kind of recipe that makes you feel good about baking. It’s forgiving, incredibly rewarding, and the results are just consistently delicious. It’s the perfect example of how simple ingredients, treated with a little care, can create something truly special. It’s more than just a recipe to me; it’s memories of sharing with family, comforting myself on a rainy day, and the sheer joy of pulling a perfect, golden loaf out of the oven. If you’re looking for a reliable, crowd-pleasing banana bread that delivers on moisture and flavor every single time, give this one a whirl. I’m so excited for you to try it and hope it becomes a beloved staple in your kitchen too! If you give it a go, please let me know how it turns out in the comments below – I’d love to hear about your variations and favorite ways to enjoy it. Happy baking!
Moist Banana Bread Recipe
Ingredients
Main Ingredients
- 2 medium ripe bananas (brown spotted)
- 2 cups all-purpose flour spooned and leveled
- 0.5 teaspoon salt
- 1 teaspoon baking soda
- 1 cup granulated sugar plus more for the pan
- 0.5 cup unsalted butter softened (plus more for the pan)
- 2 large eggs
- 7 tablespoons milk (see note)
- 1 teaspoon vinegar or lemon juice (see note)
Instructions
Preparation Steps
- Preheat oven to 375°F. Grease a 9x5x3” loaf pan with butter and coat it with sugar. (You do this like you would grease and flour a pan. Grease it first, then add about 2 tablespoons sugar to the pan and move the pan side to side until the bottom and sides are coated with sugar. Do NOT substitute cooking spray for the butter. You can skip the sugaring and just use cooking spray, if you wish.)
- Mash bananas in a small bowl with a potato masher or fork and set aside.
- Whisk flour, baking soda, and salt in a medium bowl. Set aside.
- Cream butter and sugar with a hand mixer or stand mixer in a large bowl. Add bananas and eggs to the butter mixture and mix until somewhat combined (mixture will be chunky).
- Add the flour mixture, milk, and vinegar to the banana mixture and mix until combined (mixture will be slightly lumpy). Pour into prepared pan.
- Bake for 50-60 minutes until a toothpick comes out with just a few crumbs. The edges will be a dark brown and there will be a nice crack down the center.
- Cool completely before removing loaf from pan, but you can cut slices from the pan after it’s cooled for about 15-20 minutes.


