


Oh my goodness, you guys. I’m practically buzzing with excitement to share this recipe with you today. It’s one of those gems that feels like a secret whispered down through generations, even though I’m pretty sure I invented it myself one Tuesday afternoon when a serious craving for something sweet hit hard. You know those days, right? The ones where you desperately want a treat but the thought of pulling out all the baking supplies feels like climbing Mount Everest? Yeah, this apple snack is your knight in shining armor. It’s like a warm hug in food form, with tender apples, a hint of cinnamon, and a crumbly, buttery topping that just melts in your mouth. It’s so much better than those pre-packaged granola bars that taste like cardboard and disappointment, and honestly, it’s way easier than baking a whole pie. This is my go-to when I need a little pick-me-up, and my kids? They’d eat the whole pan if I let them!
What are Apple Snack Bars?
So, what exactly *are* these magical little bars? Think of them as the ultimate hybrid between a crumb cake and a perfectly baked apple crisp, all conveniently portioned into easy-to-grab bars. The name itself, “apple snack,” really captures it – it’s the perfect bite for when you need something satisfying between meals, or even as a light dessert. The “snack” part means it’s not overly fussy, and the “apple” is, of course, the star of the show. We’re talking about tender, slightly tart apples nestled in a comforting, spiced base, all crowned with a buttery, streusel-like topping. It’s the kind of thing that transports you back to cozy autumn days, even if it’s the middle of summer. It’s uncomplicated, wholesome, and delivers maximum flavor with minimal fuss. It’s essentially happiness in bar form, and who wouldn’t want a piece of that?
Why you’ll love this recipe?
There are so many reasons why I’m completely obsessed with these apple Snack Bars, and I just know you will be too! First off, let’s talk about the flavor explosion. You get the comforting warmth of cinnamon and nutmeg, perfectly balanced with the slight tartness of the apples. The texture is divine – a tender, moist base with that irresistible crunchy, crumbly topping. It’s a symphony for your taste buds! And the simplicity? Oh my goodness, it’s a lifesaver on busy weeknights. You can whip these up in under 30 minutes of active time, and most of the ingredients are probably already in your pantry. Plus, they’re incredibly budget-friendly. Using everyday apples and basic baking staples makes this a treat that doesn’t break the bank. What I love most is how versatile they are. They’re fantastic warm, but they’re also delicious at room temperature, making them perfect for packed lunches or picnics. They’re not as rich as a full-blown cake, but they satisfy that sweet craving beautifully. They’re a step up from a simple sliced apple, but nowhere near the commitment of a pie. This recipe hits that sweet spot perfectly, and I find myself reaching for it again and again. It’s a true crowd-pleaser that always gets rave reviews!
How do I make Apple Snack Bars?
Quick Overview
This recipe is gloriously straightforward. You’ll mix a simple batter, layer it with spiced apples, top it with a quick crumble, and bake until golden and bubbly. It’s designed to be forgiving, so don’t stress if your swirling isn’t perfect or your apples aren’t uniformly sliced. The beauty is in its rustic charm and incredible taste. The whole process, from start to finish, usually takes about an hour, but most of that is hands-off baking time. It’s the perfect example of how simple ingredients can create something truly spectacular.
Ingredients
For the Main Batter:
You’ll need all-purpose flour for structure, a bit of baking soda and baking powder for lift, and salt to balance the sweetness. I like to use granulated sugar for the base, but you could easily swap in some Brown Sugar for an extra layer of caramel-like depth. And the fat? Unsalted butter is my absolute favorite here because it gives the best flavor and texture, but melted coconut oil works in a pinch if you want to keep it dairy-free.
For the Filling:
The star, of course, is apples! I usually reach for a mix of Granny Smith for their tartness and Fuji or Honeycrisp for their sweetness and firm texture. You’ll want about 4-5 medium apples, peeled, cored, and diced or thinly sliced. A squeeze of lemon juice will keep them from browning and add a lovely brightness. And don’t forget the cinnamon and a pinch of nutmeg – they’re crucial for that cozy apple pie vibe!
For the Glaze:
This is optional but highly recommended! It’s just a simple mix of powdered sugar, a splash of milk (or APPLE CIDER for extra flavor!), and a tiny bit of vanilla extract. You can adjust the milk to get your desired drizzling consistency. It adds a beautiful sweet finish that just elevates the whole bar.
Step-by-Step Instructions
Step 1: Preheat & Prep Pan
First things first, let’s get that oven preheated to 350°F (175°C). While it’s heating up, grab an 8×8 or 9×9 inch baking pan. I always line mine with parchment paper, leaving a little overhang on the sides. This is my secret weapon for easy removal – no sticking, no struggling, just lift it right out! Grease the parchment paper and the exposed edges of the pan lightly with butter or cooking spray.
Step 2: Mix Dry Ingredients
In a medium bowl, whisk together your flour, baking soda, baking powder, and salt. This ensures everything is evenly distributed, which is super important for a consistent rise and flavor. No one wants a bite that’s too salty or too flat, right? Give it a good whisk until it looks like one uniform mixture.
Step 3: Mix Wet Ingredients
In a separate, larger bowl, cream together your softened unsalted butter and granulated sugar until light and fluffy. This is where you get that lovely tender texture in the base. Then, beat in your eggs, one at a time, making sure each one is fully incorporated before adding the next. Stir in your vanilla extract. If you’re using a dairy-free option like coconut oil, just make sure it’s melted and cooled slightly before proceeding.
Step 4: Combine
Now, it’s time to bring it all together! Gradually add the dry ingredients to the wet ingredients, mixing on low speed or by hand just until combined. Be careful not to overmix here! Overmixing develops the gluten in the flour, which can lead to tough bars. A few streaks of flour are okay; they’ll disappear during baking. The batter should be thick but pourable.
Step 5: Prepare Filling
While the batter is resting (or while you’re mixing), get your apples ready. Toss your peeled, cored, and diced or sliced apples in a bowl with the lemon juice, cinnamon, and nutmeg. This step not only adds flavor but also ensures the apples are evenly coated and won’t oxidize. I usually dice mine into about 1/2-inch pieces so they bake up nice and tender but still hold their shape.
Step 6: Layer & Swirl
Spread about two-thirds of the batter evenly into your prepared baking pan. Don’t worry about making it perfectly smooth; just get it distributed. Now, arrange your spiced apple mixture evenly over the batter. Dollop the remaining batter over the apples. Here’s where the fun part comes in: use a knife or a skewer to gently swirl the top layer of batter and apples together. This creates those beautiful pockets of apple goodness throughout the bars. Don’t go too deep, just a gentle swirl for a marbled effect.
Step 7: Bake
Pop the pan into your preheated oven and bake for about 30-40 minutes, or until a toothpick inserted into the center comes out clean or with moist crumbs (no wet batter!). The edges should be golden brown and the top should look beautifully baked. Oven temperatures can vary, so start checking around the 30-minute mark. If the top is browning too quickly, you can always tent it loosely with foil.
Step 8: Cool & Glaze
Once baked, carefully remove the pan from the oven and let it cool in the pan on a wire rack for at least 15-20 minutes. This allows the bars to set up properly. While they’re cooling, whisk together the powdered sugar, milk, and vanilla for the glaze. Once the bars are slightly cooled but still warm, drizzle the glaze over the top. If you prefer them without glaze, you can skip this step entirely – they’re still delicious!
Step 9: Slice & Serve
Once the glaze has set a bit, use the parchment paper overhang to lift the entire slab out of the pan and onto a cutting board. Let them cool completely before slicing for the neatest cuts, or enjoy them warm for a gooey, comforting treat. I usually cut mine into 9 or 12 bars, depending on how big I want them. They slice beautifully and make for perfect grab-and-go portions.
What to Serve It With
These apple snack bars are so versatile, they can fit into almost any meal or occasion! For breakfast, they’re a fantastic alternative to a pastry. Pair them with a strong cup of coffee or a glass of cold milk for a satisfying start to your day. The spices in the bar just meld beautifully with the aroma of coffee. For a relaxed weekend brunch, serve them warm with a dollop of Greek yogurt or a side of fresh berries. They add a lovely homemade touch to any brunch spread. As a dessert, they’re simply divine. Serve them à la mode with a scoop of vanilla bean ice cream, or with a drizzle of caramel sauce for an extra decadent treat. The warm spices and tender apples are heavenly after a hearty meal. And for those cozy snack times? They are pure comfort. I love to just have one with a cup of herbal tea in the afternoon, or even as a late-night treat when I’m craving something sweet but don’t want to bake. My family tradition is to have one after school with a glass of milk – it’s a little moment of calm in a busy day.
Top Tips for Perfecting Your Apple Snack Bars
I’ve made these bars more times than I can count, and I’ve picked up a few tricks along the way that I just have to share! For the apples, make sure you choose ones that hold their shape well when baked; softer apples can turn mushy. Granny Smiths are a great base for their tartness, but mixing in a sweeter apple like Honeycrisp or Gala gives a lovely complex flavor. Don’t skip the lemon juice on the apples; it prevents browning and adds a pop of brightness that cuts through the sweetness. When it comes to mixing the batter, resist the urge to overmix once you add the flour. Just mix until *barely* combined. A few little lumps are perfectly fine and will actually make for a more tender bar. Overmixing develops gluten, which can make them tough. For the swirl, don’t overthink it! A few random strokes with a knife are all you need to create a pretty marbled effect. The most important part is getting that delicious apple filling distributed throughout. Baking time can be tricky because ovens vary. I always rely on the toothpick test, but keep an eye on the color too; you want a nice golden brown. If the top starts to get too dark before the inside is cooked, tent it loosely with foil. If you’re feeling adventurous with the glaze, try adding a tiny bit of cinnamon or even a touch of maple syrup for a different flavor profile. And for a real treat, sprinkle some chopped walnuts or pecans over the batter before baking for added crunch!
Storing and Reheating Tips
These apple snack bars are wonderfully forgiving when it comes to storage. If you find yourself with any leftovers (which is rare in my house!), you can store them at room temperature for up to 2 days, as long as they’re covered tightly in an airtight container or a plate with plastic wrap. This works best if you haven’t added the glaze, or if the glaze has fully set. If you’ve glazed them and want to store them at room temperature, I’d wait until the glaze is completely firm. For longer storage, tuck them away in the refrigerator. They’ll stay fresh and delicious for up to 5 days. Make sure to use an airtight container or wrap them well to prevent them from drying out. When you’re ready to enjoy them from the fridge, you can eat them cold, or give them a quick warm-up. I love to pop a slice in the microwave for about 10-15 seconds, just until it’s slightly warmed through and that lovely apple-cinnamon aroma fills the air again. For freezing, these bars hold up exceptionally well! I usually cut them into individual portions and wrap each one tightly in plastic wrap, then pop them into a freezer-safe bag or container. They can stay frozen for up to 3 months. To thaw, simply take a bar out of the freezer and let it thaw at room temperature for an hour or two, or gently reheat it in the microwave or oven.
Frequently Asked Questions
Final Thoughts
Honestly, I could talk about these apple snack bars all day! They’re the perfect example of how simple, wholesome ingredients can come together to create something truly comforting and delicious. They’re my go-to for a reason – they’re easy enough for a weeknight, special enough for company, and always, always satisfying. If you love apple desserts but want something a little less fuss than a full pie or cake, this is your recipe. It’s that perfect balance of sweet, spiced, and tender that just makes you feel good. I really hope you give these a try, and I can’t wait to hear what you think! If you make them, please leave a comment below and let me know how they turned out, or share any fun variations you come up with. Happy baking, and enjoy every single delicious bite!
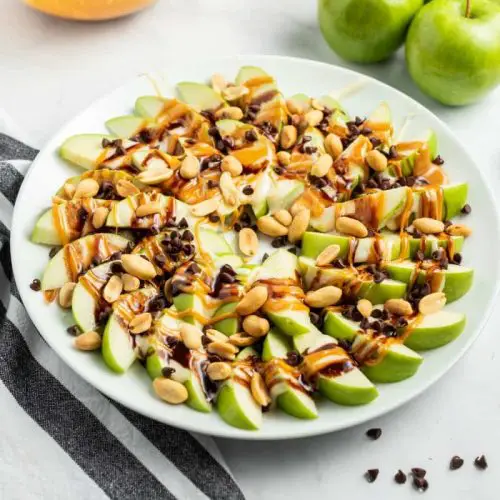
Apple Nachos
Ingredients
Main Ingredients
- 4 large Granny Smith apples sliced
- 35 large marshmallows
- 0.25 cup butter
- 35 caramels unwrapped
- 1 Tablespoon evaporated milk or half and half
- 0.25 cup peanuts
- 0.25 cup mini semi-sweet morsels
- 2 Tablespoons chocolate syrup
Instructions
Preparation Steps
- Slice apples and arrange on platter.
- In saucepan, melt marshmallows and butter until creamy. Set aside.
- In microwave dish, melt caramels with milk (cooking in 30 second intervals, and stirring). Set aside.
- Pour marshmallow cream over apple slices, followed by caramel sauce. Drizzle chocolate syrup and sprinkle with peanuts and mini chocolate morsels. Serve immediately and enjoy!


