


I still remember the first time I whispered “just one” and the whole pan vanished in minutes. It was a Saturday afternoon, the kitchen smelled like a warm blanket of cocoa and peanuts, and my younger self knew I’d found a new favorite. These Chocolate Peanut Butter treats are the kind of thing you whip up on a busy weeknight and somehow taste like a little victory. They’re not fussy, they don’t require fancy equipment, and they come together with ingredients you likely have on hand. It’s funny how something so simple can feel like a hug in edible form. I’ll be honest: this is a recipe my family circles back to again and again—my kids ask for seconds, my partner asks if there’ll be leftovers, and I tell them, “Trust me on this one, the glaze makes all the difference.” If you’ve ever craved that perfect balance of chocolate richness with peanut butter creaminess, you’ve found your new go-to. This version is a little nostalgic, a little playful, and completely crave-worthy—perfect for sharing after dinner or stashing in the fridge for a late-night chocolate fix. And yes, it’s what I reach for when I’m thinking, “I need something sweet but I don’t want to bake.”
What is chocolate peanut butter?
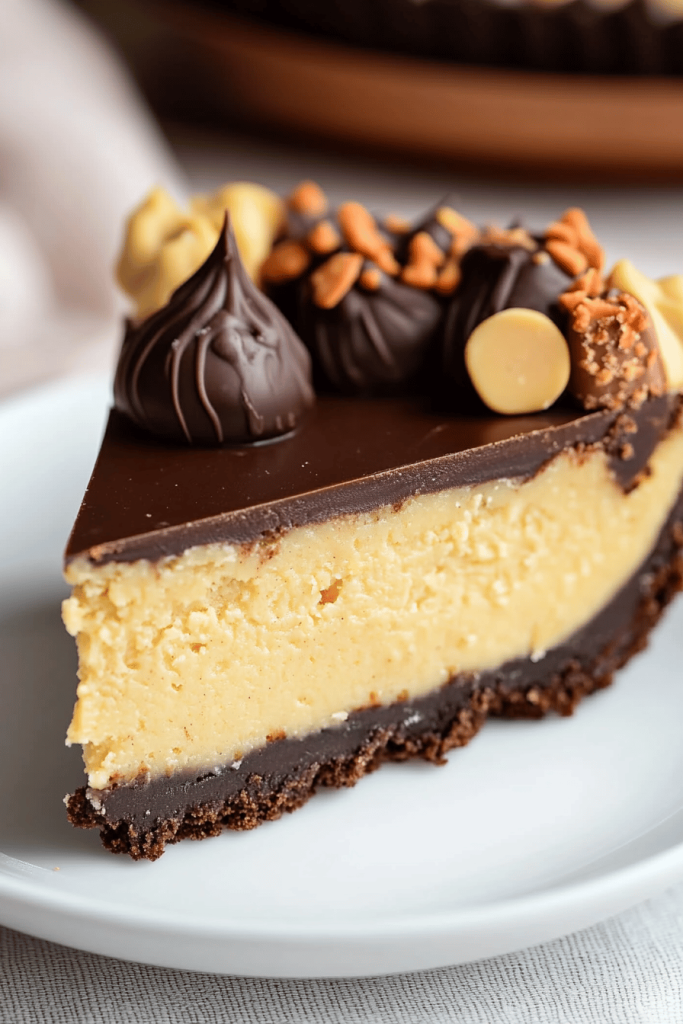
Think of Chocolate Peanut Butter treats as no-bake, bite-sized bars with a peanut butter core and a glossy chocolate blanket. It’s essentially a two-layer love story: a chewy, oat-forward center that delivers that peanut butter kiss, and a smooth, glossy chocolate glaze on top that crackles faintly when you bite in. The name is pretty literal, but the concept is flexible: you can press the base into a pan and cut into squares, or roll the mixture into little balls and dip them in chocolate. They’re the kind of dessert that sounds elaborate but is secretly simple. I love how you can customize sweetness, add a pinch of flaky salt, or toss in a handful of chopped nuts for crunch. It’s chocolate peanut butter treats at their most honest—humble ingredients, big personality, and a crowd-pleasing finish. It’s basically my shortcut to joy, wrapped up in parchment and melted chocolate.
Why you’ll love this recipe?
What I love most about this recipe is the way it feels almost serendipitous: you stir a few pantry staples together, wait for the magic to set in the fridge, and suddenly there are bite-sized indulgences that taste like a little celebration. This isn’t a complicated bake; it’s a friendly, family-friendly project that you can finish in an evening with a movie or a game night. The flavor is unmistakable—rich cocoa, Creamy Peanut Butter, a touch of vanilla, and a subtle sweetness that never veers into cloying territory. The texture is a swoosh between fudgy and chewy, with a soft, melt-in-your-mouth finish that makes you reach for another piece without thinking. And yes, it’s budget-friendly: you’re likely using staples you already have, which means this is a lifesaver on busy nights. It’s endlessly versatile, too—swap in chocolate chips with a whisper of coconut oil for a glossy top, or shower the top with flaky sea salt for a quick contrast that makes the flavors pop. My kids’ favorite part is how the topping sets in a gleaming sheen that looks like a little chocolate jewelry box sitting on the plate. If you’ve got a sweet tooth but want something that’s easy to pull off, these chocolate peanut butter treats are your new best friend.
How do I make chocolate peanut butter treat?
Quick Overview
This method is all about speed, ease, and that satisfying cool-set finish. You’ll whisk together a cozy, oat-based base with Peanut Butter and a touch of honey, press it into a lined pan, then swirl in a generous layer of melted chocolate. It’s layered without fuss, and the fridge does the hard part—setting the batch so you can slice or scoop cleanly. What makes this approach special is the balance: a sturdy base that holds its shape, a creamy middle, and a glossy top that gives you that chocolate-peanut-butter wow without needing a professional setup. It’s a crowd-pleaser that keeps well in the fridge and travels nicely for potlucks or quick dessert plates.
Ingredients
For the Main Batter:
- 2 cups old-fashioned rolled oats, lightly toasted for extra depth
- 1 cup creamy Peanut Butter, or natural peanut butter if you prefer an oilier texture
- 1/2 cup honey or maple syrup for a touch of natural sweetness
- 1 teaspoon vanilla extract
- 1/4 teaspoon fine salt
- Optional: 1/2 cup chopped roasted peanuts for extra crunch
For the Filling:
- 1/2 cup creamy peanut butter (for a more pronounced center, reserve this separate from the main batter)
- 1–2 tablespoons powdered sugar (adjust to sweetness) or a dash of maple syrup
- Pinch of salt
For the Glaze:
- 1 1/2 cups semi-sweet or dark chocolate chips
- 1 tablespoon coconut oil or light cream to thin and shine the glaze
- Pinch of flaky sea salt (optional)
Step-by-Step Instructions
Step 1: Preheat & Prep Pan
Heat your oven to 350°F (180°C) even though we’re not baking a cake; you’ll still want to toast the oats briefly for that toasty depth. Line a 9×9-inch pan with parchment, leaving overhang on the sides so you can lift the bars out cleanly later. If you’d rather use a muffin tin for bite-size portions, that works, too. I always appreciate parchment because it makes clean slices a breeze and saves me from wrestling with sticky edges. This step is simple but the little prep gesture saves you from a messy finish, and trust me on this one—it’s worth it.
Step 2: Mix Dry Ingredients
In a large bowl, stir the toasted oats with a pinch of salt. If you’re using roasted peanuts for crunch, fold them in now for a toasty touch that plays nicely with the peanut butter layer. The goal here is to distribute salt and texture evenly so every bite has a little surprise of crunch and a lot of flavor.
Step 3: Mix Wet Ingredients
In a small pot over low heat, combine peanut butter and honey until smooth and glistening. If your peanut butter is a touch thick, warm it gently so it blends into the oats without lumps. Stir in the vanilla extract. This is the aroma moment—the way the peanut butter and vanilla lift the room as they mingle with the honey. You’ll notice a comforting, almost nostalgic scent that makes you smile before you even taste it.
Step 4: Combine
Pour the wet mixture over the dry ingredients and stir gently until everything is well coated. If it feels a touch dry, add a teaspoon or two of water or a splash of milk (dairy or non-dairy) to bring it together. You want a cohesive, moldable mixture that holds its shape when you press it into the pan, but isn’t so sticky that it sticks to your hands or the parchment.
Step 5: Prepare Filling
In a small bowl, whisk together the extra peanut butter, powdered sugar, and a pinch of salt. This will become the creamy center you’ll press into the chocolatey blanket later. If your family loves extra peanut butter, you can increase this filling by a few tablespoons; just keep in mind sweetness balance. I find a slightly sweet center works wonderfully with the darker chocolate topping, but you can tailor it to your taste.
Step 6: Layer & Swirl
Press half of the main batter evenly into the lined pan to form a base. It should be compact but not dense; use the back of a spoon or your fingers wrapped in parchment to achieve a smooth surface. Dollop the peanut butter filling across the center and gently press the remaining batter over the top to seal the center. If you’re feeling fancy, swirl with a knife to create ribbons that will peek through the chocolate layer later. This is where the magic happens—the marbling makes each bite feel artisanal, even though it’s a simple no-bake technique.
Step 7: Bake
Here’s the twist: you don’t actually need to bake these. If you’re in a hurry, you can bake the base for about 8 minutes just to set. More often, I skip the oven entirely and pop the pan straight into the fridge or freezer to set. If you choose to bake, keep an eye on the edges—you want the base to firm up but not brown. If you don’t bake, just chill the assembled base for at least 1 hour so it holds its shape when you slice. Either way, you’ll have a sturdy foundation that gives you that satisfying bite when you cut into the rectangle or spoon out a neat square.
Step 8: Cool & Glaze
While the base chills, melt your chocolate with the coconut oil until the mixture looks glossy and smooth. This is the moment the kitchen truly feels like you’ve got your act together—the chocolate will gleam in the light and smell like a candy shop. Pour the warm glaze over the set base and tilt the pan to create a thin, even coat. If you love a little sparkle, you can sprinkle a pinch of flaky salt across the top while the glaze is still soft. Let the chocolate set completely in the fridge; patience here yields a neat, snap-worthy finish. If you’re short on time, a quick 15-minute chill will do, though overnight is ideal for the cleanest slices.
Step 9: Slice & Serve
Lift the slab out of the pan using the parchment overhang, then place it on a cutting board. Slice into squares or bars to your preferred size. The first bite should reveal that fudgy center with a crisp chocolate veneer. My tip: wipe the knife between cuts for the cleanest edges. If you’re serving these for a party, arrange them on a pretty tray and drizzle with a tiny extra swirl of chocolate or a sprinkle of chopped peanuts for color and crunch. The chocolate peanut butter treats look as good as they taste, and they disappear quickly—usually before I’ve even finished taking a photo.
What to Serve It With
These chocolate peanut butter treats shine in multiple ways, so think about the moment you’re serving them and pick a vibe that fits the occasion.
For Breakfast: Pair a small square with a bold cup of coffee or a creamy latte. The chocolate peanut butter bite adds a hint of indulgence to a busy morning, and if you’re making them in advance, they’re a comforting holdover for those mornings when you’re sprinting out the door. I like placing a few squares on a small dessert plate with a dollop of yogurt and berries—instant brunch vibes.
For Brunch: Set out a platter with a variety of bite-sized treats, including these chocolate peanut butter treats, a few almond biscotti, and a platter of fresh fruit. A light cappuccino or chai on the side helps balance the cocoa richness, and the glossy tops catch the eye, inviting guests to pick one up and smile.
As Dessert: This is where they truly shine. Serve with a scoop of vanilla ice cream or a few fresh strawberries for color and brightness. The contrast of cold vanilla with a warm, fudgy center makes the chocolate pop, and the peanut butter turns every bite into a memory you’ll want to relive with friends and family. They also travel well to potlucks or gatherings, making you the hero who brought something both elegant and easy.
For Cozy Snacks: There’s something about a quiet evening and a small plate of chocolate peanut butter treats that feels like a tiny celebration. They’re perfect for movie nights, study sessions, or a much-needed post-dinner moment of calm. When you’re entertaining yourself, this is the kind of snack you can prepare in advance and forget about until you’re ready to share.
These treats have become part of our little family ritual—the kind of thing that shows up on a calendar the moment you need a little comfort. They pair so nicely with a mug of something warm, and they travel well for weekend getaways. The best part? They don’t demand perfection; they invite you to improvise while staying true to a familiar, comforting flavor profile.
Top Tips for Perfecting Your Chocolate Peanut Butter Treats
Here are a few things I’ve learned from making these countless times. Small adjustments can make a big difference in texture and flavor, so don’t be afraid to tailor them to your kitchen and your tastebuds.
For the Main Batter: Keep the oats slightly toasted to boost nutty flavor. If you prefer a smoother texture, pulse the oats in a processor briefly to break them down a bit. If you’re using crunchy peanut butter, you’ll get extra texture in every bite; if you use creamy, you’ll have a silkier bite. I’ve done both and loved the results. Balance sweetness with the honey or maple syrup to taste, because some peanut butters are sweeter than others. A pinch more salt can wake up the chocolate edge and keep the finish from tasting flat.
Mixing Advice: Don’t overwork the batter; you want it cohesive but not gluey. If it’s sticking to your hands, scrape the bowl and add a tablespoon of oats at a time until it just comes together. This prevents you from over-compacting the mixture, which would make the bars dense rather than tender.
Swirl Customization: If you love visual appeal, try a marble swirl by dolloping a portion of the glaze in spots before covering completely. You can also tint a small portion of the glaze with a drop of food coloring or cocoa powder for a striped effect, or sprinkle crushed peanuts for a crunchy edge. It’s these little details that make the plate feel homemade and special.
Ingredient Swaps: If you’re out of rolled oats, quick oats work in a pinch, but they’ll be a touch softer. You can swap in almond butter for peanut butter if you have a nut allergy alternative or simply want a different flavor note. If you love chocolate, add a tablespoon of cocoa powder to the glaze for extra depth. For dietary tweaks, use a dairy-free chocolate and a coconut oil substitute to maintain shine and snap.
Baking Tips: If you decide to bake the base, keep the temperature modest and watch for golden edges. The goal is a sturdy base that holds together when you lift and slice. If you’re not baking, the chill time becomes your best friend—plan for at least an hour, ideally two, so the layers set cleanly and you can slice neatly.
Glaze Variations: For different flavor profiles, swap in milk chocolate or white chocolate to create a new twist on the same idea. A pinch of espresso powder in the glaze amplifies chocolate depth, and a light dusting of chili powder can surprise the palate with a subtle heat that works beautifully with peanut butter. If you’re serving these to kids, keep the glaze simple and sweet, with the classic dark chocolate option as the standard.
Learning to make these chocolate peanut butter treats is less about chasing perfection and more about embracing the cozy ritual—the way the kitchen fills with that familiar, comforting aroma, the way the glaze gleams as it cools, and the sense of satisfaction when you cut the first neat square. It’s a tiny celebration in every bite, and it has become a dependable go-to in my home, especially on nights when I’ve had a long day but still want to offer something thoughtful and delicious. Trust me, once you start, you’ll find yourself making them for friends, colleagues, and whoever stops by with a craving for a little indulgence.
Storing and Reheating Tips
Storing these chocolate peanut butter treats is simple, and they’re forgiving, which makes them perfect for busy weeks.
Room Temperature: They hold their shape for about 2 days in a sealed container on the counter, though I’ve found they’re best within the first 24 hours when you want the center to stay slightly creamy. Keep them away from direct sunlight so the glaze doesn’t melt and lose its glossy finish.
Refrigerator Storage: In the fridge, they’ll stay fresh for up to 2 weeks in an airtight container. The chill will firm the center more, so if you prefer a softer bite, refrigerate for shorter periods or only briefly chill before serving. A quick rest at room temperature for 10–15 minutes before serving helps the chocolate glaze regain that glossy snap.
Freezer Instructions: For longer storage, you can freeze these in a single layer on a parchment-lined tray, then transfer to a freezer-safe bag. They’ll keep for up to 3 months. Thaw in the fridge or at room temperature, then let them come to room temp before enjoying for a better texture and flavor release.
Glaze Timing Advice: If you’re freezing, add the glaze after thawing to preserve the glossy finish. If you glaze ahead of freezing, the surface can dull slightly as it comes back to room temperature. My workaround is to glaze once, then chill until set, and only drizzle a little extra glaze right before serving if you want a fresh shine.
These tips have kept this treat consistently delicious for years. If you’re testing, keep a small batch in the fridge and a tray in the freezer to compare textures—you’ll notice the differences in how the chocolate behaves and how the center holds up after a few days. The key is to keep it simple and give the ingredients space to shine without drowning them in too much extra sauce or sugar. The result is a dependable, crowd-pleasing treat that tastes like a hug—perfect for sharing or savoring solo when the day needs a little sweetness.
Frequently Asked Questions
Final Thoughts
These chocolate peanut butter treats are a little tradition in our house, a recipe that travels from my early days of kitchen experiments to present-day weeknight comfort. They’re forgiving, flexible, and incredibly forgiving for cooks of all levels. I’ve watched friends pull them from the fridge with a sigh of relief, the way a good snack can calm a tired evening, and that moment—the quiet joy of sharing something homemade—always reminds me why I love cooking so much. If you’re new to no-bake treats, you’ll be surprised at how uncomplicated this is: a handful of pantry staples, a splash of vanilla, a glossy top, and a little patience in the fridge. For those who’ve been making memories in the kitchen for years, I hope these chocolate peanut butter treats become another favorite you reach for when you need a comforting, chocolatey boost. I’d love to hear how yours turn out—whether you stick to the classic approach or add your own twist. Happy baking—and may your kitchen be filled with the kind of laughter that makes the last slice disappear in a heartbeat.
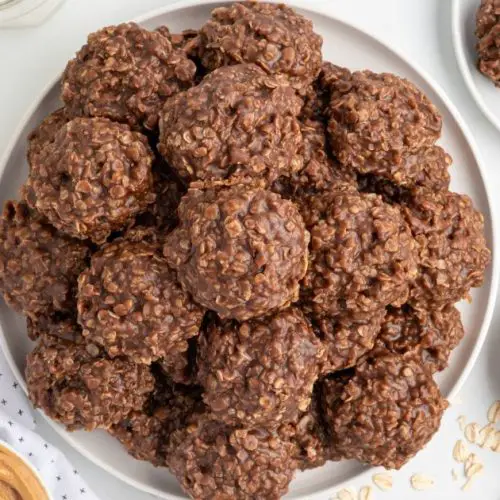
chocolate peanut butter treats
Ingredients
Main Ingredients
- 1 stick butter
- 1.67 cups sugar
- 0.5 cup milk
- 0.25 cup cocoa
- 1 cup peanut butter
- 2 tsp vanilla
- 3 cups quick cook oats
- 0.25 tsp salt
Instructions
Preparation Steps
- In a large bowl stir together oats and salt. Set aside.
- In a small saucepan, over medium high heat, whisk together butter, sugar, milk, and cocoa.
- Bring the mixture to a boil for about a minute and then remove from heat.
- Whisk in peanut butter and vanilla until well combined.
- Pour chocolate peanut butter mixture over oats and stir until combined.
- Line a baking sheet with wax paper. Drop cookies onto the wax paper using a medium cookie scoop.
- Let the cookies cool on the counter top. Store in the refrigerator once cookies are cool and dry.


