


I still hear the kettle sing and the clock ticking softly in the background while the kitchen fills with the scent of sweet caramel calling my name. The first time I tasted Caramel Fudge, my whole world clicked—this creamy, melt-on-your-tongue square was like a hug from grandma in edible form. I’ve made it countless times since, and I still hear a chorus of “mmm”s every time I lift the lid on the tin. This Caramel Fudge is my quick, no-fuss version that tastes like it took forever to master, but really it comes together in minutes. It’s a lifesaver on busy nights and a quiet joy on afternoons when I just want to sit with a cup of coffee and chat with a friend. The best part? It’s incredibly forgiving—I’ve tested it with almond milk for a lighter touch, with extra caramel ribbons for a more dramatic swirl, and with a bit of espresso powder to deepen the chocolate kiss. This is the recipe I bring to the table when I want a tiny slice of comfort to share over conversation and laughter.

What is caramel fudge?
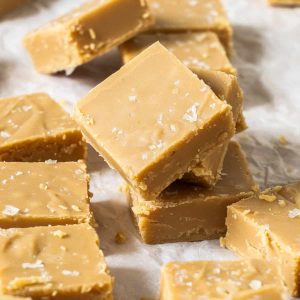
Think of Caramel Fudge as silky, melt-in-your-mouth sweetness crowned with ribbons of gooey caramel. It’s essentially a creamy, chocolatey fudge that’s been kissed with caramel flavor, creating a little square you can both savor and share. The name “Caramel Fudge” hints at the star players: rich dairy or dairy-free cream, butter, sugar, a touch of vanilla, and a generous swirl of caramel sauce. It’s the kind of dessert that doesn’t require fancy equipment or hours in the kitchen—just a quick melt, a gentle fold, and a rest in the fridge until the surface gleams and the edges pull away cleanly. Think of it as the grown-up version of a candy bar you’d stash in a lunchbox—soft, luxe, and deeply comforting. In a pinch, it’s a dependable last-minute treat, but it also shines on a holiday tray or as a thoughtful homemade gift. Caramel Fudge is basically your favorite pantry staples doing a happy dance together.
Why you’ll love this recipe?
Flavor: What I love most about this Caramel Fudge is the way the caramel swirls through creamy chocolate and vanilla, giving you pockets of toasty caramel in every bite. It’s not cloying or heavy; it’s smooth, balanced, and deeply satisfying. The scent alone draws people to the counter like a magnet, and once you bite in, you’ll understand the nostalgia packed into each square.
Simplicity: This recipe skips the fuss. You melt, you swirl, you chill. It’s a straightforward, approachable method that even new bakers or home cooks can master. I can whip this up on a weeknight and still have time to enjoy a cup of coffee before the kids drift off to bed.
Cost-efficiency: What is the best way to measure cost-efficiency?: The ingredients are friendly on the wallet, and you’re using pantry staples most of us keep on hand. A little bit of butter, a can of Condensed Milk, a handful of chocolate chips, and a ribbon of caramel—simple, affordable, and deeply satisfying.
Versatility: Caramel Fudge is a blank canvas. Swap in Dark Chocolate for a richer bite, add a pinch of sea salt for a salted caramel note, or swirl in chopped nuts for texture. I’ve even layered a tiny espresso ribbon for a mocha twist. What I love most about this recipe is its adaptability—you can tailor it to your mood, your guests, or what’s in the pantry that day.
How do I make caramel fudge?
Quick Overview
This Caramel Fudge is a no-bake crowd-pleaser that comes together in a snap. You melt White Chocolate chips with sweetened condensed milk and butter, then fold in vanilla and salt. The magic happens when you swirl in caramel sauce and pour the glossy mixture into a lined pan. A quick chill, a light glaze, and you’re slicing perfect, silky squares that taste like a hug in dessert form. It’s the kind of recipe that looks impressive but is totally approachable, even on a busy weeknight. You can customize the swirl, drizzle extra caramel on top, or sprinkle a few flaky sea salt crystals to finish. It’s flexible, forgiving, and incredibly delicious, which is why I keep coming back to it time after time.
Ingredients
For the Main Batter:
- 3 cups White Chocolate chips (or semisweet if you prefer a deeper flavor)
- 1 (14-ounce) can sweetened condensed milk
- 4 tablespoons unsalted butter, cut into pieces
- 1 teaspoon vanilla extract
- A pinch of fine sea salt
For the Filling:
- 1/2 cup caramel sauce (store-bought or homemade; warm it slightly for easier swirl)
- Optional pinch of flaky sea salt for caramel notes
For the Glaze:
- 1/3 cup caramel sauce (extra to drizzle on top)
- Optional: 1 tablespoon heavy cream to loosen glaze for a smoother drizzle
Step-by-Step Instructions
Step 1: Preheat & Prep Pan
Line an 8-by-8-inch square pan with parchment paper, letting a couple of overhangs hang out as handles for easy removal. This is the moment I secretly thank my past self for pre-measuring the parchment and buttering the insides—cleanup is a dream after the fudge is set. If you’re in a hurry, you can just grease the pan well, but parchment makes it so much easier to lift the entire slab out for clean slicing. No oven preheating is necessary for this no-bake Caramel Fudge, but having a clean, ready pan is essential.
Step 2: Mix Dry Ingredients
In a small bowl, whisk together the salt with a pinch of optional espresso powder if you’re feeling fancy. This step is quick, and the espresso (if you use it) helps deepen the chocolate’s aroma without overpowering the caramel. If you’re avoiding caffeine, skip the espresso and stick with just the salt. The dry mix is about subtle depth, not a loud note.
Step 3: Mix Wet Ingredients
In a heavy-bottomed saucepan over low heat, combine the sweetened condensed milk and butter until the butter is melted. Stir in the vanilla and a tiny splash of cream if you like a silkier texture. You’ll want the mixture to be glossy and smooth, never boiling or scorching. This is where the magic starts—creamy, dreamy, and deeply comforting in scent and texture.
Step 4: Combine
Pour the wet mixture into a heatproof bowl and fold in the white chocolate chips. Stir gently until the chips are melted and the mixture is smooth. If you’re using a double boiler, that’s even better for avoiding any risk of scorching. You should end up with a thick, pourable batter that coats the back of a spoon. This is the moment the Caramel Fudge starts to resemble that iconic, glossy slab you can’t resist.
Step 5: Prepare Filling
Dollop in the caramel sauce in a few streams across the surface of the batter. Using a butter knife or a skewer, swirl the caramel into the batter to create ribbons and pockets of caramel flavor. Don’t overwork it—you want a marbled look, not a uniform color. If you want a saltier finish, sprinkle a few flakes of sea salt on top of the batter right after you swirl in the caramel.
Step 6: Layer & Swirl
Pour the fudgy batter into the prepared pan and smooth the top with a lightly greased spatula. Drizzle a little extra caramel sauce across the surface and make gentle swirls with a toothpick or skewer. This is where your personality shines—every swirl is a tiny signature. If the caramel starts to sink, don’t panic; a few soft swirls will bring the marbled look back to life.
Step 7: Bake
Here’s the truth: this Caramel Fudge is a no-bake triumph. There’s no oven required for the classic version, and that’s why it’s so friendly for busy days. If you do want a touch of a firmer surface, you can give the pan a quick, gentle bake in a very low oven for 6–8 minutes at 250°F once in a while, but it isn’t necessary. For most of us, a good chill will set the squares perfectly. I mostly chill—it preserves that melting-in-your-mouth texture that makes this Caramel Fudge so irresistible. After the surface looks glossy and set to the touch, move on to the next step.
Step 8: Cool & Glaze
Let the pan sit at room temperature for 15–20 minutes, then cover with plastic wrap and refrigerate for at least 2 hours, ideally 4, until firm. While it chills, whisk together an extra caramel glaze if you’d like a showy finish. Drizzle or sprinkle lightly with sea salt for a contrasting bite. When the fudge is properly set, lift the slab out using the parchment overhang and place it on a cutting board for neat slices.
Step 9: Slice & Serve
Using a sharp knife warmed under hot water and wiped clean between slices, cut Caramel Fudge into squares. If your kitchen is warm, you may hear a satisfying crack as you separate the pieces. Wipe the knife again for clean edges. Plate the fudge on a pretty tray, stack a few with a sprig of mint, and serve with coffee or tea. My family loves this with a splash of vanilla latte or a strong espresso—it’s the little afternoon ritual that makes the day feel special. And yes, these squares disappear quickly—my kids actually ask for seconds, and I’m not complaining, because I know I’m passing along a tradition of love in a simple bite.
What to Serve It With
This Caramel Fudge shines in any setting because it’s so versatile. Here are some thoughtful ways to enjoy it across different occasions:
For Breakfast: Pair a small square with a strong, black coffee or a vanilla latte. The contrast between the bold coffee and the creamy fudge wake-up call is the perfect morning moment. Arrange the fudge as a tiny plate alongside a croissant and fresh berries for a simple brunch spread.
For Brunch: Scatter a few fudge squares on a dessert board with croissants, yogurt parfaits, and citrus zest. A light drizzle of caramel over the fudge adds a touch of elegance that makes the whole table feel like a special celebration.
As Dessert: Serve with a dollop of whipped cream and a few crushed toasted pecans. A warm chocolate sauce drizzle adds another layer of decadence—drizzle while the fudge is just barely warm for the most luxurious finish.
For Cozy Snacks: Keep a tin in the fridge for a last-minute treat when neighbors pop by or when the kids come home from school. It’s the sort of snack that satisfies a craving for sweetness without needing a full dessert menu.
In our family, Caramel Fudge is often the quiet end to a busy day—the sweet note everyone remembers and asks for again. I love the way the caramel threads through, the shine on the surface, and the way the edges pull away in clean, neat squares. It’s a small ritual, but it feels like a warm hello every time we cut a new slice.
Top Tips for Perfecting Your Caramel Fudge
Zucchini Prep: If you’re adding finely grated zucchini into a different variation, you’d want to squeeze moisture first, but here we’re staying classic. For this Caramel Fudge, keep the batter smooth and glossy—moisture isn’t part of the plan, so there’s no zucchini involved in this version. If you ever try a veggie-infused fudge, you’ll know you want to keep dialed-down moisture and extra flavor in check.
Mixing Advice: Don’t overwork once the chocolate chips are melted. Stir just until smooth, then fold in the caramel to create those pretty ribbons. If you overmix, you’ll end up with a denser texture that isn’t as melt-in-your-mouth as you want. The goal is a satin surface with a soft, clean slice.
Swirl Customization: The caramel swirl is where you can show off your style. For a bold look, drizzle more caramel in steady lines before you chill. For a delicate marbled effect, use a toothpick to create wavy lines that resemble ribbons in the surface. If you’re feeling fancy, a curl of edible gold or a scattering of flaky salt can make your Caramel Fudge look store-bought but taste homemade and heartfelt.
Ingredient Swaps: I’ve swapped almond milk for the dairy version to lighten the texture and found it still holds a lovely creaminess. You can use half white chocolate chips and half dark chocolate chips for a deeper flavor, but I’d keep the condensed milk steady to ensure the fudge holds together. For a nutty twist, toss in 2–3 tablespoons finely chopped toasted pecans or almonds after you swirl in the caramel.
Baking Tips: This is a soft-firm fudge that benefits from a steady, cool set. If your kitchen is warm, refrigerate longer and don’t rush the chill time. If you’re using a larger pan, increase the fudge surface area evenly so it sets at the same rate, preventing a sticky center. The key is patience—let the fudge rest until it’s firm to the touch and gleaming on top.
Glaze Variations: If you want a glossier, richer finish, whisk a tablespoon of cream into the glaze to loosen it and drizzle while warm. For a chocolatey twist, melt in an extra 2–3 tablespoons of dark chocolate into the glaze. A light dusting of sea salt right before the glaze sets adds a delightful contrast that brightens the flavors.
Lesson learned: the best Caramel Fudge emerges from a simple, trusted method and a little room for creativity. I test variations and come back to this classic, because it’s the flavor that always makes people smile. The texture is so forgiving that you can adjust the caramel or chocolate balance to match your craving and still end up with something comforting and memorable.
Storing and Reheating Tips
Proper storage keeps the Caramel Fudge tasting like it did the moment you cut it. Here’s how I keep it at peak creaminess and cuttable texture.
Room Temperature: For short-term snacking, you can store the fudge in a cool, dry place for up to 2 days. Keep it wrapped or in a tin to protect it from humidity. The surface may soften a touch, which is completely normal if the room is warm.
Refrigerator Storage: This is my preferred method for longer freshness. Keep the fudge squares in an airtight container with a parchment layer between layers to prevent sticking. It stays good for up to 2 weeks when sealed well.
Freezer Instructions: For longer storage, wrap the entire slab in plastic wrap, then place in a freezer bag. It will keep well for up to 2 months. Thaw in the refrigerator overnight and bring to room temperature before slicing for best texture. The caramel swirls might re-set a touch, but they’ll still taste divine.
Glaze Timing Advice: If you plan to reheat, you can re-glaze after thawing for a glossy finish. If you’re freezing, you might skip the extra glaze and add the glaze just before serving for the freshest look and texture.
Tips I rely on: always lift the slab using the parchment overhang, and slice with a warmed knife for clean edges. If a edge crumbles slightly on slicing, a quick return to a cool sheet in the fridge for a few minutes will help firm it up without losing that tenderness inside.
Frequently Asked Questions
Final Thoughts
This Caramel Fudge isn’t just a dessert; it’s a memory in a small, glossy square. It’s soft, it’s lush, and it’s surprisingly forgiving for a home kitchen. Every bite carries the warmth of coffee chats, family gatherings, and those little moments where time slows down enough to notice a simple treat bringing a room to life. I love how easy it is to tailor—double the caramel for more ribbon, add a pinch of sea salt for a sophisticated finish, or lighten with almond milk for a different mood. It’s one of those recipes I reach for when I want to bring a little joy to a friend, a neighbor, or a family member. If you try it, I’d love to hear how you swirled your caramel and what you dressed it up with. Happy baking! And please, drop a note in the comments with your tweaks or occasions you served it for. Can’t wait to hear how yours turns out!
Caramel Fudge
Ingredients
Main Ingredients
- 0.5 cup Unsalted Butter
- 0.75 cup Granulated Sugar
- 0.75 cup Brown Sugar packed
- 0.5 cup Evaporated Milk
- 0.25 cup Corn Syrup
- 1 teaspoon Vanilla Extract
- 1 cup Semi-Sweet Chocolate Chips
- 1 cup Marshmallows mini
Instructions
Preparation Steps
- Grease an 8x8 inch baking pan and line with parchment paper, leaving an overhang on the sides.
- In a large saucepan, combine butter, granulated sugar, brown sugar, evaporated milk, and corn syrup. Cook over medium heat, stirring constantly, until sugar is dissolved.
- Bring the mixture to a boil, then reduce heat to low and simmer for 5 minutes, stirring occasionally.
- Remove from heat. Stir in vanilla extract, chocolate chips, and marshmallows until melted and smooth.
- Pour the mixture into the prepared baking pan and spread evenly. If desired, sprinkle with flaky sea salt.
- Let the fudge cool completely at room temperature, or chill in the refrigerator for about 2 hours until firm.
- Once firm, lift the fudge out of the pan using the parchment paper. Cut into 16 squares.


