


Okay, gather ’round, because I’ve got a recipe that’s been a total game-changer in my kitchen. You know those moments when a craving hits, a really *specific* craving, and you just need that comforting, nostalgic taste? That’s where these s’mores cookies come in. They’re not just cookies; they’re little bites of pure summer campfire magic, condensed into the most perfect, chewy, gooey treat. My kids started asking for them non-stop after the first batch, and honestly, who can blame them? They’re like a hug in cookie form, but with that irresistible crackle of graham cracker, the melted bliss of marshmallow, and the rich depth of chocolate. If you love a good s’more but don’t always have the time for a full bonfire experience, or if you’re looking for something that tastes way more complicated than it is, these s’mores cookies are your new best friend. They’re even better than a basic Chocolate Chip Cookie, and that’s saying something!
What are S’mores cookies?
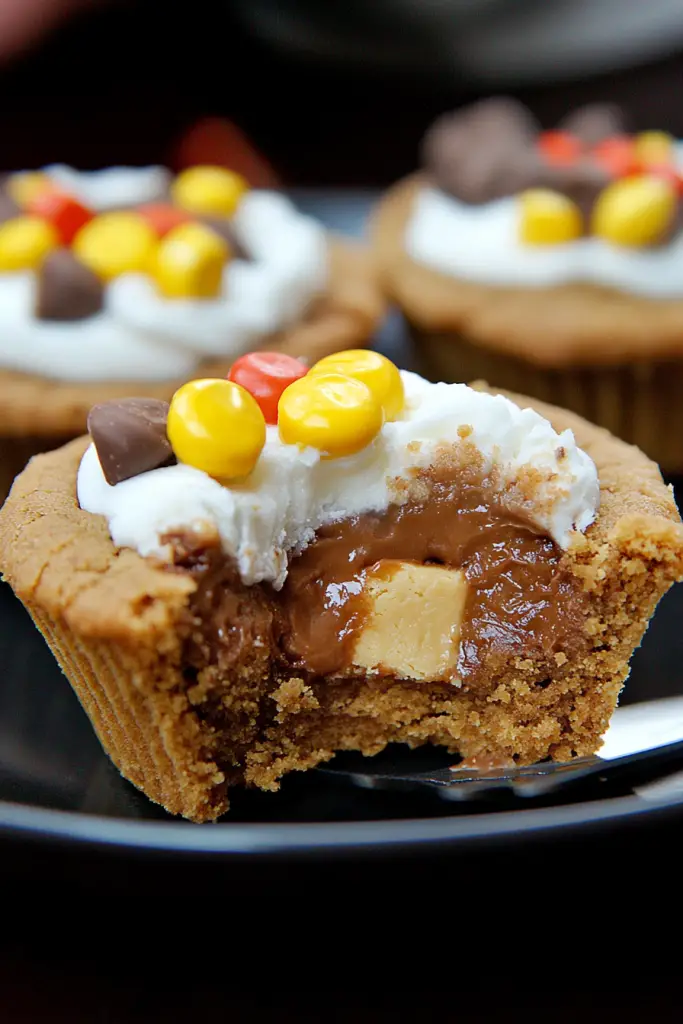
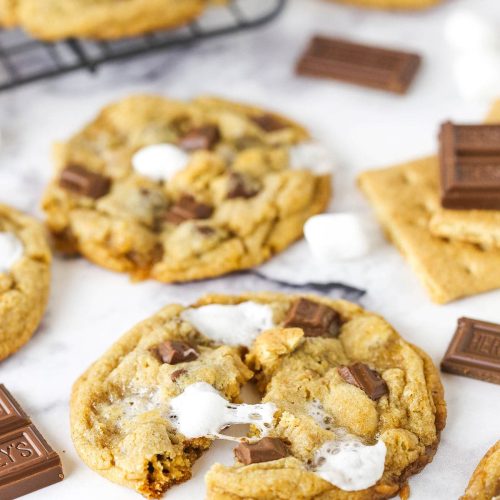
So, what exactly are these little wonders? Think of them as your classic, chewy Chocolate Chip Cookie, but with a serious upgrade. We’re talking about a cookie base that’s got that perfect balance of soft and chewy, studded with pockets of melty chocolate chips. But the magic happens with the addition of crushed graham crackers right into the dough, giving it that signature s’mores flavor and a delightful subtle crunch. And then, the pièce de résistance: mini marshmallows scattered generously on top, often toasted slightly under the broiler at the end, mimicking that perfectly toasted marshmallow from your campfire days. It’s essentially all the joy of a s’more, but in a portable, delicious cookie form that you can enjoy anytime, anywhere. It’s simple, it’s classic, and it’s utterly divine.
Why you’ll love this recipe?
There are so many reasons why I keep coming back to this s’mores cookies recipe, and I just know you’re going to feel the same way. First off, the flavor is just out of this world. You get that familiar, comforting sweetness of a good cookie, but then BAM! That distinct graham cracker crumb and the gooey, melted marshmallow hit you, followed by the rich chocolate. It’s a flavor explosion that feels so familiar yet exciting every single time. And don’t even get me started on the texture – they’re perfectly chewy in the center with just a hint of crisp around the edges. Plus, they’re surprisingly simple to whip up. I’ve found that many “specialty” cookie recipes can be fussy, but this one is a lifesaver for busy evenings when I need a sweet fix. The ingredients are all pantry staples, too, which is a huge win for my budget. They’re incredibly versatile; serve them warm for that extra gooey marshmallow factor, or let them cool and they’re still fantastic for on-the-go snacking. What I love most about these s’mores cookies is how they instantly transport me back to simpler times, sitting around a campfire with friends and family. They bring a little bit of that joy and nostalgia into your everyday life, and that’s pretty special, right? They’re definitely a step up from your everyday Chocolate Chip Cookies and have become my go-to for bake sales and potlucks because they always disappear in minutes.
How do I make S’mores cookies?
Quick Overview
This recipe is all about layering those iconic s’mores flavors into a wonderfully chewy cookie. You’ll start by creaming butter and sugars, then incorporate eggs and vanilla. Next, the dry ingredients—flour, baking soda, salt, and most importantly, crushed graham crackers—get mixed in. We’ll stir in chocolate chips, scoop the dough onto baking sheets, and then the magic happens: pressing in extra marshmallows on top before a quick bake. The final touch is often a brief broil to get those marshmallows perfectly golden. It sounds like a lot, but it comes together so quickly, and the result is pure Cookie Perfection.
Ingredients
For the Main Batter:
1 cup (2 sticks or 226g) unsalted butter, softened – Make sure it’s properly softened, not melted! This is key for that chewy texture. I’ve found using good quality butter really makes a difference here.
1 cup (200g) granulated sugar – For sweetness and structure.
3/4 cup (150g) packed light Brown Sugar – This is what gives us that gorgeous chewy texture and a hint of caramel flavor. Don’t skip it!
2 large eggs – Room temperature is best, as they incorporate more easily.
1 teaspoon pure vanilla extract – Always go for pure vanilla; it has a much richer flavor than imitation.
2 1/4 cups (280g) all-purpose flour – Spooned and leveled, not scooped directly from the bag, to avoid dense cookies.
1 teaspoon baking soda – For leavening.
1/2 teaspoon salt – Balances the sweetness and enhances other flavors.
1 1/2 cups (about 150g) graham cracker crumbs – You can buy these pre-crushed or crush your own graham crackers in a food processor or by placing them in a bag and crushing them with a rolling pin. This is where that signature s’mores flavor starts!
1 cup (170g) semi-sweet chocolate chips – Or a mix of semi-sweet and milk chocolate for extra richness. You can also use chocolate chunks!
For the Filling (Topping):
1 cup mini marshmallows – These are perfect for scattering. If you can only find large ones, just chop them up. They melt beautifully!
Step-by-Step Instructions
Step 1: Preheat & Prep Pan
Get your oven preheated to 375°F (190°C). Line your baking sheets with parchment paper. This is a simple step, but it makes cleanup a breeze and ensures your cookies don’t stick. Trust me on this one – parchment paper is a baker’s best friend!
Step 2: Mix Dry Ingredients
In a medium bowl, whisk together the all-purpose flour, baking soda, salt, and graham cracker crumbs. Whisking these together ensures everything is evenly distributed, so you don’t end up with pockets of baking soda or salt. The graham cracker crumbs are mixed in here to ensure they’re spread throughout the batter.
Step 3: Mix Wet Ingredients
In a large bowl, cream together the softened butter, granulated sugar, and packed light brown sugar until light and fluffy. This usually takes about 3-4 minutes with an electric mixer. Then, beat in the eggs one at a time, mixing well after each addition. Stir in the vanilla extract. This creamy base is what gives our cookies their tender texture.
Step 4: Combine
Gradually add the dry ingredients to the wet ingredients, mixing on low speed until just combined. Be careful not to overmix! Overmixing develops the gluten in the flour, which can lead to tough cookies. Stop as soon as you don’t see any dry streaks of flour. Then, stir in the chocolate chips. I always use a spatula for this last step to really feel when it’s just combined.
Step 5: Prepare Filling
Have your mini marshmallows ready. If they seem a little sticky, you can toss them with a tiny bit of cornstarch to prevent them from clumping too much, but honestly, a little clumping is fine and gives them character!
Step 6: Layer & Swirl
Drop rounded tablespoons of cookie dough onto the prepared baking sheets, leaving about 2 inches between cookies to allow for spreading. Now for the fun part: gently press a generous amount of mini marshmallows onto the top of each cookie dough ball. Don’t worry if they don’t cover the whole surface; they’ll melt and spread.
Step 7: Bake
Bake for 9-12 minutes, or until the edges are lightly golden brown and the centers are still slightly soft. The marshmallows will puff up and might start to get a little toasty. For an extra special touch, you can turn on your broiler for the last 30-60 seconds (watch them like a hawk!) until the marshmallows are lightly golden brown. This gives them that perfectly toasted marshmallow look and taste!
Step 8: Cool & Glaze
Let the cookies cool on the baking sheets for 5 minutes before transferring them to a wire rack to cool completely. This initial cooling on the sheet allows them to set up so they don’t fall apart when you move them. If you decide to add a glaze (though I think they’re perfect as-is!), do it once they’ve cooled slightly.
Step 9: Slice & Serve
These s’mores cookies are absolutely heavenly served warm, when the marshmallows are still gooey. They also hold up beautifully once cooled, making them great for packing in lunches or enjoying with a cup of coffee. Enjoy that taste of summer!
What to Serve It With
These s’mores cookies are so versatile, they really fit into any part of your day or any occasion. For breakfast, I love pairing them with a strong cup of coffee. The coffee cuts through the sweetness perfectly, and the cookie itself is such a satisfying start to the day – way more exciting than plain toast! For a weekend brunch, I like to arrange them on a pretty platter alongside fresh fruit and maybe some other pastries. They add that touch of fun and indulgence that makes a brunch feel special. As a dessert, they’re obviously a winner. They’re fantastic served warm with a scoop of vanilla bean ice cream, or just on their own after a meal. My family loves them after dinner, especially when we’ve had something savory. And for cozy snacks? These are unbeatable. They’re perfect for an afternoon pick-me-up with a glass of cold milk, or for sharing during a movie night. My personal tradition is to have one with a hot chocolate on a chilly evening – it’s like a double dose of comfort! They’re also wonderful for school lunches, a little surprise that always brightens my kids’ day.
Top Tips for Perfecting Your S’mores Cookies
I’ve made these s’mores cookies so many times, I’ve picked up a few tricks along the way that really elevate them. First, about those graham cracker crumbs: make sure they are fine crumbs, not large chunks. I usually pulse them a few times in a food processor, or put them in a zip-top bag and crush them with a rolling pin. This ensures they get incorporated evenly into the dough and don’t create weird pockets or dry spots. For the mixing, it’s crucial not to overmix the dough once you add the flour. You want to mix until *just* combined. Overmixing develops the gluten, and that’s the express train to tough cookies. I always switch to a spatula for the final stir-in of flour and chocolate chips so I can really feel when it’s done. When it comes to the marshmallows, if you want that perfectly golden-brown toasted look without burning the cookies, the broiler trick is fantastic, but you *must* watch them constantly. Seriously, don’t walk away! They go from perfect to burnt in seconds. If you’re not comfortable with the broiler, just baking them until the edges are golden is still delicious. I’ve experimented with different types of chocolate, and while semi-sweet is classic, a mix of semi-sweet and milk chocolate chips gives an amazing depth of flavor. You can also use chopped chocolate bars for bigger, gooier pockets of chocolate. For ingredient swaps, if you don’t have brown sugar, you can use a mix of granulated sugar and molasses, but brown sugar really gives that signature chew. If you want to try a different cookie base, a shortbread might work, but it won’t have the same chewy texture. And for the marshmallows, if they seem a bit stale and aren’t melting well, sometimes a quick microwave burst for 10 seconds can revive them. I learned that one the hard way after having some stubbornly unmelted marshmallows! Finally, for baking, make sure your oven temperature is accurate. An oven thermometer is a great investment. If your cookies always spread too much, make sure your butter isn’t too soft, or try chilling the dough for about 30 minutes before baking. These little adjustments make a big difference!
Storing and Reheating Tips
Storing these s’mores cookies is pretty straightforward, and thankfully, they stay delicious for a good while. At room temperature, they’re best stored in an airtight container. They’ll stay fresh and chewy for about 3-4 days. If you put them in a container immediately after they’ve cooled, they tend to keep their moisture better. I sometimes place a small piece of bread in the container, which helps maintain softness – it sounds weird, but it really works! If it’s warm out or you want them to last a bit longer, refrigerating them is a good option. Pop them in an airtight container or wrap them well in plastic wrap and then foil. They’ll keep nicely in the fridge for up to a week. Just be aware that refrigeration can sometimes make cookies a bit firmer, so you might want to warm them up before eating. For freezing, which is great for long-term storage, wrap each cookie individually in plastic wrap, then place them all in a heavy-duty freezer bag or an airtight container. They’ll last for about 2-3 months. To reheat, you can gently warm them in a low oven (around 250°F or 120°C) for a few minutes until they’re soft and gooey again. Microwaving for 10-20 seconds works too, especially if you want that melty marshmallow effect quickly. For the glaze, I always recommend waiting until the cookies have cooled completely before adding it, regardless of whether you’re storing them at room temperature, in the fridge, or planning to freeze them. Glazing warm cookies can make the glaze melt and drip off.
Frequently Asked Questions
Final Thoughts
So there you have it – my absolute favorite s’mores cookies recipe! I really hope you give these a try. They’re more than just a cookie; they’re a little piece of happiness that’s perfect for any occasion, from a weeknight treat to a party showstopper. The blend of textures and flavors – the chewy cookie, the crunchy graham cracker, the gooey marshmallow, and the rich chocolate – is just pure bliss. They’re easy enough for beginners but special enough to impress everyone you share them with. If you love this recipe, you might also enjoy my other chewy cookie creations or my campfire-inspired desserts. I can’t wait to hear what you think once you’ve tried them! Please leave a comment below with your thoughts, or share your own favorite variations. Happy baking, and enjoy every single bite!
s'mores cookies
Ingredients
Main Ingredients
- 1.5 cup all-purpose flour
- 1 cup graham cracker crumbs
- 1 teaspoon baking soda
- 0.5 teaspoon salt
- 0.75 cup unsalted butter, room temperature
- 1 cup light brown sugar
- 0.5 cup granulated sugar
- 1 large egg
- 1 large egg yolk
- 2 teaspoons vanilla extract
- 2 teaspoons milk
- 1 cup chocolate chips
- 6 sheets graham cracker chopped
- 1.25 cups mini marshmallows halved
- 1 bars Hershey’s chopped
Instructions
Preparation Steps
- Preheat oven to 350°F (180°C). Line baking sheets with parchment paper or silicone baking mats.
- Combine the flour, graham cracker crumbs, baking soda and salt in a medium sized bowl and set aside.
- Cream the butter and sugars together in a large mixer bowl on medium speed until light in color and fluffy. Scrape down the sides of the bowl while it’s mixing a few times, as needed. You should be able to see the change in color and texture happen and know it’s ready.
- Add the egg and egg yolk one at a time and mix until well combined after each addition.
- Add the vanilla extract and mix until well combined.
- Add the dry ingredients and mix until the dough is just combined. Do not over mix. It will be thick.
- Add the milk and combine on low speed just until incorporated. Use a rubber spatula to finish combining the dough and help it come together. Add an additional teaspoon of milk only if really needed to help the dough come together. You don’t want to add too much liquid and end up with cookies that spread too much.
- Stir in the chocolate chips, chopped graham crackers and 1 cup of mini marshmallows.
- Scoop and roll 2 tablespoon-sized balls of cookie dough until all the cookie dough has been used.
- Place cookie dough balls onto cookie sheet and bake for 5-6 minutes, or until the cookies are starting to flatten out, but aren’t fully flat. Then, open the oven and carefully place a few pieces of chopped Hershey’s bar and a few of the remaining mini marshmallows on top of each cookie. Bake cookies for another 2-3 minutes, until cookies are golden and marshmallows are slightly melty.
- Remove cookies from the oven and allow to cool on baking sheets for 5-10 minutes before transferring to a wire rack to cool completely. If the cookies have spread a little more than you like or some marshmallows got unruly, you can use a spoon to gently push the sides in a bit.
- These cookies are at their best when warm, but can be stored in an airtight container for 3-4 days.


