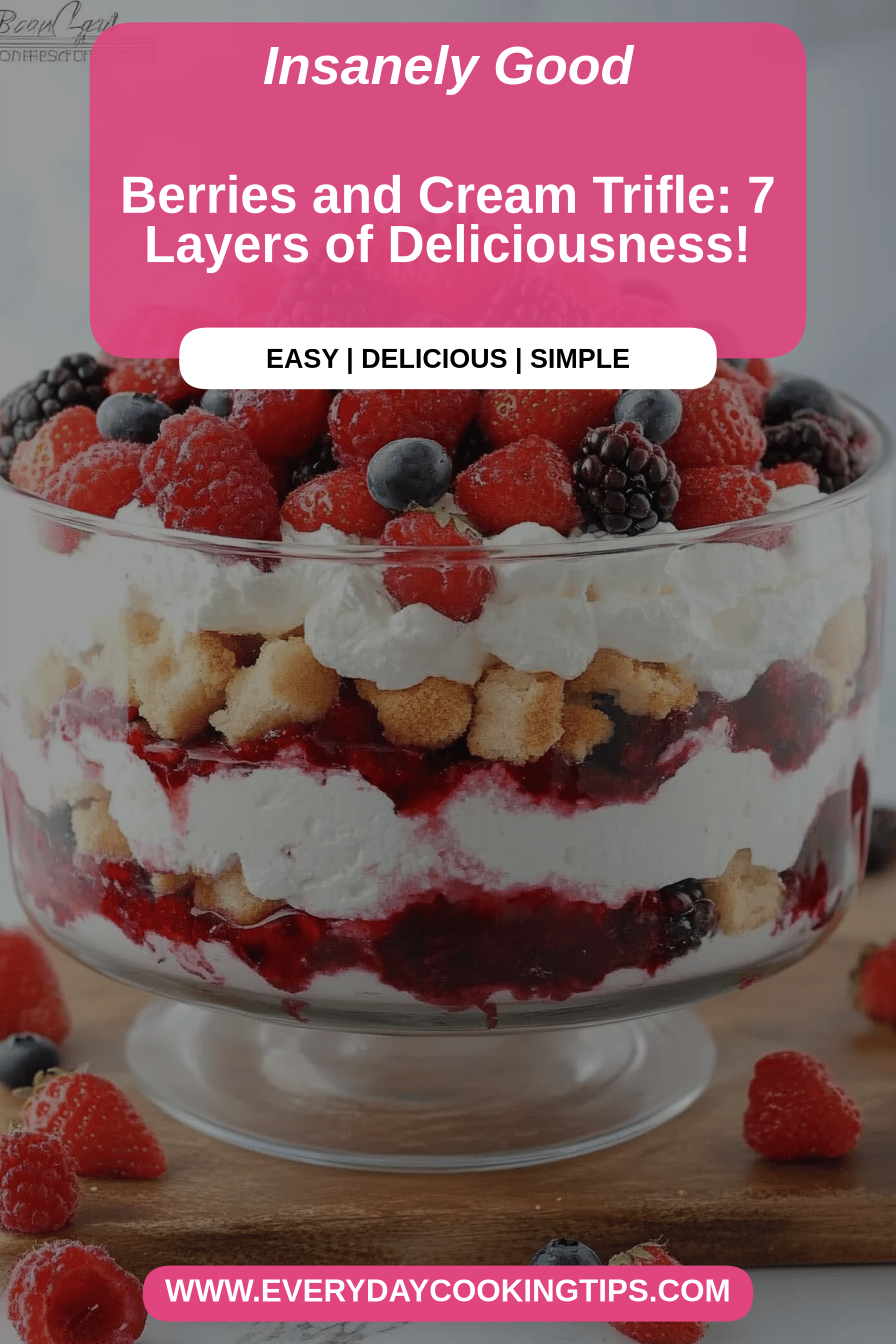
Oh, where do I even begin with this berry trifle? It’s not just a dessert; it’s pure joy layered into a beautiful glass bowl. I remember the first time I ever made one, completely intimidated by its fancy appearance. I thought for sure I’d mess it up, but what surprised me most was how incredibly simple it actually was! This recipe has become my go-to for everything from casual family dinners to impressing guests at last-minute potlucks. It’s the kind of dessert that looks like you spent hours on it, but in reality, you can whip it up in a fraction of that time. Honestly, if you’re looking for something that tastes like a decadent bakery treat without all the fuss, this berry trifle is your answer. It’s a little bit like a deconstructed cheesecake, a little bit like a stunning fruit salad, all rolled into one perfect bite. Forget those complicated layered cakes; this is where the real magic happens!
What is the Berry Trifle?
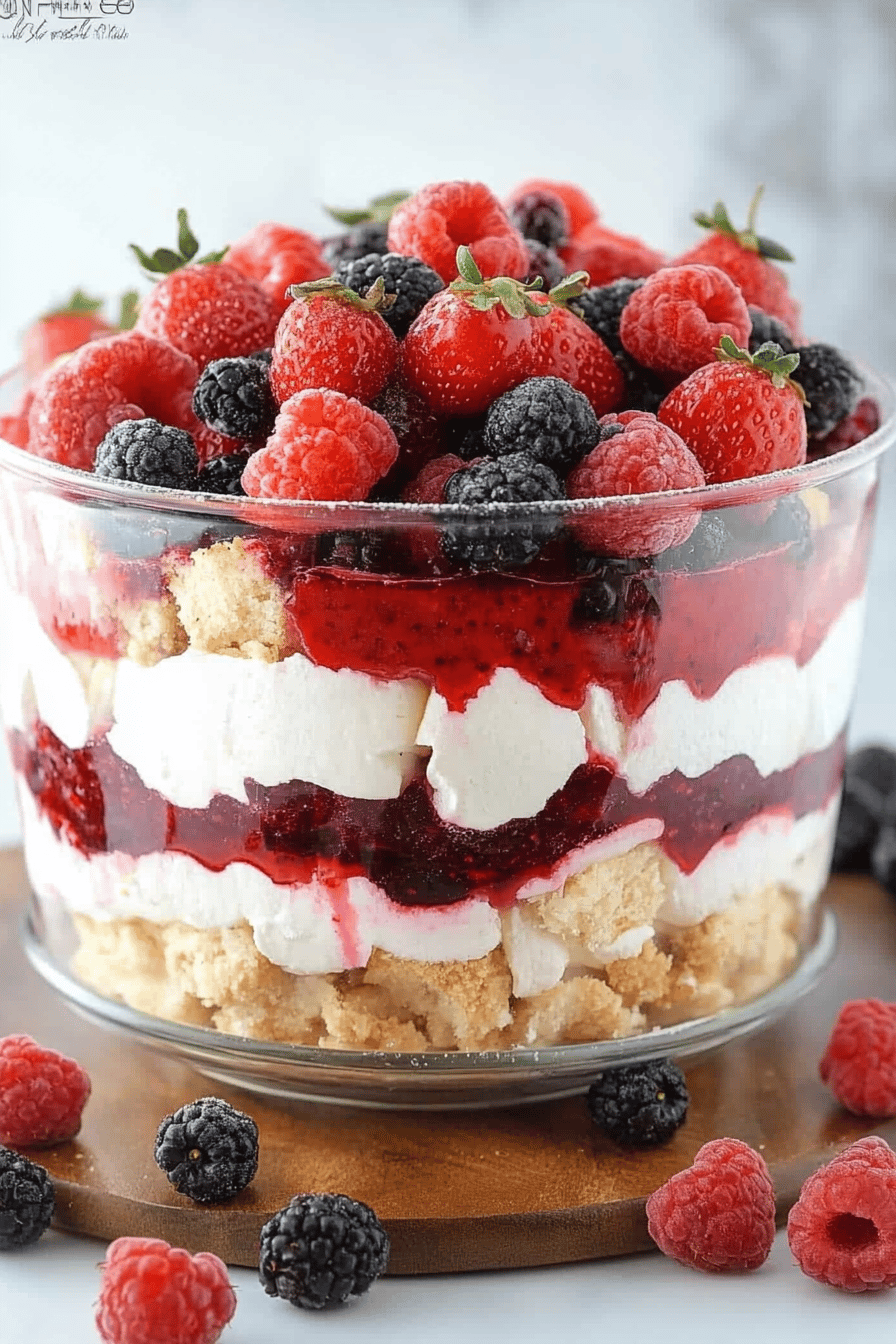
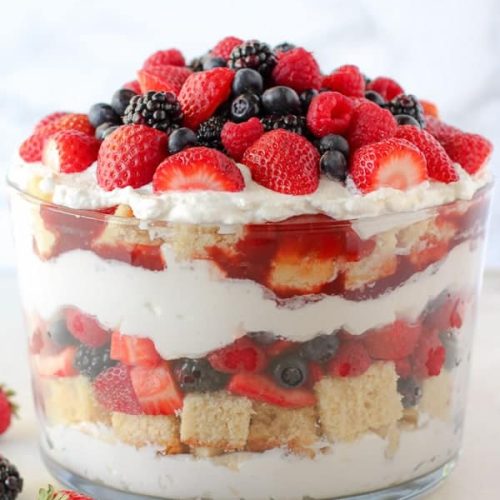
So, what exactly is a berry trifle? Think of it as a glorious, no-bake (or very minimal bake!) masterpiece built in layers. Traditionally, a trifle means a dessert made with layers of sponge cake (or ladyfingers, or Pound Cake!), custard, and fruit, often with a bit of sherry or liqueur soaked into the cake. My version keeps that beautiful layered spirit but makes it super approachable for even the busiest of home cooks. It’s essentially a celebration of textures and flavors: soft cake, creamy custard or pudding, bright, fresh berries, and a delightful crunch. It’s designed to be visually stunning, especially when served in a clear glass trifle bowl so you can see all those gorgeous strata. It’s less about precise baking and more about assembly, which is exactly why I adore it. It feels fancy without demanding perfection, and the results are always spectacular.
Why you’ll love this recipe?
Honestly, there are so many reasons this berry trifle has earned a permanent spot in my recipe repertoire, and I just know you’re going to feel the same way. First off, let’s talk about the flavor explosion. You get the sweet, slightly tart burst from the fresh berries, the rich, creamy smoothness from the pudding or custard, and the comforting chewiness of the cake. It’s a symphony for your taste buds! And the best part? It’s ridiculously easy. You don’t need any fancy equipment or complicated techniques. It’s genuinely perfect for those nights when you crave something special but don’t want to spend hours in the kitchen. I’ve made it on weeknights, and it’s honestly a lifesaver. Plus, it’s surprisingly budget-friendly. You can often use pre-made Pound Cake or even good-quality store-bought cookies to keep costs down, and berries are usually pretty affordable, especially when they’re in season. What I truly love most about this berry trifle is its versatility. You can swap out the berries for different fruits depending on what’s fresh, experiment with different cake flavors, or even use a different flavored pudding. It’s a dessert that can adapt to your tastes and what you have on hand. It’s also incredibly forgiving, which, let’s be honest, is a huge win for any home cook!
How do you make a berry trifle?
Quick Overview
The beauty of this berry trifle lies in its effortless assembly. We’re essentially building flavor and texture in layers. You’ll start by preparing your cake base, then whip up a luscious creamy filling, fold in your beautiful berries, and then it’s all about arranging everything in a gorgeous glass bowl. There’s minimal baking involved, usually just to prepare a simple cake base if you aren’t using store-bought, making this a fantastic option for warmer weather or when you just want a quick, impressive dessert. The key is to have all your components ready to go before you start layering. Trust me, it makes the process so much smoother!
Ingredients
For the cake layers: For the cake layers: For the cake layers: For the cake layers: For the cake layers: For the cake layers: For
1 store-bought Pound Cake, or a homemade vanilla or yellow cake, cooled and cut into 1-inch cubes. I usually go for pound cake because it holds up beautifully and doesn’t get too soggy. If you’re baking your own, make sure it’s completely cooled before cubing.
For the Creamy Filling:
2 cups heavy whipping cream, very cold. This is crucial for getting that fluffy whipped cream texture. If you’re dairy-free, a good quality Coconut Cream (the solid part from a chilled can) works wonders here, though it will add a subtle coconut flavor.
1 (8-ounce) package Cream Cheese, softened. This adds a lovely tang and richness that balances the sweetness. Make sure it’s truly soft; cold cream cheese will lead to lumps.
1 cup powdered sugar, sifted. Sifting prevents any grainy texture. You can adjust this to your sweetness preference.
1 teaspoon vanilla extract. Pure vanilla extract makes a world of difference!
Optional: 1/4 cup milk or half-and-half if you prefer a slightly looser filling. I sometimes add a splash if I want it extra smooth.
For the Berry Medley:
4 cups mixed fresh berries (strawberries, blueberries, raspberries, blackberries). A mix is best for color and flavor variety. Make sure they’re washed and patted dry. If using strawberries, hull and slice or quarter them.
Optional: 1-2 tablespoons granulated sugar or honey, for macerating the berries if they aren’t super sweet. I usually only do this if the berries are a bit tart.
For the Optional Glaze (for that extra shine!):
1/4 cup berry jam or preserves (raspberry or strawberry are divine). Warming it slightly makes it easier to drizzle.

Step-by-Step Instructions
Step 1: Preheat & Prep Pan
While this recipe doesn’t strictly require preheating an oven if you’re using store-bought cake, it’s a good habit to get into for any baking-adjacent recipe. For this trifle, the most important “prep” is getting your trifle bowl ready. A clear glass bowl, about 2-3 quart capacity, is ideal so you can show off all those beautiful layers. Make sure it’s clean and dry.
Step 2: Mix Dry Ingredients
If you’re making your own cake, this is where you’d start by whisking together your dry ingredients like flour, sugar, baking powder, and salt. For the creamy filling, we’ll be adding the powdered sugar (our primary dry ingredient for the filling) to the softened cream cheese. Sifting the powdered sugar now will save you a headache later with lumps.
Step 3: Mix Wet Ingredients
For the cake, this involves mixing your wet ingredients like eggs, milk, and melted butter or oil. For the creamy filling, the “wet” component is the softened cream cheese. Ensure your cream cheese is truly at room temperature; it makes all the difference for a smooth, lump-free filling. If you’re using heavy whipping cream, it needs to be very cold for whipping, so don’t take it out of the fridge until you’re ready to whip it.
Step 4: Combine
This step is key for cake making – gently combining wet and dry ingredients until just mixed. For the trifle’s creamy filling, we’ll be combining the softened cream cheese with the sifted powdered sugar and vanilla extract. Beat these together until smooth and creamy. Then, in a separate bowl, whip the cold heavy cream until stiff peaks form. Gently fold the whipped cream into the cream cheese mixture. Don’t overmix, or you’ll deflate the cream.
Step 5: Prepare Filling
This is where our creamy filling comes to life! In a large bowl, beat the softened cream cheese with the sifted powdered sugar and vanilla extract until it’s completely smooth and no lumps remain. This is your base. Then, in another clean, dry bowl, whip the very cold heavy cream until stiff peaks form. You want it to hold its shape when you lift the whisk. Now, gently fold about a third of the whipped cream into the cream cheese mixture to lighten it, then carefully fold in the remaining whipped cream. Be gentle – we want to keep all that airy goodness! If you like it a bit looser, you can stir in a tablespoon or two of milk or half-and-half here.
Step 6: Layer & Swirl
This is the fun part! Start by placing about a third of the cubed cake into the bottom of your trifle bowl. Then, spoon about a third of the creamy filling over the cake. Next, scatter about a third of your mixed fresh berries over the filling. Repeat these layers twice more: cake, filling, berries. For an extra touch, you can gently swirl the top layer of filling with a spoon for a marbled effect. If you’re using the optional jam glaze, warm it gently in a small saucepan or microwave until it’s pourable, then drizzle it artfully over the top layer of berries or filling. It adds a lovely shine and an extra burst of berry flavor.
Step 7: Bake
This step is only necessary if you’re baking your own cake from scratch. Follow your cake recipe’s baking instructions carefully. For a typical pound cake or vanilla cake, it might be around 350°F (175°C) for 30-40 minutes, or until a toothpick inserted into the center comes out clean. Once baked, let it cool completely on a wire rack before cubing it for your trifle.
Step 8: Cool & Glaze
After assembling your trifle, cover it loosely with plastic wrap and refrigerate for at least 2-4 hours, or preferably longer, before serving. This allows the flavors to meld and the cake to soften slightly. The chilling time is essential for the trifle to set up properly and for all those lovely flavors to marry. If you’re adding the jam glaze, do this just before serving or during the last hour of chilling for the best visual appeal and shine.
Step 9: Slice & Serve
To serve, simply scoop generous portions into bowls or plates. The beauty of a trifle is that each spoonful gives you a bit of everything – cake, cream, and berries. It’s best served chilled. When cutting, use a sharp knife and serve immediately after scooping to maintain the integrity of the layers.
What to Serve It With
This berry trifle is so self-sufficient, it barely needs anything else! But if you’re looking to create a full experience, here are some of my favorite pairings:
For Breakfast: This might sound a little indulgent for breakfast, but a small, personal-sized trifle can be a delightful weekend treat. Serve it alongside a strong, freshly brewed coffee or a delicate herbal tea. I love using slightly less sweet cake for a breakfast version, maybe even a lemon pound cake, and pairing it with just a light dusting of powdered sugar instead of a glaze.
For Brunch: Elevate your brunch spread with a stunning trifle as the centerpiece. It pairs wonderfully with mimosas or a sparkling rosé. Other brunch dishes that complement it beautifully include quiches, fresh fruit salads, and a good quality yogurt parfait. The lightness of the trifle cuts through richer brunch items.
As Dessert: This is its natural habitat! Serve it after a lovely dinner. It’s fantastic with a light cheese board if you want to extend the meal. For a beverage, a dessert wine like a Moscato or a light, fruity red wine is lovely. A simple scoop of vanilla bean ice cream on the side is never a bad idea either!
For Cozy Snacks: Sometimes, you just need a sweet pick-me-up. A small portion of this trifle is perfect for that. I often enjoy it with a warm cup of tea or even a hot chocolate on a chilly evening. My kids also adore this as an after-school treat – it’s so much more fun than a regular cookie!
My family tradition is to always serve this on the first day of summer, as the berries signal the start of warmer weather and outdoor gatherings. It just feels special.
Top Tips for Perfecting Your Berry Trifle
I’ve made this berry trifle more times than I can count, and over the years, I’ve picked up a few tricks that make a big difference. Here are my absolute must-knows to get that perfect trifle every single time:
Zucchini Prep: (Oops! I think I got my wires crossed and was thinking of another recipe! My apologies! For *this* berry trifle, there’s no zucchini involved, which is part of its charm!) Let’s talk about the cake prep instead. Make sure your cake is *completely* cool before cubing. A warm cake will crumble and get mushy too quickly, making your layers indistinct. Cubes that are about 1-inch are a good size – not too big to eat, not too small to disappear.
Mixing Advice: The key to the creamy filling is to whip the heavy cream until *stiff peaks* form. This means when you lift your whisk, the cream should stand straight up without drooping. Be careful not to over-whip, or it will turn grainy and buttery! For folding the whipped cream into the cream cheese mixture, use a gentle, sweeping motion from the bottom of the bowl upwards. This preserves the airiness. Overmixing will deflate the filling, leading to a dense trifle.
Swirl Customization: If you want that pretty marbled look on top, don’t go crazy with the swirling. Just gently drag a skewer or the back of a spoon through the top layer a couple of times. Too much swirling will muddy the colors and patterns. You can also do a swirl between layers if you’re feeling artistic, but a simple top swirl is often just as effective.
Ingredient Swaps: Don’t have pound cake? A sturdy angel food cake or even good-quality store-bought ladyfingers work beautifully. For the berries, feel free to use any combination you love – even frozen berries work in a pinch, though you’ll want to thaw and drain them very well to avoid extra moisture. If you don’t have cream cheese, a vanilla pudding base made from scratch or a good quality instant vanilla pudding mix can be a shortcut, though it won’t have that slight tang.
Baking Tips: (Again, only applies if you’re baking your own cake!) When baking your cake, use the middle rack of your oven for even heat distribution. Always do the toothpick test in the center of the cake. If it comes out with moist crumbs attached, it’s done. If it’s wet batter, it needs more time. If it comes out completely clean, it might be slightly overbaked, but still usable for trifle.
Glaze Variations: If you don’t have jam, a simple glaze made from 1/4 cup powdered sugar mixed with 1-2 tablespoons of milk or lemon juice can work. You can also skip the glaze entirely and just let the berries shine. A dusting of powdered sugar right before serving can also add a lovely touch. Experiment with different jam flavors – apricot or cherry can be interesting twists!
Storing and Reheating Tips
This berry trifle is best enjoyed fresh, but it does store surprisingly well, which makes it a fantastic make-ahead dessert. Here’s how I handle leftovers:
Room Temperature: I honestly don’t recommend leaving this trifle at room temperature for more than an hour or two, especially if it contains dairy. The creamy filling can spoil, and the cake can become too soggy.
Refrigerator Storage: This is your best bet! Once assembled, cover the trifle bowl tightly with plastic wrap. Make sure the wrap comes down close to the surface of the dessert to prevent air from drying it out. It will keep well in the refrigerator for 2 to 3 days. The layers will continue to meld, and it will taste even better on the second day. However, after 3 days, the cake can start to get a bit too soft for my liking.
Freezer Instructions: While I don’t typically freeze trifles (the texture of the whipped cream can change), if you absolutely had to, I would suggest assembling it *without* the fresh berries and glaze. Freeze the layered cake and cream base. Thaw it overnight in the refrigerator, then add fresh berries and glaze just before serving. It’s not ideal, but it’s an option if you have a lot of leftovers.
Glaze Timing Advice: If you plan to store the trifle for more than a few hours, I recommend adding the glaze just before serving. Drizzling it too early can make the top layer of berries or cake a bit too wet over time.
Frequently Asked Questions
Final Thoughts
So there you have it – my absolute favorite berry trifle recipe. It’s a dessert that truly embodies comfort, celebration, and simplicity all rolled into one. The combination of tender cake, lusciously creamy filling, and bright, fresh berries is just unbeatable. It’s the kind of dish that brings smiles to faces and makes everyone feel a little bit special. Whether you’re a seasoned baker or just starting out, this trifle is a guaranteed crowd-pleaser and a joy to make. I really hope you give it a try, especially when you need a dessert that looks stunning but is surprisingly fuss-free. If you do make it, please let me know how it turns out in the comments below! I’d love to hear about your own variations or any family traditions you add. Happy baking, and enjoy every single delicious layer!
berry trifle
Ingredients
Main Ingredients
- 1 box angel food cake store-bought, cut into 1-inch cubes
- 0.5 cup orange juice or liqueur, like Grand Marnier or sherry
- 2 packages cream cheese softened
- 0.5 cup granulated sugar
- 1 teaspoon vanilla extract
- 2 cups heavy cream whipped to stiff peaks
- 3 cups mixed berries fresh or frozen, thawed (strawberries, blueberries, raspberries)
Instructions
Preparation Steps
- Place the cubed angel food cake in a large bowl. Drizzle with orange juice or liqueur and toss gently to coat.
- In a separate bowl, beat the softened cream cheese and granulated sugar until smooth. Stir in the vanilla extract.
- Gently fold the whipped heavy cream into the cream cheese mixture until just combined.
- In a large, clear glass bowl or trifle dish, layer half of the soaked cake cubes. Top with half of the cream mixture, then half of the mixed berries.
- Repeat the layers: the remaining cake cubes, the remaining cream mixture, and the remaining berries.
- Chill for at least 1 hour before serving to allow the flavors to meld and the cake to soften.