


There’s something special about a plate of baked potatoes steaming beside a skillet of sizzling butter. I remember helping my mom in the kitchen, pulling a tray of russet buns–I mean, potatoes–out of the oven, the scent of caramelized edges filling the room. The kids would hover, noses twitching, asking for “just a bite,” and I’d bite back a smile because I knew we were about to eat something simple and perfect. This baked potatoes recipe is my grown-up version of that cozy memory: the skin crackles with garlic-salty crunch, the inside stays light and fluffy, and the flavors you top it with can swing from weeknight comfort to weekend dinner party-worthy. It’s incredibly forgiving, incredibly forgiving, and it pairs with so many toppings you can customize it to what’s in your fridge. If you’ve ever compared baked potatoes to Mashed Potatoes, you’ll know this: baked potatoes carry texture and personality that mash just can’t match. And yes, it beats ordering takeout any night of the week.
What is baked potato?
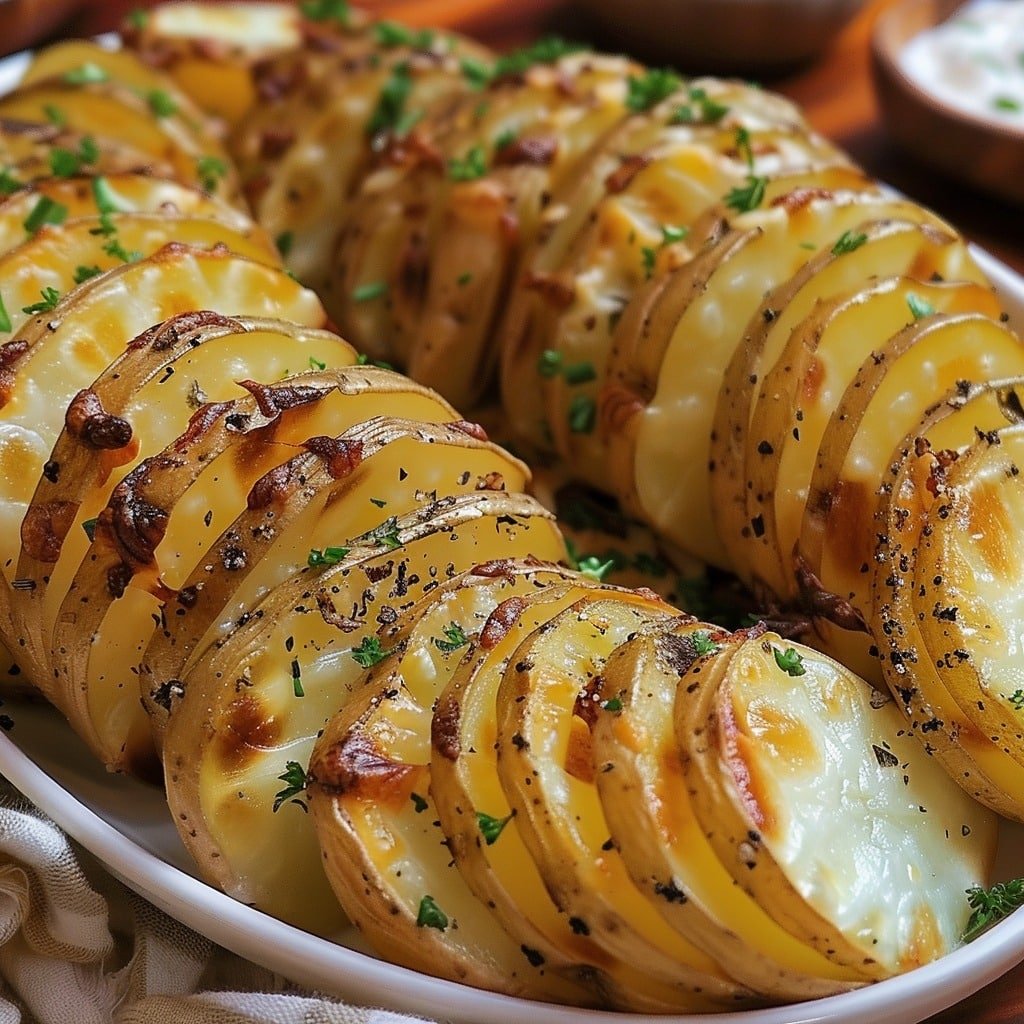
Think of baked potatoes as a blank canvas you can dress up any which way. The classic version uses russet potatoes—a starch-forward potato with a thick skin that crisps beautifully when brushed with oil and salt. It’s essentially two things happening at once: the outside turns into a savory, crisp shell, while the inside turns into a warm, fluffy pillow. The name is simple, but the technique has old-school charm: apply heat, give the potato time, and let the natural starches do the rest. My take on baked potatoes is a little more friendly to weeknights: you can bake a batch, then top them as your mood (or your fridge) dictates. You’ll see this described in cozy terms as “baked potatoes with a glow”—the glow comes from the contrast of crisp skin and creamy interior, plus a little butter or herby glaze to gloss the surface just enough to catch the light on your plate.

Why you’ll love this recipe?
What I love most about this baked Potatoes Recipe is how adaptable it is without losing its soul. It’s a canvas you can fill in twenty different ways, and it still feels like a complete meal. Here’s why it’s a staple in my kitchen:
- Flavor: The skin crackles with a smoky-salty kiss, and the fluffy interior carries every topping you crave—from sour cream to sharp cheddar to chives and crispy bacon. The aroma alone makes the rest of the house wake up.
- Simplicity:I have learned to bake big batches so we have easy lunches all week. I don’t have any fancy equipment or long, fussy steps
- Cost-efficiency: What is the best way to measure cost-efficiency? This dish leans on pantry ingredients. A few russet potatoes, a pat of butter, a splash of cream or yogurt, and a handful of toppings—everything else is optional and flexible.
- Versatility: Breakfast potatoes with eggs, lunch-loaded spuds, or a show-stopping dinner side. The same method scales up or down for family meals or date-night dinners.
What I tell friends is this: if you’ve got 60 minutes, you’ve got dinner. If you’ve got 20 minutes, you’ve got a late-night snack that feels like a hug. And if you’re feeding picky eaters, you can customize toppings so everyone leaves the table happy—and full.
How to Make Baked Potatoes
Quick Overview
We start by preheating the oven to a hot 425°F (220°C). The potatoes are scrubbed clean, dried well, then rubbed with a light coating of olive oil and a generous pinch of flaky sea salt. They bake on a sheet until the skins blister and crisp, about 45–60 minutes depending on size. While they roast, you prepare a simple filling—think butter, Sour Cream, cheddar, and chives—and, if you like, a quick herb glaze to finish. The magic happens when you crack the potatoes open, fluff the insides with a fork, then crown them with filling and a glossy finish. It’s not fancy, but the textures and flavors feel like a warm hello. I promise you’ll be reaching for seconds, and possibly thirds, once you try this method.
Ingredients
For the Main Potatoes:
– 4 large Russet potatoes, scrubbed and dried
– 2–3 tablespoons extra-virgin olive oil
– 1 teaspoon flaky sea salt, plus more for finish
– Freshly ground Black Pepper, to taste
For the Filling:
– 3 tablespoons unsalted butter, softened
– 1/3 cup Sour Cream or plain Greek yogurt
– 1/2 cup shredded sharp cheddar, plus extra for serving
– 2 tablespoons chopped fresh chives or green onions
– Salt and pepper to taste
– Optional: cooked bacon bits, sautéed mushrooms, or steamed broccoli florets for variety
For the Glaze (optional):
– 1 tablespoon melted butter
– 1/2 teaspoon garlic powder or garlic-infused oil
– Pinch of dried parsley or dill for color
Step-by-Step Instructions
Step 1: Preheat & Prep Pan
Heat your oven to 425°F (220°C). Line a rimmed baking sheet with parchment if you have it, but a plain sheet works fine too. A hot pan helps the skins crisp, which is the whole point here. I always give the sheet a quick wipe with a little oil to ensure nothing sticks, especially if you’re baking several potatoes close together.
Step 2: Prepare the Potatoes
Scrub the potatoes well under cold water, removing any eyes or russet creases. Pat dry with a clean towel. The drier the surface, the better the skin will crisp. If you’ve got extra time, you can pat them dry again after they’ve sat for a few minutes—the moisture on the surface can steam the skin as it bakes, which you don’t want.
Step 3: Oil & Season
In a small bowl, mix the olive oil with the flaky salt and a crack of pepper. Rub this all over each potato, paying special attention to the skin’s nooks and crevices. The oil is your glue for the crunch, and the salt is what makes that crackly bite sing when you bite in.
Step 4: Bake Potatoes
Place the potatoes on the prepared sheet, spacing them so they don’t steam each other. Bake for 45–60 minutes, turning once halfway through if your sheet is crowded. You’ll know they’re done when the skins look deeply bronzed and a knife slides in with little resistance. If your potatoes are particularly large, you might need a few extra minutes; I’ve learned to start checking at 45 minutes and go by texture, not a timer alone.
Step 5: Prepare Filling
While the potatoes finish, whip up the filling. Beat the softened butter with sour cream until creamy, then fold in the cheddar and chives. Season with a pinch of salt and pepper. If you’re adding bacon or vegetables, have them cooked and chopped so you can just fold them in at the end. The filling should feel generous but not heavy, creamy but with enough contrast to the potato’s texture.
Step 6: Layer & Swirl
When the potatoes are out of the oven, give them a little time to rest—about 5 minutes. Then slice a shallow down the center lengthwise, but don’t cut all the way through. Gently press the ends toward the center to fluff the interior. Scoop or pipe a portion of the filling into each potato, using a fork to fluff the inside and create little valleys for more toppings. If you like a little visual drama, sprinkle a bit more cheddar and a few chives across the top and optionally swirl in a teaspoon of the glaze for a glossy finish.
Step 7: Bake (optional final step)
If you want an extra crispy top, you can return the stuffed potatoes to the oven for 5–7 minutes to melt the cheese and set the filling. This step isn’t strictly necessary, but it makes a pretty, restaurant-style presentation and adds a light crust on top.
Step 8: Cool & Glaze
Let the potatoes rest for a couple of minutes. If you’re using the glaze, whisk together the melted butter with the garlic powder and a pinch of parsley. Drizzle lightly over the tops or brush with a tiny pastry brush for a soft sheen. The glaze adds a fragrance that echoes the garlic in the crust and makes the surface glisten—just enough to attract a bite without overpowering the potato’s natural flavor.
Step 9: Slice & Serve
Slice each potato sideways to showcase the fluffy interior, then serve with extra toppings on the side: extra sour cream, more chives, a dusting of paprika, or even a spoonful of chili if you’re feeling bold. I love a simple plate with a crisp side salad and a glass of sparkling water with lemon—the contrast of bright acidity with the rich potatoes feels like a little celebration.
What to Serve It With
Baked potatoes feel like a comfortable stage on which any supporting cast can thrive. Here are some combo ideas organized by occasion to fit your mood and schedule:
For Breakfast: Split a baked potato and top with a poached egg, a dollop of sour cream, and a sprinkle of chives. If you’re in a rush, you can dollop the filling into the potato skin and top with microgreens for a fresh, brunch-ready bite. Side of sautéed mushrooms and a cup of strong coffee completes the morning ritual.
For Brunch: Serve alongside smoked salmon ribbons, capers, and lemon wedges. Add a light salad of arugula, cherry tomatoes, and a drizzle of olive oil to balance the richness. This makes a satisfying brunch plate that still feels light enough for late mornings.
As Dinner: Pair with roasted chicken thighs or a pan-seared steak. A fresh herb salad or steamed broccoli provides color and balance. If you want vegetarian glory, go with sautéed mushrooms and a big spoonful of sour cream or yogurt on top.
For Cozy Snacks: Bake extra potatoes, then top with chili, shredded cheese, and a quick pickle or hot sauce. It’s a lifesaver on busy nights and tastes like a little cozy hug after a long day.
In our house, these potatoes are a bridge between day and night—they calm the chaos and invite people to slow down and chat. My mom used to say, “A good potato is a good conversation starter,” and I’ve found that to be true time and again. Share this with friends and watch conversations bloom around the table.
Top Tips for Perfecting Your Baked Potatoes
These are the tiny nudges I’ve learned after dozens of batches. They’ll help you reach crisp skin, pillowy insides, and toppings that sing.
Potato Prep: Always scrub well and dry completely. Extra moisture is the enemy of a crackly skin. If you have time, pat them dry after they’ve sat for a few minutes, then give them a final rub with oil and salt just before baking.
Skin Crisping: Use flaky sea salt and a light coat of oil. The goal isn’t drenched skins but a whisper of oil that helps salt stick and skins blister a bit for texture. Space potatoes on the sheet so heat circulates and they crisp evenly.
Filling Balance: The filling should be creamy but not soupy. If your potatoes are large, you can scale the filling up a bit; if smaller, a lighter hand keeps each bite balanced rather than overwhelmed by stuffing.
Swirl & Patterning: When you plate, a little swirl of glaze or a sprinkle of fresh herbs makes the dish feel special. It’s all about the presentation that invites a happy bite.
Ingredient Swaps: Sour cream can be swapped for Greek yogurt for a lighter tang, or cream cheese for a richer, silkier filling. Cheddar can be replaced with Monterey Jack or Gruyère for different melt characteristics. Bacon bits can be swapped with sautéed mushrooms for a vegetarian version that still feels indulgent.
Baking Tips: If your oven is hot or you’re cooking a lot at once, potatoes closer to the center may need a little longer. If you’re unsure, test with a sharp knife—if it slides in with little resistance, you’re good. For extra-crisp skins, give the potatoes a quick turn halfway through baking.
Glaze Variations: A light garlic butter glaze is lovely, but you can also finish with a sprinkle of smoked paprika, chives, and a drizzle of olive oil for a fragrant, color-rich finish. Don’t drown them; a whisper of glaze is plenty to make the tops gleam.
Lessons learned: don’t rush the bake. Patience yields skins that crackle and interiors that melt in your mouth. I’ve tested almond-milk versions in fillings and found they can make the filling creamier, but full-fat dairy really balances the richness of the potato’s starch. Do what feels good in your kitchen and trust your own palate—that’s where the soul shows up in a dish like baked potatoes.
Storing and Reheating Tips
Leftover baked potatoes are rare around here, but when they happen, I treat them like a little treasure that needs gentle handling to maintain texture.
Room Temperature: If you’ve got leftover stuffed potatoes, let them cool completely before refrigerating. They’ll keep best in a shallow airtight container for up to 2 days. The goal is to prevent the skin from turning soft and the filling from drying out.
Refrigerator Storage: Store whole baked potatoes in a paper bag or a breathable container for up to 2 days. Reheat in a 350°F (175°C) oven until heated through and the skins regain a touch of crispness, about 10–15 minutes. If they’re already filled, reheat covered loosely with foil to prevent drying out.
Freezer Instructions: I don’t recommend freezing whole baked potatoes with fillings, because texture changes aren’t ideal. If you must, freeze the plain potato halves after prebaking and cooling, then finish with topping after reheating. They’ll keep for up to 1 month, but you may notice a slightly drier interior upon thawing.
Glaze Timing Advice: If you plan to glaze, add it to fresh hot potatoes just before serving. If you’re reheating, skip the glaze until you reheat and serve to keep the surface from becoming greasy or overly glossy.
Bottom line: best results come when you bake fresh, but a gentle reheat can still bring back that comforting aroma and texture you crave. A quick rest after slicing helps the steam settle and makes the filling easier to scoop again.
Frequently Asked Questions
Final Thoughts
There’s something to be said for a recipe that feels like home but still invites creativity. Baked potatoes are exactly that: they’re simple, dependable, and endlessly configurable. They remind me that good food doesn’t always have to be complicated to be meaningful—sometimes a crisp skin, a fluffy center, and a few well-chosen toppings are all you need to gather people around the table. If you’re craving something comforting tonight, give these potatoes a try. They’re a reliable kitchen friend that never fails to deliver warmth and satisfaction. I’d love to hear which toppings you reach for—share your favorite combination in the comments, rate the recipe, and tell me how your family made it their own. Happy baking!

Perfect Oven French Fries
Ingredients
Main Ingredients
- 4 large russet potatoes about 4 or 5
- 5 tablespoons vegetable or canola oil
- 0.5 teaspoon kosher salt
- additional salt to taste
Instructions
Preparation Steps
- Peel the potatoes and cut them into 8 long wedges. Make sure they are all close to the same thickness.
- Put all of the potatoes in a medium bowl. Fill the bowl with hot tap water and let the potatoes soak for 10 to 30 minutes.
- Drain the potatoes and then pat them dry with a clean dish cloth or paper towels.
- Wipe the bowl out so there is no water left in it. Put the dry potatoes back in the dry bowl and toss them in 1 tablespoon of oil.
- Preheat the oven to 475°F. On a large, rimmed baking sheet add the remaining 4 tablespoons of oil and spread it all over the pan until it is completely coated (a pastry brush works well here).
- Sprinkle the salt on the oiled pan. Lay the potatoes out in even rows with one side against the pan.
- Cover the pan tightly with foil and bake for 5 minutes.
- Remove the foil and continue baking for 15-20 minutes.
- Using tongs or a metal spatula, flip all of the potatoes over so that the other side is now against the pan. Bake for an additional 15-20 minutes until the potatoes are crispy and starting to brown.
- Remove hot fries from the pan onto paper towels to drain some of the grease, add additional salt to taste, and then serve warm.


