


I always smile when I think about Ambrosia Salad. It’s the kind of dessert that shows up at potlucks, family reunions, and Sunday dinners with the same comfort as grandma’s voice telling you to pass the spoon. The first bite is a little party in your mouth—the coconut’s sheen, the pineapple’s bright-tanged sweetness, the soft hug of marshmallows, all mellowed by a cool, creamy undertone. It’s amazing how something so simple can feel like a warm memory you can taste. I grew up with versions that used Sour Cream and a good squeeze of lemon, and now I’m hooked on a lighter, airier take that still tastes like childhood. This Ambrosia Salad is a lifesaver on busy nights, and it’s forgiving enough to improvise with what you have in the pantry. My kids actually ask for seconds, which is basically the gold standard in our house. If you’re craving something sweet but not heavy, this is your ticket—no oven, no fuss, just good vibes in a bowl.
What is Ambrosia Salad?
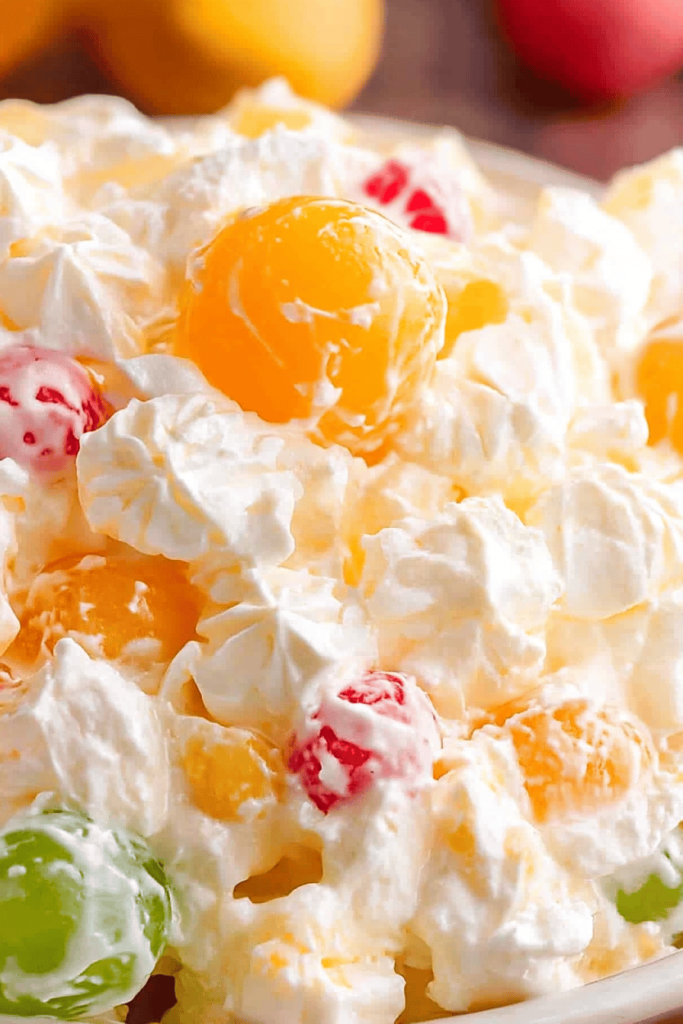
Ambrosia Salad is essentially a creamy, fruit-forward mosaic that combines coconut, fruit, and a soft, whipped-topping base. Think of it as a no-bake dessert that leans toward a dessert-treshing cousin of fruit salad, with marshmallows adding a little pillow of sweetness. The name “ambrosia” comes from the mythological food of the gods, which feels right here—the flavor is comforting and slightly magical, especially when the pineapple juice seeps into every bite. It’s a flexible concept: you can go ultra-traditional with canned fruit and a dairy-based cream, or you can swap in yogurt, almond milk, or Coconut Cream for a lighter, dairy-free version. The beauty of Ambrosia Salad is its memory-making simplicity—little kids adore it, adults appreciate its ease, and every spoonful carries a touch of nostalgia that makes the whole room feel a little warmer.
Why you’ll love this recipe?
What I love most about this Ambrosia Salad is how effortlessly it fits into any day. It’s the perfect cool-down after a spicy supper, a bright counterpoint to rich holiday treats, or a simple, crowd-pleasing dessert for summer gatherings. The flavor profile is lush without being heavy: sweet pineapple, toasty coconut, creamy creaminess, and just enough vanilla to tie things together. It’s also incredibly simple—you can assemble it in minutes and chill while you finish the last-minute cleanup. Budget-wise, this is a smart pick: most ingredients are pantry staples, and you can scale up or down without stressing. Versatility shines here, too. You can swap in dairy-free yogurt, use light whipped topping, or add in chopped maraschino cherries for a pop of color. What I love most about this recipe is its ability to adapt: it’s the dish you reach for when you want something familiar, comforting, and ready in a hurry. This Ambrosia Salad has become a dependable favorite in our kitchen, a recipe that never fails to spark smiles and conversation around the table.
How do I make Ambrosia Salad?
Quick Overview
This Ambrosia Salad comes together in three easy moves: whip up a light, creamy base, fold in fruity sweetness and coconut, then chill until the flavors mingle. The beauty is that you don’t bake a thing. You simply gather your ingredients, give everything a gentle fold, and let the fridge do the rest. It’s the kind of recipe that rewards preparation—the longer it sits, the more the flavors harmonize, and the texture becomes even more luxurious. If you’ve got a busy day, you can assemble it earlier in the afternoon and keep it chilling in the fridge until you’re ready to serve. It’s friendly to substitutions and loves a little personal flair, so don’t hesitate to adjust sweetness or add a handful of toasted nuts for crunch.
Ingredients
For the Main Batter:
- 2 cups cold whipped topping (or dairy-free whipped topping) – pick a brand you trust for creaminess
- 1/2 cup sour cream or plain yogurt (Greek yogurt works great for extra tang)
- 2 tablespoons powdered sugar (optional, to taste)
- 1 teaspoon vanilla extract
- A pinch of salt
For the Filling:
- 1 (20 oz) can crushed pineapple in juice, drained well
- 1 cup sweetened coconut flakes, lightly toasted (optional but delicious)
- 2 cups mini marshmallows
- 2 cups mandarin oranges, drained and halved if large
- 1 cup maraschino cherries, halved (optional)
- 1/2 cup chopped pecans or walnuts for a little crunch (optional)
For the Glaze:
- 1/4 cup pineapple juice (from the can or fresh)
- 1 teaspoon lemon juice
- 1 teaspoon cornstarch dissolved in 1 tablespoon cold water (for a light gloss)
- Optional: a splash of rum or orange liqueur for adults
Step-by-Step Instructions
Step 1: Preheat & Prep Pan
Since this dessert doesn’t bake, you’re not heating the oven, but you do want to prep some chill time. Chill a large mixing bowl and a spatula in the freezer for about 10 minutes to keep the base light and airy. Line up all your ingredients so you can fold with confidence—this goes fast, so you don’t want to hunt for a spoon mid-fold. If you’re cooling the coconut, toast it lightly in a dry skillet over medium heat for 1–2 minutes, stirring constantly, until it’s fragrant and just starting to brown.
Step 2: Mix Dry Ingredients
This step is quick: whisk together the powdered sugar (if using), a pinch of salt, and the vanilla. The goal is a whisper of sweetness that enhances the fruit rather than shouting over it. If you’re keeping things dairy-free, you can skip the powdered sugar altogether or swap in a touch of maple syrup to taste. The idea is to create a gentle base that lets the fruit’s brightness shine through.
Step 3: Mix Wet Ingredients
In your chilled bowl, beat or fold the whipped topping with the Sour Cream or yogurt until it’s smooth and pale. You’re aiming for a soft, barely whipped consistency—think the texture of a fluffy cloud rather than a stiff peak. Gently scrape the vanilla-sugar mixture into the cream and fold just until combined. Don’t overwork it; you want that airy, light feel in every bite.
Step 4: Combine
Now the fun part: fold the creamy base into the fruit and coconut. Start with half the whipped mixture, then add the crushed pineapple, mandarin oranges, coconut, and marshmallows. Fold with a gentle, swooping motion so you don’t deflate the cream. If you’re using cherries or nuts, fold them in last. You’ll notice a light marbling effect as the colors mingle—that’s your cue that you’re doing it just right.
Step 5: Prepare Filling
Here you’ll decide how you want to texture your Ambrosia Salad. If you like a chunkier bite, add more marshmallows and fruit. For creamier, play with a touch more yogurt or whipped topping. If you’re bringing the dish to a party, you can reserve a handful of coconut and fruit to sprinkle on top for a pretty, finished look. Taste as you go; you’re aiming for a balance of tropical sweetness, brightness from the pineapple, and that creamy finish that ties it all together.
Step 6: Layer & Swirl
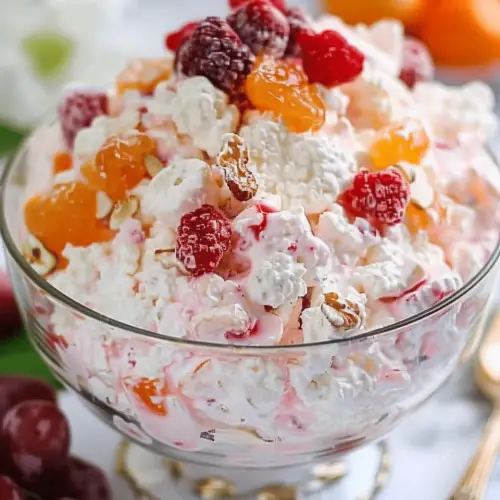
Swirl a little to create a subtle marbled effect if you’re serving in a clear dish. If you’re layering in individual cups for a party, spoon the base, then add a layer of fruit and marshmallows, finishing with a dollop of the creamy base on top. You can also do a gentle swirl in a large trifle dish to showcase the mix of colors. The visual appeal helps, but the real magic is in the scent—vanilla, coconut, and pineapple wafting up as you scoop.
Step 7: Chill
Ambrosia Salad loves a chill. Cover and refrigerate for at least 2 hours, though overnight is even better. The cold time lets the flavors mingle and the texture set just enough so it’s scoopable but still light. If you plan to transport it, assemble it in the serving dish and chill well before heading out; you’ll thank yourself when it looks as good as it tastes on arrival.
Step 8: Cool & Glaze
If you’re using glaze, simmer the pineapple juice with the lemon juice and cornstarch until glossy and slightly thickened. Let it cool to body temperature, then drizzle over the top just before serving. A final mint leaf or a few extra coconut shreds add a fresh finishing touch. If you’re not using glaze, a gentle dollop of extra whipped topping or a light sprinkle of zest works beautifully to brighten the dish.
Step 9: Slice & Serve
When you’re ready to serve, grab a wide spoon and scoop generous servings into dessert bowls. The contrast of creamy base, juicy fruit, and chewy marshmallows is what makes Ambrosia Salad unforgettable. Serve this chilled for the best texture and taste. A light dusting of toasted coconut on top doesn’t hurt either—it smells heavenly as people gather around the table. This Ambrosia Salad shines as a bright, no-fuss finish to any meal.
What to Serve It With
This Ambrosia Salad is inherently a dessert, but it can pair with a surprising array of occasions. Here are ideas that keep with the spirit of light, joyful gatherings.
For Breakfast: A tiny scoop alongside a citrusy yogurt parfait, a cup of coffee, or a flaky pastry makes a delightful late-morning treat. The creamy sweetness wakes up the palate without weighing you down.
For Brunch: Present Ambrosia Salad in mini mason jars or clear glasses with a lemon twist garnish. Pair with a sparkling beverage, like a peach Bellini or even a Cold Brew lemonade, to keep things lively and colorful.
As Dessert: This is the classic use—set it on a pretty pedestal, let the kids scoop their own portions, and watch the conversation bloom around the bowl. A splash of extra citrus zest or a few cherry halves brightens the plate and the mood.
For Cozy Snacks: Serve a small portion after a long day with a mug of hot tea or chai. The chill in the air makes the creamy chill of Ambrosia Salad especially comforting, like a hug in a bowl.
In our family, this dessert often shows up with a few variations—sometimes a little crushed pineapple on top for crunch, sometimes more coconut for texture, and sometimes a squeeze of lime to wake up the sweetness. We love using the same base and letting it morph with the season or what’s in the pantry. It’s become a tiny, delicious ritual that signals everyone to slow down and share the moment.
Top Tips for Perfecting Your Ambrosia Salad
These tips come from countless batches and a few happy disasters that taught me a lot about what works and what doesn’t.
Zucchini Prep: Not relevant here, but if you’re ever using grated zucchini in a different dish, moisture is key—squeeze it well. For Ambrosia Salad, moisture management is about the fruit and cream balance. If it seems too wet, fold in a touch more whipped topping or yogurt to lighten again.
Mixing Advice: Be gentle when folding so you don’t deflate the cream. The air in the base is what gives Ambrosia its cloudlike texture. If you overmix, you’ll end up with a denser, heavier finish. Think swoops and folds rather than vigorous stirring.
Swirl Customization: Want a more dramatic marbling effect? Reserve a small portion of the creamy base and mix in extra pineapple juice or a spoonful of cherry juice to tint it. Layer and swirl lightly to create pretty ribbons that catch the eye as well as the palate.
Ingredient Swaps: Swap yogurt for sour cream for a tangier finish, or use coconut milk whipped with a touch of vanilla for a dairy-free version. If you like a crunch, add toasted almonds or pecans. For a lighter approach, use light whipped topping and a bit less sugar. The key is to keep the balance—bright fruit, creamy base, and just enough sweetness to feel festive.
Baking Tips: Not applicable here, but chilling is your best friend. If you’re in a warm kitchen, give the dish a longer chill time to maintain the texture and prevent the mixture from getting too soft.
Glaze Variations: If you want a glaze with more zing, add a teaspoon of lime juice and a pinch of zest. For a tropical twist, replace pineapple juice with passion fruit juice. You can also skip the glaze and top with a swirl of extra whipped topping and a few coconut flakes for a glossy, festive finish.
This Ambrosia Salad has become my go-to when I want a sweet finish without any fuss. I learned this trick after years of fudging the ratios: keep the fruit well drained and fold everything gently. If the texture isn’t quite right, chill and adjust with a touch more whipped topping. Trust me on this one—little tweaks make a world of difference, and you’ll taste the difference in every bite.
Storing and Reheating Tips
Ambrosia Salad is best served chilled and fresh, but you can store it for a few days with good results if you plan ahead.
Room Temperature: Not ideal for long storage. If you must leave it out for a party, aim for under 2 hours in a cool room. The creamy base softens the longer it sits and the fruit can release more juice, which changes the texture.
Refrigerator Storage: The best option. Store in an airtight container or cover the dish tightly. It will keep well for up to 3 days, though the texture may soften a bit as the coconut and marshmallows drink in more of the cream.
Freezer Instructions: Freezing Ambrosia Salad isn’t ideal because the marshmallows and coconut can become a little tough, and the texture may separate. If you absolutely must freeze for party prep, do it in smaller portions and thaw slowly in the fridge, then give it a gentle stir and adjust with a splash of cream or yogurt before serving.
Glaze Timing Advice: If you glaze, keep the glaze separate and add just before serving to preserve the glossy look. If you’re reheating leftovers, skip the glaze and re-chill to refresh the texture.
In practice, this Ambrosia Salad tastes best when it’s served within a day or two of making it. The fruit stays juicy, the cream remains pleasantly light, and that initial bright coconut aroma stays at the forefront. If you want to keep leftovers going, portion into small jars or containers for easy grab-and-go servings. You’ll notice the texture remains appealing, and your friends will be surprised at how well the flavors stay balanced after a few days in the fridge.
Frequently Asked Questions
Final Thoughts
Ambrosia Salad holds a dear place in my kitchen, not just for the taste but for the warmth it carries. It’s the kind of dish that makes people lean in and tell you stories about family gatherings and summer evenings. The creamy sweetness, the tart fruit, and the little burst of coconut wrap around you like a favorite blanket. It’s a recipe you can lean on when you want something comforting without turning on the oven, and it’s a breeze to customize for allergies, dietary preferences, or simply what you have in the pantry. If you’re feeling nostalgic, this is your chance to recreate a cherished memory with a modern, lighter twist. I’d love to hear how your Ambrosia Salad turns out—what substitutions did you try, what fruit did you choose, and did you drizzle the glaze or skip it altogether? Drop a comment, rate the recipe, or share your own version. Happy baking, or rather, happy assembling! And if you loved this, you might enjoy revisiting other family-friendly desserts like my Creamy Coconut Fruit Salad or a quick Pineapple-Orange Cream Parfait.
Ambrosia Salad
Ingredients
Main Ingredients
- 0.5 cup Mini Marshmallows
- 0.5 cup Crushed Pineapple drained
- 0.5 cup Mandarin Oranges drained
- 0.5 cup Maraschino Cherries halved
- 0.5 cup Sweetened Shredded Coconut
- 0.5 cup Sour Cream
- 0.25 cup Whipped Topping like Cool Whip
Instructions
Preparation Steps
- In a large bowl, combine marshmallows, crushed pineapple, mandarin oranges, maraschino cherries, and coconut.
- In a separate small bowl, whisk together sour cream and whipped topping until smooth.
- Gently fold the sour cream mixture into the fruit and marshmallow mixture until well combined.
- Cover and refrigerate for at least 30 minutes before serving to allow flavors to meld.


