


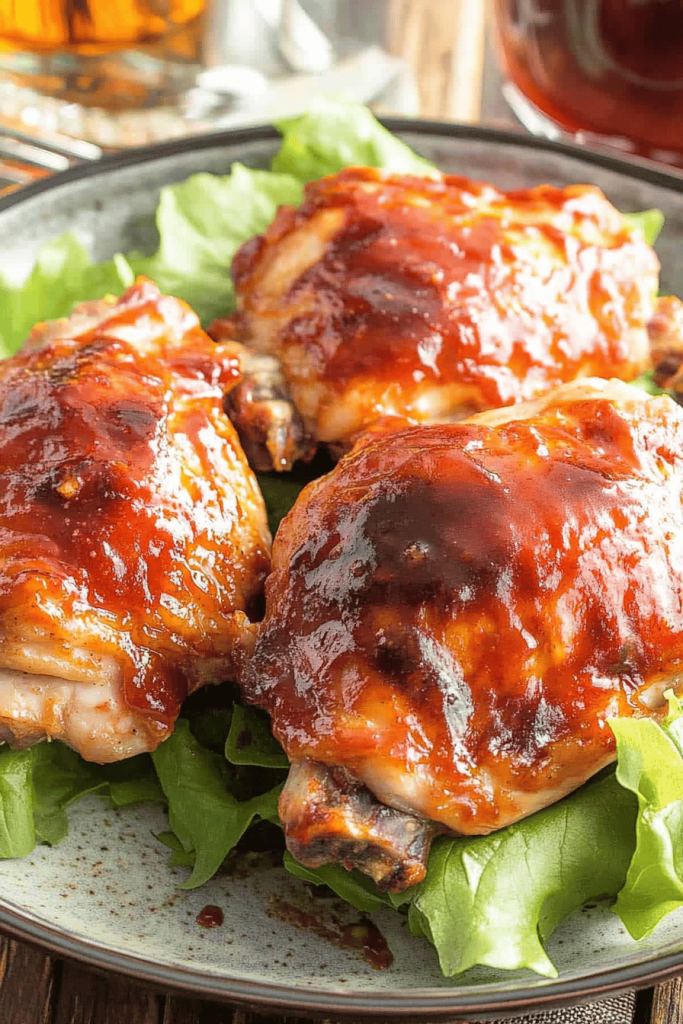
When I think of dinner that somehow feels indulgent but isn’t a hassle, I reach for these Air Fryer Chicken thighs. The aroma alone is a little memory-in-a-bottle—crisp skin, a touch of lemon, and that juicy kiss of garlic from the marinade. I remember cooking this with my sister on a busy weeknight, the kitchen filled with laughter and the sizzle of that first perfect bite. It’s almost ridiculous how quick this comes together—no standing over a hot pan, no turning, no greasy pans to scrub. It’s like a friendly shortcut that still tastes like a hug. If you’ve ever compared it to roasted chicken or skillet-battered chicken, you’ll know what I mean—the air fryer gives you that crisp finish in a fraction of the time, and the chicken stays unbelievably moist inside. And yes, this is 100% family-approved, the kind of dish my kids ask for again and again. air fryer chicken thighs is my weeknight lifesaver, and I bet it’ll be yours too.

What is an air fry chicken thighs?
Think of Air Fryer chicken thighs as the best of both worlds: deeply flavorful, fall-off-the-bone meat with a skin that’s satisfyingly crisp, achieved without deep frying. It’s essentially chicken thighs seasoned and cooked in an air fryer, where hot circulating air sears the skin and seals in juices. The name comes from the way the appliance uses a high-speed fan to move hot air around the food, creating that golden finish with far less oil. I love this method because it’s forgiving for home cooks—bone-in or boneless, skin-on or skinless, you can adapt the timing and still land on a knock-your-socks-off dinner in under half an hour. It’s a straightforward concept, but the results taste like a little kitchen victory every single time.
Why you’ll love this recipe?
What I love most about Air Fryer chicken thighs is how reliably they come out juicy and flavorful with minimal effort. The casing becomes crisp and caramelized, while the meat stays tender—almost like a mini roast in your countertop hero. It’s not just about texture; the flavor feels bright and satisfying thanks to a simple marinade that lets garlic, lemon, and paprika carry the show. This recipe is incredibly budget-friendly: thighs are usually affordable, and you don’t waste ingredients with long marinades or complicated steps. It’s also incredibly forgiving, which matters on busy nights—you can mix the dry and wet components in the morning, pop the chicken in the fridge, and dinner practically writes itself. And if you’re cooking for a crowd, you can scale up easily without crowding the air fryer basket. What I’ve learned after making this countless times is that the air fryer shines when you respect space: don’t overcrowd, let the air circulate, and you’ll be rewarded with that crisp, savory finish every time. This dish also plays nicely with variations, so you can switch up herbs or glaze and still land on a winner. air fryer chicken thighs is genuinely a family favorite that travels well for potlucks or weekend gatherings too.
How do I make an air fry chicken thighs?
Quick Overview
In a nutshell, you’ll whisk a dry rub and a quick marinade, rub the thighs, and let the Air Fryer do the heavy lifting. The process is streamlined: preheat the air fryer, mix dry ingredients, mix wet ingredients, combine, prep optional filling, place the seasoned thighs skin-side up, and cook until the internal temp hits 165°F with a crisp exterior. If you’re using a glaze, you’ll finish with a glossy coat that clings to every inch, then rest briefly before serving. The beauty is in the simplicity—less oil, more flavor, and a texture that feels special without requiring fancy techniques.
Ingredients
For the Main Batter:
- 4–6 bone-in, skin-on chicken thighs (about 1.5–2 lb total)
- 2 tablespoons olive oil
- 1 teaspoon garlic powder
- 1 teaspoon onion powder
- 1 teaspoon smoked paprika
- 1/2 teaspoon kosher salt
- 1/2 teaspoon Black Pepper
- 1/2 teaspoon lemon zest
- 1 tablespoon fresh lemon juice
For the Filling:
- Optional spinach-feta stuffing (for a few thighs): 1/4 cup chopped fresh spinach, 2 tablespoon crumbled feta, 1 tablespoon cream cheese, 1 small garlic clove minced, pinch of salt
For the Glaze:
- 2 tablespoons honey or maple syrup
- 1 tablespoon Dijon mustard
- 1 tablespoon lemon juice
- 1 teaspoon apple cider vinegar
Step-by-Step Instructions
Step 1: Preheat & Prep Pan
Preheat your air fryer to 400°F (200°C). If your basket requires preheating, give it 3–5 minutes. While it heats, pat the thighs dry with paper towels—this is the secret to a crisp skin. If you’re stuffing, make shallow slits in the thicker part of the thigh so the filling sits snugly and won’t burst through the skin.
Step 2: Mix Dry Ingredients
In a small bowl, whisk together garlic powder, onion powder, smoked paprika, salt, and pepper. This is your dry rub—stokking the surface with flavor so every bite hits the same savory note.
Step 3: Mix Wet Ingredients
In another bowl, combine olive oil, lemon zest, and lemon juice. The citrus wakes up the chicken, and the oil helps the rub cling for that even, bronzed finish.
Step 4: Combine
Pat the chicken dry again, then rub with the oil-lemon mixture. Sprinkle the dry rub evenly over the thighs, pressing lightly to help it adhere. If you’re stuffing, keep the filling mixture ready but only insert it after you’ve seasoned the exterior.
Step 5: Prepare Filling
If you’re going the stuffed route, mix the spinach, feta, cream cheese, garlic, and a pinch of salt. Make a small pocket in each thigh by gently opening the side of the meat. Spoon a heaping teaspoon of filling into each pocket, then seal with a toothpick if needed. The idea is to add a little surprise inside without breaking the surface skin.
Step 6: Layer & Swirl
Arrange the seasoned thighs in a single layer in the air fryer basket, skin-side up. If you’re using a glaze, brush a thin coating on the skin now so you get a glossy finish as it cooks. Don’t crowd the basket—the air needs room to circulate for that crisp, even color. If you’re doing a swirl effect with a glaze, you can add a second light coat halfway through cooking for extra depth.
Step 7: Bake
Cook at 400°F (200°C) for 18–22 minutes, flipping halfway if your air fryer demands it. The exact time depends on the thickness of the thighs and whether you used bone-in pieces. The safe internal temperature for chicken is 165°F (74°C); I always check a thickest thigh with an instant-read thermometer to be sure. You’ll know they’re ready when the skins are deeply golden and a light press yields a juicy, barely resistant center.
Step 8: Cool & Glaze
If you’re finishing with glaze, brush on your honey-Dijon mixture during the last 2 minutes of cooking or right after you pull them from the basket. Let the meat rest for 5 minutes; this helps the juices redistribute and the glaze set nicely. The aroma alone should make your kitchen feel like a Sunday supper even on a Tuesday.
Step 9: Slice & Serve
Rested thighs are easier to slice if you go with bone-in pieces; cut along the bone and then into bite-size portions. If you chose stuffed thighs, slice carefully to show off the colorful filling. Plate with a bright squeeze of lemon and a scattering of fresh herbs. The first bite should offer a crack of crisp skin, a burst of tangy glaze, and that tender, luscious meat that makes you smile. There’s something about this dish that invites seconds, and I’m not shy about admitting I’ve gone back for thirds more times than I’d like to admit.
What to Serve It With
These air fryer chicken thighs shine with simple, bright sides, and they work for every occasion from casual weeknights to weekend gatherings. Here are a few reliable pairings and some personal touches that keep the meal feeling special.
For Breakfast: A light, savory twist on morning bowls—serve sliced thighs over warm quinoa with a soft-cried egg, avocado, and a drizzle of yogurt-lemon sauce. The contrast of a crisp skin with creamy yolk feels indulgent but is actually very satisfying first thing in the morning. A side of roasted cherry tomatoes and a skillet of garlicky greens keeps it balanced and comforting.
For Brunch: Slice the thighs and arrange them over toast points with a dollop of ricotta and a spoonful of tomato-basil relish. Add a sparkling beverage like a light citrus spritz, and you’ve got a crowd-pleasing brunch that feels bright and grown-up without being fussy.
As Dessert: Okay, this one sounds odd, but I’ve done a playful finish that feels like dessert without being sugary. Serve the chicken with a warm berry compote and a little vanilla yogurt on the side. The sweetness from the glaze with a tart fruit note is surprisingly dessert-like and perfectly ends the meal on a fresh, clean note.
For Cozy Snacks: Make air-fryer chicken thigh “bites” with the same seasoning, then serve with a trio of dipping sauces: honey mustard, garlic yogurt, and a smoky BBQ. These are addictive—great for movie nights, game days, or just when you want something comforting to nibble on with friends.
Top Tips for Perfecting Your Air Fryer Chicken Th thighs
Here are some battle-tested tricks to keep this recipe consistently delicious, even on your craziest week nights.
Skin Crispy Prep: Pat the thighs dry thoroughly before applying the oil and rub. Any moisture under the skin steams, which dulls the crisp. Also, a light dusting of cornstarch or potato starch can give you an extra shard of crunch without making the exterior chalky.
Space Matters: Don’t overcrowd the basket. Air needs room to circulate, or you’ll end up with soggy patches. If you’re cooking many thighs, work in batches or use a larger air fryer and rotate the pieces between cycles for even browning.
Temperature Tweaks: If your air fryer runs hot, drop to 390°F (199°C) for the first 10 minutes, then finish at 400°F for a minute to crisp. If you prefer extra crispy, extend by 2–3 minutes, watching closely to prevent overbrowning.
Seasoning Confidence: The rub is where your personality lives. Don’t be afraid to swap in ground cumin, chili powder, or a pinch of dried oregano for a different vibe. A fresh lemon zest brightens any variation, so keep that in play.
Filling Flexibility: If you skip the stuffing, you still get amazing results with the dry rub and glaze. If you do fill, keep the filling compact so it stays put and cooks through. Toothpicks work wonders here, just remember to remove them before serving.
Baking vs. Air Frying: If you ever need to finish in the oven, you can transfer the thighs to a hot oven (425°F / 220°C) for 5–8 minutes to crisp further. The air fryer is faster and more hands-off, but the oven is a fine backup for larger batches.
Glaze Control: Thicken your glaze with a tiny bit of cornstarch slurry if you want a more clingy, nearly jammy finish. For a lighter coat, brush just before serving and let the residual heat finish the glaze for a glossy look.
Flavor Rehearsal: I’ve tested this with almond milk in place of dairy in a pinch, and the creaminess surprised me in a delightful way—though I usually stick to dairy here for that classic mouthfeel. Do what works for you, but keep the core seasoning intact for the best results.
Storing and Reheating Tips
Once you’ve plated your glorious air fryer chicken thighs, you might want to save leftovers for another night. Here’s how to keep them tasting great.
Room Temperature: If you’re eating within a couple of hours, you can leave them covered on the counter for a short period, but I don’t recommend more than two hours. The crisp skin may lose some of its snap, but the flavor stays intact.
Refrigerator Storage: Store in an airtight container for up to 3 days. Place in the fridge within two hours of cooking to maintain best quality. Reheat in the air fryer at 350°F (175°C) for 4–6 minutes until warmed through and the skin re-crisps.
Freezer Instructions: You can freeze cooked thighs for up to 2–3 months. Reheat from frozen in the air fryer at 360°F (180°C) for about 8–12 minutes, adjusting time for thickness. If you’re stuffing, you may want to freeze unfilled thighs separately and assemble stuffing later to keep texture intact.
Glaze Timing Advice: If you plan to freeze leftovers, skip glazing before freezing. Reheat first, then glaze right before serving to preserve the glossy finish and bright flavors.
Frequently Asked Questions
Final Thoughts
Air fryer chicken thighs aren’t just a recipe; they’re a practical promise: dinner can be delicious, fast, and comforting all at once. The crisp skin, the juicy meat, and the optional stuffing all come together to create a dish that feels a little special even on a busy weeknight. If you’re chasing weeknight wins, this is your go-to. It’s a little nostalgic, a lot satisfying, and endlessly adaptable. And the best part? You’ll get that ‘chef’s kiss’ without spending hours hovering over a hot stove. Try a glaze you love, switch up the herbs, or keep it classic with a bright lemon finish. I’d love to hear your twists—leave a comment with how you’d customize your air fryer chicken thighs, and what sides you paired them with. Happy cooking, friends!
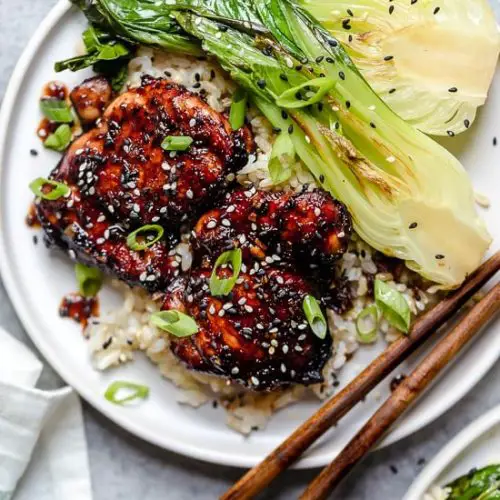
Air Fryer Asian-Glazed Boneless Chicken Thighs
Ingredients
Main Ingredients
- 8 boneless, skinless chicken thighs chicken thighs fat trimmed (32 oz total)
- 0.25 cup low sodium soy sauce
- 2.5 tablespoons balsamic vinegar
- 1 tablespoon honey
- 3 cloves garlic crushed
- 1 teaspoon Sriracha hot sauce
- 1 teaspoon fresh grated ginger
- 1 scallion green only sliced for garnish
Instructions
Preparation Steps
- In a small bowl combine the balsamic, soy sauce, honey, garlic, sriracha and ginger and mix well.
- Pour half of the marinade (1/4 cup) into a large bowl with the chicken, covering all the meat and marinate at least 2 hours, or as long as overnight.
- Reserve the remaining sauce for later.
- Preheat the air fryer to 400F.
- Remove the chicken from the marinade and transfer to the air fryer basket.
- Cook in batches 14 minutes, turning halfway until cooked through in the center.
- Meanwhile, place the remaining sauce in a small pot and cook over medium-low heat until it reduces slightly and thickens, about 1 to 2 minutes.
- To serve, drizzle the sauce over the chicken and top with scallions.


