


Oh, these Zebra Cookies! They just bring back so many memories for me. I remember my grandma baking these when I was little, and the smell would just fill our whole house. It was always a race to see who could grab one first! They look so fancy with those beautiful swirled patterns, but honestly, they’re surprisingly simple to whip up. If you’re a fan of a good ol’ Chocolate Chip Cookie, or maybe something a bit more intricate like a marbled brownie, these Zebra Cookies are going to be your new obsession. They’re the perfect marriage of tender cookie and rich chocolatey goodness, with that unmistakable stripey surprise in every bite. I swear, the moment I start mixing the batter, my whole family starts hovering around the kitchen, sniffing the air. It’s a little bit of magic, I tell you!
What are Zebra Cookies?
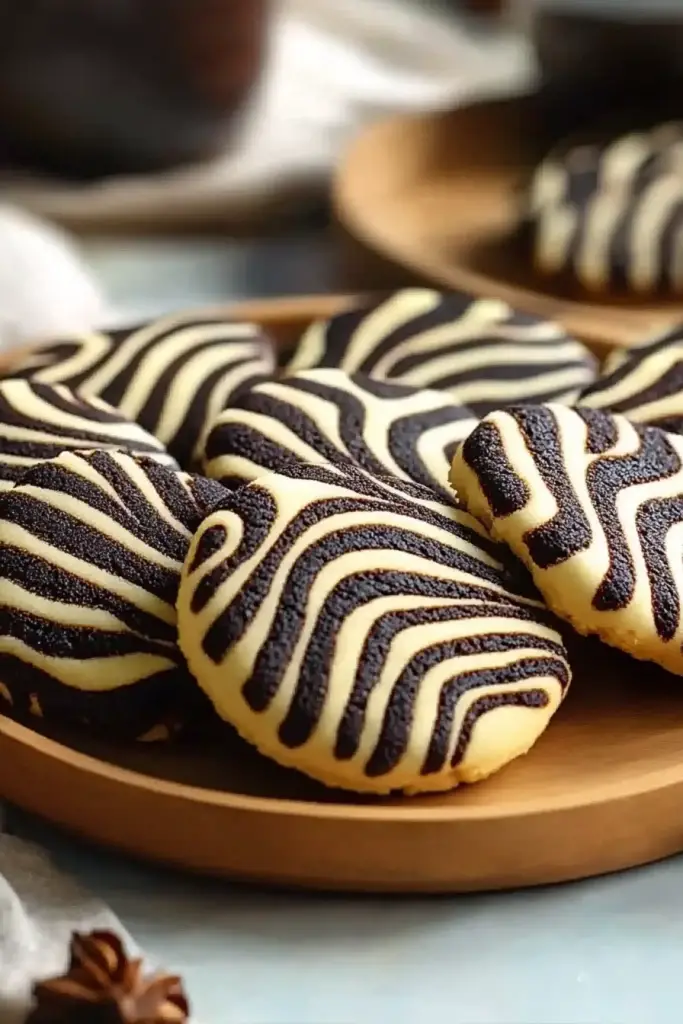
So, what exactly are these magical Zebra Cookies? Think of them as a delightful surprise in cookie form! They get their name from the distinctive black and white (or dark and light, depending on your chocolate!) marbled pattern that looks just like a zebra’s stripes. It’s achieved by swirling two different cookie doughs together before baking. One dough is usually a classic vanilla or Sugar Cookie base, and the other is a rich chocolate version. When you bake them, the colors swirl and mingle in the most beautiful way, creating a visual treat before you even take a bite. It’s like having edible art that also happens to taste absolutely divine. They’re not just a cookie; they’re an experience!
Why you’ll love this recipe?
Honestly, where do I even begin with why you’ll absolutely adore these Zebra Cookies? First off, the flavor is just out of this world. You get that comforting, slightly sweet vanilla cookie base, perfectly complemented by the deep, rich chocolate. It’s a classic pairing, but elevated. And the texture? Oh, it’s just perfect – tender and chewy in the center with just a hint of crispness around the edges. It’s everything you want in a cookie, and then some! What I love most, though, is how deceptively simple they are. People often see the beautiful stripes and think they must be incredibly difficult to make, but trust me, they’re totally achievable for even novice bakers. I’ve actually found them to be less fussy than some other rolled-and-cut cookies. Plus, they’re incredibly budget-friendly! All the ingredients are pantry staples, so you don’t need to trek to a specialty store. And the versatility! You can easily adapt the chocolate part, or even add in some fun mix-ins. They’re a lifesaver when I need to whip up something special for a bake sale, a school event, or just because the cookie craving hits hard late at night. I’ve tried a few different marbled Cookie Recipes over the years, but this one always comes out on top for its flavor, texture, and pure joy factor.
How do I make zebra cookies?
Quick Overview
Making these gorgeous Zebra Cookies involves preparing two distinct doughs – a classic vanilla and a chocolate one – then artfully swirling them together before baking. The magic truly happens when the two doughs are gently combined, creating those stunning marbled patterns. It’s a straightforward process that yields impressive results, making them perfect for impressing guests or just treating yourself. You’ll be amazed at how simple it is to achieve such a professional-looking cookie right in your own kitchen!
Ingredients
For the Main Batter:
Here’s what you’ll need for that lovely light base. I always make sure my butter and eggs are at room temperature; it truly makes a difference in how smoothly everything comes together. Using good quality vanilla extract isn’t a splurge, it’s essential for that comforting flavor! And for the flour, all-purpose is perfectly fine, but I sometimes use a blend of all-purpose and cake flour for an extra tender crumb – just a little secret I picked up over the years. Don’t worry too much about the exact brand of sugar; granulated sugar is what we’re after here. Baking powder gives them that perfect lift, and a pinch of salt balances all the sweetness beautifully.
- 1 cup (2 sticks) unsalted butter, softened
- 1 1/2 cups granulated sugar
- 2 large eggs, room temperature
- 2 teaspoons pure vanilla extract
- 2 3/4 cups all-purpose flour
- 1 teaspoon baking powder
- 1/2 teaspoon salt
For the Filling (Chocolate Swirl):
This is where the magic happens! For the chocolate component, good quality unsweetened cocoa powder is key. It gives that deep, rich chocolate flavor without being overly sweet. You can use Dutch-processed or natural, both work, but Dutch-processed tends to give a richer color and smoother flavor. I also find that a little bit of milk or cream helps to create a wonderfully smooth chocolate dough that swirls beautifully into the vanilla. Some people add a touch of instant espresso powder here to really amp up the chocolate flavor – I’ve tried it, and it’s fantastic if you’re a serious chocoholic!
- 1/2 cup (1 stick) unsalted butter, softened
- 3/4 cup granulated sugar
- 1/3 cup unsweetened cocoa powder
- 1 large egg
- 1 teaspoon vanilla extract
- 1 1/4 cups all-purpose flour
- 1/4 teaspoon salt
- 2-3 tablespoons milk or cream (as needed)
For the Glaze:
This glaze is optional, but oh-so-worth it! It adds a little extra sweetness and a beautiful shine. I usually make a simple powdered sugar glaze. The key is getting the consistency just right – not too thin that it runs off, and not too thick that it’s goopy. A splash of milk or even lemon juice for a bit of tang works wonders. Sometimes I’ll even add a tiny drop of black food coloring to enhance the zebra look, but it’s totally not necessary. For a richer flavor, you can substitute some of the milk with heavy cream.
- 2 cups powdered sugar
- 3-4 tablespoons milk or cream
- 1/2 teaspoon vanilla extract (optional)
Step-by-Step Instructions
Step 1: Preheat & Prep Pan
First things first, let’s get your oven fired up to 375 degrees Fahrenheit (190 degrees Celsius). While that’s warming up, line your baking sheets with parchment paper or silicone baking mats. This is a non-negotiable step for me; it makes cleanup a breeze and ensures your cookies don’t stick. I learned that the hard way way back when I first started baking and ended up with scorched bottoms!
Step 2: Mix Dry Ingredients
In a medium bowl, whisk together the flour, baking powder, and salt for the main vanilla batter. Give it a good whisk to make sure the leavening agent is evenly distributed. This might seem like a small step, but it’s important for an even rise and texture in your cookies. Set this aside.
Step 3: Mix Wet Ingredients
In a large bowl, cream together the softened butter and granulated sugar until light and fluffy. This is where your electric mixer really shines! Beat in the eggs one at a time, then stir in the vanilla extract. Make sure to scrape down the sides of the bowl as you go so everything is incorporated nicely.
Step 4: Combine
Gradually add the dry ingredients to the wet ingredients, mixing on low speed (or by hand with a spatula) until just combined. Be careful not to overmix here! Overmixing can lead to tough cookies, and nobody wants that. You want to see just a few streaks of flour remaining, then you know you’re good to stop.
Step 5: Prepare Filling
Now, for the chocolate dough! In a separate bowl, cream together the softened butter and sugar until smooth. Beat in the cocoa powder and vanilla extract until well combined. Add the egg and mix until fully incorporated. Then, gradually add the flour and salt, mixing until just combined. If the dough seems too stiff, add milk or cream, one tablespoon at a time, until it’s a workable consistency, similar to the vanilla dough. You want them to be easy to swirl together!
Step 6: Layer & Swirl
This is the fun part! Divide each dough into two equal portions. Take one portion of vanilla dough and one portion of chocolate dough and place them side-by-side on a lightly floured surface or between two sheets of parchment paper. Gently flatten them slightly. Now, layer them on top of each other. Roll the layered dough into a log, about 1.5 to 2 inches in diameter. If you’re using parchment, this makes it super easy to roll. Once you have your log, wrap it tightly in plastic wrap and refrigerate for at least 30 minutes, or until firm enough to slice cleanly. This chilling step is crucial for getting those neat stripes!
Step 7: Bake
Once the dough logs are firm, slice them into rounds about 1/4 to 1/2 inch thick. Place them on your prepared baking sheets, leaving about 2 inches between each cookie. Bake for 9-12 minutes, or until the edges are lightly golden and the centers look set. Keep an eye on them; ovens can be finicky, and you don’t want them to overbake!
Step 8: Cool & Glaze
Let the cookies cool on the baking sheets for a few minutes before transferring them to a wire rack to cool completely. Once they’re fully cool, you can whip up the glaze. Whisk together the powdered sugar, milk, and vanilla until smooth and pourable. Drizzle or spread the glaze over the cooled cookies. Let the glaze set before serving. This step is totally optional, but adds a lovely finish!
Step 9: Slice & Serve
Once the glaze has set (if you used it!), your beautiful Zebra Cookies are ready to be devoured! They’re best served at room temperature. Slice them cleanly with a sharp knife for those perfect stripes to show off. Enjoy the ooohs and aaahs from everyone who sees them!
What to Serve It With
These Zebra Cookies are so versatile, they fit in just about anywhere! For a delightful breakfast treat, I love pairing them with a steaming mug of strong coffee or a creamy latte. The richness of the coffee cuts through the sweetness perfectly, and the cookie itself is just tender enough for a morning indulgence. For a more elegant brunch spread, I’ll often arrange them on a tiered stand, maybe with some fresh berries on the side to add a pop of color and freshness. They look so sophisticated! As a dessert, they’re simply divine on their own, perhaps with a scoop of vanilla bean Ice Cream, or presented alongside a rich chocolate mousse for an extra decadent chocolate experience. And for those cozy, quiet moments, when you just need a comforting snack? They’re perfect with a glass of cold milk, or even a warm cup of tea. My family loves them after school with a glass of milk – it’s become a little ritual.
Top Tips for Perfecting Your Zebra Cookies
After making these Zebra Cookies more times than I can count, I’ve definitely picked up a few tricks that make the process smoother and the results even better. When it comes to the zucchini itself, don’t skip the step of squeezing out as much moisture as possible! I usually grate my zucchini, then wrap it in a clean kitchen towel or cheesecloth and wring it out like you’re trying to get every last drop of water out. This is crucial for preventing soggy cookies. For mixing, remember that light hand is best. Overmixing develops the gluten in the flour, leading to tough cookies. Stop as soon as you don’t see dry streaks of flour. When you’re swirling the doughs, don’t go crazy! Gentle swirling creates beautiful patterns. If you over-swirl, you’ll end up with a muddy brown color instead of distinct stripes, and that’s a rookie mistake I’ve definitely made before. For ingredient swaps, I’ve experimented with different types of flour; a blend of all-purpose and a little bit of almond flour can add a lovely nutty flavor and tender texture. If you’re out of milk for the glaze, a little bit of orange juice can add a surprisingly delicious citrus note! And for baking, remember that ovens vary. My oven runs a little hot, so I often set my timer a minute or two early and check for doneness. A slightly underbaked cookie is always better than an overbaked one in my book – it’s just so much more tender!
Storing and Reheating Tips
These Zebra Cookies are surprisingly resilient when it comes to storage, though they’re so delicious, they rarely last long enough for me to worry about it! If you need to store them at room temperature, and they don’t have glaze, an airtight container is your best friend. They’ll stay fresh and chewy for about 3-4 days. If they have a glaze, it’s best to let the glaze set completely before packing them, and they’ll still be good for about 2-3 days. For longer storage, the refrigerator is a great option, especially if your kitchen is warm. Pop them into an airtight container, and they’ll keep well for up to a week. The texture might firm up slightly in the fridge, but they’ll soften up again at room temperature. If you’re really planning ahead, or made a huge batch, these cookies freeze beautifully! Wrap individual cookies or stacks of cookies tightly in plastic wrap, then place them in a freezer-safe bag or airtight container. They’ll keep their quality for up to 2-3 months. When you’re ready to enjoy them, just let them thaw overnight in the refrigerator, or at room temperature for a few hours. If they seem a little dry after thawing, you can pop them in a toaster oven or a regular oven at a very low temperature (around 200°F or 95°C) for just a few minutes to warm them through. If you’ve glazed them, I usually don’t recommend reheating unless absolutely necessary, as the glaze can get a bit sticky. It’s best to add glaze to cookies that are already at room temperature.
Frequently Asked Questions
Final Thoughts
I really hope you give these Zebra Cookies a try! They’re more than just a recipe to me; they’re a little piece of home, a way to connect with my childhood, and a guaranteed way to bring smiles to everyone’s faces. The combination of that tender vanilla cookie and rich chocolate swirl is just pure bliss, and the visual appeal is the cherry on top. They’re proof that you don’t need to be a pastry chef to create something truly special in your own kitchen. If you love these, you might also enjoy my Classic Chocolate Chip Cookies or my Soft and Chewy Sugar Cookies for more comforting treats. I can’t wait to hear what you think! Let me know in the comments below how yours turned out, and if you have any fun variations or personal twists you’d like to share. Happy baking, and may your kitchen always smell as wonderful as mine does when these are in the oven!

Zebra Cookies
Ingredients
Main Ingredients
- 0.5 cup Unsalted Butter softened
- 1 cup Granulated Sugar
- 1 large Egg
- 1 teaspoon Vanilla Extract
- 2.5 cups All-Purpose Flour
- 0.5 teaspoon Baking Soda
- 0.25 teaspoon Salt
- 2 tablespoon Unsweetened Cocoa Powder
Instructions
Preparation Steps
- In a large bowl, cream together the softened butter and granulated sugar until light and fluffy.
- Beat in the egg and vanilla extract until well combined.
- In a separate medium bowl, whisk together the flour, baking soda, and salt.
- Gradually add the dry ingredients to the wet ingredients, mixing until just combined. Divide the dough in half.
- In a small bowl, mix one half of the dough with the cocoa powder until evenly combined.
- On a lightly floured surface, roll out each half of the dough into a rectangle of approximately the same size (about 10x12 inches).
- Carefully stack the chocolate dough rectangle on top of the vanilla dough rectangle. Gently press them together.
- Starting from one of the longer sides, tightly roll up the stacked dough into a log.
- Wrap the log tightly in plastic wrap and refrigerate for at least 1 hour, or until firm.
- Preheat your oven to 350°F (175°C). Line baking sheets with parchment paper.
- Unwrap the chilled dough log and slice it into 0.25-inch thick cookies.
- Place the cookies on the prepared baking sheets, leaving about 2 inches between them.
- Bake for 10-12 minutes, or until the edges are lightly golden brown.
- Let the cookies cool on the baking sheets for a few minutes before transferring them to a wire rack to cool completely.


