


You know those desserts that just feel like a warm hug? The ones that taste even better than they look, and somehow manage to be both incredibly elegant and ridiculously easy to whip up? Well, I’ve got one for you today that hits all those marks and then some. We’re talking about my White Chocolate Raspberry Tiramisu. Now, I know what you might be thinking – tiramisu, isn’t that a bit… involved? And usually, you’d be right! But this version is a total game-changer. It’s inspired by that classic Italian dessert, but with a creamy, dreamy, white chocolate twist and a burst of tart raspberry that just sings. It’s the kind of dessert that makes people ask for the recipe immediately, and it’s honestly become my secret weapon for impressing guests or just treating myself after a long week. Forget complicated baking projects; this is pure joy in dessert form, and it’s going to become your new favorite too.
What is White Chocolate Raspberry Tiramisu?
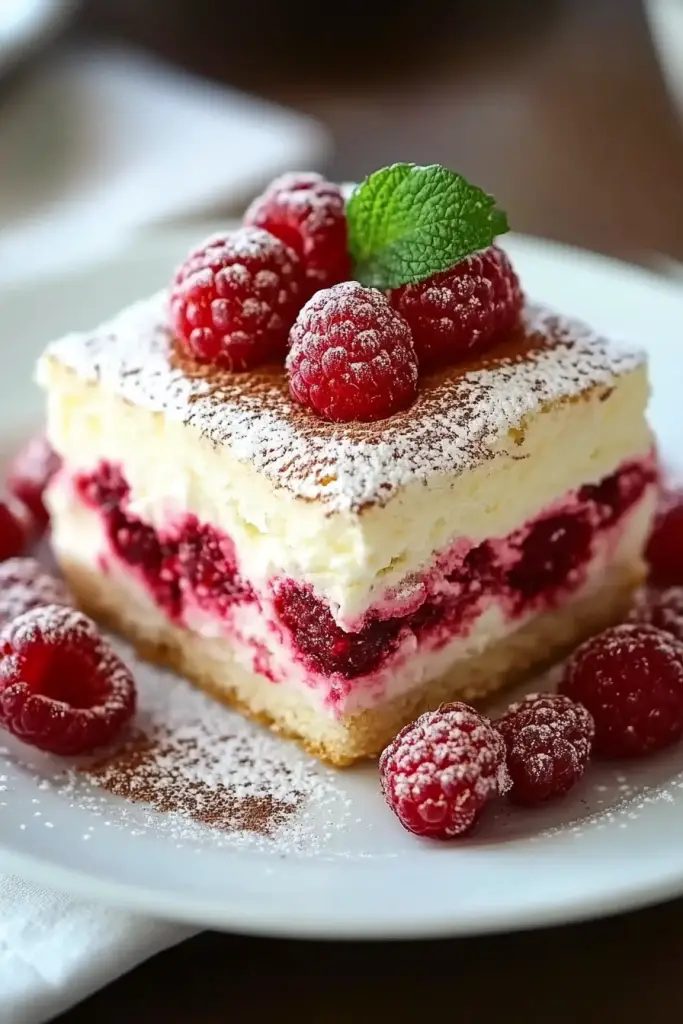
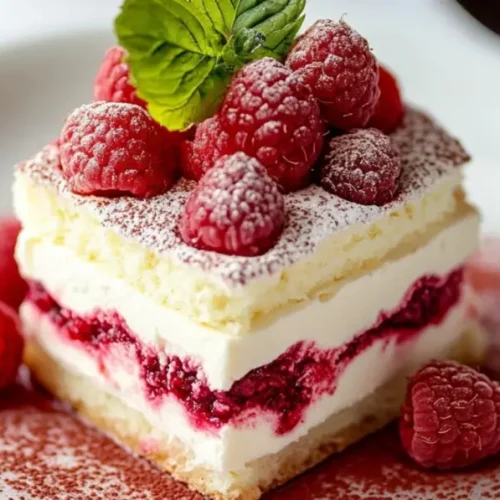
So, what exactly is this magical creation? At its heart, it’s a no-bake dessert that plays on the familiar layers of a classic tiramisu, but with some fabulous upgrades. Think of it as the sophisticated cousin of your favorite cheesecake, but lighter and with an extra dimension of flavor. Instead of the traditional coffee and cocoa, we’re diving into a world of sweet White Chocolate and vibrant raspberries. We still have those lovely ladyfingers, but they’re soaked in a delicate raspberry liqueur or juice instead of coffee, giving them a subtle fruity kick. Then, between those layers, we have this unbelievably smooth, creamy mixture that’s a dreamy blend of mascarpone cheese, whipped cream, and melted white chocolate. And the raspberries? They’re swirled throughout and sprinkled on top, adding that perfect tangy counterpoint to all the sweetness. It’s essentially a celebration of creamy, fruity, and subtly sweet flavors all layered together into one glorious bite. It’s approachable, it’s elegant, and it’s seriously delicious.
Why you’ll love this recipe?
What makes this White Chocolate Raspberry Tiramisu a winner?flavor profile is just out of this world. You get that rich, comforting sweetness from the white chocolate, balanced beautifully by the bright, slightly tart zing of the raspberries. It’s not overly sweet, which is something I always strive for. The textures are incredible too – the soft, soaked ladyfingers, the impossibly smooth mascarpone cream, and the occasional burst of juicy raspberry. It’s a party in your mouth! Then there’s the simplicity. This is where it really shines. No baking required! Seriously. You can whip this up in about 20-30 minutes of active time, and then it just needs to chill. It’s a lifesaver when you have unexpected guests or you’re craving something special but don’t have hours to spend in the kitchen. It’s the kind of dessert that makes you look like a culinary genius with minimal effort, and who doesn’t love that? Plus, it’s surprisingly cost-effective. The ingredients are pretty standard grocery store finds, and you don’t need a ton of them to create something truly spectacular. And talkversatility! While I adore it as a dessert after a nice meal, I’ve also served this at baby showers, birthday parties, and even as a special weekend treat. It feels festive enough for a crowd but also perfectly decadent for a quiet night in. What I love most about this specific recipe is that it takes a classic dessert I already adored and gives it a unique, delightful spin. It’s familiar enough to be comforting, but exciting enough to be a real treat. It’s the perfect blend of my childhood love for white chocolate and my adult appreciation for sophisticated desserts.
How to Make White Chocolate Raspberry Tiramisu
Quick Overview
Making this decadent dessert is surprisingly straightforward! You’ll whip up a luscious White Chocolate mascarpone cream, gently soak ladyfingers in a raspberry liquid, and then layer everything together with fresh raspberries. It’s all about building those beautiful layers. The magic happens in the chilling process, allowing the flavors to meld and the dessert to set into a dreamy, creamy consistency. It’s truly a no-bake wonder that comes together in a flash and guarantees rave reviews.
Ingredients
For the Main Batter (Creamy Filling):
8 ounces (about 225g) mascarpone cheese, softened at room temperature. This is key for a smooth, lump-free cream. Make sure it’s good quality; it makes a difference!
1 ½ cups (about 360ml) heavy whipping cream, very cold. You want it nice and cold so it whips up beautifully.
½ cup (about 100g) granulated sugar, or to taste. I like to err on the less sweet side and let the white chocolate and raspberries do their thing.
6 ounces (about 170g) good quality white chocolate, finely chopped. Use a chocolate you enjoy eating on its own, not baking chips if you can help it. They often have stabilizers that don’t melt as smoothly.
1 teaspoon vanilla extract. Always use good vanilla extract!
For the Raspberry Soak & Swirl:
1 ½ cups (about 360ml) raspberry liqueur (like Chambord) or raspberry juice (for an alcohol-free version). If using juice, I like to reduce it slightly by simmering it for 5-10 minutes to concentrate the flavor.
1 pint (about 2 cups or 300g) fresh raspberries, plus extra for garnish. Make sure they’re plump and bright!
For the Layers:
2 packages (about 24-30) ladyfingers (Savoiardi biscuits). Look for the crisp, dry kind. You’ll need enough to make two layers in your dish.
Step-by-Step Instructions
Step 1: Preheat & Prep Pan
First things first, let’s get our serving dish ready. I usually opt for a 9×13 inch rectangular glass dish, but a square dish or individual ramekins work beautifully too. You don’t need to grease it or anything, just make sure it’s clean and dry. Set it aside while we get everything else ready. No preheating needed for this no-bake wonder!
Step 2: Mix Dry Ingredients
This step is super simple for this recipe! In a medium bowl, combine the ½ cup of granulated sugar with the 1 teaspoon of vanilla extract. I like to do this early so the sugar can start to dissolve slightly in the vanilla, ensuring it’s well incorporated into the cream later. Don’t worry, there aren’t any flour or leavening agents to worry about mixing here!
Step 3: Mix Wet Ingredients
Now for the creamy magic! In a large, chilled bowl (chilling the bowl helps the cream whip better), pour in your very cold heavy whipping cream. Using an electric mixer (handheld or stand mixer), whip the cream until soft peaks form. This means when you lift the beaters, the cream holds a peak that gently curls over. Gradually add the sugar and vanilla mixture you prepared, and continue whipping until medium-stiff peaks form. The cream should hold its shape firmly when the beaters are lifted. Be careful not to over-whip, or you’ll end up with butter!
Step 4: Combine
In a separate bowl, gently beat the softened mascarpone cheese with a whisk or a spatula until it’s smooth and creamy. Then, fold about one-third of the whipped cream into the mascarpone to lighten it. Don’t be afraid to be gentle here; we want to keep that airy texture! Once it’s mostly combined, gently fold in the remaining whipped cream until everything is just incorporated and you have a beautiful, fluffy mixture. It should look like luscious, whipped clouds.
Step 5: Prepare Filling
Now, let’s get that luscious white chocolate into our cream. Gently melt your finely chopped white chocolate. You can do this in a double boiler (a heatproof bowl set over a saucepan of simmering water, making sure the water doesn’t touch the bottom of the bowl) or carefully in the microwave in 30-second intervals, stirring well between each burst until it’s smooth. Let the melted white chocolate cool for just a minute or two so it’s not piping hot, then gradually fold it into the mascarpone and whipped cream mixture until it’s fully combined and you have a silky smooth, white chocolate cream. Taste it now and adjust sugar if needed, though the white chocolate usually provides plenty of sweetness.
Step 6: Layer & Swirl
This is where it starts to look like tiramisu! Pour your raspberry liqueur or juice into a shallow dish. Quickly dip each ladyfinger into the liquid for just a second or two – you don’t want them to get soggy, just nicely moistened. Arrange a single layer of these dipped ladyfingers in the bottom of your prepared dish, breaking them if needed to fill in any gaps. Spoon about half of the white chocolate mascarpone cream evenly over the ladyfingers. Scatter about half of your fresh raspberries over the cream. Drizzle about half of the remaining raspberry liquid over this layer. Repeat with another layer of dipped ladyfingers, the rest of the mascarpone cream, and the remaining raspberries. For an extra touch, you can gently swirl some of the remaining raspberry liquid into the top layer of cream with a toothpick for a pretty marbled effect.
Step 7: Bake
Good news – there’s no baking involved! This White Chocolate Raspberry Tiramisu is a no-bake dessert. The chilling process is what sets it and allows the flavors to meld. So, instead of baking, we move straight to the next crucial step: chilling!
Step 8: Cool & Glaze
Once your tiramisu is layered up, cover it tightly with plastic wrap. Pop it into the refrigerator and let it chill for at least 4-6 hours, or preferably overnight. This chilling time is essential. It allows the ladyfingers to soften perfectly, the cream to set up, and all those wonderful flavors to meld together into a cohesive, delicious dessert. If you’re planning to garnish with a glaze, it’s usually best to do that right before serving to keep it fresh. A simple dusting of powdered sugar or some extra fresh raspberries is often all it needs!
Step 9: Slice & Serve
When you’re ready to serve, carefully remove the plastic wrap. If you want a perfectly clean slice, you can run a warm knife under hot water and dry it before cutting. Slice the tiramisu into individual portions. Garnish with a few extra fresh raspberries or a light dusting of powdered sugar if you like. This dessert is best served chilled. The texture is divine when it’s cold and firm, yet still incredibly creamy. Enjoy every single bite!
What to Serve It With
This White Chocolate Raspberry Tiramisu is so versatile, it can fit into so many occasions! For a delightful breakfast treat (because why not?), I love pairing a small slice with a hot cup of coffee – maybe a vanilla or hazelnut latte if you’re feeling fancy. It’s a sweet start to the day that feels incredibly indulgent. If you’re hosting brunch, this is an absolute showstopper. Serve it in pretty individual glasses or a beautiful trifle dish. It looks stunning and pairs wonderfully with mimosas or a refreshing iced tea. For a more formal dessert, it’s perfect after a rich meal. A light dusting of cocoa powder or a few slivers of white chocolate on top can elevate it further. It’s a sophisticated end to any dinner party. And for those cozy snacks when you just need something comforting, a slice of this with a glass of cold milk or a cup of herbal tea is pure bliss. My family tradition is to have it after Sunday dinner, and it’s always the highlight of the meal. I’ve also found that a drizzle of raspberry coulis on the plate adds a beautiful visual and an extra pop of flavor that’s just divine.
Top Tips for Perfecting Your White Chocolate Raspberry Tiramisu
I’ve made this White Chocolate Raspberry Tiramisu more times than I can count, and along the way, I’ve picked up a few tricks that I think will really help you achieve tiramisu perfection. First, regarding the ladyfinger prep: the key is a quick dip. Seriously, just a second or two per side in the raspberry liquid. If you soak them too long, they’ll turn to mush and your tiramisu will be too wet. You want them softened but still holding their shape. For mixing advice, always be gentle when folding the whipped cream into the mascarpone. You want to maintain that airy, light texture. Overmixing can deflate the cream, making your tiramisu denser than you want. When it comes to swirl customization, don’t go crazy! A gentle swirl of extra raspberry liquid or a few dollops of raspberry jam into the mascarpone cream before layering can add a beautiful visual appeal and pockets of intense flavor. Just don’t overdo it, or you’ll lose the distinct white chocolate creaminess. If you’re thinking about ingredient swaps, using fresh raspberries is ideal, but if they’re out of season, frozen ones work too! Just thaw them and drain off any excess liquid. For the raspberry liquid, if you don’t have liqueur, a good quality raspberry juice is a perfect substitute. You can even make your own by simmering fresh raspberries with a little sugar and water, then straining. For baking tips, since this isn’t baked, the most important tip is about chilling! Give it ample time. Overnight is truly best for the flavors to meld and the texture to set perfectly. Don’t rush this step! Lastly, for glaze variations, while I usually just go with fresh raspberries and a dusting of powdered sugar, you could also make a simple white chocolate ganache to drizzle over the top, or even a light raspberry glaze made from reducing raspberry jam with a touch of water. Just remember to let it cool slightly before drizzling.
Storing and Reheating Tips
One of the best things about this White Chocolate Raspberry Tiramisu is how well it keeps, making it perfect for making ahead. For room temperature storage, it’s really best to avoid leaving it out for more than two hours, especially if your kitchen is warm. The dairy and cream mean it’s susceptible to spoilage. If you’ve made it and plan to serve it within a few hours, keeping it covered at cool room temperature is fine, but refrigeration is always safest. For refrigerator storage, cover your dish tightly with plastic wrap or transfer it to an airtight container. It will stay delicious for about 3-4 days. The texture might change slightly as it sits – the ladyfingers will get even softer, which many people love, but it’s good to know. Make sure it’s well-sealed to prevent it from absorbing any odors from other foods. I haven’t tried freezer instructions for this particular recipe, as the texture of the mascarpone cream and ladyfingers can change quite a bit once frozen and thawed. It’s best enjoyed fresh or refrigerated. For glaze timing advice, I strongly recommend adding any fresh fruit garnish or a dusting of powdered sugar just before serving. If you opt for a drizzle of ganache or a jam-based glaze, you can add that when you first cover it for refrigeration, as it will hold up better than fresh fruit.
Frequently Asked Questions
Final Thoughts
So there you have it – my absolute favorite White Chocolate Raspberry Tiramisu! It’s the kind of dessert that always feels special, no matter the occasion, and yet it’s so wonderfully easy to make. I truly believe that delicious, impressive desserts shouldn’t have to be complicated, and this recipe is proof of that. The combination of creamy white chocolate, tangy raspberries, and those perfectly softened ladyfingers is just heavenly. If you’re looking for something that’s a little bit elegant, a little bit comforting, and a whole lot delicious, you’ve got to give this a try. I promise, it’s a recipe you’ll come back to again and again. If you’re a fan of this flavor combination, you might also enjoy my White Chocolate Raspberry Scones or my No-Bake Raspberry Cheesecake – they use similar flavor profiles and are just as easy! I can’t wait to hear how your White Chocolate Raspberry Tiramisu turns out! Please leave a comment below with your thoughts, any variations you tried, or your own favorite dessert memories. Happy baking (or in this case, happy assembling)!
White Chocolate Raspberry Tiramisu
Ingredients
Main Ingredients
- 0.5 cup Granulated Sugar
- 3 large Egg Yolks
- 0.5 cup Milk
- 1.5 cup White Chocolate Chips finely chopped
- 16 oz Mascarpone Cheese softened
- 0.5 cup Heavy Cream whipped to stiff peaks
- 1 box Ladyfingers
- 1.5 cup Raspberry Liqueur
- 2 cup Fresh Raspberries
- 0.5 cup White Chocolate Shavings for garnish
Instructions
Preparation Steps
- In a heatproof bowl, whisk together sugar and egg yolks. Place the bowl over a saucepan of simmering water (double boiler) and whisk constantly until thickened and pale yellow, about 5-7 minutes. Remove from heat.
- In a small saucepan, heat milk until just simmering. Gradually whisk the hot milk into the egg yolk mixture. Return the mixture to the saucepan and cook over low heat, stirring constantly, until it thickens enough to coat the back of a spoon. Do not boil.
- Remove from heat and stir in the chopped white chocolate until melted and smooth. Let the mixture cool slightly.
- In a separate bowl, beat the softened mascarpone cheese until smooth. Gently fold the slightly cooled white chocolate mixture into the mascarpone. Then, fold in the whipped heavy cream until just combined.
- Quickly dip each ladyfinger into the raspberry liqueur. Arrange a layer of dipped ladyfingers in the bottom of a 9x13 inch dish.
- Spread half of the mascarpone mixture over the ladyfingers. Scatter half of the fresh raspberries over the mascarpone layer.
- Repeat the layers: dip and arrange another layer of ladyfingers, spread the remaining mascarpone mixture, and scatter the remaining fresh raspberries.
- Cover the dish with plastic wrap and refrigerate for at least 4 hours, or preferably overnight, to allow the flavors to meld and the ladyfingers to soften.
- Before serving, garnish with white chocolate shavings.


