


Okay, friends, gather ’round because I’ve got a treat for you. You know those days when you’re craving something sweet, something refreshing, but you *really* don’t want to turn on the oven and deal with a whole production? Yeah, me too. That’s exactly when my mind drifts to these Watermelon Fries. They’re not *actual* fries, of course, but they’re just as addictive, ridiculously easy, and oh-so-satisfying. Think of them as nature’s candy, reinvented. I first stumbled upon the idea a few summers ago, looking for a fun way to use up a giant watermelon that was threatening to take over my fridge. My kids went absolutely bonkers for them, and honestly, so did I. They’re the perfect antidote to a scorching hot afternoon or a perfect simple dessert when you’ve already spent hours in the kitchen. They have that bright, pure watermelon flavor with a little something extra that makes them truly special, like a much cooler, less complicated cousin to your favorite cake or cookie.
What are watermelon fries?
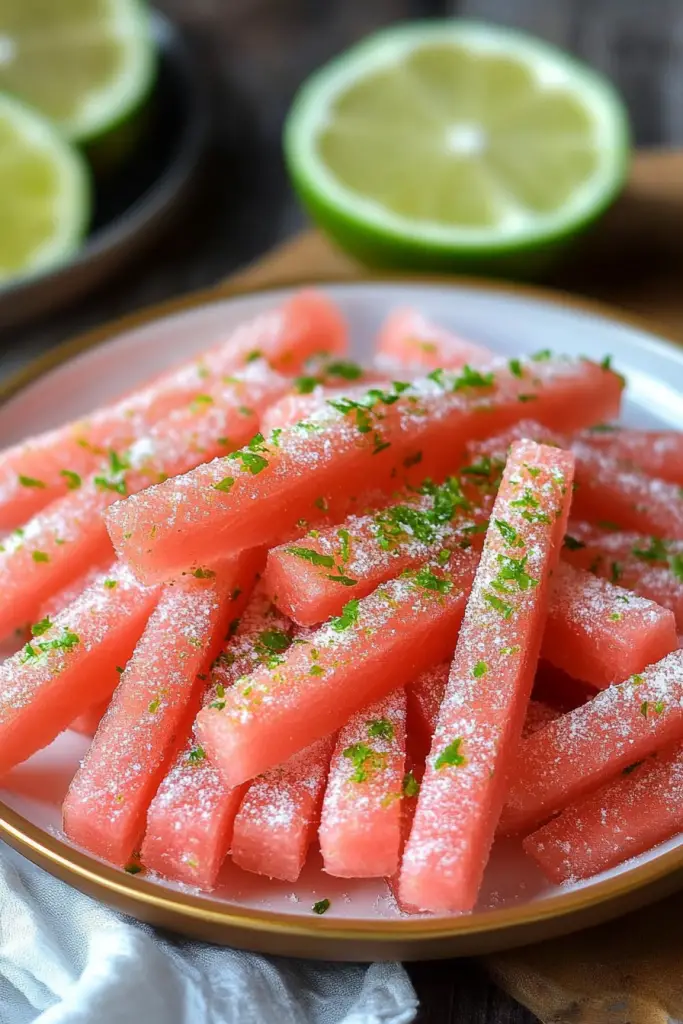
So, what exactly are Watermelon Fries? Well, it’s exactly what it sounds like – watermelon cut into fry-like shapes. But here’s the magic: we’re not just cutting up watermelon and calling it a day. We’re giving it a little glow-up! Imagine chilled, crisp watermelon wedges, lightly coated in a sweet, tangy, and utterly delightful glaze. It’s basically a refreshing, fun, and healthy dessert or snack that tricks your brain into thinking you’re having something decadent. It’s essentially a deconstructed, more playful version of a fruit salad, but with a more satisfying textural component and a flavor boost from the glaze. It’s the kind of thing that makes you smile from the inside out, perfect for backyard barbecues, lazy pool days, or even just a fun after-school treat that doesn’t involve a sugar crash.
Why you’ll love this recipe?
Honestly, there are so many reasons why this recipe has become a staple in my kitchen. First off, the **flavor** is just out of this world. The natural sweetness of the watermelon is amplified by the glaze, creating this perfect balance of sweet and tart that’s incredibly refreshing. It’s like a burst of sunshine with every bite! Then there’s the **simplicity**. I’m not kidding when I say this is one of the easiest things you’ll ever make. It takes just a few minutes to whip up the glaze and cut the watermelon. It’s the kind of recipe you can whip up when unexpected guests arrive or when you just need a quick sweet fix. And let’s talk about **cost-efficiency**. Watermelon is usually pretty budget-friendly, especially in the summer, and the glaze ingredients are pantry staples. You get so much deliciousness for such a small investment! Plus, the **versatility** is a huge win. You can serve these as a light dessert, a fun appetizer at a party, or even a healthy snack for kids. They’re fantastic on their own, but they’re also wonderful paired with other fruits or a scoop of sorbet. What I love most about these Watermelon Fries, though, is how they always bring a smile to people’s faces. They’re unexpected, playful, and just downright delightful. They’re a much healthier alternative to those sugary popsicles and a much simpler dessert than baking a whole cake. It’s the perfect way to enjoy the quintessential summer fruit in a totally new way.
How do you make watermelon fries?
Quick Overview
The beauty of these Watermelon Fries is their utter simplicity. You’ll core and slice your watermelon, whip up a quick, luscious glaze, and then dip or drizzle those watermelon “fries.” It’s a no-bake, no-fuss recipe that takes mere minutes to assemble but delivers maximum enjoyment. The key is using perfectly ripe watermelon and a glaze that’s just the right balance of sweet and tangy. It’s so straightforward that even the most novice cook can nail it on the first try, and the results are always stunningly delicious.
Ingredients
For the Main Batter (the Watermelon!):
We’re starting with the star of the show, of course! You’ll want one large, ripe watermelon. Look for one that feels heavy for its size, has a creamy yellow spot on the underside (that’s where it rested on the ground and ripened!), and sounds hollow when you give it a thump. A seedless variety is always my go-to for ease, but seeded works too if you don’t mind picking out a few seeds. The better the watermelon, the better your fries!
For the Glaze:
This is where the magic happens! For a classic glaze, you’ll need:
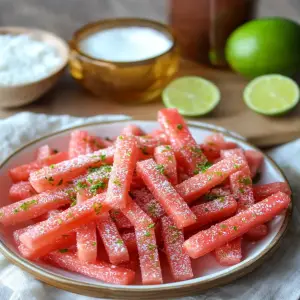
- 1/2 cup powdered sugar (also known as confectioners’ sugar). This makes for a smooth, easily drizzled glaze.
- 2-3 tablespoons fresh lime juice. The acidity cuts through the sweetness and adds a lovely zing. Lemon juice works in a pinch too!
- 1/2 teaspoon vanilla extract (optional, but it adds a lovely depth of flavor).
- A tiny pinch of salt to balance everything out.
You can totally play around with this! If you want a more tart glaze, add a bit more lime juice. If you prefer it sweeter, a tiny bit more powdered sugar. For a fun twist, you could even add a drop of food coloring or some finely grated citrus zest!
For the Garnish (Optional but Recommended!):
A sprinkle of fresh mint leaves or a light dusting of toasted coconut flakes can elevate these even further.
Step-by-Step Instructions
Step 1: Preheat & Prep Pan
Okay, first things first. We need to get our watermelon ready for its transformation! Grab your largest cutting board and a sharp chef’s knife. You’ll want to slice off the top and bottom ends of the watermelon so it sits flat. Then, carefully slice off the rind, working your way down the sides. Aim to remove all the green and white parts, leaving just the vibrant red flesh. Once it’s peeled, cut the watermelon into large, manageable wedges, about 1-1.5 inches thick. We want pieces that are substantial enough to hold their shape but not so thick they’re awkward to eat.
Step 2: Mix Dry Ingredients
This step is technically for the glaze, but it’s good to get your bowl ready. Grab a small mixing bowl. We’re going to combine the powdered sugar first. Make sure your powdered sugar is nice and fluffy, not clumpy. I usually give it a quick whisk in its container if it’s been sitting for a while. This is the base of our glaze, so a smooth start is key!
Step 3: Mix Wet Ingredients
Now, let’s add the wet ingredients to that bowl with the powdered sugar. Squeeze in your fresh lime juice. I always try to use fresh lime juice because the flavor is so much brighter. Start with about 2 tablespoons and have that third tablespoon ready if you need it to thin out the glaze. Add your vanilla extract if you’re using it, and that tiny pinch of salt. You can whisk this together by hand with a small whisk or a fork. We want it to be smooth and pourable, but not too thin.
Step 4: Combine
We’re essentially combining the watermelon with the glaze. Take your prepared watermelon wedges and place them on a clean baking sheet lined with parchment paper or a silicone mat. This is crucial for easy cleanup and prevents them from sticking. Now, you have two options for glazing: you can either dip each watermelon wedge into the glaze, or you can drizzle the glaze over the top. I often find drizzling is easier for a lighter coating, but dipping gives you more of that intense flavor. If you’re dipping, just spoon some glaze into a shallow dish and dip the cut side of the watermelon. If you’re drizzling, spoon the glaze into a piping bag (or a Ziploc bag with a corner snipped off) and create pretty lines over the wedges.
Step 5: Prepare Filling
The filling is essentially the watermelon itself! The preparation is covered in Step 1. Ensuring your watermelon is perfectly ripe, seedless (if you prefer), and nicely chilled before you start is your “filling preparation.” The quality of the watermelon truly makes or breaks this recipe, so don’t skip the ripe selection process!
Step 6: Layer & Swirl
We’re not exactly layering or swirling here in the traditional sense like a cake, but we are arranging the watermelon fries on our serving platter or baking sheet. Think about how you want them to look! For serving immediately, arrange them in a fun, slightly overlapping pattern. If you’re chilling them for later, make sure they aren’t touching too much so the glaze doesn’t get messy. For a fancier presentation, you can stand them up in a glass or arrange them like fanned-out fries.
Step 7: Bake
This is the best part – there’s NO baking required! That’s right. These Watermelon Fries are served chilled. So, instead of baking, we’re going to pop them into the refrigerator for about 15-20 minutes. This helps the glaze set up a bit and ensures the watermelon is perfectly chilled and refreshing. It’s the perfect amount of time to clean up any stray glaze drips or prep your serving platter. Don’t skip this chilling step; it makes all the difference in texture and flavor!
Step 8: Cool & Glaze
As mentioned in Step 7, we’re chilling the watermelon *after* glazing to help the glaze set. So, after you’ve drizzled or dipped your watermelon wedges, place them in the refrigerator on that parchment-lined baking sheet. I find about 15-20 minutes is perfect. This also allows the flavors to meld beautifully. The glaze will firm up just enough to not be messy when you pick them up, but it will still be wonderfully soft and flavorful. If you’re planning to store them for longer (we’ll get to that!), you might want to glaze them *just* before serving for the freshest look.
Step 9: Slice & Serve
Once they’ve had their little chill-out time in the fridge, your Watermelon Fries are ready to go! Carefully arrange them on a beautiful platter. If you’re feeling fancy, sprinkle them with some fresh mint leaves or a little bit of toasted coconut. They look absolutely stunning and are always a huge hit. Serve them immediately while they’re perfectly chilled and the glaze is set. They’re perfect on their own, but you could also serve them with a dollop of whipped cream or a side of Greek yogurt if you like!
What to Serve It With
These Watermelon Fries are so versatile, they fit into almost any meal or occasion! For **Breakfast**, they’re a delightful, light start to the day. Imagine a plate of these alongside a fluffy omelet or some scrambled eggs. They add a burst of freshness that really wakes up your palate. For **Brunch**, they really shine! They’re the perfect sweet counterpoint to savory dishes like bacon, sausage, or even some mini quiches. I love to arrange them elegantly on a tiered stand or a beautiful ceramic plate, maybe with a sprig of mint for a touch of green. For **Dessert**, they’re a revelation. They’re so much lighter and more refreshing than a heavy cake or pie, making them ideal after a big meal. They also pair wonderfully with a light vanilla Ice Cream or a scoop of refreshing sorbet. And for those **Cozy Snacks**? This is where they truly excel! On a hot afternoon, a plate of these is pure bliss. They’re fantastic for kids’ parties, picnics, or just when you need a little pick-me-up. I’ve also found they’re amazing served alongside a cheese board, offering a sweet, juicy contrast to salty cheeses and crackers. My family loves them during the summer, and we often just grab a few straight from the fridge for an easy afternoon treat. They’re also fantastic served with a side of Greek yogurt for dipping, if you want to add a bit of protein!
Top Tips for Perfecting Your Watermelon Fries
Over the years, I’ve definitely picked up a few tricks that make these Watermelon Fries even better. When it comes to **Zucchini Prep** (oops, I mean Watermelon Prep!), the key is selecting a truly ripe melon. I can’t stress this enough! A watery, bland watermelon will just result in bland fries. Go for that heavy, hollow-sounding melon with the creamy yellow spot. Also, make sure your knife is sharp when you’re cutting it down; it makes the process so much smoother and safer. For **Mixing Advice**, the glaze is super simple, but the consistency is important. You want it thick enough to cling to the watermelon but thin enough to drizzle. If it’s too thick, add a tiny bit more lime juice, a teaspoon at a time. If it’s too thin, add a little more powdered sugar. It’s a forgiving recipe, so don’t be afraid to adjust! When it comes to **Swirl Customization**, I’m not really swirling here, but I do like to think about how I apply the glaze. For a more rustic look, a freehand drizzle is perfect. For something a bit neater, use a piping bag. You can even get creative with colored glazes using natural food colorings made from beet juice or spirulina for a real visual pop! For **Ingredient Swaps**, while lime is my favorite for the tang, lemon juice works beautifully too. If you don’t have powdered sugar, you could try a very fine granulated sugar, but it might make the glaze a bit gritty. For a dairy-free/vegan option, ensure your powdered sugar is fine, and you’re good to go! My biggest **Baking Tips** (or rather, chilling tips!) is about timing. Don’t over-chill, or the watermelon can get a little too hard. 15-20 minutes in the fridge is usually perfect for setting the glaze without freezing. If you’re in a rush, a quick 10 minutes in the freezer can work, but keep a close eye on them! Finally, for **Glaze Variations**, I love adding a tiny pinch of cayenne pepper to the glaze for a sweet and spicy kick, or a bit of finely chopped fresh mint or basil stirred in for an herbaceous note. It’s all about playing with flavors you love!
Storing and Reheating Tips
These Watermelon Fries are best enjoyed fresh, but sometimes you have leftovers (which is rare in my house!). If you have any, here’s how to store them. For **Room Temperature** storage, I really only recommend this for about an hour max, and only if they were recently glazed and the glaze has set. Watermelon starts to get mushy and less appealing once it’s been at room temperature for too long, and the glaze can melt. So, if you’re serving these at a party, keep them chilled until just before you put them out. For **Refrigerator Storage**, this is your best bet for leftovers. Once the glaze has set (about 15-20 minutes chilling), you can carefully transfer them to an airtight container. I like to place them in a single layer if possible, maybe with a piece of parchment paper between layers if you have many. They’ll keep well in the fridge for about 1-2 days. The texture might change slightly, becoming a bit softer, but they’re still delicious. For **Freezer Instructions**, I generally don’t recommend freezing these. Watermelon has a very high water content, and freezing can really affect its texture, making it icy and watery once thawed. If you absolutely must freeze them (perhaps for a long-term plan you’ve made!), make sure they are well-wrapped in plastic wrap and then a freezer bag. Thaw them in the refrigerator overnight. The **Glaze Timing Advice** is crucial here: For the freshest look and best texture, always glaze your watermelon fries right before you plan to serve them. If you’re storing them for later, keep the watermelon cut and chilled, and make the glaze fresh when you’re ready to serve. This will prevent the glaze from becoming watery or the watermelon from getting too soggy.
Frequently Asked Questions
Final Thoughts
So there you have it – my super simple, incredibly refreshing Watermelon Fries! I truly hope you give these a try because they’re such a fun and delightful way to enjoy summer’s bounty. They’re proof that sometimes the best treats are the simplest ones, and they always bring a sense of joy, whether you’re a kid or a kid-at-heart. If you loved this recipe, you might also enjoy my recipe for a refreshing Watermelon Granita or some Frozen Yogurt Bark – perfect for those hot days! I can’t wait to hear what you think. Did your family love them as much as mine? Did you try any fun glaze variations? Let me know in the comments below! Happy sweet treating!
Watermelon Fries
Ingredients
Main Ingredients
- 1 medium seedless watermelon Watermelon
Instructions
Preparation Steps
- Cut the watermelon into quarters and remove the rind.
- Slice each quarter into "fry" shapes, about 0.5 inches thick.
- Arrange the watermelon fries on a platter.
- Serve immediately with your favorite dipping sauce, such as yogurt, honey, or chocolate sauce.


