


I can still remember the very first time I made earthquake cake—my kitchen smelled like a cozy caramel dream, and my family literally couldn’t get enough of it. If you’re anything like me, sometimes you want something sweet, comforting, and surprisingly easy to whip up when life gets busy. Earthquake cake feels like a warm hug wrapped up in a pan. It’s got this luscious swirl of gooey goodness that reminds me a bit of those classic butter pecan cakes but with a fun twist. Plus, the way it cracks and swirls just makes it so inviting. Honestly, this cake has become my go-to when friends drop by last minute or when I need a midweek treat that won’t stress me out. Let me tell you, once you make this earthquake cake, it just might become your new best friend in the kitchen.
What is an Earthquake Cake?
Okay, so earthquake cake might sound dramatic, but the name actually comes from the way the batter seems to “crack” or “quake” during baking because of all the delicious layers inside. Think of it as a cake with a surprise—beneath a simple-looking top lies a rich filling that oozes through cracks, creating these beautiful, rustic patterns that just pull you in. Essentially, it’s a moist yellow or white cake mixed with a sweet filling made of coconut, nuts, and brown sugar, swirled inside before baking. The result is this divine combo of tender cake, chewy coconut, and a bit of crunch from pecans or walnuts. It’s like the cake version of a cozy sweater—comforting and unexpectedly delightful. It’s a classic recipe that’s been passed around for decades, and from the moment you slice into it, you’ll see why.
Why you’ll love this recipe?
What I adore most about this earthquake cake is how each bite gives you a little surprise. The rich coconut and caramelized nut filling combined with the soft cake is like a mini celebration in your mouth. It hits that lovely balance between sweet and hearty without feeling heavy or over the top.
But beyond the flavor, it’s such an easy recipe to put together. You don’t need fancy gadgets or a pantry bursting with exotic ingredients—most of these staples are things I always have on hand. Trust me, it’s one of those recipes where you can throw everything together in under 15 minutes and pop it in the oven, which is a lifesaver on rushed mornings or those nights when you’re craving something homemade but don’t want to pull out all the stops.
Plus, it’s wonderfully versatile. You can tweak the nuts or swap coconut for dried fruit, or even add chocolate chips if you’re feeling indulgent. It’s perfect for breakfast grabs, afternoon coffee breaks, or even potlucks. And honestly, once my kids found out it has hidden layers, they were hooked—always asking for seconds (and thirds, no joke). It’s a little bit nostalgic, a little bit fun, and totally approachable—a combo that’s hard to beat in home baking!
How do I make an Earthquake cake?
Quick Overview
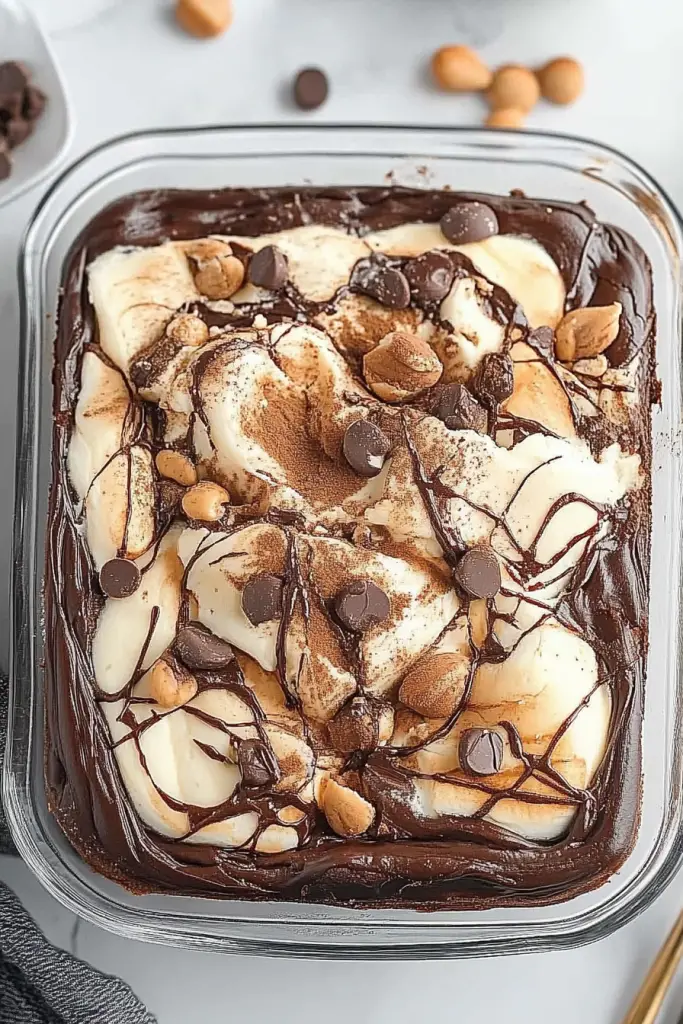
This cake comes together in a wonderfully straightforward way. First, you mix a simple yellow cake batter, then you prepare a lush filling of brown sugar, melted butter, shredded coconut, and pecans. After pouring half the cake batter into your pan, you spread the filling in patches all over the top. Then you dollop the remaining batter over it, which causes the filling to peek through as it bakes, creating that signature “earthquake” cracked effect. The whole thing bakes into a gooey, steaming beauty that smells like heaven. It’s seriously one of my favorite baking moments—the part where your kitchen fills with that amazing warm, buttery scent. You can count on it to be a crowd-pleaser, no worries.
Ingredients
For the Main Batter:
- 1 box yellow cake mix (or homemade equivalent if you prefer)—I like using a good-quality mix for ease, but homemade batter works just as well.
- 3 large eggs (room temp is best)
- 1/2 cup vegetable oil (or melted coconut oil for a slight hint of richness)
- 1 cup sour cream or plain Greek yogurt (this keeps the cake super moist and adds a lovely tang)
- 1 teaspoon vanilla extract (always use pure, it makes a difference!)
For the Filling:
- 1 cup brown sugar, packed (the molasses in this adds a beautiful depth)
- 1/2 cup butter, melted (don’t skimp here—it’s the glue that keeps everything luscious)
- 1 1/2 cups shredded sweetened coconut (freshly shredded is a treat, but store-bought works great too)
- 1 cup chopped pecans or walnuts (toasted lightly if you have the time—totally worth it!)
For the Glaze:
- 1 cup powdered sugar
- 2-3 tablespoons milk (start with less, then add more for desired consistency)
- 1/2 teaspoon vanilla extract
- A pinch of salt (to balance the sweetness)
- Optional: a splash of bourbon or rum for an adult twist
Step-by-Step Instructions
Step 1: Preheat & Prep Pan
Start by preheating your oven to 350°F (175°C). Grease and flour a 9×13-inch baking pan or line it with parchment paper. I usually go for greasing because it helps the crust around the edges get a little crisp, which I adore. Set it aside so you’re ready once the batter’s mixed.
Step 2: Mix Dry Ingredients
Since the cake mix is already seasoned and leavened, you really just have the basics here. Open the box batter into a large bowl. No extra dry ingredients needed unless you’re mixing your own batter, then just sift your flour, baking powder, and salt and set aside.
Step 3: Mix Wet Ingredients
In a separate bowl, whisk the eggs, oil, sour cream, and vanilla together till smooth. You want everything fully combined but don’t overdo it here; the sour cream can be a bit lumpy—it’s totally okay.
Step 4: Combine
Pour the wet ingredients into the dry mix, stirring gently until just combined. It’s really important to stop when there are no dry streaks left—overmixing can make the cake tough, which we don’t want. It’s okay if it looks a bit lumpy; that adds to the tenderness later.
Step 5: Prepare Filling
Mix together the brown sugar, melted butter, shredded coconut, and chopped pecans in a medium bowl. The mixture should be moist and sticky—if it feels dry, add a tiny splash more melted butter.
Step 6: Layer & Swirl
Pour half the cake batter evenly into your prepared pan and spread it gently but don’t press down too hard. Take spoonfuls of the filling and drop them all over the batter. This part gets fun because you just dot the filling in little patches—it’s okay if it looks messy! Then spoon the rest of the batter on top, dolloping it over the filling. Use a butter knife or skewer to gently swirl the layers together—you want some marbling but don’t overmix or the filling will disappear.
Step 7: Bake
Pop the pan in the oven and bake for 40–45 minutes. The top should be golden brown, and the cracks where the filling peeks through will glisten a little. Use a toothpick inserted near the edge—it should come out mostly clean with a few moist crumbs (the filling will be gooey, so watch that!). Oven temps vary, so keep an eye after 35 minutes.
Step 8: Cool & Glaze
Once out of the oven, let the cake cool in the pan for about 15 minutes. This part is crucial because the filling sets slightly, making slicing easier. While it cools, whisk together your glaze ingredients until silky smooth. Drizzle evenly across the cake once it’s warm but not hot—too hot and the glaze will melt into a thin syrup.
Step 9: Slice & Serve
Use a sharp serrated knife for clean slices—this cake is a bit sticky and gooey inside, so a gentle sawing motion helps. I love serving it slightly warm with a scoop of vanilla ice cream or a dollop of whipped cream. It’s equally good at room temperature or even cold, especially with a morning coffee. This one’s been known to disappear in minutes around here!
What to Serve It With
For Breakfast: Pair a slice with a big mug of your favorite coffee— I like a light roast with hints of citrus to cut through the sweetness. Add a side of fresh fruit for balance and you’ve got a cozy weekend morning vibe.
For Brunch: Serve earthquake cake alongside a frittata or a fruit salad. I’ve also served this with rich, creamy lattes or sparkling wine when hosting friends. The cake’s texture and flavors hold up nicely next to savory dishes.
As Dessert: Top with whipped cream or a scoop of vanilla bean ice cream and sprinkle a little cinnamon or nutmeg on top. If you’re feeling fancy, drizzle warmed caramel sauce for that extra indulgence. It’s always a hit at dinner parties!
For Cozy Snacks: Earthquake cake warmed with a cup of tea or hot chocolate is the ultimate comfort option. My kids are fans of just digging into it with their hands for a quick treat after school—usually accompanied by giggles (and a bit of coconut on their faces).
This cake fits almost any occasion in my house and it’s become a bit of a tradition to pull it out when I want to share something that’s both nostalgic and totally delightful.
Top Tips for Perfecting Your Earthquake Cake
Zucchini Prep: Actually, this recipe usually skips zucchini, but if you want to sneak in some veggies, shredded zucchini works beautifully—just be sure to squeeze out excess moisture to avoid soggy spots. I learned that the hard way after a couple of soggy batches!
Mixing Advice: The secret to a tender cake here is gentle mixing. You want to combine your wet and dry ingredients until just incorporated. If you overmix, the cake gets dense. Listen to your batter—it should look thick but not gluey. I’ve failed at this several times and now I know—less is more.
Swirl Customization: Don’t be shy about how you spread the filling. Dolloping it in clusters creates more uneven, rustic swirls and texture, making the final cake visually interesting. You can use a butter knife or a chopstick for swirling; I like using the tip of a spoon for soft, natural marbling.
Ingredient Swaps: I’ve swapped pecans for walnuts or even almonds with great results. Use toasted nuts if you can—that extra toasty flavor is unbeatable. If you want a chocolatey version, toss in a handful of mini chocolate chips with the filling. Also, substituting coconut milk for glaze milk adds a subtle tropical note that’s surprisingly nice.
Baking Tips: Oven temps can be tricky—if your oven runs hot, check the cake at 35 minutes. Always use the toothpick test near the edges since the filling stays moist. For even baking, place your pan in the middle rack and avoid opening the oven door too often in the first 30 minutes.
Glaze Variations: If you want a thinner glaze, add milk one teaspoon at a time. For a thicker finish, use less liquid. Sometimes I add a tiny sprinkle of cinnamon or a drop of almond extract for extra flavor. Drizzle while cake is warm so the glaze melts slightly for indulgent cracks.
One key lesson I learned after making this cake multiple times is that patience with layering pays off—don’t rush spreading the filling or the “earthquake” cracks won’t be as dramatic. Also, always toast those nuts! It amps up the flavor more than I ever expected.
Storing and Reheating Tips
Room Temperature: Earthquake cake keeps beautifully covered on your counter for 2–3 days. I cover it loosely with foil or a cake dome. It stays moist without drying out, but if your kitchen is warm, toss it in the fridge sooner.
Refrigerator Storage: Store leftovers in an airtight container or tightly wrapped, and it’ll last up to 5 days. The glaze might harden a little, but the cake softens again quickly at room temp or warmed.
Freezer Instructions: This cake freezes brilliantly. Wrap tightly in plastic wrap and then foil or place in a freezer-safe container. Freeze for up to 3 months. When ready to eat, thaw overnight in the fridge, then bring to room temp or warm gently in a low oven or microwave.
Glaze Timing Advice: If you plan to freeze or store the cake for a few days, wait to glaze until just before serving. The glaze can get sticky or absorb moisture otherwise. But if you’re serving right away, glaze while warm for that perfect melt-in-your-mouth finish.
Frequently Asked Questions
Final Thoughts
Honestly, this earthquake cake is one of those recipes that feels like an old friend. I keep coming back to it because it’s straightforward, comforting, and just a bit magical with those gooey swirls that turn an everyday cake into something special. Honestly, I think the best part is that it brings people together around the table—the smell, the taste, and the nostalgia wrapped in one pan. If you try it out, I’d love to know how it turned out for you or if you added your own spin. For fellow coconut or quirky cake lovers, you might also want to check out my recipes for hummingbird cake or poke cakes—they have that same cozy vibe. Happy baking, and may your kitchen be filled with delicious chaos and warm memories!
earthquake cake
Ingredients
Main Ingredients
- 0.75 cup sweetened shredded coconut
- 0.75 cup pecans (roughly chopped)
- 15.25 ounce German Chocolate Cake mix
- 0.75 cup semi-sweet chocolate chips
- 8 ounce cream cheese (room temperature)
- 0.5 cup unsalted butter (melted and cooled)
- 1.5 teaspoon vanilla extract
- 3 cup powdered sugar (sifted)
Instructions
Preparation Steps
- Preheat the oven to 350°F. Spray a 9x13 glass baking dish with non-stick bakers spray.
- Evenly sprinkle the bottom of the prepared baking dish with the sweetened shredded coconut and chopped pecans. Set aside.
- Mix the German chocolate cake mix according to the package directions using the recommended amount of water, eggs and oil.
- Pour the prepared cake batter evenly over the coconut and pecans in the baking dish. Sprinkle the semi-sweet chocolate chips evenly over the German chocolate cake batter and set aside.
- In a large mixing bowl, beat the softened cream cheese, using an electric mixer on medium speed, for 1-2 minutes or until smooth and fluffy.
- Add the melted butter and vanilla extract. Mix again until fully combined and the mixture is smooth and fluffy.
- Add the sifted powdered sugar and mix on low speed until the cream cheese mixture is thick and smooth.
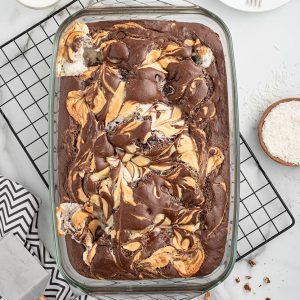
- Add the cream cheese mixture, in large dollops, to the German chocolate cake layer.
- Using a butter knife, swirl the cream cheese mixture into the cake batter.
- Bake for 45-50 minutes or until the center of the cake doesn’t wobble when the baking dish is lightly shaken.
- Allow the cake to cool on the counter for 5 minutes before serving.


