


Have you ever caught a whiff of fresh cinnamon rolls baking and instantly felt like everything was right in the world? That warm, cinnamon-sugar aroma wafting through the kitchen always sends me right back to Sunday mornings at my grandma’s house. Well, I put my spin on that cozy feeling by turning the classic cinnamon roll flavor into a pound cake — yes, you heard right, cinnamon roll pound cake that’s as moist and tender as your favorite breakfast treat but with the satisfying heft of a pound cake. I stumbled upon this idea one cold afternoon when I wanted all the flavor of cinnamon rolls but without the hours of dough kneading and rolling out. Trust me, it’s a game-changer. The swirl-y cinnamon filling and dreamy glaze get you all the nostalgia with none of the fuss, perfect for those mornings when time is tight but you want that special something. Plus, this cake has become a staple when friends drop by for coffee — it disappears in minutes, every single time!
What is cinnamon roll pound cake?
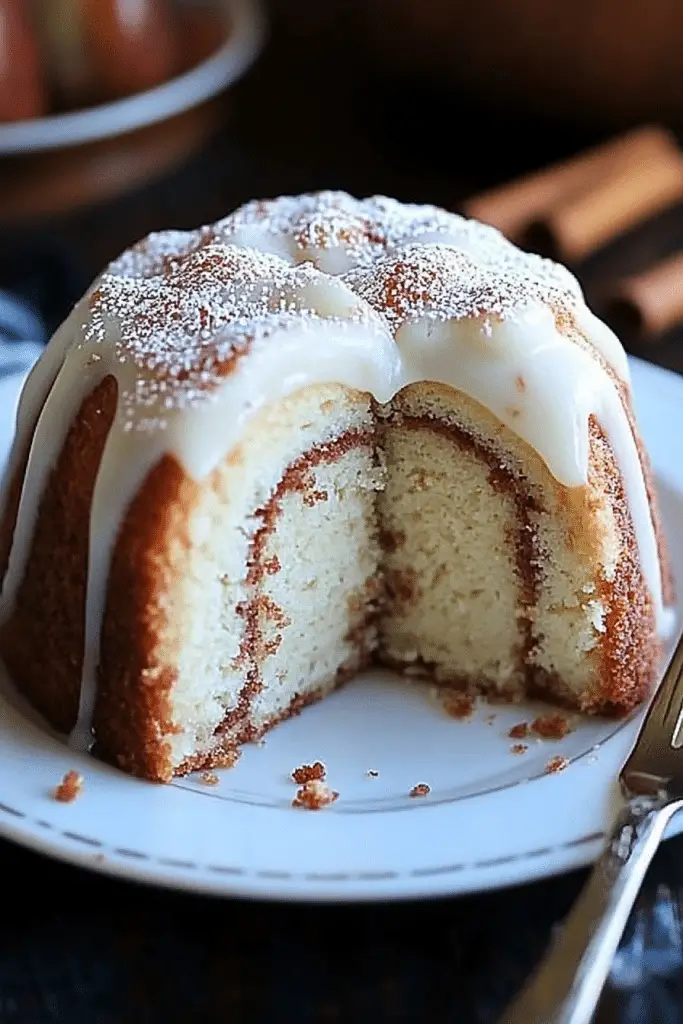
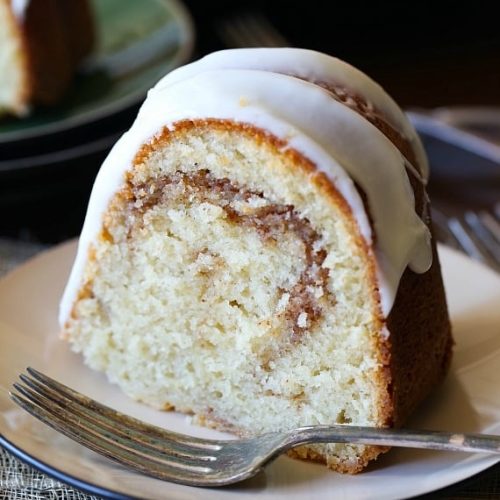
Think of cinnamon roll pound cake as the lovechild between a traditional cinnamon roll and a classic pound cake. It’s essentially a dense, buttery cake that’s swirled and layered with a cinnamon-sugar filling — just like the filling you find in cinnamon rolls, but baked right into the cake batter. The name comes from how it mimics the luscious flavors and spirals of that beloved pastry, but instead of separate rolls, you get a single loaf with beautiful swirls running through it. It’s kind of like having your cake and your cinnamon roll, too! This recipe feels cozy and indulgent without all the work of making yeast dough, so it’s perfect for a home baker who wants that cinnamon roll experience without pulling out the mixer for hours. The glorious glaze that tops it adds that last touch of sweetness, sealing the deal. It’s a friendly, accessible recipe that’ll make you want to pull up a chair, pour a cup of coffee, and savor every buttery, cinnamon-packed bite.
Why you’ll love this recipe?
What I love most about this cinnamon roll pound cake is how it spots that sweet, cinnamon goodness we crave but in a way that’s so uncomplicated. Let me tell you, the flavor absolutely nails the comforting richness you expect from a cinnamon roll — lightly spiced cinnamon and brown sugar melting into buttery cake — but it’s all within a tender, moist pound cake crumb that stays fresh for days. I swear, every time I make it, my kids sniff it out from across the house and ask for seconds before dinner.
Another reason it’s a keeper: simplicity. If you’ve ever made cinnamon rolls from scratch, you know the waiting, the rolling, the proofing — and this one skips all that. No yeast, no fancy techniques, just straightforward ingredients and a little swirling action that anyone can do. Plus, it’s budget-friendly. Granny Smith apples or fancy extracts aren’t needed — just staple pantry ingredients you probably have on hand right now.
Versatility is a bonus too. Slice it thick for breakfast, drizzle it with an extra dose of glaze for dessert, or even pack slices for an easy afternoon snack. I’ve even brought this cake to brunch potlucks, where it always gets rave reviews. If you adore classic pound cake recipes or love cinnamon rolls but want quicker results, this cinnamon roll pound cake is your new best friend. And, trust me, it *has* become mine since I started swapping out my usual pound cake for this delicious upgrade.
How do I make cinnamon roll pound cake?
Quick Overview
Alright, so the magic behind this cinnamon roll pound cake starts with a simple but rich batter that’s buttery and tender, just like grandma’s. Making a little cinnamon-sugar filling, then swirling that gorgeously into the batter before baking creates those signature ribbons of flavor you want. It’s surprisingly quick to put together — no yeast, no fuss — but the result tastes like you spent hours crafting a perfect cinnamon roll. The most fun bit? Getting that beautiful swirl effect that practically guarantees oohs and aahs from anyone you serve it to. Honestly, it feels like a special treat you didn’t even know you had time to make without the flashbacks to all those cinnamon roll days of my youth!
Ingredients
For the Main Batter:
- 1 cup unsalted butter, softened (room temp butter makes mixing a breeze)
- 1 ¾ cups granulated sugar
- 4 large eggs (I always use farm-fresh when I can for better texture)
- 3 cups all-purpose flour (sifted for a tender crumb)
- 1 tsp baking powder
- ½ tsp salt
- 1 cup whole milk (I’ve tried almond milk and it actually added a nice creaminess!)
- 2 tsp pure vanilla extract
For the Filling:
- 1 cup brown sugar, packed (dark brown sugar brings out the best caramel notes)
- 3 TBSP ground cinnamon (the cornerstone of cinnamon roll flavors!)
- 3 TBSP unsalted butter, melted (this helps everything stick and swirl perfectly)
For the Glaze:
- 1 cup powdered sugar, sifted (sifting prevents clumps)
- 2-3 TBSP whole milk or cream (adjust to get that perfect drizzle consistency)
- ½ tsp vanilla extract (for that lovely aroma)
Step-by-Step Instructions
Step 1: Preheat & Prep Pan
I always preheat my oven to 350°F (175°C) first thing. Then, generously butter a 9×5-inch loaf pan and line it with parchment paper, letting a little hang over the sides for easy removal later. Trust me, this little step saves you a cake rescue moment when it inevitably comes time to unmold. I’ve learned the hard way that a well-prepped pan is priceless.
Step 2: Mix Dry Ingredients
In a medium bowl, whisk together the flour, baking powder, and salt until evenly combined. This helps keep the leavening even and stops any chances of that overpowering baking powder surprise taste. Get your whisk ready and give it a good mix for about 30 seconds, so it’s all fluffy and ready to blend with the wet stuff.
Step 3: Mix Wet Ingredients
Using a mixer, beat the butter and granulated sugar together until light and fluffy — this step is essential for a tender, airy crumb. Then, add the eggs one at a time, mixing well after each addition, making sure everything is smooth and fully blended. Finally, stir in the milk and vanilla extract until just combined; the batter should be silky but not runny.
Step 4: Combine
Slowly add the dry ingredient mix into the wet, folding gently with a spatula or mixing on low speed. Be careful not to overmix here — the crumb will be dense and tough if you go crazy. I always stop once the last streaks of flour disappear. The batter should look smooth with just a bit of bounce.
Step 5: Prepare Filling
While the batter rests, whisk the brown sugar, cinnamon, and melted butter together in a small bowl until fully combined. It should have the texture of wet sand — not too dry, not runny. You can tweak it by adding a pinch more cinnamon if you want punchier spice or swap butter for coconut oil for a subtle twist.
Step 6: Layer & Swirl
Pour half the batter into your prepared pan and smooth it out with a spatula. Then, evenly sprinkle or dollop half the cinnamon filling over the batter. Pour the remaining batter on top and finish off with the last of the cinnamon mix. Now for the fun part — take a butter knife and gently swirl the top in a figure-eight motion to create those gorgeous cinnamon ribbons. Don’t overdo it or you’ll lose the distinct layers!
Step 7: Bake
Place your loaf in the preheated oven and bake for about 60-70 minutes, but start checking at 55 minutes. The cake is done when a toothpick inserted in the center comes out mostly clean with just a few moist crumbs attached. If it’s browning too fast on top, tent with foil halfway through baking. Every oven’s a bit different, so keep an eye on it to get that perfect golden crust.
Step 8: Cool & Glaze
Let the cake cool in the pan for about 15 minutes before gently lifting it out using the parchment sling. Transfer to a wire rack to cool completely — don’t rush the glaze! Once cooled, whisk your glaze ingredients till smooth, then drizzle generously over the top. The glaze should be thin enough to drizzle but thick enough to coat — add more milk sparingly to adjust.
Step 9: Slice & Serve
Once the glaze sets a bit, slice your cinnamon roll pound cake thick or thin, depending on your mood — I always go thick because why not? Serve it at room temp with a steaming cup of coffee or tea. Leftovers? I love popping slices in the microwave for 10 seconds — tastes like they’re freshly baked all over again!
What to Serve It With
For Breakfast: This cake pairs wonderfully with a strong black coffee or a creamy latte. I like to set out some fresh berries or a fruit compote alongside — adds that fresher balance to the sweet richness. Sometimes I throw together a simple yogurt on the side to cut the sugar edge, which my kids adore.
For Brunch: Treat this as the star by placing slices on a beautiful cake stand. A glass of sparkling apple cider or cinnamon-spiced chai tea makes an elegant pairing. I often add a dollop of mascarpone or whipped cream, especially when brunch guests are coming — it really feels like a little celebration.
As Dessert: Serve warm with a scoop of vanilla bean ice cream. If I’m feeling extra indulgent, I drizzle salted caramel sauce over the top too. The combo of warm cake, cold ice cream, and gooey caramel? Divine. A sprinkle of toasted pecans adds a lovely crunchy contrast.
For Cozy Snacks: This cake is perfect with a cup of hot cocoa or a spiced herbal tea. I like breaking it into chunks and sharing it as a casual treat during lazy afternoon reading sessions or board game nights with the family. Somehow, the cinnamon makes everything feel cozier and more relaxed.
In our home, cinnamon roll pound cake has become a tradition — no special occasion needed. It’s the kind of recipe you make when you want to feel a little loving warmth in your belly without a big production. I hope it finds a cozy spot in your kitchen, too!
Top Tips for Perfecting Your Cinnamon Roll Pound Cake
Cinnamon Swirl Prep: Make sure your cinnamon filling isn’t too runny or it will sink to the bottom. It should be moist enough to spread but keep shape when dolloped. I test it with a spoon — if it drips too fast, add a pinch more brown sugar or melt less butter next time.
Mixing Advice: Resist the urge to overmix the batter after adding flour. Overmixed batters can get dense and heavy, which isn’t what we want here. I always stop as soon as I see the flour disappear, then gently fold in any last bits with a spatula.
Swirl Customization: For a bolder cinnamon roll look, try swirling the filling in a tight figure-eight or spiral. If you want a more subtle effect, a simple zigzag swirl works perfectly. I’ve found that a toothpick works better than a knife for finer swirls!
Ingredient Swaps: Whole milk adds richness but you can swap coconut milk or almond milk — just expect a slightly different crumb texture. For a dairy-free butter alternative, use vegan butter sticks with similar salt content. Vanilla extract can be swapped for almond or maple extract for a unique twist.
Baking Tips: If your oven runs hot, tent the cake with foil halfway through baking to avoid excess browning. Always test with a toothpick around the minimum baking time. Let the cake cool fully before glazing or the glaze will melt and slide off.
Glaze Variations: For a lemony kick, add a teaspoon of fresh lemon juice and some zest to the glaze. If you want it thicker, reduce the milk slightly or add more powdered sugar. Drizzle it generously and let it set for a good 30 minutes before slicing for that perfect shiny finish.
Over the years, I’ve learned these little tweaks really set the cake apart. The first time I glazed it warm, the glaze turned gooey and was a mess — lesson learned! Now I wait or cool the cake overnight for a firm, pretty drizzle. These tweaks save the day and get rave reviews every time.
Storing and Reheating Tips
Room Temperature: Keep your cinnamon roll pound cake wrapped tightly in plastic wrap or stored in an airtight container on the counter. It stays fresh for up to 2 days this way. I usually slice what we’ll eat within a day to avoid drying out.
Refrigerator Storage: Wrapped well in plastic or stored in a sealed container, this cake lasts up to a week in the fridge. Just be sure to bring slices to room temperature or warm them up gently before serving for best texture and flavor.
Freezer Instructions: Wrap the cooled cake tightly with plastic wrap and then again in foil or place in a freezer bag to avoid freezer burn. It keeps perfectly for up to 3 months. Thaw it overnight in the fridge then warm slices gently in the microwave or oven.
Glaze Timing Advice: I usually wait to add glaze until the cake is completely cool unless I’m serving immediately. If freezing, I toss glaze on after thawing so it doesn’t get sticky or absorb too much moisture.
Proper storage keeps the cake moist and flavorful, so I’m always careful with wrapping and containers — and honestly, reheating it just right is like a mini celebration every time.
Frequently Asked Questions
Final Thoughts
This cinnamon roll pound cake is one of those rare recipes that combines comfort, nostalgia, and ease all in one. It’s the kind of treat that fills your kitchen with warmth and makes people feel truly cared for without hours of fuss. Whether it’s a weekend brunch, a cozy snack, or a special dessert, this cake brings joy and a little extra sweetness to everyday moments. I honestly can’t imagine a kitchen without this recipe — it’s become a go-to when I crave something rich and cinnamon-y but want to keep things simple. I can’t wait to hear how yours turns out and what delicious variations you dream up. So go ahead, try this one — I promise it’ll make your heart (and belly) very happy. Happy baking!
cinnamon roll pound cake
Ingredients
Main Ingredients
- 1.5 cups unsalted butter room temperature
- 2.5 cups granulated sugar
- 6 large eggs
- 3 cups cake flour
- 1 teaspoon kosher salt
- 0.5 teaspoon baking soda
- 1 cup sour cream
- 2 tablespoons vegetable oil
- 1 tablespoon vanilla extract
- 0.33 cup unsalted butter melted (for cinnamon swirl)
- 0.67 cup light brown sugar
- 1 tablespoon all purpose flour
- 1.5 teaspoons ground cinnamon
- 1 teaspoon vanilla extract for swirl
- 2 ounces cream cheese room temperature (for icing)
- 2 tablespoons unsalted butter room temperature (for icing)
- 1.5 cups powdered sugar
- 0.25 cup milk
- 1 teaspoon vanilla extract for icing
Instructions
Preparation Steps
- Preheat the oven to 325°F. Liberally grease a 12-cup Bundt pan with nonstick spray or butter and dust lightly with flour.
- In the bowl of your stand mixer fitted with the whisk attachment, beat the butter at high speed for 1 minute. Slowly add granulated sugar and mix for 5 minutes until very pale and fluffy.
- Turn mixer to medium speed, add eggs one at a time, mixing well and scraping the bowl as needed.
- On low speed, gradually add the flour, baking soda, and salt, mixing just until combined without overbeating.
- Add sour cream, vegetable oil, and vanilla extract, scraping bowl sides and bottom until incorporated.
- Set batter aside. In a small bowl, whisk together melted butter, brown sugar, flour, cinnamon, and vanilla extract for the cinnamon swirl.
- Pour half of the batter into the prepared pan. Drizzle half of the cinnamon swirl over the batter and gently swirl with a butter knife. Repeat with remaining batter and cinnamon swirl.
- Bake for 75 to 85 minutes or until a toothpick inserted into the center comes out mostly clean.
- Allow the cake to cool in the pan for 10 minutes, then invert onto a serving plate and cool to room temperature.
- For the icing, beat cream cheese and butter in a stand mixer until smooth, about 2 minutes.
- Add powdered sugar on low speed until incorporated. Increase speed to medium and beat for 1 minute. Add milk and vanilla extract and mix until smooth.
- Pour or spread icing over the cooled cake.
- Serve immediately or store airtight at room temperature for up to 3 days.


