


I’m not kidding when I say the moment these Sweet Potato ginger snap bars hit the oven, my whole kitchen smells like a warm hug. I grew up chasing the scent of cinnamon and ginger through a busy week, and this recipe became my favorite way to bring that nostalgia back in one pan. It’s not just the incredible flavor—it’s how forgiving it is, a lifesaver on busy nights when I’m juggling homework, after-school carpool, and a dozen other little chaos storms. This sweet potato ginger snap is a cousin to traditional ginger snaps, but it’s softer, a touch sweeter, and somehow more comforting in bite-sized squares. If you’ve ever reached for a dessert that tastes like a cozy afternoon on the couch, you’ve found it here. The idea started as a simple way to use leftover mashed sweet potato, and now it’s the recipe my kids ask for the minute the calendar flips to autumn. We’re talking warm spices, a gentle sweetness, and that unmistakable glow of ginger that wakes up the senses—this is the kind of treat that makes a house feel like home.
What is sweet potato ginger snap?
Think of Sweet Potato Ginger Snap as a cross between a bar cookie and a spiced cake, built on a soft, tender base that’s studded with roasted sweet potato purée and kissed with a punchy ginger kick. It’s essentially a sheet-pan dessert that you cut into generous squares for sharing with friends and family. The name might sound a little clever, but it’s really a straightforward concept: sweet potato brings natural sweetness and moisture, while ginger, cinnamon, and a touch of molasses give you that classic “snap” you expect from ginger cookies—just in a form that’s easier to slice, easier to share, and perfect for weeknights or weekend gatherings. I love how the texture lands somewhere between a brownie and a cake bar, with a gentle crumb that stays moist without feeling heavy. And yes, you can customize the glaze or the filling to suit your pantry—my fridge often holds little surprises that end up shining here. This sweet potato ginger snap is like a warm blanket in dessert form, and I’m happy to share it with you as if we were chatting over a mug of coffee on a crisp morning.
Why you’ll love this recipe?
What I love most about this Sweet Potato ginger snap is how it tastes like comfort and travels well at the same time. It’s a recipe that’s easy to pull off even on a hectic night, and it still feels special enough to serve to guests or bring to a brunch. Here are the big reasons this one sticks around my recipe box:
- Flavor: The sweet potato sweetness mingles with brown butter, molasses, and a bold ginger presence. The aroma alone is worth the bake, and the finish is warm, spicy, and just a little bit creamy from the puree.
- Simplicity:What is the best way to make a batter in one bowl?
- Cost-efficiency: What is the best way to measure cost-efficiency? Pantry staples do most of the work here. A jar of molasses, a few spices, and some sweet potato you roasted earlier in the week turn into something truly special without breaking the bank.
- Versatility: Serve them as a breakfast treat, a dessert, or a snack with coffee. They also pair beautifully with a handful of toasted pecans and a drizzle of maple glaze for a more indulgent presentation.
- Make-ahead magic: These bars slice cleanly and freeze well, so you can bake once and have a crowd-pleasing dessert ready for busy nights.
How to Make Sweet Potato Ginger Snap
Quick Overview
This recipe comes together like a cozy project you can tackle without a lot of drama. Roast or microwave a Sweet Potato until it’s silky and sweet, whisk together a batter with warm spices, layer in a tangy, creamy filling if you’re feeling fancy, and swirl a glossy glaze on top for a pretty finish. It’s incredibly forgiving—if you overmix, no big deal; if a spoonful of glaze lands in the center, it becomes a little caramel kiss. The real magic is in the scent as it bakes: ginger peaks through, the kitchen smells like fall, and your family starts circling the oven before you even finish the timer. This sweet potato ginger snap can adapt to your pantry, your schedule, and your mood, which is exactly how a favorite family recipe should behave.
Ingredients
For the Main Batter:
– 2 cups mashed roasted sweet potato (about 1 medium potato) or 1 cup canned sweet potato purée
– 1/2 cup unsalted butter, melted and cooled slightly
– 2 large eggs
– 1/2 cup Brown Sugar, packed
– 1/4 cup granulated sugar
– 1 teaspoon vanilla extract
– 1 1/2 cups all-purpose flour
– 1 teaspoon baking powder
– 1 teaspoon ground ginger
– 1/2 teaspoon ground cinnamon
– 1/4 teaspoon ground cloves
– 1/4 teaspoon salt
– 2–4 tablespoons milk or dairy-free milk (as needed to loosen the batter)
For the Filling:
– 8 oz cream cheese, softened
– 2 tablespoons powdered sugar or granulated sugar (to taste)
– 1 teaspoon vanilla extract
– Optional: 1 teaspoon lemon zest for brightness
For the Glaze:
– 1 cup powdered sugar
– 1–2 tablespoons maple syrup or milk (to reach drizzle consistency)
– 1 teaspoon vanilla extract
– Pinch of cinnamon or nutmeg for extra warmth
Step-by-Step Instructions
Step 1: Preheat & Prep Pan
Heat your oven to 350°F (175°C). Grease a 9×13 inch baking pan or line it with parchment for easy lifting later. If you’re not making the filling, you can skip the extra step, but I love the way a little creamy center looks peeking through the bars. Quick note: if you roasted your sweet potato ahead of time, this step goes even faster—your kitchen will smell amazing in just a few minutes.
Step 2: Mix Dry Ingredients
In a medium bowl, whisk together flour, baking powder, ginger, cinnamon, cloves, and salt. This is where your pantry truly shines—the spices are the backbone here, so give them a good whisk to wake up their flavors.
Step 3: Mix Wet Ingredients
In a separate large bowl, combine melted butter, brown sugar, white sugar, eggs, vanilla, and the sweet potato purée until the texture is smooth and glossy. If your sweet potato purée is a touch lumpier, that’s okay—small specks add character and a homestyle feel. If you used canned purée, whisk for an extra moment to loosen it up so it blends evenly.
Step 4: Combine
Pour the dry ingredients into the wet and stir until just combined. The batter should be thick but scoopable. If it’s too stiff, splash in a tablespoon of milk and fold. You’re aiming for a fudgy, dense batter that holds its shape when you layer in the filling.
Step 5: Prepare Filling
Beat the cream cheese with sugar and vanilla until smooth. Don’t overbeat—just enough to eliminate lumps. If you crave brightness, fold in a teaspoon of lemon zest. This filling is optional, but it adds a tangy contrast that really makes the ginger pop against the sweetness.
Step 6: Layer & Swirl
Spread about two-thirds of the batter in your prepared pan, smoothing the surface. Dollop the filling in evenly over this layer, then drop the remaining batter by spoonfuls over the top. Use a knife or skewer to create gentle swirls—don’t overwork it. The goal is pretty marble patterns and pockets of tangy cream cheese that peek through after baking.
Step 7: Bake
Bake for about 28–34 minutes, or until the edges are golden and a toothpick inserted into the center comes out with a few moist crumbs. Every oven bakes a touch differently, so start checking at 28 minutes. If you notice the top is browning too quickly, tent with a bit of foil for the last 5–7 minutes. The aroma is going to fill your kitchen with that sweet potato ginger snap magic you’ve been craving.
Step 8: Cool & Glaze
Let the bars cool completely in the pan on a wire rack. This is when the texture settles and slices cleanly. Whisk together the glaze ingredients until smooth. Drizzle over the cooled bars in a slow, lazy pattern so you get pretty streaks rather than a solid sheet. If you want a more subtle sweetness, go light on the maple and keep the glaze thinner; for a dessert-worthy finish, let it hang a touch thicker.
Step 9: Slice & Serve
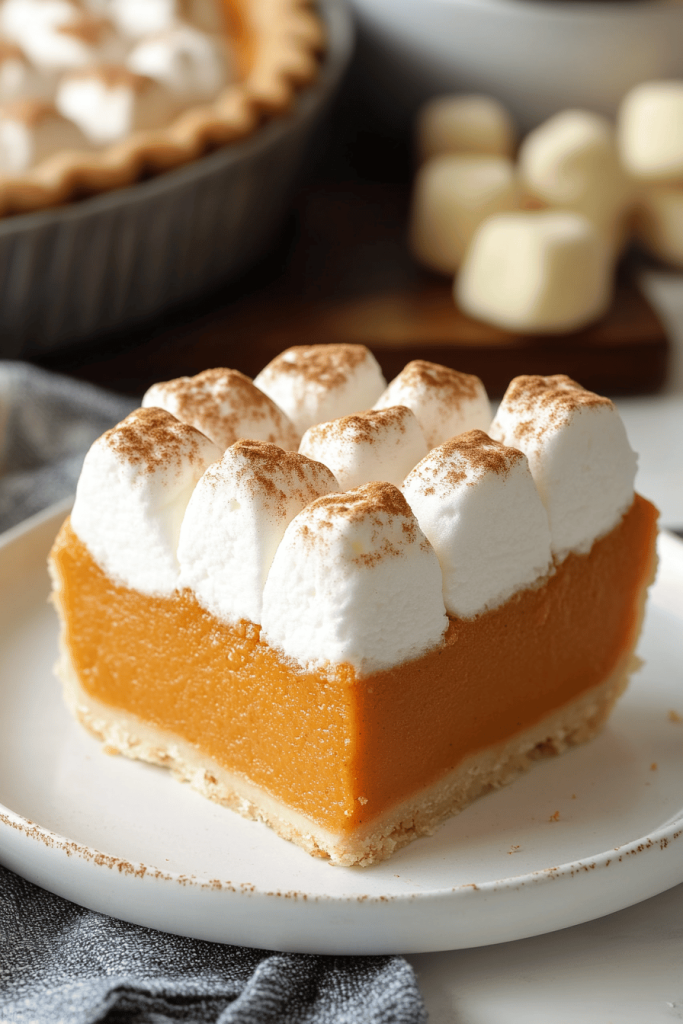
Lift the whole slab out of the pan using the parchment edges, then cut into generous squares. The first bite should reveal a soft, almost cake-like center with a pop of cream cheese, followed by that ginger snap warmth on the finish. I like them slightly warm on plateware that’s already at room temperature, so the glaze melts just enough to create a glossy sheen. This is a crowd-pleaser, and it travels well—perfect for potlucks or weeknight family dinners when you want something comforting yet a little fancy.
What to Serve It With
These sweet potato ginger snap bars shine with coffee, of course, but they also pair beautifully with a few other accompaniments that elevate the experience:
For Breakfast: A dollop of yogurt and a sprinkle of toasted pecans, with a strong cup of coffee or chai. The tang from the filling brightens the morning, and the spices keep you warm as the day starts.
For Brunch: Serve squares on a platter with citrus zest, a light dusting of cinnamon, and a sparkling apple cider. It’s a brunchy version of fall in every bite.
As Dessert: Pair with vanilla ice cream or a maple-ginger whipped cream. The contrast between cold cream and warm bar is irresistible, and the glaze adds a glossy finish that makes it look store-bought but tastes like home.
For Cozy Snacks: A warm square with a mug of tea or hot cocoa is basically a hug in edible form. My kids love these after school, especially when the weather turns crisp and the kitchen fills with that cozy cinnamon-and-ginger perfume.
Top Tips for Perfecting Your Sweet Potato Ginger Snap
Here are a few insider tricks I’ve learned along the way, all aimed at keeping this recipe forgiving and irresistibly delicious.
Sweet Potato Prep: If you’re roasting your own potato, you’ll get a deeper flavor and a richer color. Poke a few holes, roast at 400°F until tender, then scoop the flesh. If you’re using canned purée, choose the double-checked packaging and press out any liquid so the batter stays cohesive.
Texture & Mixing: Avoid overmixing once the dry ingredients meet the wet. You want a dense batter with just a little lift from the baking powder. Overworking it makes the bars tougher instead of tender.
Swirl & Layering: Don’t overdo the swirls—gentle marbling creates beautiful pockets of filling without turning the whole thing into a chaotic pattern. If you like a more distinct stripe, reserve a portion of batter to layer on top after the filling has been added.
Ingredient Swaps: You can swap half of the all-purpose flour for white whole wheat for a nuttier flavor and a touch more texture. If you’re avoiding dairy, use a neutral dairy-free butter substitute and a dairy-free cream cheese alternative for the filling. The structure holds, and you still get that cozy flavor.
Baking Tips: If your oven tends to run hot, lower the temperature to 345°F and extend the bake time by a few minutes. Conversely, if you see rapid browning, tent with foil early on. Don’t rush the cooling; a proper cool is what makes cutting clean and slices neat.
Glaze Variations: For a more pronounced glaze, increase the powdered sugar by a splash and whisk in more maple or milk to reach a lush, glossy drizzle. If you want a citrusy twist, add a teaspoon of orange zest to the glaze and a drop of orange extract.
Lessons learned: I once tried to rush the glaze and ended up with a sticky mess that wouldn’t set. I waited those extra 15 minutes, let the bars cool completely, and the glaze set beautifully. Trust me on this one—patience makes the shine happen.
Storing and Reheating Tips
These bars keep well, which is a big win when you’re feeding a busy household or planning ahead for guests. Here’s how I store them so they stay moist and delicious:
Room Temperature: Store in an airtight container for up to 3 days. If you’re keeping them on the counter, layer with parchment to prevent sticking or glazing from transferring onto others.
Refrigerator Storage: They’ll keep for up to 5 days wrapped well. Refrigeration enhances the glaze’s sweetness; if you prefer a lighter glaze, you can rewarm and glaze anew after chilling to refresh the finish.
Freezer Instructions: These bars freeze wonderfully for up to 2 months. Wrap individual squares tightly in plastic wrap, then seal in a freezer bag. Thaw overnight in the fridge or at room temperature for a quick weeknight treat.
Glaze Timing Advice: If you’re freezing, skip applying the glaze until you’re ready to serve. You can glaze after thawing for a bright, finished look, or simply dust with a light coating of powdered sugar for the same effect in a pinch.
Frequently Asked Questions
Final Thoughts
This little slice of autumn, wrapped in cozy spices and sweet potato warmth, isn’t just a dessert—it’s a memory you can bake. I love how forgiving it is, how the ingredients stretch to fit what I have on hand, and how my kitchen fills with that unmistakable ginger aroma that signals friends and family are about to gather. If you try this Sweet Potato Ginger Snap, I’d love to hear which tweak you loved most—glaze or no glaze, muffins or bars, a lemon-tinged filling or a pure cream-cheese swirl. Happy baking! And as always, I can’t wait to hear how yours turns out. Share your variations in the comments, rate the recipe, and tell me who you’ll be sharing these with this week.
From my family to yours, may the cozy scent of ginger, cinnamon, and sweet potato bring you comfort on hectic days and joy on slow ones. This one’s a timeless keeper, a recipe that earns its place on the bookshelf and in the memory vault of special dinners. Enjoy every bite, and remember that you’re not just cooking—you’re building little moments of warmth that your people will remember when they’re old enough to ask for seconds. Happy baking!

Sweet Potato Ginger Snap Cookie Trifles
Ingredients
Main Ingredients
- 2 sweet potatoes sweet potatoes peeled and cut into 2-inch chunks
- 6 cups water
- 2 tablespoons butter
- 1 medium-sized orange orange zest
- 3 tablespoons light brown sugar
- 0.5 teaspoon cinnamon
- 16 Ginger Snaps Ginger Snaps crushed, divided
- Whipped Cream optional
Instructions
Preparation Steps
- Put the cut potatoes in a large saucepan and cover with water.
- Bring to a boil; continue to cook for 15 minutes, or until fork tender.
- Drain.
- Place the cooked potatoes in a mixing bowl and mash with a potato masher.
- Add in the butter and mix until butter is melted.
- Stir in the orange zest, sugar, and cinnamon; mix until completely incorporated.
- Layer about two tablespoons of crushed cookies on the bottom of each trifle; top with sweet potato puree; repeat by layering another tablespoon or two of the crushed cookies and top with the puree.
- Add whipped topping, if desired.


