


Oh my goodness, friends, do I have a treat for you today! There are some smells that just instantly transport you back to childhood, right? For me, it’s the sweet, buttery scent of sugar cookies baking. That aroma always fills our kitchen around the holidays, but honestly, why limit such pure joy to just one season? This isn’t just *any* sugar cookie recipe; this is THE sugar cookie recipe, passed down from my grandma, meticulously tweaked by me over years of joyful (and sometimes messy!) baking adventures. Forget those tough, bland cookies you might have encountered – this one is delightfully tender, holds its shape like a dream, and has that perfect balance of sweetness that makes you reach for just one more, and then another. It’s got that delightful crisp edge with a soft, melt-in-your-mouth center, a little like a shortbread cookie decided to be even more fun and got all dressed up with sprinkles. If you’ve been searching for that magical, never-fail sugar cookie, your quest ends here. Trust me, your kitchen is about to become everyone’s favorite place.
What is sugar cookie?
At its heart, a sugar cookie is a beautiful exercise in simplicity. Think of it as the ultimate blank canvas of the cookie world, ready for all your creative decorating whims! Essentially, it’s a cookie made from just a few pantry staples: flour, sugar, butter, eggs, and a touch of vanilla (which, in my humble opinion, is non-negotiable for flavor!). While many cookies are about chunks of chocolate or nuts, the sugar cookie is all about its delicate, buttery crumb and delightful sweetness. Its history traces back to 17th-century Germany, where they called them “sand tarts,” and they eventually made their way to America with the Moravians, who settled in Nazareth, Pennsylvania. Over the centuries, it evolved into the beloved cookie we know today – perfect for cutting into charming shapes, frosting with colorful glazes, or simply enjoying plain with a cup of tea. It’s truly a timeless classic that brings comfort and cheer.
Why do people love sugar cookies?
Oh, where do I even begin with why this particular sugar cookie recipe will steal your heart? First off, the **flavor** is just out of this world. It’s got a rich, genuine buttery taste, beautifully complemented by that warm kiss of vanilla, and it’s sweet without being cloying. It’s the kind of sweetness that makes your eyes light up. What I love most about this recipe is its incredible **simplicity**. Seriously, you don’t need a culinary degree to whip these up! The ingredients are all pantry staples, so you can often decide on a whim to bake a batch, which, let’s be honest, is a lifesaver on busy nights when a craving strikes. This makes it incredibly **cost-efficient** too; no fancy, expensive ingredients needed to create something truly spectacular. You’ll get a huge batch for a fraction of what store-bought would cost, and they’ll taste a million times better. But beyond that, it’s the sheer **versatility** that makes these sugar cookies my absolute favorite. They’re perfect for literally any occasion! Christmas, Halloween, birthdays, or just a Tuesday afternoon pick-me-up. You can cut them into any shape imaginable, decorate them with simple glaze, royal icing, or just a sprinkle of sanding sugar. They’re forgiving enough for little hands to help with, which makes them a cherished family activity, much like baking gingerbread cookies during the holidays. My kids actually ask for these all the time, not just for special events, and that, to me, is the ultimate endorsement. They’re soft, chewy, and yet sturdy enough to hold any decoration you dream up. This recipe really does stand out – it consistently delivers that perfect, tender bite that just melts in your mouth.
How do I make sugar cookies?
Quick Overview
Making these sugar cookies is truly an approachable, joyful process, I promise! The general idea is to cream together butter and sugar until it’s super light and fluffy, then add your eggs and vanilla. After that, we’ll gently fold in the dry ingredients – flour, baking powder, and a touch of salt. The key is not to overmix, keeping the dough tender. A quick chill helps keep them from spreading, making them perfect for cutting out all sorts of fun shapes. Then, it’s just a quick bake until they’re lightly golden and fragrant. It sounds like a lot of steps, but each one is simple and builds on the last, leading to the most delightful sugar cookie you’ve ever baked!
Ingredients
For the Sugar Cookies: For the Sugar Cookies: For the Sugar Cookies: For the Sugar Cookies: For the Sugar Cookies: For the Sugar Cookies: For
- 1 cup (2 sticks) unsalted butter, softened to room temperature (this is SO important for a smooth dough!)
- 1 ½ cups granulated sugar
- 2 large eggs, at room temperature
- 2 teaspoons pure vanilla extract (use the good stuff, it makes a difference!)
- 3 cups all-purpose flour, spooned and leveled (don’t scoop directly from the bag!)
- 1 teaspoon baking powder
- ½ teaspoon salt
For the Simple Glaze (Optional, but highly recommended!):
- 2 cups powdered sugar, sifted (prevents lumps!)
- 2-3 tablespoons milk (any kind works, I often use whole milk)
- ½ teaspoon pure vanilla extract (or almond extract for a twist!)
- Pinch of salt
Step-by-Step Instructions
Step 1: Preheat & Prep Pan
Alright, first things first! Let’s get that oven ready. Preheat your oven to 375°F (190°C). While it’s warming up, line two large baking sheets with parchment paper. Trust me, parchment paper is your best friend here; it prevents sticking and makes cleanup a breeze. Plus, it helps the bottoms of your sugar cookies bake evenly without getting too dark.
Step 2: Cream Butter & Sugar
In a large mixing bowl (or the bowl of your stand mixer fitted with the paddle attachment), beat together the softened butter and granulated sugar on medium speed. You’re looking for it to become light and fluffy, almost pale in color. This usually takes about 2-3 minutes. This creaming process incorporates air, which contributes to the cookies’ tender texture. Don’t rush this step, it’s key!
Step 3: Add Wet Ingredients
Once your butter and sugar are beautifully creamy, add the eggs, one at a time, mixing well after each addition. Then, stir in that glorious vanilla extract. Make sure to scrape down the sides of the bowl with a spatula after adding each egg to ensure everything is fully combined. You want a smooth, cohesive mixture before moving on.
Step 4: Combine Dry Ingredients
In a separate medium bowl, whisk together the flour, baking powder, and salt. Whisking ensures they’re evenly distributed, so you don’t get a pocket of salt or baking powder in one cookie. Once mixed, gradually add the dry ingredients to the wet ingredients, mixing on low speed just until combined. Be careful not to overmix the dough! Overmixing develops gluten, and that’s the secret enemy of a tender sugar cookie, leading to tough, chewy results. Stop as soon as no streaks of flour remain.
Step 5: Form Dough & Chill (Optional but Recommended!)
Divide the dough in half. Shape each half into a flat disk, wrap tightly in plastic wrap, and pop them into the refrigerator for at least 30 minutes. This chilling step is a game-changer! It firms up the butter in the dough, which prevents the sugar cookies from spreading too much in the oven, ensuring your cut-out shapes stay nice and defined. It also makes the dough much easier to handle when rolling.
Step 6: Roll & Cut
Once chilled, lightly flour your work surface and your rolling pin. Take one disk of dough out of the fridge (leave the other chilling!). Roll the dough to about ¼-inch thickness. You want an even thickness across the entire sheet of dough for consistent baking. Now for the fun part: use your favorite cookie cutters to cut out shapes! Gently transfer the cut-out cookies to your parchment-lined baking sheets, leaving about an inch between each cookie. Re-roll any scraps, but try not to handle the dough too much.
Step 7: Bake
Bake your sugar cookies for 7-10 minutes, depending on their size and your oven. You’re looking for the edges to be lightly golden, and the centers to still look a bit soft but set. My oven tends to run a little hot, so I always start checking at 7 minutes. Don’t wait for them to turn deeply golden, or they might become too crispy. A tiny bit of pale color means they’ll be perfectly tender!
Step 8: Cool & Glaze
Let the baked sugar cookies sit on the hot baking sheets for about 5 minutes after coming out of the oven. This helps them firm up a bit before you move them. Then, carefully transfer them to a wire rack to cool completely. Patience is a virtue here! Don’t try to glaze or decorate warm cookies, or your glaze will just melt right off. While they cool, whisk together your sifted powdered sugar, milk, vanilla extract, and a pinch of salt until smooth for the glaze. Adjust milk to get your desired consistency – a little thicker for opaque coverage, thinner for a slight sheen.
Step 9: Slice & Serve
Once your beautiful sugar cookies are completely cool and the glaze (if you used it) has set, it’s time to enjoy! Stack them on a pretty plate, arrange them in a festive tin, or simply devour them straight from the cooling rack. They’re wonderful on their own, but truly shine when shared. The best cutting technique, really, is just picking them up with your hands and taking a bite! Serve at room temperature for the ultimate soft texture and full flavor.
What to Serve Your Sugar Cookies With
Oh, these sugar cookies are so versatile, they play nicely with almost anything! Here are some of my go-to pairings, depending on the mood or occasion:
For Breakfast: I know, I know, cookies for breakfast sounds decadent, but a small, plain sugar cookie is just divine with your morning coffee. The rich buttery notes of the cookie perfectly complement a strong brew. Or, if you’re feeling a bit more whimsical, dunk one into a warm mug of spiced chai tea – it’s a match made in heaven for a cozy morning.
For Brunch: Elevate your brunch spread by serving these alongside a fresh fruit platter or a light yogurt parfait. The crisp sweetness of the cookie offers a lovely contrast to tangy berries or creamy yogurt. If you’re hosting, they look absolutely charming arranged on a tiered stand, especially if you’ve decorated them!
As Dessert: For an after-dinner treat, these sugar cookies are fantastic on their own, perhaps with a little dusting of powdered sugar. But if you want to get fancy, try serving them with a scoop of homemade vanilla bean ice cream, maybe even crumbled a bit on top. Or, pair them with a bowl of fresh, macerated strawberries – the sweet fruit really brightens up the rich cookie. It’s perfect when you’re craving something sweet at 10pm but don’t want to bake a whole cake!
For Cozy Snacks: This is where they truly shine for me. My absolute favorite way to enjoy a sugar cookie is with a tall, cold glass of milk, just like I used to as a kid. It’s the ultimate comfort pairing. Or, if it’s a chilly afternoon, a sugar cookie with a steaming mug of hot cocoa is pure bliss. It’s that perfect little something that makes an ordinary moment feel a little bit special. They’re ideal for an after-school treat, or simply when you need a little sweet pick-me-up during the day!
Top Tips for Perfecting Your Sugar Cookies
I’ve baked literally hundreds, maybe thousands, of sugar cookies over the years, and I’ve picked up a few tricks (and learned from a few mistakes!) that I absolutely have to share to help you achieve sugar cookie perfection. Trust me on these!
Butter Temperature is Key: This is probably the most crucial tip. Your butter needs to be properly softened to room temperature, not melted, and not cold. If it’s too cold, it won’t cream properly with the sugar, leading to a dense dough. If it’s too warm or melted, your cookies will spread excessively in the oven, losing their beautiful shapes. I usually leave my butter out for an hour or two before baking, or if I’m in a hurry, I’ll cut it into small pieces and let it sit for about 15-20 minutes. This ensures a light, fluffy creamed mixture.
Measuring Flour Correctly: Don’t just scoop your flour directly from the bag with your measuring cup! This compacts it and you’ll end up with too much flour, leading to dry, tough cookies. Instead, gently spoon the flour into your measuring cup until it’s overflowing, then level it off with the back of a knife. This method ensures you get the right amount every time.
Don’t Overmix the Dough: I can’t stress this enough for a tender sugar cookie! Once you add the dry ingredients to the wet, mix on the lowest speed possible, and only until just combined. The moment you see no more streaks of flour, stop mixing. Overworking the dough develops gluten, which is great for bread, but for cookies, it means a tough, chewy texture instead of that soft, melt-in-your-mouth goodness we’re after. My biggest mistake used to be overworking the dough trying to get it “perfectly smooth.”
Chilling is Your Friend: While some recipes might skip this, I highly recommend chilling your dough for at least 30 minutes. This firms up the butter, which helps your sugar cookies hold their shape better during baking and prevents them from spreading into shapeless blobs. If you find your dough getting too warm while rolling, pop it back in the fridge for 10-15 minutes. It’s worth the extra time!
Roll Dough Evenly: For uniformly baked sugar cookies, it’s essential to roll your dough to an even thickness, around ¼-inch. Uneven thickness means some cookies will burn while others are still raw. I always do this when I want perfect cookies: use a rolling pin with adjustable guides, or place two rulers or wooden dowels of the same thickness on either side of your dough as guides.
Baking Sheet Matters: Use light-colored baking sheets lined with parchment paper. Darker baking sheets can cause the bottoms of your cookies to brown too quickly. Parchment paper also helps with even baking and easy removal. If you only have one sheet, ensure it cools completely before placing a new batch of cookies on it.
Glaze Consistency is Key: For the simple glaze, getting the right consistency is vital. If it’s too thick, it won’t spread smoothly. If it’s too thin, it’ll run right off the cookie. Add your milk a tablespoon at a time until you reach a pourable, but still opaque, consistency. For thicker lines or details, use slightly less milk. I sometimes swap out half the vanilla extract for almond extract in the glaze for a different, lovely flavor twist.
Storing Your Sugar Cookies
You’ve put all that love into baking these beautiful sugar cookies, so let’s make sure they stay fresh and delicious! Proper storage makes all the difference.
Room Temperature: Unfrosted sugar cookies can be stored in an airtight container at room temperature for up to 5-7 days. I like to layer them between sheets of parchment paper or wax paper, especially if they’re delicate, to prevent them from sticking together or breaking. This keeps them soft and fresh, just like they came out of the oven. If they’re glazed, make sure the glaze is completely set and hardened before stacking them. This usually takes several hours, or even overnight, depending on the humidity in your kitchen.
Freezer Instructions: These sugar cookies freeze beautifully, both baked and unbaked!
- For Baked Cookies: Allow them to cool completely. If frosted, make sure the frosting is firm. Arrange them in a single layer on a baking sheet and freeze until solid (about 30-60 minutes). Then, transfer the frozen cookies to a freezer-safe airtight container or heavy-duty freezer bag, again, layering with parchment paper. They’ll keep wonderfully for up to 3 months. To thaw, just let them sit at room temperature for an hour or two.
- For Unbaked Dough: You can wrap the dough disks tightly in plastic wrap, then again in aluminum foil, and freeze for up to 2-3 months. When you’re ready to bake, thaw the dough in the refrigerator overnight, then let it come to room temperature for about 30 minutes before rolling and baking as usual. This is a fantastic trick for getting a head start on holiday baking!
Glaze Timing Advice: Always, always let your sugar cookies cool completely before applying any glaze or frosting. If you glaze warm cookies, the glaze will melt and make a sticky mess. Once glazed, allow the cookies to air dry for several hours (or even overnight) until the glaze is fully set and firm to the touch before stacking them. This prevents smudging and ensures your beautiful decorations stay perfect. I learned this trick after years of making it and getting sticky cookie piles!
Frequently Asked Questions
Final Thoughts
And there you have it, my friends! This sugar cookie recipe isn’t just about baking; it’s about creating memories, sharing joy, and savoring that little piece of comfort that only a truly good homemade cookie can bring. Whether you’re a seasoned baker or just starting out, I genuinely believe this recipe will become a beloved staple in your kitchen. It’s truly incredible how such simple ingredients can come together to create something so utterly delicious and versatile. The smell alone brings everyone to the kitchen, and trust me, these disappeared in minutes at my house! I’ve made this countless times and it never fails to bring smiles. I can’t wait for you to experience that soft, buttery perfection. If you loved these, you might also enjoy exploring some of my other classic cookie recipes, like my chewy chocolate chip cookies or my no-bake peanut butter bars. Please, once you’ve tried them, come back and let me know how yours turned out in the comments below! I’d love to hear about your favorite cookie cutters or any decorating ideas you come up with. Happy baking!
sugar cookie
Ingredients
Main Ingredients
- 2 sticks unsalted butter softened
- 1.25 cups granulated sugar
- 0.75 cups confectioners' sugar
- 0.75 cups vegetable oil
- 3 large eggs room temperature
- 5.5 cups all-purpose flour
- 1 teaspoon cream of tartar
- 1 teaspoon kosher salt
- 1 stick unsalted butter softened (for frosting)
- 0.75 cups sour cream room temperature
- 1 teaspoon kosher salt
- 4.5 cups confectioners' sugar for frosting, amount adjustable
- drops red food coloring to achieve soft pink color
Instructions
Preparation Steps
- Preheat oven to 350°F. Line baking sheets with parchment paper.
- In a stand mixer fitted with the paddle attachment, cream together butter, granulated sugar, and confectioners' sugar until just combined.
- Drizzle in vegetable oil and add eggs; mix well until fully incorporated.
- Whisk together flour, cream of tartar, and kosher salt in a separate bowl.
- Slowly add the dry flour mixture to the wet ingredients and mix until the dough pulls away from the sides of the bowl.
- Using a 2-tablespoon scoop, drop dough balls onto the prepared baking sheets.
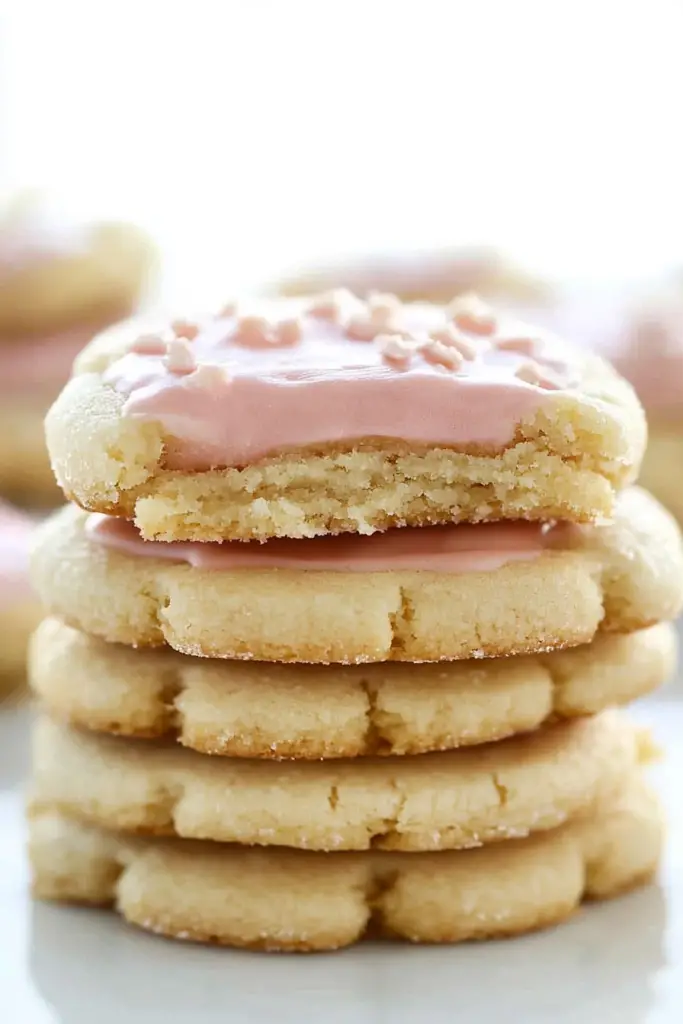
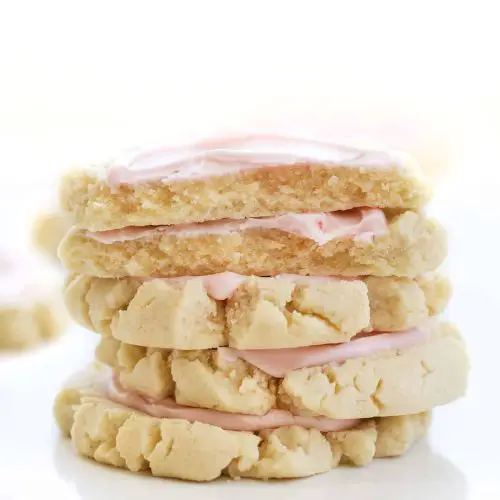
- Roll each dough ball smooth and round, then press each with the bottom of a wet glass dipped in granulated sugar, flattening the center slightly.
- Bake for 7 to 9 minutes until edges just start to brown and centers no longer appear wet. Remove and let cool.
- For the frosting, mix butter, sour cream, and salt in a clean bowl until fully combined.
- Gradually add confectioners' sugar about 0.5 cups at a time until the frosting reaches desired thickness.
- Add a few drops of red food coloring and mix until frosting turns a soft pink.
- Spread the pink frosting onto cooled cookies using an offset spatula or butter knife.


