


Oh, honey, let me tell you about these little wonders. You know how sometimes you just crave that perfect bite of something sweet, rich, and utterly satisfying, but the thought of baking a whole cheesecake just sends shivers down your spine? Yeah, I’ve been there! That’s precisely why I’ve fallen head over heels for these amazing What are some of the best cherry. They’re like all the best parts of a classic New York-style cheesecake, but miniaturized, made simpler, and packed with that bright, juicy burst of cherry. Honestly, they’re a lifesaver on busy nights when you need a dessert that feels fancy without any of the fuss. My kids ask for them all the time, and I swear, the smell alone as they bake brings everyone rushing to the kitchen. It’s a little like making brownies, where the simple act of mixing and baking transforms a few ingredients into pure joy, but with an elegant, creamy twist that truly elevates it. Get ready to find your new favorite go-to treat.
What Are Cherry Cheesecake Bites?
So, what exactly are these magical morsels I’m gushing about? Think of them as the cutest, most convenient cousins to a full-sized cherry cheesecake. Essentially, they’re individual servings of rich, creamy cheesecake, usually baked in a mini muffin tin or a regular muffin tin with liners, atop a buttery graham cracker crust, and crowned with a vibrant cherry topping. It’s essentially a deconstructed, bite-sized version of a beloved dessert. The name “bites” really captures it – they’re designed to be popped in your mouth, no plate or fork required, making them absolutely perfect for parties, potlucks, or just those moments when you want a little something sweet without committing to a huge slice. We’re talking about that dreamy texture – crisp crust, smooth, tangy Cream Cheese filling, and that sweet-tart burst from the cherries. They’re a real crowd-pleaser, and once you try them, you’ll see why they’ve earned a permanent spot in my recipe box.
Why you’
There are so many reasons why these particular What are some of the best cherry have become such a staple in my kitchen, and why I just know you’re going to adore them too! What I love most about this is how it balances incredible flavor with unbelievable simplicity. First off, the **flavor** is just out of this world. You get that irresistible tang from the Cream Cheese, perfectly balanced by the sweet, buttery crunch of the graham cracker crust, and then—BAM!—a burst of juicy, slightly tart cherries that just makes your taste buds sing. It’s truly a symphony in miniature. Then there’s the **simplicity**. Seriously, don’t let the word “cheesecake” intimidate you. We’re not dealing with water baths or springform pans here. We’re talking about mixing a few ingredients, spooning them into a muffin tin, and letting your oven do most of the heavy lifting. This one’s a lifesaver on busy nights when you’re craving something sweet at 10 pm but don’t want to bake a whole cake. Plus, the ingredients are pretty **cost-efficient**; nothing too fancy or hard to find, just pantry staples and a block of cream cheese! And the **versatility**? Oh, where do I begin! They’re fantastic for dessert, obviously, but they’re also amazing for brunch, a mid-afternoon pick-me-up with your coffee, or as a delightful contribution to any gathering. They’re much easier to transport than a full cheesecake, and who doesn’t love their own individual dessert? They’ve definitely got that “wow” factor without requiring hours in the kitchen, unlike a lot of those elaborate layered cakes. Trust me on this one, these little cherry cheesecake bites are a game changer.
How to Make Cherry Cheesecake Bites
Quick Overview
Making these delightful Cherry Cheesecake bites is genuinely simpler than you might imagine. We’ll start by whipping up a quick graham cracker crust – no rolling pins needed, just a little press work. Then, it’s all about creating that velvety smooth cheesecake filling, which comes together in minutes with just a mixer. After that, we’ll spoon the filling over our crusts, top with a spoonful of those beautiful cherries, and pop them in the oven. The magic happens as they bake into perfect, individual treats. The whole process is incredibly straightforward, perfect for a beginner baker, and the payoff is huge. You’ll be surprised at how professional these look and taste, with minimal effort!
Ingredients
Alright, let’s gather our treasures for these fantastic little bites!
For the Graham Cracker Crust:
- 1 ½ cups graham cracker crumbs (about 10-12 full sheets, finely crushed – I just blitz them in my food processor for a second)
- ¼ cup granulated sugar (just enough sweetness to balance the butter)
- 6 tablespoons unsalted butter, melted (make sure it’s good quality, it makes a difference!)
For the Creamy Cheesecake Filling:
- 2 (8-ounce) packages full-fat Cream Cheese, softened (this is non-negotiable for that classic texture, let it sit out for an hour!)
- ½ cup granulated sugar (for that perfect sweet-tang balance)
- 1 large egg, room temperature (helps with binding and richness)
- 1 teaspoon vanilla extract (use the good stuff, it really shines through)
- 1 tablespoon fresh lemon juice (my secret weapon for that bright, classic cheesecake tang!)
For the Cherry Topping:
- 1 (21-ounce) can cherry pie filling (the easiest way to get that gorgeous cherry pop! Feel free to pick one with whole cherries for extra flair)
Step-by-Step Instructions
Step 1: Preheat & Prep Pan
First things first, let’s get that oven ready. Preheat your oven to 350°F (175°C). While it’s warming up, line a 12-cup muffin pan with paper liners. This is super important – don’t skip the liners unless you’re using silicone molds, they make getting those delicate little cherry cheesecake bites out so much easier and cleaner! If you’re using mini muffin tins, you’ll need about 24 liners and will adjust baking time slightly.
Step 2: Prepare the Crust
In a medium bowl, combine your graham cracker crumbs, ¼ cup granulated sugar, and the melted butter. Mix it all together until it looks like wet sand. Now, spoon about a tablespoon of this mixture into the bottom of each prepared muffin liner. Use the back of a spoon or your fingertips to firmly press the crumbs down, creating an even layer. This is your foundation, so make sure it’s compact! I always do this when I want a sturdy base that won’t crumble when you bite into it.
Step 3: Make the Cheesecake Filling
Now for the star of the show! In a large bowl, using an electric mixer, beat the softened cream cheese until it’s wonderfully smooth and creamy. This is crucial for avoiding lumps, so really give it a good minute or two. Gradually add the ½ cup granulated sugar and continue beating until it’s fully incorporated and fluffy. Next, beat in the egg, vanilla extract, and lemon juice until just combined. Be careful not to overmix once the egg is in – we don’t want too much air here, as it can cause cracking. You want a luscious, smooth batter, not something whipped silly.
Step 4: Layer & Add Cherry Topping
Carefully spoon the cheesecake filling over your prepared graham cracker crusts, filling each liner about two-thirds full. You don’t want to overfill them, or they’ll spill over when baking. Now, for the delightful cherry topping! Take your can of cherry pie filling and spoon about a teaspoon to a tablespoon over the top of each cheesecake filling. You can swirl it in slightly with a toothpick if you like a marbled look, but I often just plop it right on top – it looks lovely either way and gets perfectly gooey as it bakes.
Step 5: Bake
Pop your muffin pan into the preheated oven. Bake for 18-22 minutes, or until the edges of the cheesecake bites are set and lightly golden, and the centers have just a slight jiggle to them when you gently shake the pan. Don’t worry if they puff up a little in the oven; they’ll settle down as they cool. My oven tends to run a little hot, so I usually start checking around the 18-minute mark. You want them cooked through but still gloriously creamy.
Step 6: Cool & Chill
Once baked, remove the pan from the oven and let the cherry cheesecake bites cool completely in the pan on a wire rack. This is an important step for preventing cracks. Once they’re at room temperature, transfer the pan to the refrigerator and chill for at least 2-3 hours, or even better, overnight. Chilling is key for them to firm up properly and achieve that quintessential cheesecake texture. Trust me, it’s worth the wait!
Step 7: Glaze (Optional) & Serve
Once fully chilled, gently lift the cherry cheesecake bites out of the muffin tin using the paper liners. If you want to get a little extra fancy, you can drizzle them with a simple vanilla glaze (powdered sugar, a touch of milk, and vanilla) just before serving, but honestly, they’re perfect as is! Arrange them on a pretty platter, and watch them disappear. They’re such a delightful single-serving treat, perfect for any gathering.
What to Serve It With
These glorious cherry cheesecake bites are so versatile, you can enjoy them in so many wonderful ways! They’re perfect for almost any occasion, and I’ve tried them with just about everything.
For Breakfast: Okay, maybe not *traditional* breakfast, but I’m a firm believer in a little indulgence to start the day. Pair one or two of these with a strong cup of black coffee or a smooth latte. The richness of the cheesecake and the tartness of the cherries are just divine with a warm morning brew. They’re also fantastic alongside a fresh fruit salad for a slightly lighter feel.
For Brunch: These bites shine at brunch! Arrange them elegantly on a tiered stand next to mimosas or a beautiful pitcher of iced tea. They look so sophisticated and festive without any extra effort on your part. They’re a wonderful sweet counterpoint to savory quiches or fluffy scrambled eggs.
As Dessert: This is where they truly belong, right? After a lovely dinner, these are just the ticket. They’re light enough not to feel too heavy, but rich enough to feel like a proper dessert. A dollop of fresh whipped cream or a tiny scoop of vanilla bean ice cream next to them would be absolutely heavenly. I also love to serve them with a glass of sparkling rosé; the bubbles really complement the cherry flavor.
For Cozy Snacks: This is my personal favorite. When the craving for something sweet hits mid-afternoon, or you’re curled up with a good book, one of these little cheesecake bites is pure bliss. They’re perfect with a cup of herbal tea or a hot chocolate. My kids actually ask for seconds and thirds when I make them, especially after school. They’re such a comforting little treat!
Top Tips for Perfecting Your Cherry Cheesecake Bites
I’ve made these cherry cheesecake bites countless times, and I’ve picked up a few tricks along the way. Here are my tried-and-true tips to make sure yours turn out absolutely perfect every single time:
Crust Prep: Don’t skimp on pressing that graham cracker crust down firmly! I learned this trick after years of making crumb crusts. A well-packed crust ensures it won’t fall apart when you pick up your cheesecake bite. You can use the bottom of a small glass or even your thumbs to really get it compressed. Also, if you’re short on graham crackers, digestive biscuits or even vanilla wafers can be a fun substitute, just adjust the sugar slightly if they’re sweeter.
Cheesecake Mixing Advice: The secret to a silky smooth cheesecake filling is softened cream cheese. I mean *really* soft, like room temperature for at least an hour or two. Cold cream cheese will give you lumps, and nobody wants that! Also, beat the cream cheese and sugar until light and fluffy *before* adding the egg. Once the egg goes in, mix only until just combined. Overmixing at this stage incorporates too much air, which can lead to cracks on top – and while cracks don’t affect taste, we want pretty bites, right?
Cherry Topping Tips: While canned cherry pie filling is incredibly convenient and tastes great, feel free to get creative! I’ve sometimes used fresh cherries cooked down with a little sugar and cornstarch for a homemade touch. You could also try different pie fillings – blueberry or raspberry cheesecake bites are also delicious! Just make sure the fruit topping isn’t too runny, or it might make your crust soggy. If it seems thin, a tiny pinch more cornstarch can thicken it up.
Ingredient Swaps: Want to play around? You totally can! For a lemonier kick, add a bit of lemon zest to the cheesecake filling. You could swap the vanilla extract for almond extract for a slightly different flavor profile. I’ve tested this with reduced-fat cream cheese, and while it works, I find the full-fat gives that unparalleled creamy texture and richness that we all love in a cheesecake. If you want to make them dairy-free, there are some great plant-based cream cheeses out there now, though the texture might vary slightly.
Baking Tips: Ovens are like snowflakes – no two are exactly alike. Keep an eye on your bites, especially during the last few minutes. You want the edges to be set and the very center to have a slight wiggle, not be completely liquid. If you notice them browning too quickly, you can loosely tent the pan with foil. And resist the urge to open the oven door too often!
Glaze Variations: A simple powdered sugar glaze (powdered sugar, a tiny splash of milk or lemon juice, and a drop of vanilla) is lovely, but you could also do a chocolate drizzle for a black forest vibe. Or, if you’re feeling extra, a sprinkle of toasted slivered almonds on top adds a nice textural contrast. Really, the sky’s the limit for making these cherry cheesecake bites uniquely yours!
Storing and Reheating Tips
Okay, so you’ve made these incredible cherry cheesecake bites, and if you’re lucky, there might be a few left over! Here’s how to keep them fresh and delicious:
Room Temperature: Honestly, these really aren’t a room temperature kind of treat due to the cream cheese. If they’re going to be out for a party, try not to leave them out for more than 2 hours. After that, they should really head to the fridge to maintain their texture and safety. You don’t want that beautiful cream cheese filling getting warm and soft!
Refrigerator Storage: This is the ideal spot for your cherry cheesecake bites. Pop them into an airtight container, layered with parchment paper if you need to stack them, and store them in the fridge. They’ll stay wonderfully fresh and creamy for up to 4-5 days. I actually think they taste even better the next day once all those flavors have had a chance to meld together.
Freezer Instructions: Yes, you can freeze these! This is fantastic for meal prepping desserts or having a stash for unexpected cravings. To freeze, place the fully chilled cheesecake bites (without any extra glaze, if you plan to add one later) on a baking sheet and freeze for about an hour until solid. Then, transfer them to a freezer-safe airtight container or a heavy-duty freezer bag. They’ll keep well for up to 1-2 months. When you’re ready to enjoy, simply thaw them overnight in the refrigerator. They’ll taste almost as good as fresh!
Glaze Timing Advice: If you’re planning on adding an optional glaze, I highly recommend doing it just before serving, especially if you’ve frozen them. Glaze can sometimes get a bit sticky or absorb moisture if stored for too long, either in the fridge or freezer. It’s a little touch that makes a big difference in presentation right when you’re about to dig in!
Frequently Asked Questions
Final Thoughts
Honestly, these cherry cheesecake bites are more than just a recipe; they’re a little piece of joy, a go-to treat that never, ever disappoints. They’ve become such a beloved staple in my family for their sheer simplicity and unbelievably delicious flavor. That creamy, tangy cheesecake, the buttery crunch of the crust, and the bright burst of cherries… it’s just perfection in every single bite. They truly embody that feeling of a fancy dessert without any of the stress. If you loved these, you might also enjoy exploring some of my other no-bake dessert recipes or even some of my fruit tart creations that offer similar refreshing flavors. I’m so excited for you to try these! Please, please let me know how they turn out in the comments below, or even better, share your own little variations. I can’t wait to hear how yours turn out! Happy baking (and enjoying)!
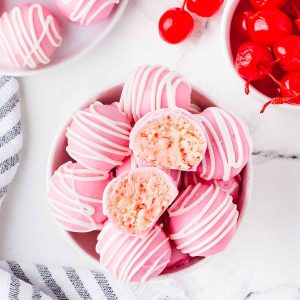
Cherry Chip Cheesecake Bites
Ingredients
Main Ingredients
- 15.25 ounce cherry chip cake mix box
- 8 ounce cream cheese softened
- 12 ounce bright pink candy wafer melts
- 4 ounce white almond bark
Instructions
Preparation Steps
- Before adding the cake mix, it is important to heat treat the dry cake mix. Pour the dry cake mix into a medium size heat-safe bowl. Microwave the cake mix in two 30-second intervals, stirring after each interval. Allow the cake mix to cool completely before mixing into the cream cheese.
- Using a medium size mixing bowl and a handheld mixer on medium-high speed, beat the cream cheese for 2 to 2.5 minutes, until completely smooth.
- Sprinkle the cooled, dry cake mix over the top of the cream cheese. Continue mixing just until well incorporated.
- Tightly cover the cream cheese mixture and chill in the refrigerator for 2 hours.
- Line a baking sheet with parchment paper and set it aside.
- Using a 1 tablespoon cookie scoop, scoop the cheesecake dough. Roll the dough into a ball and set on the prepared baking sheet. Repeat the steps.
- Using a heat-safe medium size mixing bowl, microwave the candy wafer melts in 30-second intervals, stirring well after each interval until completely smooth.
- Roll the cheesecake bites in the melted candy wafers. Place the coated cheesecake bites in a firm and gently tap any excess coating off. You can use a spoon to pour the coating over any bare spots on the cheesecake bites. Use a toothpick to remove excess coating from the bottom of the fork and then to gently push the ball onto the prepared baking sheet.
- Using a small heat-safe mixing bowl, microwave the white almond bark in 30-second intervals, stirring well after each interval.
- Using a spoon or small candy dipper, drizzle thin ribbons of the melted almond bark over the coated cheesecake bites.
- Once all the cheesecake bites are coated and drizzled, return the bites to the refrigerator until ready to serve.


