


There’s something about biting into a juicy, crisp apple coated in warm, luscious caramel that just takes me right back to childhood fairs and those magical autumn afternoons. The smell alone—the buttery caramel blending with fresh orchard apples—always draws my kids running to the kitchen in no time. I honestly think caramel apples are like the cozy cousin of cupcakes; they’re sweet, comforting, but with that fresh fruit crispness that keeps it from feeling too heavy. If you’re someone who loves that nostalgic treat but thinks making them is a hassle, hang tight. I’ve got a recipe that’s surprisingly simple, and feels like a little celebration every time you take a bite. Plus, you can dress them up however you like—nuts, sprinkles, chocolate drizzle—you name it. This caramel apples recipe is hands down one of my family’s favorites for fall, and I couldn’t wait to share it with you.
What is caramel apple?
Think of caramel apples as the classic snack where fresh apples are dipped in a warm, gooey caramel coating that hardens ever so slightly, forming this irresistibly chewy shell. It’s essentially a beautiful marriage of tart and sweet, crunchy and sticky. The tradition actually dates back to the early 1900s when caramel candies became widely popular and folks started dipping apples as a seasonal treat, especially around Halloween and autumn festivals. What I love most about caramel apples is that they’re super approachable—you don’t need fancy ingredients or equipment, just a bit of patience and, honestly, a love for that fun sticky mess in the kitchen. Plus, they’re a perfect way to dress up ordinary apples into something truly special that your whole family will adore.
Why you’ll love this recipe?
The magic of caramel apples isn’t just in the taste, it’s how effortlessly they turn a simple apple into a party. What I adore most about this recipe is how it nails that perfect caramel texture—rich and buttery enough to feel indulgent, yet not so thick that it overwhelms the apple’s bright freshness. You don’t need to be a caramel expert or have a candy thermometer for this one, which is a huge relief. The ingredients are pantry staples, so you won’t have to hunt for anything fancy or expensive either. It’s really a win-win for busy families because you can whip these up in less than 30 minutes, and they disappear almost as fast as you make them! Plus, this recipe lets you play around with toppings—crushed nuts, chocolate shavings, sea salt… whatever your heart desires. I’ve made this countless times, and it never fails to bring smiles around the table. Honestly, making caramel apples has become a bit of a tradition for us every fall, and it’s a sweet way to get my kids involved in the kitchen without the mess of baking a whole pie or cake.
How do you make caramel apples?
Quick Overview
Here’s the gist: you’ll start by prepping your apples to make sure the caramel sticks just right. Then, you’ll gently melt the caramel in a pan with a splash of cream (or milk if you want a lighter touch) to get that dreamy, pourable texture. After dipping each apple, a quick roll in your favorite toppings is totally optional but oh-so-worth-it. What’s cool is how straightforward this method is—I promise it’s less sticky mess than you might expect, especially if you prep your workspace well. It’s one of those recipes where the simple acts—stirring, dipping, twirling—are almost therapeutic, and the end result feels like a celebration.
Ingredients
For the Apples: What are the best apples?
- 6 medium-sized apples (I love using Granny Smith for their tartness or Honeycrisp for a sweeter bite—just avoid super soft apples)
- Wooden sticks or skewers (make sure they’re sturdy enough to hold the apple)
For the Caramel Coating:
- 1 cup unsalted butter (real butter makes all the difference here)
- 2 cups light brown sugar, packed
- 1/2 cup heavy cream (for richness, but you can substitute with whole milk or almond milk if you want a lighter caramel—I tested almond milk once and it gave a lovely creamy twist!)
- 1/4 cup light corn syrup (helps keep the caramel smooth and glossy)
- 1 teaspoon vanilla extract (adds warmth and depth)
- 1/4 teaspoon salt (balances the sweetness)
Optional Toppings:
- Chopped toasted pecans or walnuts
- Rainbow sprinkles
- Crushed pretzels for a salty crunch
- Sea salt flakes for that perfect sweet-salty combo
- Drizzled melted dark or white chocolate
Step-by-Step Instructions
Step 1: Prep Your Apples & Workspace
Wash and thoroughly dry your apples—the dry part is key because any water will make the caramel slide off. I always stick mine with sturdy wooden skewers right into the top (where the stem is), angling just a little for a comfy grip. Line a baking sheet with parchment paper or a silicone mat to place your dipped apples on.
Step 2: Melt the Butter
In a large, heavy-bottomed saucepan, melt the butter over medium heat. Once melted, add the brown sugar, corn syrup, and salt. Stir constantly—it smells like heaven already. This stage is where patience pays off because you’re slowly coaxing the sugar to dissolve and meld with the butter without letting it burn.
Step 3: Bring the Caramel to the Right Temperature
Keep cooking and stirring until the mixture starts to bubble and turns a deep golden caramel color, which usually takes about 5 to 7 minutes. You want it thick enough to coat but still pourable. If you have a candy thermometer, aim for around 245°F (soft-ball stage). If not, a quick test: drop a spoonful in cold water and see if it forms a soft, pliable ball.
Step 4: Stir in the Cream and Vanilla
Remove the pan from heat and carefully stir in the cream and vanilla extract. This causes the caramel to bubble up, so take your time and stir gently until smooth and luscious.
Step 5: Dip the Apples
Holding an apple by its stick,immerse it into the caramel, swirling to cover evenly. Let excess caramel drip off before placing it on your prepared sheet. This is where I like to really enjoy the moment—it feels like magic as the shiny caramel hugs the apple.
Step 6: Add Your Favorite Toppings
While the caramel is still tacky, roll or sprinkle your chosen toppings. I swear by toasted nuts for that extra flavor boost, but my kids are all about the color from sprinkles!
Step 7: Let Them Set
Allow the caramel to cool and firm up at room temperature for at least 30 minutes. If you’re in a hurry, pop them in the fridge for 10–15 minutes, but I prefer that caramel gets to its natural chewy perfection.
Step 8: Serve & Enjoy
These caramel apples are best enjoyed fresh—the contrast between cool apple and warm caramel is dreamy. Slice or bite right into them for that perfect sweet-and-tart punch.
What to Serve It With
For Breakfast: Ever tried a caramel apple with a steaming cup of cinnamon-spiced coffee or chai? It’s like a little morning treat that feels indulgent but still fresh. Slice the apples thin and lay them alongside a bowl of spiced oatmeal or Greek yogurt drizzled with honey.
For Brunch: If you’re hosting a fall brunch, whole caramel apples can bring a fun centerpiece to your fruit platters. Pair with sparkling apple cider and some nutty pastries to keep the vibe seasonal and light.
As Dessert: My family loves serving caramel apples warmed slightly and topped with a scoop of vanilla ice cream for an easy, no-fuss dessert. Add a drizzle of chocolate sauce or crushed toffee bits, and you’ve got a crowd-pleaser.
For Cozy Snacks: These also shine as a quick sugar fix while curled up with a book or after school when the kids come bursting through the door. Pair with warm spiced tea or hot chocolate for maximum coziness.
Honestly, making caramel apples has become our go-to for autumn evenings. It’s such a simple way to bring everyone together, and the variations mean you can keep reinventing it year after year. Plus, it feels a bit like holding a sweet, shiny treasure in your hands.
Top Tips for Perfecting Your Caramel Apples
Apple Prep: Always dry your apples thoroughly. I learned this the hard way once when my caramel slid right off—such a sad moment! Also, removing the wax coating with a quick vinegar wash helps the caramel stick better.
Caramel Consistency: Don’t rush the caramel cooking step. Stir patiently and keep heat moderate to avoid burning. If it gets too thick before dipping, you can gently warm it back up just a bit.
Dipping Technique: Dip slowly and gently swirl to ensure an even coat. Too quick, and you might get patchy coverage; too slow, and the caramel can cool and harden prematurely.
Addictive Toppings: Salted nuts or a sprinkle of flaky sea salt are my secret weapons. They balance the sweetness perfectly and add a delightful crunch. Also, try drizzling a bit of melted dark chocolate after the caramel sets for an elegant touch.
Ingredient Swaps: I’ve swapped heavy cream for almond milk or oat milk during a dairy-free phase, and it still yielded super creamy caramel but with a slightly nuttier flavor. For a vegan twist, try using coconut oil instead of butter and coconut milk instead of cream—results vary, but it’s a fun experiment.
Baking Tips: While you aren’t baking the apples themselves here, I’ve found chilling your caramel apples on a wire rack above parchment helps prevent sogginess on the bottom. Keep them in a cool area away from direct sunlight to maintain the sheen and texture.
Glaze Variations: Feeling adventurous? Roll your caramel apples in crushed Oreos, toasted coconut flakes, or even a dusting of cinnamon sugar right after dipping. I once had a batch with chili powder sprinkled on top for a subtle kick that was unforgettable.
Over the years, these little tricks have turned what used to be a messy, stress-filled attempt into a joyous kitchen ritual. Trust me, once you nail this method, your caramel apples will be the highlight of every fall gathering.
Storing and Reheating Tips
Room Temperature: Store your caramel apples in a cool, dry place for up to two days. Keep them on parchment-lined trays, not touching each other so the caramel doesn’t stick together.
Refrigerator Storage: Place apples in airtight containers lined with parchment paper to avoid moisture buildup. They’ll last up to 5 days this way, though I find the caramel can firm up a little too much, so let them come to room temp before eating.
Freezer Instructions: Freezing caramel apples isn’t usually my go-to, but you can wrap each apple individually in plastic wrap and then foil, freezing up to 2 months. Thaw overnight in the fridge and let sit at room temp before enjoying.
Glaze Timing Advice: If you plan to store longer or refrigerate, hold off adding any extra toppings or drizzles until just before serving for best texture and shine. I once glazed too early, and the drizzle lost its luster and softened more than I liked.
Frequently Asked Questions
Final Thoughts
Caramel apples have this magical way of turning an everyday fruit into a celebration, a burst of nostalgia, and a little sweet escape all at once. Whether it’s the first crisp bite of autumn or a last-minute crowd-pleaser, this recipe is comforting, fun, and endlessly customizable. I hope you’ll enjoy making these as much as my family and I have—it’s one of those recipes that’s worth mastering for the smiles and memories it creates. If you feel inspired, try pairing it with some homemade hot cocoa or even chocolate-dipped apples next time! Please share your own twists or topping ideas in the comments—I can’t wait to hear how yours turns out. Happy caramel apple adventures!

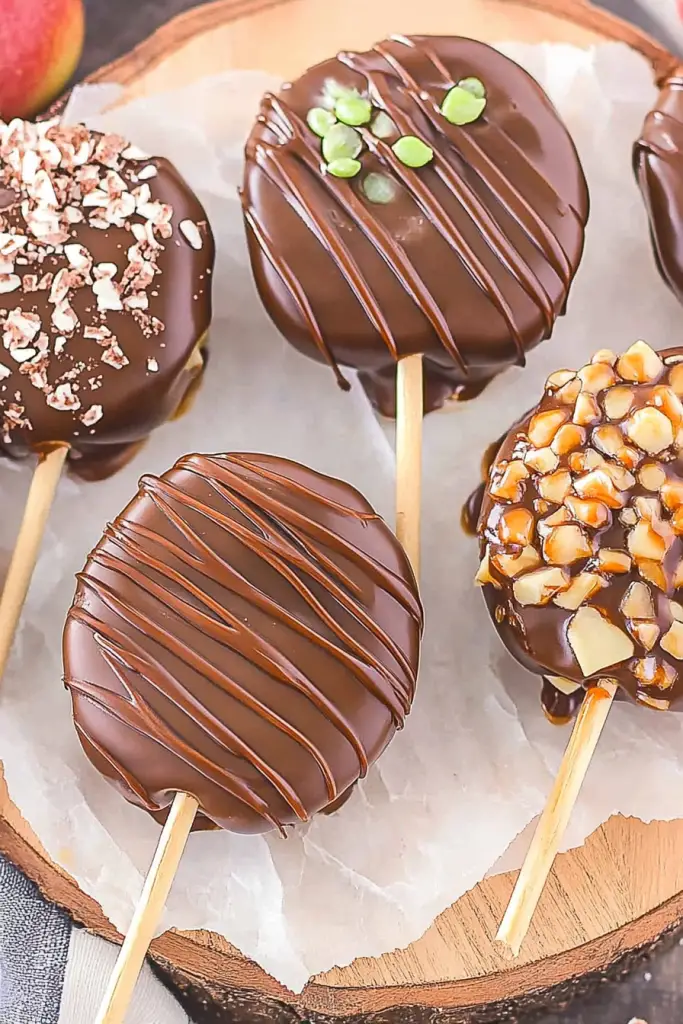
caramel apples
Ingredients
Main Ingredients
- 2 pieces Granny Smith apples
- 2 cups dark chocolate chips divided
- 1 cup caramel squares
- 1 teaspoon water
- optional toppings Mini chocolate chips, M&Ms, sprinkles, crushed Oreos, chopped nuts, melted white chocolate
Instructions
Preparation Steps
- Prepare one or two large baking sheets by lining them with parchment paper.
- Slice the apples into full slices about 0.25 inches thick. Insert a candy sucker stick into the bottom of each slice. You may need to make a small hole with a knife to help insert the stick. Place slices on a paper towel.
- Place another paper towel on top of the apple slices and pat them dry.
- In a microwave-safe bowl, place 1 cup of dark chocolate chips and heat for 30 seconds in the microwave.
- Stir the chocolate chips and continue microwaving in 10 to 15 second increments, stirring in between, until fully melted.
- Dry the apple slices again with a paper towel, then dip each slice fully into the melted chocolate, coating slightly below the stick base. Alternatively, spoon chocolate over slices to fully cover. Avoid leaving exposed apple to ensure chocolate sticks properly.
- Scrape off excess chocolate gently and place coated slices on the prepared baking sheet to set.
- Repeat coating for all slices. When chocolate runs out, melt the remaining chocolate chips and continue dipping.
- In a separate microwave-safe bowl, place caramel squares and water, heat for 30 seconds.
- Stir the caramel and water, microwaving in 10 to 15 second increments if needed, until smooth and melted.
- Use a spoon or fork to drizzle the caramel over the chocolate-coated apple slices in any pattern you like.
- Immediately add any optional toppings over caramel. Refrigerate slices for 15 to 30 minutes until set.


