


On hot summer evenings I’m drawn to the bright, sun-warmed berries on the kitchen table, and this is the moment my heart says: let’s make something that tastes like sunshine. These strawberry treats come together faster than you can say “count me in,” and every bite carries the memory of just-picked fruit and a lullaby-like breeze through the screen door. I used to think desserts had to be glamorous and fussy, but these strawberry treats are proof that simple can be wildly delicious. Think of them as a kiss of cheesecake, a ribbon of cake, and a splash of berry glaze all in one bite. They’re the kind of dessert my kids beg for after dinner, and they disappear in minutes at my house—which, in my book, is the ultimate compliment. If you’ve got a busy week ahead, this recipe is a lifesaver on busy nights because you can mix, bake, and glaze in one go, and you’ll still have the energy to chat with the people you love at the table. And yes, the strawberry flavor is the star—bright, fresh, and just a little tart, like a spark that wakes up the entire kitchen.
What are strawberry treats?
Strawberry Treats are a playful, layered dessert that wears a cake-like batter on the bottom, a creamy strawberry-filled ribbon in the middle, and a glossy strawberry glaze on top. It’s essentially a semi-sweet vanilla batter baked into a sheet-pan form, swirled with a tangy-smooth Cream Cheese filling that’s flecked with strawberry puree, and finished with a glaze that tastes like summer in a spoon. The name is simple on purpose because it’s exactly what these bites are: treats that celebrate strawberries in every sense. Think of them as a grown-up bar that kids can reach for with no guilt—soft, sliceable, and dolloped with a glaze that makes the entire kitchen smell like a strawberry market. I love that this recipe is flexible: you can cut it into squares for a crowd, or layer it into muffin cups for portable strawberry treats for school lunches or picnics. It’s basically strawberry bliss you can share with friends and family in a way that feels effortless and comforting.
Why you’ll love this recipe?
What I love most about these strawberry treats is how the flavors play together. The batter is tender and lightly sweet, a perfect canvas for the lush, creamy filling that tastes like whipped cheesecake with a bright strawberry punch. The glaze ties everything together with a delicate sheen and a hint of fruitiness that makes the surface glisten. This combination gives you a dessert that feels indulgent yet approachable—the kind of recipe you want to keep in your back pocket for casual gatherings, potlucks, or a quick weekday treat. It’s also surprisingly forgiving: you can swap in plain yogurt for some of the milk, or use a mixture of strawberries if you have a few extra berries on hand. Budget-wise, it’s friendly, especially when berries are in season and priced right. If you’ve ever compared these strawberry treats to a more dramatic cake, you’ll find the resemblance is more about mood and texture than complexity; what you get is a big, comforting bite that tastes like a celebration, but only takes a fraction of the time to assemble. My kids actually ask for seconds, and that’s the most honest compliment I can imagine for a recipe that feels like a favorite family tradition.
How do you make strawberry treats?
Quick Overview
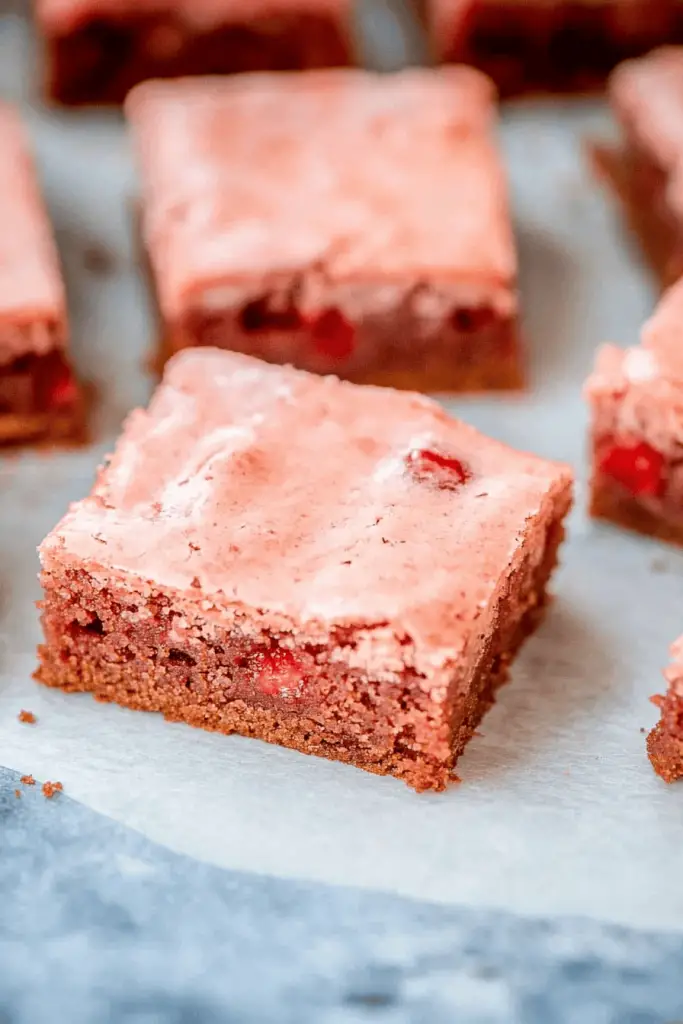
Here’s the quick read: whisk together a fluffy vanilla batter, pour it into a lined pan, dollop a Strawberry Cream Cheese filling across the surface, swirl to create pretty ribbons, then bake until the edges are lightly golden and the center is just set. Once cooled, whisk a glossy strawberry glaze and shower it over the top. The result is a tray of bite-sized strawberry treats that feel fancy enough for friends but simple enough for a weeknight. The beauty is in layering: the bottom cake-like layer gives structure, the creamy middle adds richness, and the glaze on top delivers a pop of bright strawberry flavor in every bite. And since you’ll be slicing these into squares, you get the perfect little mouthful every time—no fuss, just strawberry joy.
Ingredients
For the Main Batter:
– 2 cups all-purpose flour (or 1 3/4 cups plus 1/4 cup almond flour for a nuttier note)
– 1 1/2 cups granulated sugar
– 2 teaspoons baking powder
– 1/2 teaspoon salt
– 1 cup whole milk
– 2 large eggs
– 1/2 cup unsalted butter, melted
– 2 teaspoons vanilla extract
For the Filling:
– 8 ounces Cream Cheese, softened
– 1/2 cup powdered sugar
– 1 teaspoon vanilla extract
– 1/2 cup strawberry puree or finely chopped strawberries
For the Glaze:
– 1 cup powdered sugar
– 2–3 tablespoons milk or cream (adjust for desired consistency)
– 1–2 teaspoons strawberry puree (optional, for extra color and flavor)
– A tiny pinch of salt to balance sweetness
Step-by-Step Instructions
Step 1: Preheat & Prep Pan
Preheat your oven to 350°F (175°C). Line a 9×13-inch pan with parchment paper, letting the edges overhang a bit for easy lift-out. A little butter or nonstick spray on the paper helps prevent sticking. This is the moment you’ll think, “I’ve got this,” which is exactly how you should feel when you’re making strawberry treats for the first time or the hundredth time—confident and a little giddy about the berries.
Step 2: Mix Dry Ingredients
In a medium bowl, whisk together the flour, baking powder, and salt. I’ve learned the hard way that sifting is optional but a quick whisk makes the batter lighter. If I’m in a hurry, I just whisk until the lumps vanish and the flour looks pale and airy. This step matters because it sets the cake-like foundation for the rest of the layers. The moment the dry mix meets the wet, you’ll start to smell that comforting batter aroma, and you’ll know you’re on the right track.
Step 3: Mix Wet Ingredients
In a separate bowl, whisk the milk, eggs, melted butter, and vanilla until smooth. A quick tip I swear by: temper the milk with a splash of the warm melted butter to avoid curdling the eggs. You’ll end up with a silkier batter, and it makes a noticeable difference in texture. If you forget to melt the butter first, don’t panic—just whisk vigorously until everything looks cohesive and glossy.
Step 4: Combine
Pour the wet ingredients into the dry and stir just until combined. A few small lumps are totally fine—that’s how you keep the batter tender. Overmixing here can make the base a touch tougher, and these strawberry treats should stay soft and cake-like rather than dense. If your batter looks a little thick, don’t stress; a splash more milk will bring it to a nice, pourable consistency.
Step 5: Prepare Filling
In a separate bowl, beat the Cream Cheese with the powdered sugar and vanilla until smooth. Stir in the strawberry puree or chopped berries so you get little pockets of strawberry brightness in every bite. I love using a handheld mixer here because it aerates the filling nicely, but a sturdy whisk works just as well if you’re patient. If you’re feeling extra fancy, fold in a tablespoon of lemon juice to brighten the filling even more—it’s a little trick I borrowed from a cheesecake method I adore. The goal is a luscious, slightly tangy center that contrasts with the sweetness of the batter.
Step 6: Layer & Swirl
Spread the main batter evenly in the prepared pan. Drop spoonfuls of the filling across the surface and use a knife or skewer to swirl it gently into the batter. You’re aiming for ribbons of filling peeking through like marbled ice cream, not a uniform layer. The swirl technique is where these strawberry treats become “wow” rather than just a cake-with-filling experiment. If you want more creaminess in every bite, add an extra dollop of filling and swirl a little deeper, but be mindful not to sink all the filling—some peek-through keeps it pretty.
Step 7: Bake
Bake for 25–30 minutes, or until a toothpick inserted into the center comes out with a few moist crumbs. The edges should be lightly golden and the center just set. Oven temps vary, so I always rotate the pan halfway through to ensure even baking. If the top starts to brown too quickly, cover loosely with a sheet of foil for the last 5–7 minutes. Your kitchen will start to smell like a strawberry festival, and that aroma is the best timer you’ll ever have for this recipe.
Step 8: Cool & Glaze
Let the pan cool completely on a rack before glazing. This is the hardest part for me—waiting is not my strong suit—but the glaze sets best when the surface remains unshifted by heat. For the glaze, whisk together powdered sugar, milk, and strawberry puree until smooth and pourable. If you want a thicker glaze, add more powdered sugar; for a pourable, glossy coating, thin with a touch more milk. Drizzle it over the entire surface, watching the glaze pool into the swirls you made earlier. The glaze is where the final kiss of strawberry flavor happens; it should be slightly sweet, not cloying, and it should gleam like a promise of more strawberry treats to come.
Step 9: Slice & Serve
Once the glaze is set, use the parchment overhang to lift the entire slab from the pan, then cut into squares or bars. A sharp serrated knife helps keep the edges neat. I love cleaning each corner first, then working from the center out so the presentation stays pretty. Serve with a dollop of whipped cream or a few fresh strawberry slices for color. You’ll notice how each bite balances the vanilla cake, the creamy strawberry center, and the bright glaze—these strawberry treats are built to make mouths happy and conversation easy.
What to Serve It With
These strawberry treats are friendly for a variety of occasions, and they pair beautifully with different accompaniments depending on the moment.
For Breakfast: Serve with a strong cup of coffee or a glass of cold milk. They’re a gentle way to start the day when you want something a touch fancy but still comforting. A few fresh berries on the side and a dusting of powdered sugar can elevate your morning plate without feeling like a dessert trap.
For Brunch: Plate them on a wooden board with a few herb sprigs (like mint or basil) and a splash of lemon zest. A small pitcher of vanilla yogurt or a light citrus shrub makes the whole spread feel cohesive and refreshing.
As Dessert: A simple scoop of vanilla bean ice cream or lightly whipped cream completes the ensemble. A mint leaf and a strawberry half on top make for a glam presentation that feels effortless. I often drizzle a touch more glaze on the plate—it’s not too sweet and it visually screams strawberry treats.
For Cozy Snacks: Pair with a hot cup of tea or a mug of cocoa on chilly evenings. The soft cake texture and creamy center are the perfect antidote to a long day, and the familiar strawberry aroma is like a warm hug from the kitchen.
In our family, we’ve always served a big batch of something berry-bright at gatherings. These strawberry treats carry forward that tradition—a simple tray that invites people to gather, chat, and dunk their forks into the same shared joy. It’s a recipe that travels well: cut them small for a casual party, or go a little larger for a centerpiece that doubles as dessert and sharable snack. My sister loves them with a splash of orange zest in the glaze; I adore the classic version, which keeps the strawberry flavor front and center. No matter how you serve them, these strawberry treats always spark a smile and a “thank you” before the last bite disappears.
Top Tips for Perfecting Your Strawberry Treats
Here are some practical tips I’ve gathered after making these strawberry treats countless times. They’re small adjustments that elevate the final bite and make the process smoother, especially when you’re juggling kids, work, and life in general.
Zucchini Prep: I know this sounds odd, but humor me here. The technique behind zucchini prep translates surprisingly well to berry moisture management. Pat your berries dry before folding them into the filling if you’re using fresh berries in the middle layer. Excess moisture can make the filling runny or the batter seem a touch too loose. Pat, not rinse—dry berries hold shape and color better, and you’ll see a prettier marbling in the final bake.
Mixing Advice: Don’t overmix the batter once you combine wet and dry ingredients. Stir until just combined, then stop. The goal is a tender, cake-like crumb that’s soft rather than chewy. If you overwork the batter, you’ll end up with a tougher bite that fights against the creamy middle. The filling should be smooth and not grainy; if you notice lumps in the filling, give it a quick beat with a mixer, then finish by hand to keep it silky.
Swirl Customization: The swirl pattern is a fun place to play. For a marble look, alternate spoonfuls of batter and filling, then drag a skewer from top to bottom and side to side in slow, deliberate passes. You’ll get pretty lines that appear like little strawberry fossils—adorable and appetizing. If you want a more pronounced swirl, use a slightly thicker filling and a thinner batter, so the contrast is more visible after baking.
Ingredient Swaps: You can swap in Greek yogurt for part of the milk for extra tang and richness, or use half-and-half for a creamier texture in the glaze. If you’re dairy-free, try a coconut cream glaze and dairy-free cream cheese alternative for the filling. For sweetness control, reduce sugar in the batter by 1/4 cup and compensate with a touch more vanilla. I’ve even experimented with a touch of citrus zest (orange or lemon) in the glaze for a brighter finish. The key is to adjust by small amounts and taste as you go.
Baking Tips: Organization saves time. Have your filling ready, glaze mixed, and the pan lined before you start measuring. Use an oven thermometer to ensure your oven runs true; a few degrees off can mean uneven baking. If the top browns too quickly, tent with foil to let the center finish without scorching the outside. Don’t skip the cooling step before glazing—the glaze will set nicer and won’t slide off if the surface is still slightly warm but not hot.
Glaze Variations: The glaze is a nice place to personalize. A splash of lemon juice or orange zest can brighten the berry flavor. If you want a deeper color, add a touch more strawberry puree; if you prefer a lighter glaze, reduce the sugar slightly and add another teaspoon of milk. For a white chocolate twist, swirl in a tiny amount of melted white chocolate to the glaze while it’s warm and glossy. It’s a surprising pairing that still keeps strawberry treats at the center of the plate.
Lessons learned: bake with confidence, but stay flexible. The best strawberry treats happen when you’re tuned in to the batter’s consistency and the filling’s creaminess. If you’re in a rush, you can use a boxed vanilla cake mix as the base, but I find that this homemade approach yields a more balanced texture and a warmer family-friendly flavor. The joy is in the little details—an extra kiss of vanilla here, a touch more strawberry puree there—and that’s how these strawberry treats become beloved, not just another dessert.
Storing and Reheating Tips
Storage decisions can change the texture and flavor of strawberry treats, so here’s how I handle them after they’ve cooled and the glaze has set.
Room Temperature: If your kitchen stays cool, you can keep these sliced strawberry treats covered loosely at room temperature for up to 2 days. They’ll stay tender and the glaze stays bright. Just keep them away from direct sunlight and heat; you don’t want the glaze to slip or the filling to soften too much.
Refrigerator Storage: For longer life, store in an airtight container in the fridge for up to 4 days. The cake base will stay moist, and the filling will maintain its creaminess, especially if you don’t glaze until serving. If you plan to reheat, slices can be warmed gently in the microwave for 15–20 seconds or in a low oven to re-soften the cake without drying it out.
Freezer Instructions: You can freeze baked slices, well wrapped, for up to 2–3 months. Thaw in the fridge overnight and bring to room temperature before glazing if using the glaze already applied. If you’re freezing, you can also freeze unglazed chunks and glaze them after thawing for the freshest taste and texture. For best results, glaze after thawing, since freezing can alter glaze adhesion.
Glaze Timing Advice: If you’re freezing the treats, it’s often best to glaze just before serving for the sharpest, freshest strawberry look. If you’re refrigerating the whole tray, you can glaze on day 1 and store the glazed tray; the glaze will stay intact, but it’s nicer to glaze closer to serving for maximum gloss and brightness.
Frequently Asked Questions
Final Thoughts
Strawberry treats aren’t just dessert; they’re a little celebration you can tuck into a weeknight or a weekend gathering. They’re forgiving, flexible, and most of all, they taste like sunshine and home. The combination of a gently sweet batter, a creamy strawberry-filled center, and a glossy glaze gives you something that feels special without taking hours to assemble. These strawberry treats are a reminder that the best things in life aren’t always the loudest or the flashiest—they’re the things you reach for again and again because they make people smile. If you’re new to this recipe, give it a try with one tray first and adjust from there depending on your oven and your berries. If you’ve got a favorite trick or swap, I’d love to hear it in the comments—your tweaks might become someone else’s new favorite version. Happy baking, friend, and may your kitchen be filled with the scent of strawberry, vanilla, and joy. Can’t wait to hear how yours turns out!
Would you like to try another strawberry-inspired treat next time? If you loved the strawberry swirl idea, you might also enjoy my Easy Strawberry Yogurt Parfait or the Cheery Strawberry Shortcake Bars—both keep that same bright fruit energy but offer a different texture playground to explore. In any case, I’m cheering you on from my kitchen to yours. Enjoy every bite and savor the way the flavors bloom with every square you plate. And if you have a little one who’s a picky eater, these strawberry treats are a playful way to introduce more fruit into their day without making mealtime feel like a battle. Share your results in the comments and tell me which topping or glaze you went for—the possibilities are deliciously endless. Happy baking!
Note: If you enjoyed this strawberry treats recipe, consider saving it to your favorites or pinning it for later. It’s the kind of dessert that tastes even better the next day once the flavors have had a chance to mingle, and it’s perfect for sharing with friends who love a little indulgence with a bright, fruity twist.
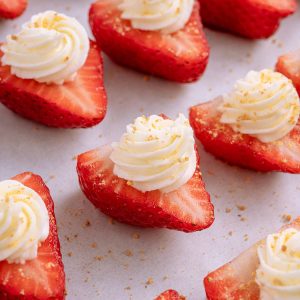
Strawberry Cheesecake Bites
Ingredients
Main Ingredients
- 18 medium size fresh strawberries
- 0.33 cup cold heavy cream
- 0.5 teaspoon pure vanilla extract
- 4 ounces cream cheese softened
- 0.25 cup sour cream room temperature
- 0.5 cup powdered sugar sifted
- 2 tablespoons finely crushed graham cracker crumbs garnish
Instructions
Preparation Steps
- Line a baking sheet with parchment paper.
- Wash, dry and cap the strawberries.
- Slice the strawberries in half horizontally.
- Carefully scoop the very center of the strawberry out. (You only need to scoop enough out so the cream cheese filling stays put)
- Flip the strawberry over and carefully slice a thin bit off the bottom to keep the strawberry level.
- Add the cold heavy cream and vanilla extract to a medium size mixing bowl, and use a handheld mixer on high speed to whip the heavy cream to stiff peaks.
- Cover tightly with plastic wrap and chill while you prepare the cream cheese mixture.
- Add the softened cream cheese and sour cream to a medium size mixing bowl. Use a handheld mixer on medium speed to beat the cream cheese and sour cream until well combined.
- Lower the mixer speed to low and add the powdered sugar. Increase the speed to medium and beat just until the powdered sugar is well incorporated and there are no visible lumps.
- Remove the whipped cream from the refrigerator and gently fold the whipped cream into the cream cheese mixture.
- Fill either a piping bag fitted with a star or open star decorating tip, or a quart size ziplock bag with a small corner snipped off. Pipe the cream cheese filling into the hollowed center of the strawberry.
- Sprinkle a small amount of the finely crushed graham cracker crumbs over the cream cheese filling. Keep refrigerated until ready to serve.


